| Table of Contents |
|---|
Introduction
Let's begin by writing a very simple graph to get acquainted with directed graph. To follow this tutorial you need to already have you Ubuntu VM setup with SLI. The tutorial to do this is at Install Oracle VM and Ubuntu. (fill in link)have access to an SDNC controller which can be an ONAP SDNC virtual machine with the containers for the controller and dgbuilder.
This graph will use SLI-API execute , if this hasn't been installed yet install it now by following SLI-API:execute-graph#API:execute-graph-InstallingSLI-API (fill in link)which is installed by default by the ONAP SDNC installation scripts.
SLI-API is being used because it allows rapid prototyping of directed graphs without all of the setup required by an MD-SAL project.
You must also can either use the dgbuilder application on your running SDNC controller or install directed graph , the tutorial to do this is at Install builder on your local VM. The tutorial for local install is at Install Directed Graph Builder on Ubuntu Desktop#InstallationInstructions. (fill in link)Desktop
You should be familiar with calling REST APIs with a JSON payload. Postman is a popular and features a GUI. Command line options like curl are fine as well.
...
Open your browser and go to your directed graph instance. The default should be http://localhost:3100/# you can check the console you started dgbuilder in to confirm the URL.Your initial sheet will be blank. On the left hand side of the screen is a palette of nodes.

ONAP SDNC controller virtual machine the dgbuilder docker container is on port 3000 (e.g. http://10.0.7.1:3000/# or http://[sdnc_vm_public_id]:3000/#)
Your initial sheet will be blank. On the left hand side of the screen is a palette of nodes.
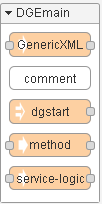
Left click and drag dgstart into the blank page. Do the same for service-logic and then method.
...
service-logic is used to uniquely identify a graph. Double left click on this node and a dialog window will appear.

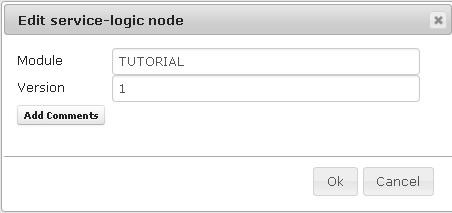
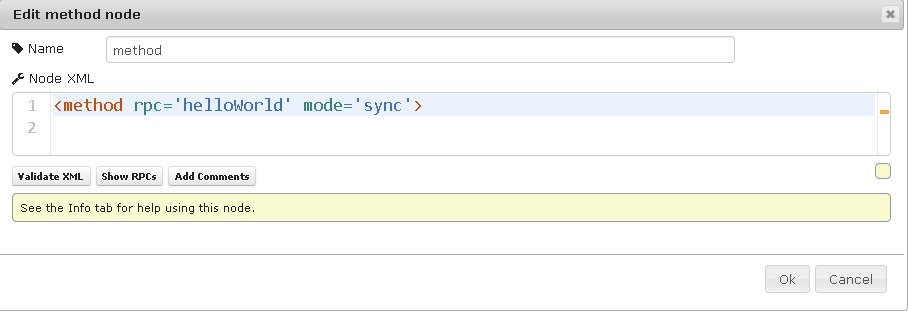
For module fill in TUTORIAL in all caps. For version simply put down 1 and then click Ok. Now double click on the method node.
By deffault it will have rpc='', click between the single quotes and type in helloWorld like in the screen shot below then click Ok.

Your First Graph
...
Connect dgstart to service-logic, service-logic to method, and method to record. Your screen should look similar to the screenshot below.


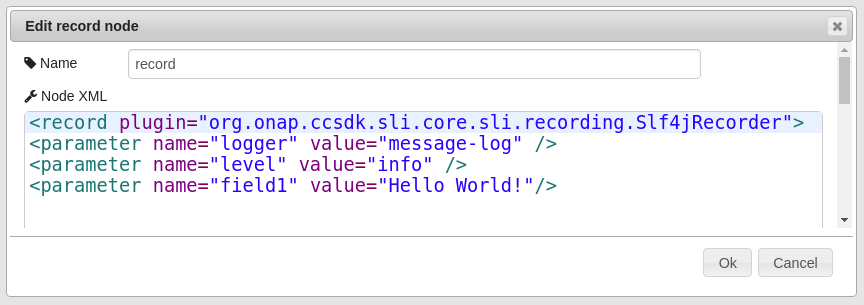
Double click on the record node. By default the node will just have the tag <record>. Highlight and delete this tag. Copy the below XML onto your clipboard and then paste it into your node then click ok.
| Code Block |
|---|
<record plugin="org.onap.openecompccsdk.sli.sdnccore.sli.recording.Slf4jRecorder"> <parameter name="logger" value="message-log" /> <parameter name="level" value="info" /> <parameter name="field1" value="Hello World!"/> |
Your node should look like this (This screenshot is slightly out of date, use the plugin name in the code block above The previous value for the record plugin was "org.openecomp.sdnc.sli.recording.Slf4jRecorder")

," but that is out of date.
At this point this is a working directed graph, quite possibly the simplest graph that can be written.
...
Upload and activate your graph, doing this through dgbuilder is the most convenient method. If you are unsure how to do this visit Your First Graphvisit Update and Activate Through DGBuilder.
Now that the graph is uploaded and activated we can invoke it.
The URL to use for you local machine is http://localhost:8181/restconf/operations/SLI-API:execute-graph. Basic authorization is used, the username is admin and the password is adminthe standard ONAP default password.
Use the below body. Initially we will not pass any parameters because this graph does not read any parameters.
...
If everything worked we should get an HTTP 200 OK response. Let's check the logs to be sure.
| Code Block |
|---|
tail /var/sdnclog/logsonap/bvcsdnc/debugkaraf.log |
Below is the output of this command
...
Connect the nodes so they match what we have below.


Double left click on the second record node, using the editor change field1 from "Hello World!" to "Goodbye". Click save, then upload and activate this graph.
Submit the same REST request and tail the debug log.
...
| Code Block |
|---|
<record plugin="org.onap.openecompsli.sdnccore.sli.recording.Slf4jRecorder"> <parameter name="logger" value="message-log" /> <parameter name="level" value="info" /> <parameter name="field1" value="Hello World!"/> <parameter name="field2" value="`$customerName`"/> |
You will be adding a second field. You will notice this field contains a dollar sign and back ticks. A dollar sign ($) is used any time anytime values are read from memory.
The back ticks (`) are used whenever a service logic expression is being created, in . In this case we have a very simple expression, but more complex expressions can be written.
...
Again check the logs
| Code Block |
|---|
/varopt/sdncopendaylight/logsdata/bvclog/debugkaraf.log 20172018-0312-14T1513T23:03:39.613Z|5879622a-ba67-4662-aa5b-1177e8c18a94|qtp1849298247-42|DEBUG|SvcLogicServiceImpl01:26,161 | INFO | qtp892619002-352 | sliapiProvider |144 226 - comorg.attonap.sdnctlccsdk.sli.core.sliapi-provider - 11.0.73.SNAPSHOT1 |Executing node- executor for| nodeCalling typedirected recordgraph - com.att.sdnctl.sli.provider.RecordNodeExecutor 2017-03-14T15:03:39.613Z|5879622a-ba67-4662-aa5b-1177e8c18a94|qtp1849298247-42|DEBUG|RecordNodeExecutorfor TUTORIAL/helloWorld/sync 2018-12-13T23:01:26,161 | INFO | qtp892619002-352 | SvcLogicServiceImpl |144 222 - com.att.sdnctlorg.onap.ccsdk.sli.core.sli-provider - 11.0.73.SNAPSHOT|record node encountered - looking for recorder class com.att.sdnctl.sli.recording.Slf4jRecorder 2017-03-14T15:03:39.613Z|5879622a-ba67-4662-aa5b-1177e8c18a94|qtp1849298247-42|INFO |message-log 1 | - | Fetching service logic from data store 2018-12-13T23:01:26,171 | INFO | qtp892619002-352 | SvcLogicServiceImpl | |145222 - com.att.sdnctlorg.onap.ccsdk.sli.core.sli-recordingprovider - 11.0.7.SNAPSHOT||Hello World!|john| 2017-03-14T15:03:39.613Z|5879622a-ba67-4662-aa5b-1177e8c18a94|qtp1849298247-42|DEBUG|RecordNodeExecutor |144 - com.att.sdnctl.sli-provider - 11.0.7.SNAPSHOT|no failure or Other branch found 2017-03-14T15:03:39.613Z|5879622a-ba67-4662-aa5b-1177e8c18a94|qtp1849298247-42|DEBUG|BlockNodeExecutor |144 - com.att.sdnctl.sli-provider - 11.0.7.SNAPSHOT|Block - executing outcome 2 2017-03-14T15:03:39.613Z|5879622a-ba67-4662-aa5b-1177e8c18a94|qtp1849298247-42|DEBUG|SvcLogicServiceImpl3.1 | SvcLogicGraph [module=TUTORIAL, rpc=helloWorld, mode=sync, version=1, md5sum=8d458c0a353f6676fd8ec607734412cf] - | About to execute graph SvcLogicGraph [module=TUTORIAL, rpc=helloWorld, mode=sync, version=1, md5sum=8d458c0a353f6676fd8ec607734412cf] 2018-12-13T23:01:26,172 | INFO | qtp892619002-352 | SvcLogicServiceImpl | 222 |144 - com.att.sdnctlorg.onap.ccsdk.sli.core.sli-provider - 11.0.7.SNAPSHOT|Executing node 3 2017-03-14T15:03:39.613Z|5879622a-ba67-4662-aa5b-1177e8c18a94|qtp1849298247-42|DEBUG|SvcLogicServiceImpl |144 - com.att.sdnctl.sli-provider - 11.0.7.SNAPSHOT|Executing node executor for node type record - com.att.sdnctl.sli.provider.RecordNodeExecutor 2017-03-14T15:03:39.613Z|5879622a-ba67-4662-aa5b-1177e8c18a94|qtp1849298247-42|DEBUG|RecordNodeExecutor3.1 | SvcLogicGraph [module=TUTORIAL, rpc=helloWorld, mode=sync, version=1, md5sum=8d458c0a353f6676fd8ec607734412cf] - 1 (block) | About to execute node # 1 (block) 2018-12-13T23:01:26,173 | INFO | qtp892619002-352 | message-log |144 223 - com.att.sdnctlorg.onap.ccsdk.sli.core.sli-providerrecording - 11.0.73.SNAPSHOT|record node encountered1 | SvcLogicGraph [module=TUTORIAL, rpc=helloWorld, mode=sync, version=1, md5sum=8d458c0a353f6676fd8ec607734412cf] - looking1 for(block) recorder| class com.att.sdnctl.sli.recording.Slf4jRecorder 2017-03-14T15:03:39.614Z|5879622a-ba67-4662-aa5b-1177e8c18a94|qtp1849298247-42|INFO ||Hello World!|john| 2018-12-13T23:01:26,173 | INFO | qtp892619002-352 | message-log |145 223 - com.att.sdnctlorg.onap.ccsdk.sli.core.sli-recording - 11.0.7.SNAPSHOT||Goodbye!| 2017-03-14T15:03:39.614Z|5879622a-ba67-4662-aa5b-1177e8c18a94|qtp1849298247-42|DEBUG|RecordNodeExecutor |144 - com.att.sdnctl.sli-provider - 11.0.7.SNAPSHOT|no failure or Other branch found3.1 | SvcLogicGraph [module=TUTORIAL, rpc=helloWorld, mode=sync, version=1, md5sum=8d458c0a353f6676fd8ec607734412cf] - 1 (block) | |Goodbye!| |
We can see that the value of the parameter named customerName is now printed out in the log.
...
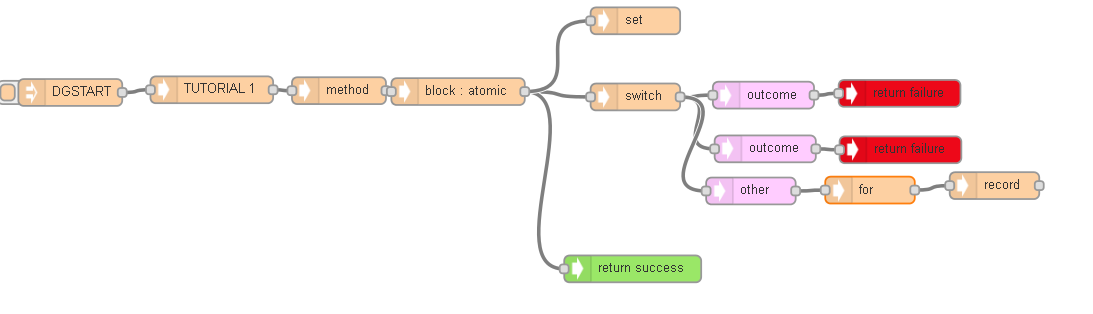
Drag into the page a switch node, a returnFailure, a returnSuccess and an outcome. Arrange and connect them similar to below.


Switch nodes work like a switch statement in any programming language. Outcomes are like case statements.
...
double click on the block node, check off the checkbox next to atomic.


When a block node is atomic it stops executing further nodes if a failure is encountered. You can experiment with this by toggling it on or off, patching the graph and re-executing.
...
The graph should look similar to the screenshot below


We can test against two scenarios
...
Connect the other outcome to the original switch node. It should look like the screenshot below.


other outcomes function like a default case statement. When the customerName is not john and the customerName is not null the other outcome will execute.
...
The set node should be arranged so it executes early. Your graph should look similar to the graph below.

Double click the for node to edit it.
...
| Code Block |
|---|
<record plugin="org.onap.ccsdk.openecompsli.sdnccore.sli.recording.Slf4jRecorder"> <parameter name="logger" value="message-log" /> <parameter name="level" value="info" /> <parameter name="field1" value="`$greeting[$greetingIdx]`"/> <parameter name="field2" value="`$customerName`"/> |
...
Your graph should look something like this


Now let's call it using this body
...
This covers the base functionality of directed graph. You can now continue with Your First Graphwith Further Reading.