Overview
For ONAP SDN-R load and stress test and Proof of concept, June 19 a three node SDN-R cluster is used. Version is El Alto.
Precondition
- Running performant physical server cluster (The hardware requirements)
- Openstack installed
- VM cloud image ubuntu 18.04-server-image
Goal of this description is to setup a partial ONAP with focus of SDN-R services
Steps
- Installing Kubernetes and Rancher
- Initiation HELM
- Downloading OOM charts
- Installation of SDN-R, LOG, AAI, SO, PORTAL, ROBOT Framework, OOF
- Installartion of Device Simulators
Installing Kubernetes and Rancher
Create the Rancher 3 nodes control cluster named as onap-control on OpenStack
The following instructions describe how to create 3 OpenStack VMs to host the Highly-Available Kubernetes Control Plane. ONAP workloads will not be scheduled on these Control Plane nodes.
Launch new VMs in OpenStack.

Select Ubuntu 18.04 as the boot image for the VM without any volume

Select m1.large flavor

Networking

Apply customization script for Control Plane VMs

The script to be copied:
!/bin/bash

DOCKER_VERSION=18.09.5

sudo apt-get update

curl https://releases.rancher.com/install-docker/$DOCKER_VERSION.sh | sh
mkdir -p /etc/systemd/system/docker.service.d/
cat > /etc/systemd/system/docker.service.d/docker.conf << EOF
[Service]
ExecStart=
ExecStart=/usr/bin/dockerd -H fd:// --insecure-registry=nexus3.onap.org:10001
EOF

sudo usermod -aG docker ubuntu

systemctl daemon-reload
systemctl restart docker
apt-mark hold docker-ce

IP_ADDR=ip address |grep ens|grep inet|awk '{print $2}'| awk -F / '{print $1}' HOSTNAME=hostname

echo "$IP_ADDR $HOSTNAME" >> /etc/hosts

docker login -u docker -p docker nexus3.onap.org:10001

sudo apt-get install make -y

wget https://storage.googleapis.com/kubernetes-release/release/v1.13.5/bin/linux/amd64/kubectl

chmod +x kubectl

sudo mv ./kubectl /usr/local/bin/kubectl


wget http://storage.googleapis.com/kubernetes-helm/helm-v2.12.3-linux-amd64.tar.gz

tar -zxvf helm-v2.12.3-linux-amd64.tar.gz

sudo mv linux-amd64/helm /usr/local/bin/helm

sudo apt-get update
sudo apt-get upgrade -y

exit 0
This customization script will:
- update ubuntu
- install docker
- install make
- download and install kubectl
- download and install helm
- once again update & upgrade ubuntu
Launched Instances

Create the Kubernetes 12 nodes worker cluster named as onap-k8s on OpenStack cloud
The following instructions describe how to create OpenStack VMs to host the Highly-Available Kubernetes Workers. ONAP workloads will only be scheduled on these nodes.
Launch new VM instances in OpenStack

Select Ubuntu 18.04 as base image

Select Flavor
The size of Kubernetes hosts depend on the size of the ONAP deployment being installed.
If a small subset of ONAP applications are being deployed (i.e. for testing purposes), then 16GB or 32GB may be sufficient.

Networking
Apply customization script for Kubernetes VM(s)

The scrip to be copied:
!/bin/bash

DOCKER_VERSION=18.09.5

sudo apt-get update

curl https://releases.rancher.com/install-docker/$DOCKER_VERSION.sh | sh
mkdir -p /etc/systemd/system/docker.service.d/
cat > /etc/systemd/system/docker.service.d/docker.conf << EOF
[Service]
ExecStart=
ExecStart=/usr/bin/dockerd -H fd:// --insecure-registry=nexus3.onap.org:10001
EOF

sudo usermod -aG docker ubuntu

systemctl daemon-reload

systemctl restart docker

apt-mark hold docker-ce

IP_ADDR=ip address |grep ens|grep inet|awk '{print $2}'| awk -F / '{print $1}'

HOSTNAME=hostname

echo "$IP_ADDR $HOSTNAME" >> /etc/hosts

docker login -u docker -p docker nexus3.onap.org:10001

sudo apt-get install make -y

wget https://storage.googleapis.com/kubernetes-release/release/v1.13.5/bin/linux/amd64/kubectl

chmod +x kubectl

sudo mv ./kubectl /usr/local/bin/kubectl


sudo apt-get update

sudo apt-get upgrade -y

exit 0
This customization script will:
- update ubuntu
- install docker
- install nfs common
- download and install kubectl
- update and upgrade ubuntu
Launched k8s instances

Configure Rancher Kubernetes Engine
Install RKE
Download and install RKE on a VM, desktop or laptop. Binaries can be found here for Linux and Mac: https://github.com/rancher/rke/releases/tag/v0.2.1
Perform this on linux based personal laptop, local machine or a VM which has the connectivity to the created VMs on OpenStack and whose key has been configured during creation of VMs.
In our setup, the key of OpenStack controller has been used to login into VMs, so these steps have been performed on OpenStack controller.
mkdir rke
cd rke/
wget https://github.com/rancher/rke/releases/download/v0.2.1/rke_linux-amd64
mv rke_linux-amd64 rke
chmod -x rke

RKE requires a cluster.yml as input. An example file is show below that describes a Kubernetes cluster that will be mapped onto the OpenStack VMs created earlier in this guide.
Example: cluster.yml

The example file:
# An example of an HA Kubernetes cluster for ONAP
nodes:
- address: 10.31.3.2
  port: "22"
  role:
  - controlplane
  - etcd
  hostname_override: "onap-control-1"
  user: ubuntu
  ssh_key_path: "~/.ssh/id_rsa"
- address: 10.31.3.3
  port: "22"
  role:
  - controlplane
  - etcd
  hostname_override: "onap-control-2"
  user: ubuntu
  ssh_key_path: "~/.ssh/id_rsa"
- address: 10.31.3.16
  port: "22"
  role:
  - controlplane
  - etcd
  hostname_override: "onap-control-3"
  user: ubuntu
  ssh_key_path: "~/.ssh/id_rsa"
- address: 10.31.3.15
  port: "22"
  role:
  - worker
  hostname_override: "onap-k8s-1"
  user: ubuntu
  ssh_key_path: "~/.ssh/id_rsa"
- address: 10.31.3.9
  port: "22"
  role:
  - worker
  hostname_override: "onap-k8s-2"
  user: ubuntu
  ssh_key_path: "~/.ssh/id_rsa"
- address: 10.31.3.29
  port: "22"
  role:
  - worker
  hostname_override: "onap-k8s-3"
  user: ubuntu
  ssh_key_path: "~/.ssh/id_rsa"
- address: 10.31.3.8
  port: "22"
  role:
  - worker
  hostname_override: "onap-k8s-4"
  user: ubuntu
  ssh_key_path: "~/.ssh/id_rsa"
- address: 10.31.3.5
  port: "22"
  role:
  - worker
  hostname_override: "onap-k8s-5"
  user: ubuntu
  ssh_key_path: "~/.ssh/id_rsa"
- address: 10.31.3.23
  port: "22"
  role:
  - worker
  hostname_override: "onap-k8s-6"
  user: ubuntu
  ssh_key_path: "~/.ssh/id_rsa"
- address: 10.31.3.1
  port: "22"
  role:
  - worker
  hostname_override: "onap-k8s-7"
  user: ubuntu
  ssh_key_path: "~/.ssh/id_rsa"
- address: 10.31.3.24
  port: "22"
  role:
  - worker
  hostname_override: "onap-k8s-8"
  user: ubuntu
  ssh_key_path: "~/.ssh/id_rsa"
- address: 10.31.3.11
  port: "22"
  role:
  - worker
  hostname_override: "onap-k8s-9"
  user: ubuntu
  ssh_key_path: "~/.ssh/id_rsa"
- address: 10.31.3.35
  port: "22"
  role:
  - worker
  hostname_override: "onap-k8s-10"
  user: ubuntu
  ssh_key_path: "~/.ssh/id_rsa"
- address: 10.31.3.13
  port: "22"
  role:
  - worker
  hostname_override: "onap-k8s-11"
  user: ubuntu
  ssh_key_path: "~/.ssh/id_rsa"
- address: 10.31.3.10
  port: "22"
  role:
  - worker
  hostname_override: "onap-k8s-12"
  user: ubuntu
  ssh_key_path: "~/.ssh/id_rsa"
services:
  kube-api:
    service_cluster_ip_range: 10.43.0.0/16
    pod_security_policy: false
    always_pull_images: false
  kube-controller:
    cluster_cidr: 10.42.0.0/16
    service_cluster_ip_range: 10.43.0.0/16
  kubelet:
    cluster_domain: cluster.local
    cluster_dns_server: 10.43.0.10
    fail_swap_on: false
network:
  plugin: canal
authentication:
  strategy: x509
ssh_key_path: "~/.ssh/id_rsa"
ssh_agent_auth: false
authorization:
  mode: rbac
ignore_docker_version: false
kubernetes_version: "v1.13.5-rancher1-2"
private_registries:
- url: nexus3.onap.org:10001
  user: docker
  password: docker
  is_default: true
cluster_name: "onap"
restore:
  restore: false
  snapshot_name: ""
Prepare cluster.yml
Before this configuration file can be used the IP address must be mapped for each control and worker node in this file.
Run RKE
From within the same directory as the cluster.yml file, simply execute:
native@node1-1:~/rke$ ./rke up
./rke up
The output will look something like:
  . . . .
  INFO[0309] [addons] Setting up Metrics Server
  INFO[0309] [addons] Saving ConfigMap for addon rke-metrics-addon to Kubernetes
  INFO[0309] [addons] Successfully saved ConfigMap for addon rke-metrics-addon to Kubernetes
  INFO[0309] [addons] Executing deploy job rke-metrics-addon
  INFO[0315] [addons] Metrics Server deployed successfully
  INFO[0315] [ingress] Setting up nginx ingress controller
  INFO[0315] [addons] Saving ConfigMap for addon rke-ingress-controller to Kubernetes
  INFO[0316] [addons] Successfully saved ConfigMap for addon rke-ingress-controller to Kubernetes
  INFO[0316] [addons] Executing deploy job rke-ingress-controller
  INFO[0322] [ingress] ingress controller nginx deployed successfully
  INFO[0322] [addons] Setting up user addons
  INFO[0322] [addons] no user addons defined
  INFO[0322] Finished building Kubernetes cluster successfully
Validate RKE deployment
copy the file "kube_config_cluster.yml" to onap-control-1 VM.
In the controller machine where the rke was executed.
example: to perform sftp to onap-control-1 node:
native@node1-1:~/rke$ sftp ubuntu@10.31.3.2
Connected to 10.31.3.2.
sftp> put kube_config_cluster.yml
sftp> exit
login into onap-control-1 VM and move the "kube_config_cluster.yml" file into .kube/ forlder and rename the file to "config.onap":
In "onap-control-1" vm:
ubuntu@onap-control-1:~$ mkdir .kube
ubuntu@onap-control-1:~$ mv kube_config_cluster.yml .kube/config.onap
Create a context file shell script in the onap-control-1 VM
ubuntu@onap-control-1:~$ nano init.sh
#!/bin/bash

export KUBECONFIG=~/.kube/config.onap
kubectl config use-context onap
Save the file.
Load the onap context
Perform this every time you want to perform helm or kubectl commands on the onap-control-1 node
ubuntu@onap-control-1:~$ . init.sh
Switched to context "onap".
Verify the kubernetes cluster
ubuntu@onap-control-1:~$ kubectl get nodes -o=wide
Result:

Initialize Kubernetes Cluster for use by Helm
Perform this on onap-control-1 VM only during the first setup.
kubectl -n kube-system create serviceaccount tiller
kubectl create clusterrolebinding tiller –clusterrole=cluster-admin –serviceaccount=kube-system:tiller
helm init –service-account tiller
kubectl -n kube-system  rollout status deploy/tiller-deploy
Setting up the NFS share for multinode kubernetes cluster:
Deploying applications to a Kubernetes cluster requires Kubernetes nodes to share a common, distributed filesystem. In this tutorial, we will setup an NFS Master, and configure all Worker nodes a Kubernetes cluster to play the role of NFS slaves.
It is recommneded that a separate VM, outside of the kubernetes cluster, be used. This is to ensure that the NFS Master does not compete for resources with Kubernetes Control Plane or Worker Nodes.
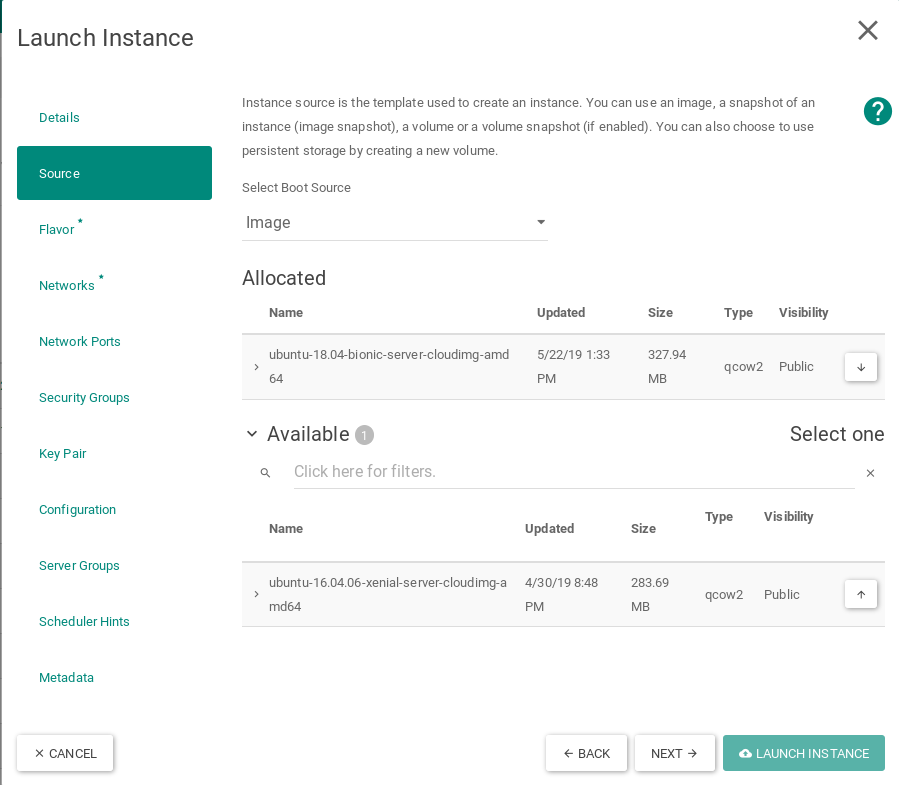
Launch new NFS Server VM instance
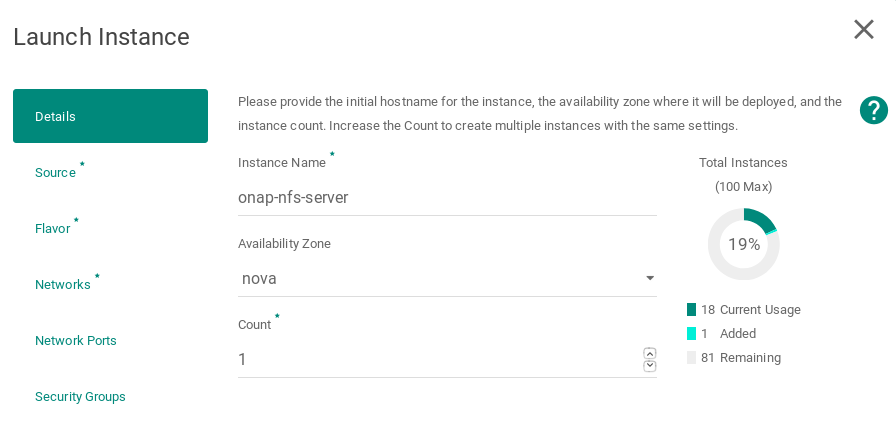
Select Ubuntu 18.04 as base image
Select Flavor

Networking

Apply customization script for NFS Server VM
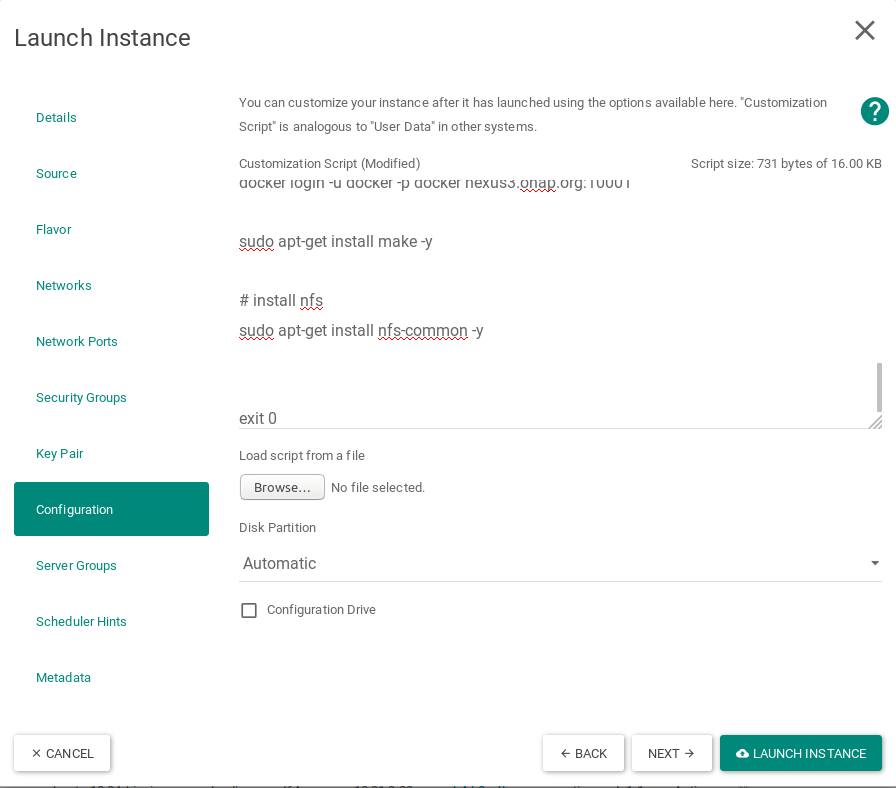
Script to be added:
#!/bin/bash

DOCKER_VERSION=18.09.5

apt-get update

curl https://releases.rancher.com/install-docker/$DOCKER_VERSION.sh | sh
mkdir -p /etc/systemd/system/docker.service.d/
cat > /etc/systemd/system/docker.service.d/docker.conf << EOF
[Service]
ExecStart=
ExecStart=/usr/bin/dockerd -H fd:// --insecure-registry=nexus3.onap.org:10001
EOF

sudo usermod -aG docker ubuntu

systemctl daemon-reload
systemctl restart docker
apt-mark hold docker-ce

IP_ADDR=`ip address |grep ens|grep inet|awk '{print $2}'| awk -F / '{print $1}'`
HOSTNAME=`hostname`

echo "$IP_ADDR $HOSTNAME" >> /etc/hosts

docker login -u docker -p docker nexus3.onap.org:10001

sudo apt-get install make -y

# install nfs
sudo apt-get install nfs-common -y

sudo apt update
sudo apt upgrade -y


exit 0
This customization script will:
- update ubuntu
- install nfs server
- update and upgrade ubuntu
Resulting example

Configure NFS Share on Master node
Login into onap-nfs-server and perform the below commands
wget https://onap.readthedocs.io/en/latest/_downloads/25aa3e27223d311da3d00de8ed6768f8/master_nfs_node.sh
chmod +x master_nfs_node.sh
sudo ./master_nfs_node.sh {list kubernetes worker nodes ip}
example from the WinLab setup:
sudo ./master_nfs_node.sh 10.31.3.15 10.31.3.9 10.31.3.29 10.31.3.8 10.31.3.5 10.31.3.23 10.31.3.1 10.31.3.24 10.31.3.11 10.31.3.35 10.31.3.13 10.31.3.10
Login into each kubernetes worker node, i.e. onap-k8s VMs and perform the below commands
wget https://onap.readthedocs.io/en/latest/_downloads/604dc45241b03eac1c92b22e0b32b5f3/slave_nfs_node.sh
chmod +x slave_nfs_node.sh
sudo ./slave_nfs_node.sh {master nfs node IP address}
example from the WinLab setup:
sudo ./slave_nfs_node.sh 10.31.3.38