...
Onboarding a Virtual Software Product (VSP) with an ETSI HEAT Template.
Onboard a VNF package along with a Network Service CSAR into SDC.
A video demonstration of this process "Onboarding ETSI Based NS" can be found here: SO NFVO NS Onboarding and LCM Demonstrations
It is recommended that you view this video before/alongside this section of the guide.Step 1:
Login to the ONAP Portal. (Link: https://portal.api.simpledemo.onap.org:30225/ONAPPORTAL/login.htm (where "portal.api.simpledemo.onap.org" is set as the IP of your VM/host of your Portal component.)
Login: cs0008
Password: demo123456!Step 2:
Select the SDC App. It is possible that your browser will block the scripts run by the Portal, you will need to enable them if it does.
Step 3:
Follow the onboarding guide below:
Onboarding your VNF:
1: Click the “ONBOARD” tab near the top of the window.
2: Create a “VLM” if you have not created a "VLM" before.
- From the “ONBOARD” page, click create VLM.
- Enter name and description, then select create.
- Click on the plus button beside Entitlement Pool.
- Add Name and Manufacturing Reference Number, then click save.
- Click on the plus button beside License Key Groups.
- Add Name and select type, then click save.
- Click on the plus button beside Feature Groups.
- In the general tab, add name, Description and Part Number. Move to the Entitlements Pools tab, select the entitlement pool you just created and click the rightward arrow. Move to the License Key Group tab, select the license key group you just created and click the rightward arrow. Once these three things are done, click save.
- Click on the plus button beside License Agreement.
- Add Name and select License Term. Next move to the Feature Groups tab, select the Feature Group you just created and click the rightward arrow. Lastly click save.
- On the overview page, select submit in the top right corner of the screen.
- Enter a commit comment and click Commit & Submit.3: Create a Virtual Service Product (VSP)

- Click the “ONBOARD” tab near the top of the window.
- Click “CREATE NEW VSP” and fill in the required information. Make sure to select “Network Package” for the “ONBOARDING PROCEDURE” section. Then click “CREATE”.
- Click where it shows “! Missing” underneath “License Agreement”. Simply select a “Licensing Version” and “License Agreement/Feature Group” from the drop downs.
- Click the “Overview” tab on the left hand side. Then press “Select File” in the “SOFTWARE PRODUCT ATTACHMENTS” section and select your prepared VNF Package. If you are onboarding a supported zip, then click “PROCEED TO VALIDATION” once you can see your added files. You can safely ignore any warnings that come up at this step, but not any errors. (Note: The package validation does not support CSARs currently, they will still work however, providing they meet SDC requirements.)Now click “Submit”.


4: Then click “ONBOARD” in the top left. Hover your mouse over the small grey triangle that is just to the right of the “ONBOARD” tab and select “HOME”.

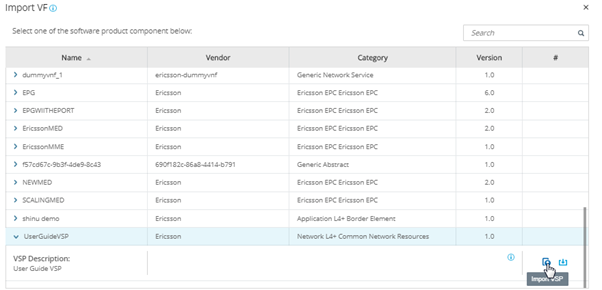
5: Hover over the “IMPORT” square and select “Import VSP”. Find your VSP, click the drop-down arrow beside it and then press the “Import VSP” icon at the far right of the line that drops down.
6: You will now be brought to the draft page of your VF. You can now Certify your VF, by clicking "Certify" in the top-right of the VF Page.
Creating/Configuring your SDC Service:
1: In the “HOME” tab of the SDC ONAP Portal, hover over the “ADD” square and select “ADD SERVICE”. Fill in the required fields, select the "Category" "Network Service" and press “Create” in the top right-hand corner.
2: You will be brought to the draft page of your Service. Go to the “Composition” tab on the left-hand side and drag/drop the VF, that you just created, into this service (you can search for the VF by name in the top left).
3: Now you will need to add the Network Service CSAR package to this service. You can do this by clicking in the blank whitespace of the composition, then on the right hand side of the page select the 2nd tab in order to add a deployment artifact. Click "ADD ARTIFACT" here, give an "Artifact Label" of "ns", any description value and ensure you choose a "Type" of "OTHER". Then click "DONE".
4: Finally you can click "Certify" in the top right hand corner, followed by "Distribute". Your Service will now distributed across ONAP.

(SECTION UNDERGOING EDIT) Preloading SDNC
...