For reference, here is the list of Required Tools .
Follow the steps below to set up your the development environment on your client machine.
| Table of Contents |
|---|
Linux Foundation
...
Account Setup
Follow the instructions on the identity portal to create a Linux Foundation account and get access to the OpenECOMP Gerrit instance. Then verify that you can log in at https://gerrit.openecomp.org/ and that you can see the OpenECOMP list of repositories.
Git and Gerrit local setup
The OpenECOMP repositories are stored on Gerrit. You need a Git client to be able to pull/push code.
Linux Setup
<<TODO: describe a Linux client set-up for Git and git-review>>You also need to add a plugin to Git in order to interact with Gerrit. The plugin is called git-review.
To install git-review on Linux (Ubuntu) :, type the following command.
sudo apt-get install git-review ...
Windows Setup
Installing Git
Install Git on your client, visit: https://www.atlassian.com/git/tutorials/install-git, and download the appropriate installation image for your host. Execute the installation script.
Include the "Git Bash" and "Git GUI" components (this is the default). For example, during the Windows installation, leave the following boxes checked:

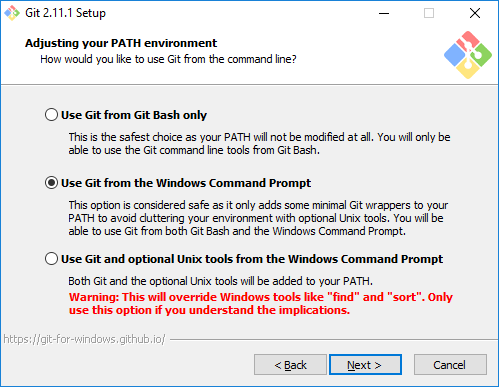
If you intend to type Git commands from the Windows Command Prompt, leave the default setting for adjusting the PATH environment:
The repositories use Unix-style line-feed for line termination, so on your windows Git client, select the conversion option:

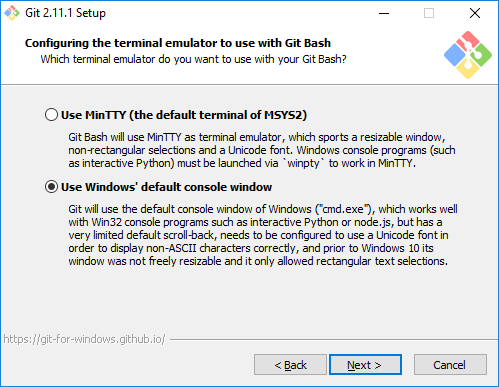
Select the following option based on your own preference (non-default shown, so 'winpty' is not required):
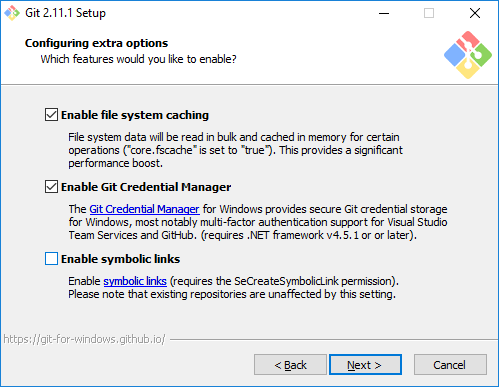
Choose the defaults here:
The installer lets you choose the experimental 'difftool'; either choice will work. Continue with the installation dialogs until the installation is complete.
Windows Setup for git-review
Follow those steps if you are a Windows user and need to interact with Gerrit; it will help you when you install git-review on your system.
Step-by-Step Guide
NOTE: It is assumed that you already have a Gerrit profile setup and you can connect to it.
Preliminary Step: Install Putty and Generate a Putty Key
NOTE: If you already have keys registered with putty, skip this section.
- Ensure you have the complete putty suite installed. You should have pageant.exe, plink.exe and puttygen.exe.
- Generate a key with puttygen. Choose a passphrase, then select "Save private key" and choose a target; also "Save public key" and select a target. It is recommended to use file names containing "private" and "public" for the keys as both will end in .ppk.
- Start pageant if not started, then add your newly generated private key.
- Under the control panel > system > advanced system properties > environment variables, add a GIT_SSH entry (if not present) and point to plink.exe.
- When done, start a command line (cmd.exe) and run 'env'; the newly added environment variable should appear.
- In your Gerrit profile, add the public key. Also, copy/paste the known_hosts entries listed, into a file named known_hosts under your .ssh profile (something like C:\Users\<ATTUID><my-id>\.ssh) (if known_hosts does not exist, create it).
...
Install Python and git-review on Windows
Download Python
...
version
...
2.7.10
...
:
- 32-
...
...
2. Using a command line with administrative privileges, go to the folder in which the .msi file was downloaded. For example:
cd C:\Users\xxxxxx\Downloads(Replace xxxxx with your user name if the package was downloaded to your Downloads folder.)
NOTE: You'll know that cmd.exe has admin privileges if the console text is green.
3. Install Python:
msiexec /i python-2.7.10.msi(32-bits)msiexec /i python-2.7.10.amd64.msi(64-bits)
4. Now, follow the instructions at the following URL:
Execute the install file that you just downloaded. (You must have administrative privileges.) During installation, select "Add python.exe to Path", overriding the default setting. Also, be sure to install "pip" (this is the default).

Continue with the installation until it is completed.
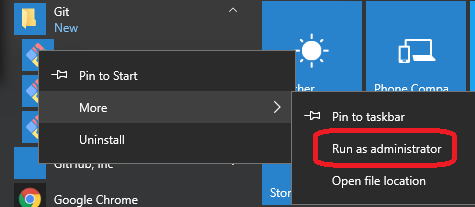
Run Git Bash as Administrator (for example, in Windows 10, use the Windows menu, scroll to the Git directory, right-click on Git-bash, and select "Run as administrator":
Within Git-bash, type the following command:
$ pip install git-review
To use git review, you have to be in a git clone directory that already contains a (possibly hidden) .gitreview configuration file (see Gerrit/Advanced usage#Setting up a repository for git-remote), otherwise you will get the error message UnboundLocalError: local variable 'no_git_dir' referenced before assignment.
| Info |
|---|
The git and git-review installation steps above are described at: https://www.mediawiki.org/wiki/Gerrit/git-review#Windows |
...
|
Configure Git to remember your Linux Foundation user name and email address (the user name and email address associated with your Linux Foundation login)
NOTE: You MUST select "Add python.exe to Path."
5. When installation is complete, restart a new command line (admin privileges may be needed) and run:
pip install git-review
NOTE: By opening a new command line you'll benefit from the %PATH% update.
6. Add your reviewer name for all future reviews:
git config --global --add gitreview.username "your_LF_user_name"
NOTE: Ensure that your user.name and user.email are matching what was configured for the Linux Foundation credentials: user.name should equal gitreview.username and email address should match the email address that was configured for the Linux Foundation.
...
:
git config --global user.email
...
<your_LF_account
...
_email>
git
...
config
...
--global
...
--add
...
gitreview.username
...
<your_LF_user_
...
name>
If you are using VPN, you might encounter a proxy problem while connecting to the Linux Foundation website. To avoid the problem, you should add the proxy setting in git config, using the following command:
git config --global https.proxy https://<proxy username>:<proxy password>@<proxy url> <proxy password>@<proxy url>
git
...
config
...
--global
...
http.proxy
...
http://<proxy
...
username>:<proxy
...
password>@<proxy url>
NOTE: When entering the proxy username, you might be required to add the domain name in front of the username.
...