description
Get Ubuntu
Get the Ubuntu ISO image from ubuntu.com. The recommended version is 16.04.3 LTS (Long Term Support). You can use the server or desktop edition. I used the server , desktop edition.
Get VirtualBox and VirtualBox Guest Additions
Make sure you have the VirtualBox Guest Additions ISO for your version of VirtualBox. I'm using VirtualBox 5.01.1628. Save the Guest Additions ISO on your host computer along with the Ubuntu ISO. Get the Guest Additions ISO from here:
http://download.virtualbox.org/virtualbox
NOTE: Guest Additions versions prior to 5.1 will not work with Ubuntu 16.04.3. If you have an earlier version of VirtualBox, you should upgrade to the latest 5.1 version.
Create a new VM in VirtualBox for Ubuntu
Type: Linux
Version: Ubuntu (64-bit)
At least 2048 MB memory
At least 40 GB VDI
Network: Attached to: NAT
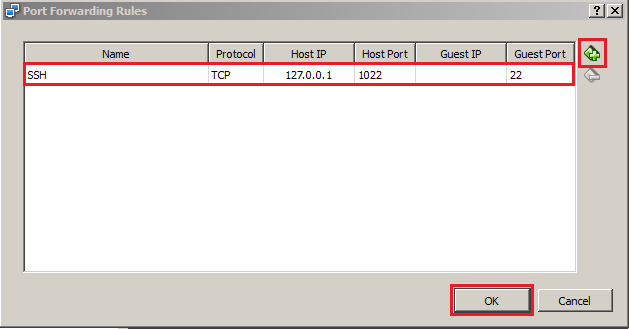
Create a port-forwarding rule for SSH
If your host computer uses a VPN client that blocks access to local subnets, it's helpful to create a Create a port-forwarding rule so that you can use PuTTY (or any other SSH client) to connect to the VM. You probably don't need this unless you're using a VPN client on your host.
Go to "Network" settings in VirtualBox, add a port forwarding rule:
...
Guest IP: <leave blank>
Guest Port: 22

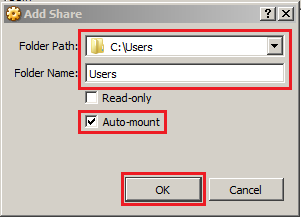
Create Shared Folder
This is for oriented to Windows users. If you're using a MAC or a Linux host computer, things the details may be quite different. The shared folder allows you to easily transfer files between the guest VM and the host computerYou can share any folder on the host computer with the Ubuntu VM. On Windows, a practical choice is to share the C:\Users folder, so that your Windows home directory will be accessible from the Ubuntu VM.
Go to "Shared Folders" settings in VirtualBox, add a share:
...
Auto-mount: <checked>
Read-only: <unchecked>

Install Ubuntu in the VM
Go to On the "Storage" settings panel in VirtualBox and , click on "[ optical drive ]" and then "Choose Disk Image". Select your Ubuntu ISO image.
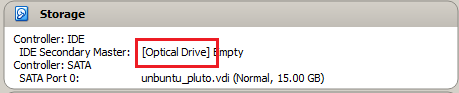
After selecting the ISO image, start Start the VM.
When you get to the "software selection" page, USE THE ARROW KEYS AND SPACEBAR to select (at minimum) the following packages. These are choices you'll see when installing Ubuntu Server. For Ubuntu Desktop, things might be different.
standard system utilities
Virtual Machine Host
OpenSSH server
Create Shared Folder
This is for Windows users. If you're using a MAC or a Linux host, things may be quite different. The shared folder allows you to easily transfer files between the guest VM and the host computer.
Create Shared Folder
This is for Windows users. If you're using a MAC or a Linux host, things may be quite different. The shared folder allows you to easily transfer files between the guest VM and the host computer.
Create Shared Folder
This is for Windows users. If you're using a MAC or a Linux host, things may be quite different. The shared folder allows you to easily transfer files between the guest VM and the host computer.
Create Shared Folder
This is for Windows users. If you're using a MAC or a Linux host, things may be quite different. The shared folder allows you to easily transfer files between the guest VM and the host computer.
Create Shared Folder
This is for Windows users. If you're using a MAC or a Linux host, things may be quite different. The shared folder allows you to easily transfer files between the guest VM and the host computer.
...
Related articles
| Content by Label | ||||||||||||||||||
|---|---|---|---|---|---|---|---|---|---|---|---|---|---|---|---|---|---|---|
|
Follow the prompts to install Ubuntu.
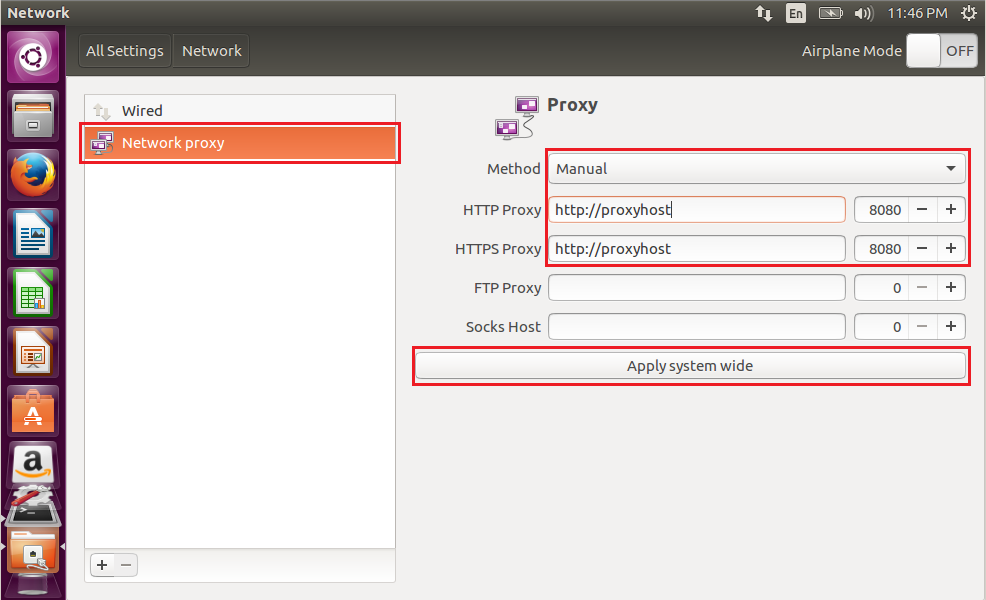
Proxy Configuration (optional)
If you're behind a corporate firewall, configure some proxy settings. NOTE: your proxy configuration may require username and password credentials, not shown here.
Ubuntu system proxy setting:
System Settings → Network → Network proxy
(Replace "proxyhost" and port with your actual proxy information)
apt proxy setting:
Edit /etc/apt/apt.conf and add one line at the top (replace "proxyhost:port" with your actual proxy information):
Acquire::http::Proxy "http://proxyhost:port";
Reboot the VM.
Install SSH Server
sudo apt update
sudo apt install openssh-server
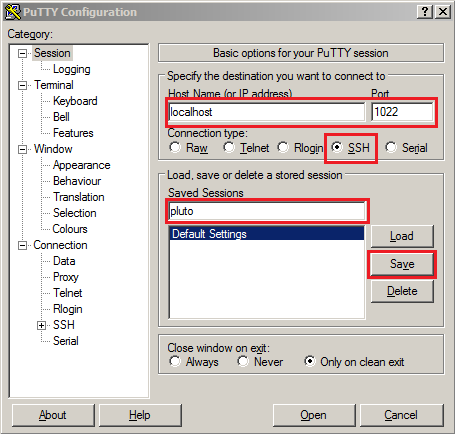
Connect to the VM from your host computer
The PuTTY SSH client is popular. A connection to localhost:1022 (or whatever port you have forwarded) will go to the VM.
Install VirtualBox Guest Additions
On the "Storage" panel in VirtualBox, click on "[ optical drive ]" and then "Choose Disk Image". Select your VirtualBox Guest Additions ISO image.
In a VM terminal window, mount the cdrom:
sudo mkdir -p /media/cdrom
sudo mount /dev/cdrom /media/cdrom
Install necessary dependencies:
sudo apt update
sudo apt install gcc g++ dkms
Install the guest additions. NOTE: look for errors in the command output! If you see an error that says you are missing kernel headers, the most likely cause is that you are using a VirtualBox version that is too old. The error message is misleading.
cd /media/cdrom
sudo ./VBoxLinuxAdditions.run

Add yourself to the vboxsf user group (replace "userid" with your user ID):
sudo usermod -a -G vboxsf userid
Reboot the VM.
In a VM terminal window, verify that you can access your home directory on the host computer, which should be mounted under here:
/media/sf_Users
...
| hidden | true |
|---|
...