THIS PAGE IS UNDER CONSTRUCTION
Get Ubuntu
Get the Ubuntu ISO image from ubuntu.com. The recommended version is 16.04.3 LTS (Long Term Support). You can use the server or , desktop edition. I used the server edition.
Get VirtualBox and VirtualBox Guest Additions
Make sure you have the VirtualBox Guest Additions ISO for your version of VirtualBox. I'm using VirtualBox 5.1.28. Save the Guest Additions ISO on your host computer along with the Ubuntu ISO. Get the Guest Additions ISO from here:
...
NOTE: Guest Additions versions prior to 5.1 will not work with Ubuntu 16.04.3. If you have an earlier version of VirtualBox, you should upgrade to the latest 5.1 version.
Create a new VM in VirtualBox for Ubuntu
Type: Linux
Version: Ubuntu (64-bit)
...
Network: Attached to: NAT
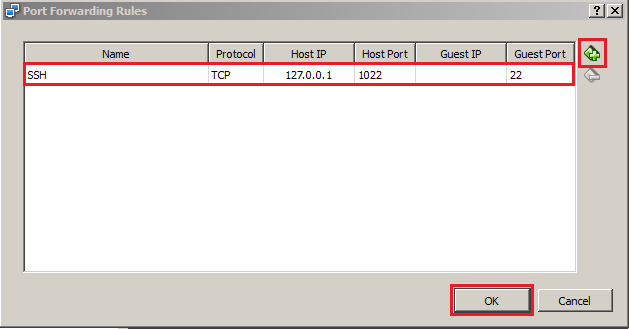
Create a port-forwarding rule for SSH
Create a port-forwarding rule so that you can use PuTTY (or other SSH client) to connect to the VM.
...
Guest IP: <leave blank>
Guest Port: 22

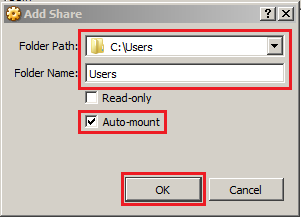
Create Shared Folder
This is oriented to Windows users. If you're using a MAC or a Linux host computer, the details may be different. You can share any folder on the host computer with the Ubuntu VM. On Windows, a practical choice is to share the C:\Users folder, so that your Windows home directory will be accessible from the Ubuntu VM.
...
Auto-mount: <checked>
Read-only: <unchecked>

Install Ubuntu in the VM
On the "Storage" panel in VirtualBox, click on "[ optical drive ]" and then "Choose Disk Image". Select your Ubuntu ISO image.
...
Follow the prompts to install Ubuntu.
Proxy Configuration (optional)
If you're behind a corporate firewall, configure some proxy settings. NOTE: your proxy configuration may require username and password credentials, not shown here.
...
Acquire::http::Proxy "http://proxyhost:port";
Reboot the VM.
Install SSH Server
sudo apt update
sudo apt install openssh-server
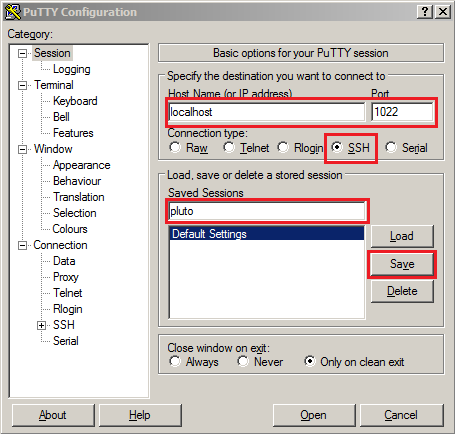
Connect to the VM from your host computer
The PuTTY SSH client is popular. A connection to localhost:1022 (or whatever port you have forwarded) will go to the VM.
Install VirtualBox Guest Additions
On the "Storage" panel in VirtualBox, click on "[ optical drive ]" and then "Choose Disk Image". Select your VirtualBox Guest Additions ISO image.
...
In a VM terminal window, verify that you can access your home directory on the host computer, which should be mounted under here:
/media/sf_Users
Install Docker
Make sure curl is installed:
sudo apt update
sudo apt install curl
If you are behind a corporate firewall (replace "proxyhost:port" with your actual proxy information)
https_proxy="https://proxyhost:port" curl -fsSL https://apt.dockerproject.org/gpg | sudo apt-key add -
Otherwise:
curl -fsSL https://apt.dockerproject.org/gpg | sudo apt-key add -
Expected Response:
OK
Add the docker package repository:
...
Install packages:
sudo apt update
sudo apt-cache policy docker-engine
sudo apt install docker-engine
sudo apt install docker-compose
If you are behind a corporate firewall, you will need to configure proxy settings for docker so that images may be obtained from internet repositories. In the commands shown here, replace "proxyhost:port", "yourdomain1.com", and "yourdomain2.com" with appropriate values.
Make the docker configuration directory:
mkdir -p /etc/systemd/system/docker.service.d
Edit (create) this file:
/etc/systemd/system/docker.service.d/http-proxy.conf
Add these lines:
[Service]Environment="HTTP_PROXY=https://proxyhost:port"Environment="HTTPS_PROXY=https://proxyhost:port"Environment="NO_PROXY=localhost,127.0.0.1,.yourdomain1.com,.yourdomain2.com"
Restart docker:
sudo systemctl daemon-reload
sudo systemctl restart docker
Add yourself to the docker user group (replace "userid" with your user ID):
sudo usermod -a -G docker userid
Log out and log back in so that the user group change will takeeffect.
Verify that you can connect to docker as yourself (i.e. not as root):
docker ps
Verify that you can download and run the hello-world container
docker run hello-world

Create Shared Folder
This is for Windows users. If you're using a MAC or a Linux host, things may be quite different. The shared folder allows you to easily transfer files between the guest VM and the host computer.
Create Shared Folder
This is for Windows users. If you're using a MAC or a Linux host, things may be quite different. The shared folder allows you to easily transfer files between the guest VM and the host computer.
Create Shared Folder
This is for Windows users. If you're using a MAC or a Linux host, things may be quite different. The shared folder allows you to easily transfer files between the guest VM and the host computer.
Create Shared Folder
This is for Windows users. If you're using a MAC or a Linux host, things may be quite different. The shared folder allows you to easily transfer files between the guest VM and the host computer.
Create Shared Folder
This is for Windows users. If you're using a MAC or a Linux host, things may be quite different. The shared folder allows you to easily transfer files between the guest VM and the host computer.
Create Shared Folder
This is for Windows users. If you're using a MAC or a Linux host, things may be quite different. The shared folder allows you to easily transfer files between the guest VM and the host computer.
...
Related articles
| Content by Label | ||||||||||||||||||
|---|---|---|---|---|---|---|---|---|---|---|---|---|---|---|---|---|---|---|
|
...
| hidden | true |
|---|
...