Follow the steps below to set up the development environment on your client machine.
| Table of Contents |
|---|
Create a Linux Foundation Account
Follow the instructions on the identity portal to create a Linux Foundation account and get access to the OpenECOMP Gerrit instance. Then verify that you can log in at https://gerrit.openecomp.org/ and that you can see the OpenECOMP list of repositories.
Linux Setup (under construction)
<<TODO: describe a Linux client set-up for Git and git-review>>
...
sudo apt-get install git-review
Windows Setup
Installing Git
Install Git on your client, visit: https://www.atlassian.com/git/tutorials/install-git, and download the appropriate installation image for your host. Once downloaded, execute the installation script ("open" the .msi file).
...
The installer lets you choose the experimental 'difftool'; either choice will work. Continue with the installation dialogs until the installation is complete.
Install Python on Windows (optional)
Not all components require Python for development. See the documentation for your component in the Development Guides section.
...
Continue with the installation until it is completed.
Set up git review and Configure git
Run Git Bash as Administrator (for example, in Windows 10, use the Windows menu, scroll to the Git directory, right-click on Git-bash, and select "Run as administrator":
...
NOTE: When entering the proxy username, you might be required to add the domain name in front of the username.
Install Putty
NOTE: If you already have keys registered with PuTTY, skip this section.
...
Execute the .msi file. Use all the default settings, thereby ensuring that you will install pageant.exe, plink.exe, and puttygen.exe.
Generate Public and Private Keys
The puttygen utility, installed with putty, generates public and private keys used for secure communication with Gerrit.
...
If you want to edit this key pair in the future, create a text file containing a short phrase, called a "passphrase". Copy and paste this passphrase into the "Key passphrase" and "Confirm passphrase" lines, then select "Save public key" and choose a filename (e.g. public.txt); also "Save private key" and choose another filename (e.g. private.ppk). Since you ran puttygen as Administrator, the files are visible to Windows Explorer.
Close puttygen.
Load Your Private Key Into Pageant
Pageant is an SSH authentication agent. It holds your private keys in memory, already decoded, so that you can use them often without needing to type a passphrase.
...
| Panel | ||
|---|---|---|
| ||
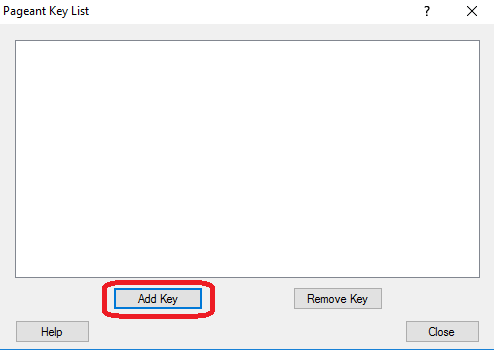
You can right-click on this icon to perform actions with pageant, including "View Keys" (which brings up a dialog box that allows you to add or remove keys.)
The "Add Key" button offers another way to enter your private key into pegeant: after clicking on "Add Key", select the file containing your private key (for example, |

Set the GIT_SSH Environment Variable
From the Desktop, right-click the Windows logo at the very bottom left corner of the screen,  , and select "System". Within the System dialog box, select "Advanced system settings" to get the Power User Task Menu.
...
Copy/paste the known_hosts entries listed, into a file named known_hosts under your .ssh profile (something like C:\Users\<my-id>\.ssh) (if known_hosts does not exist, create it).
Installing IntelliJ Community Edition and the Java SDK on Windows
If you are using IntelliJ to do Java compilations, download the IntelliJ installation image from https://www.jetbrains.com/idea/. The installation dialog gives you the opportunity to associated IntelliJ with file type .java, among others. Installation takes several minutes.
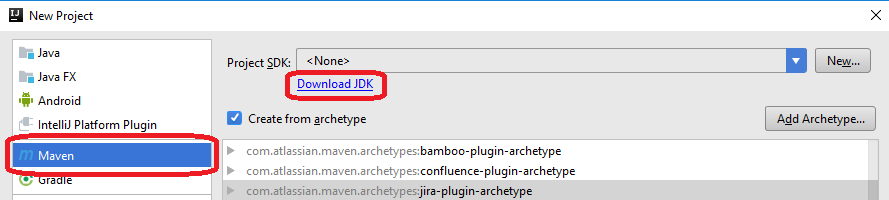
When you start your first IntelliJ project, you will need to specify the Java Software Development Kit (SDK) as the project's. If you do not have the Java SDK installed on your machine, you can download it from within IntelliJ by selecting Maven as the New Project type and clicking on "Download SDK": (Or, visit http://www.oracle.com/technetwork/java/javase/downloads/index.html).
Installing the Gerrit plugin in IntelliJ
Open File -> Settings -> Plugins of IntelliJ, and click on the Browse repositories... button.
...
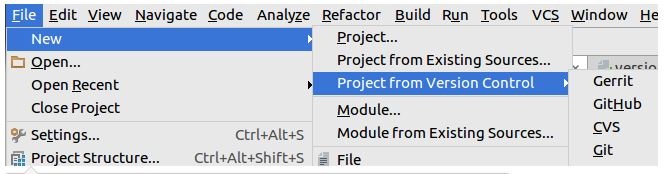
To verify whether the Gerrit plugin is installed successfully, you can click File -> New -> Project from Version Control and verify whether Gerrit is present.
Other Tools
The component you are working on may require additional tool installations, see the relevant section under Development Guides.
Selecting a connection method
Once Git is installed, you will need to select a connection method to the Gerrit host, https://gerrit.openecomp.org/.
We recommend using SSH, in which case you need to register your private key in your account settings on the Gerrit host. However, if you are using a Virtual Private Network (VPN), you will require the HTTPS method, since most VPNs won't allow an ssh connection.
SSH Connection (Recommended)
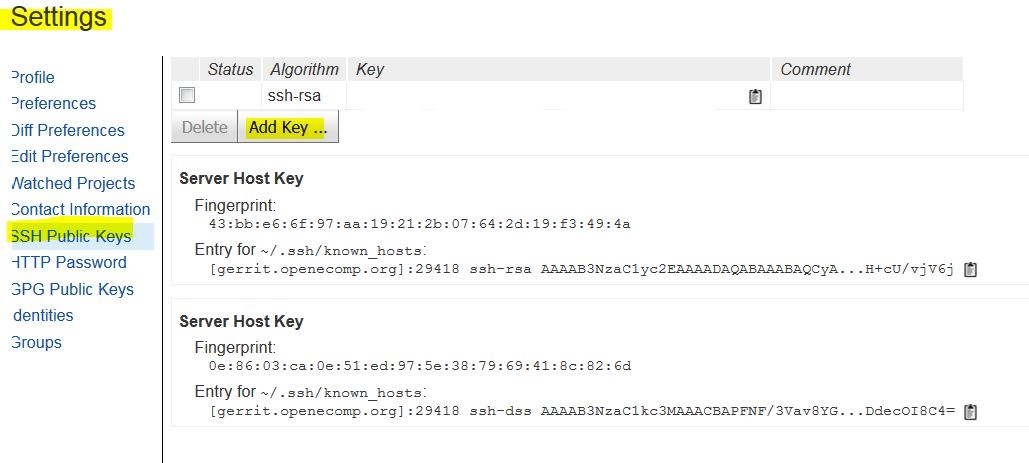
Log in to the Gerrit host https://gerrit.openecomp.org/, pull down the menu under your user name (at the extreme top right of the browser window), click on "Settings" and select "SSH Public Keys". Enter the public PuTTY key you generated above (by copying and pasting the entire contents of the file public.txt, in our example above.)
HTTPS Connection (Alternate)
If you choose to use HTTP/HTTPS, you'll need to generate an access password. To do so, In your Gerrit account settings, select HTTP Password:
...
Regenerating a password will most likely solve the connectivity issue. Sometimes, the Gerrit interface on HTTPS might be temporarily faulty, so retries might be needed.
Working with a Proxy
For developers working with a proxy, you might have proxy issues connecting to Linux Foundation website. To avoid the connection issue, you must define the proxy setting for both IntelliJ and Git.
...