The purpose of this page is to describe different methods that can be used to include a custom BPMN workflow to ONAP SO (Casablanca Release)
Add workflows to source code
- Add the custom BPMN files to "so/bpmn/so-bpmn-infrastructure-flows/src/main/resources/process/".
- Add the groovy files to "so/bpmn/so-bpmn-infrastructure-common/src/main/groovy/org/onap/so/bpmn/infrastructure/scripts/".
- Build the SO project as described earlier.
- You should be able to observe your workflows in Camunda cockpit.
This option might be useful case you have several SO project customization and you are already building your own SO project.
Case you need to add a custom workflow to a running ONAP instance, you can use one of the below methods :
Prerequisite : For ONAP casablanca release, Camunda apps are not exposed by default, so in order to be able to access Camunda applications (rest-engine, cockpit, tasklist,..), you need to expose the so-bpmn-infra deployment in your running ONAP instance.
| Ex. : use "kubectl -n onap expose deployment onap-so-so-bpmn-infra --type=NodePort --name=onap-so-bpmn-infra-svc-expose" to get a new port for camunda applications pod. |
|---|
Using Camunda Modeler deploy option
- Open the workflow using the Camunda modeler application.
- Click "deploy" button.
- Enter the deployment name (can be any name you like to use).
- Enter ONAP-SO camunda REST engine URI :
- Use your ONAP IP address & "so-bpmn-infra" deployment exposed port number.
Note that for ONAP-SO casablanca release, the URI path is
http://{{onap_LB@}}:{{camunda_Pod_Port}}/sobpmnengine/deployment/create instead of the original Camunda URI "engine-rest/deployment/create".
- Select "None" for authentication.
- Click Deploy.

- For successful deployment you should receive " Deployment Successful" message.

- Use the Camunda cockpit application to view your custom workflow.
Using cURL
- This method is useful in case you need to include some script files in your deployment.
- Specify Script format (JavaScript, groovy,..).
- Specify Script type as "External Script" in your script task.
- Refer to the script name using URI "deployment://{{script_file_name}}".

Use below cURL command to deploy the BPMN file and its associated scripts to your running ONAP instance
curl -w \
-H "Accept: application/json" \
-F "deployment-name=rest-test" \
-F "enable-duplicate-filtering=false" \
-F "deploy-changed-only=falses" \
-F "ExternalScript.bpmn=@/PATH_TO_BPMN_File/ExternalScript.bpmn" \
-F "externalScript.js=@/PATH_TO_SCRIPT_File/externalScript.js" \
http://{{onap_LB@}}:{{camunda_Pod_Port}}/sobpmnengine/deployment/create
- Use the Camunda cockpit application to view your custom workflow.
Running the custom workflows
You can run the workflow directly using below URI
| http://{{onap_LB@}}:{{camunda_Pod_Port}}/sobpmnengine/process-definition/key/{{BPMN_NAME}}/start |
|---|
The above link will bypass the API handler and run the required workflow directly.
How SO links a Service or VNF to a workflow ?
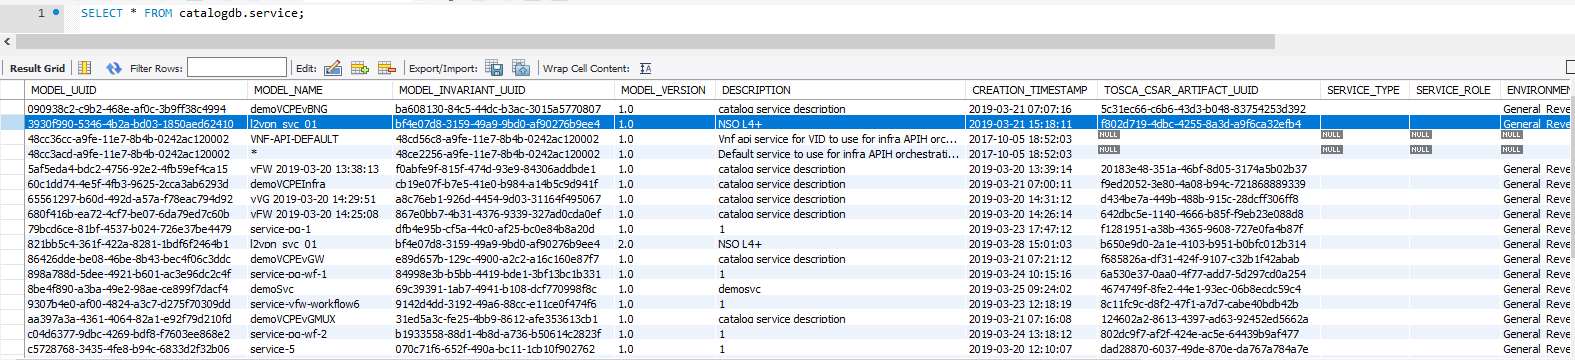
To be able to run the workflows via the APIhandler, you first need to manually create a link between the service UUID and the associated workflow in the service, service_recipe and vnf_recipe tables in SO db (catalogdb) , in order to have SO trigger the custom workflow when the createinstance action is triggered to SO API handler.
For example below, you can see in the screenshot how a custom workflow is added and linked to a specific service model in the SO service_recipe table.

You can find the SERVICE_MODEL_UUID from the services table, when a new service model is distributed from SDC to SO, a new row with the service model UUID will be created there.
Where are the BPMN workflows in SO ?
If you check the camunda database schema here https://docs.camunda.org/manual/latest/user-guide/process-engine/database/
The process definitions are in the act_re_procdef table in camunda db:

Inside so-bpmn-infra /app/app.jar, if we follow the path from the table above, we can find all the bpmn, e.g. BOOT-INF/classes/process/CreateVfModuleInfra.bpmn, as shown in the screenshot below.

2 Comments
Harry Huang
Hi, i find this post quite useful but somehow my SO failed to find the bpmn URL i created during test.
l created a bpmn called "bpmnTest" and looks like it's already been deployed successfully:
and here's the recipe:
but in SO log there's an exception about no processes deployed with key 'bpmnTest':
is there anything i have missed ?
Bilal Iqbal
Hi Harry Huang ,
I was able to run my sample flow following this page as well quite useful indeed didn't have to do anything else, somethings I'll suggest that might help unless you tried them already.
From looking at the log it seems process-definition doesn't exist based on the key given, you can check this by running a curl on `...process-definition?key=bpmnTest` to see if it exists or not, since deployments can and may not be the same name as process-definitions keys (which I believe are based on bpmn process_id) so it could just be the name/key issue.
Also, you could check the key inside camundadb db `act_re_procdef` table to verify the value of the key for your bpmn.
If the above is correct, you can test that by triggering the flow directly using the rest api:
http://{{onap_LB@}}:{{camunda_Pod_Port}}/sobpmnengine/process-definition/key/{{BPMN_NAME}}/start
or
http://{{onap_LB@}}:{{camunda_Pod_Port}}/sobpmnengine/process-definition/{{process_definition_id}}/start
/Bilal