Table of Contents
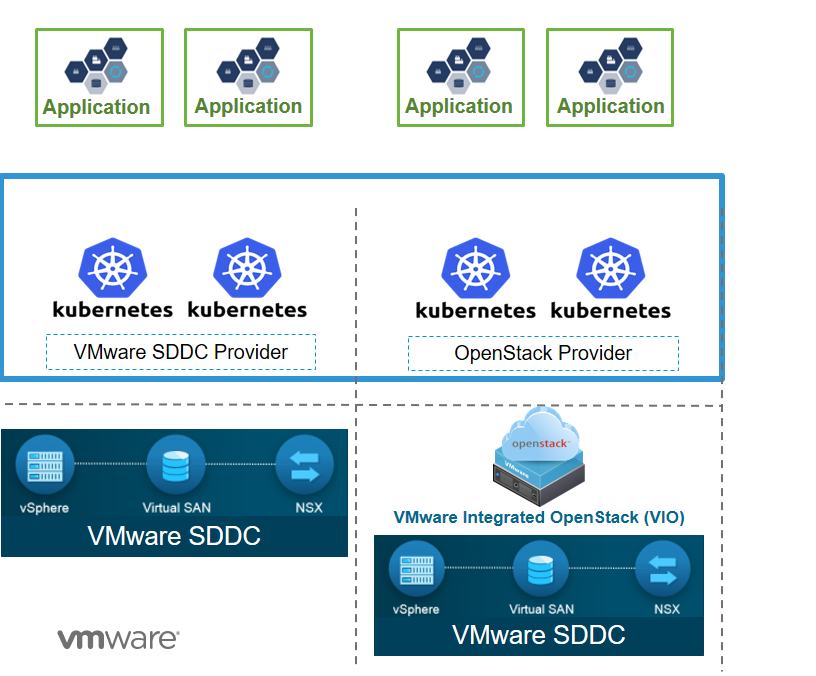
VMware VIO 4.1 Kubernetes Architecture
VMware VIO supports Container Orchestration. Container Orchestration can be used a product or as a service. This page captures the information and steps to deploy ONAP using OOM on VI0 4.1 with Kubernetes using 'OpenStack' as the Cloud Provider.
Prerequisites
- VMware Integrated OpenStack 4.1.
- VMware Integrated OpenStack 4.1 with Kubernetes.
- A SSH Client - (Example: MobaXTerm - Download).
Software Requirements
OOM Software Requirements
| Release | Kubernetes | Helm | Kubectl | Docker |
|---|---|---|---|---|
| Amsterdam | 1.7.x | 2.3.x | 1.7.x | 1.12.x |
| Beijing/Master | 1.8.5 | 2.7.x | 1.8.5 | 1.12.x |
Minimum Hardware Configuration
OOM Hardware Requirements
| RAM | HD | vCores | Ports |
|---|---|---|---|
| 128 GB | 160 GB | 16 | 0.0.0.0/0 (All Open) |
Procedure
Step 1: Login to VMware Intergrated OpenStack 4.1 with Kubernetes
- Go to your web browser (Firefox/Chrome Recommended).
- Visit https://FQDN/login or https://VIO_K8s_IP_Address/login

Step 2: Create a Cloud Provider
- Go to Cloud Provider and click on Deploy New Provider.

- If you have a JSON File with all the configurations, then click on Choose File and upload the JSON.
Otherwise, click Next.
- Give a Provider name and select OpenStack as the Provider type, then click Next.

- We need to provide OpenStack Authentication now to add it as the Cloud Provider.
Give the Keystone Public URL, Username, Password, Project name, Region name, Domain name and upload the CA Certificate.
(CA Certificate is an important step for successful OpenStack Authentication, you can found more details about the certificate on the Page 34 of this PDF.)
Click Next.
- Now, we need to select the Image which will be used to deploy the Kubernetes Master and Worker Nodes.
We are selecting Ubuntu 16.04 as the image for our deployment.
Give the Image username and Select an image from the list.
(This list will be fetched from your VMware Integrated Openstack deployment post successful authentication.)
- Now, we need to select the Flavor which will be used to deploy the Kubernetes Master and Worker Nodes.
We are selecting m1.oom as the flavor for our deployment. This is a custom flavor created on VMware Integrated OpenStack 4.1.
(It is recommended to create a flavor which meets the minimum hardware configurations as described above in this document.)
Select a flavor from the list. (This list will be fetched from your VMware Integrated Openstack deployment post successful authentication.)
Click Next.
- If you are not using NSX-T, then you can click Next.
If you are using NSX-T, then give then Manager address, Username, Password, Tier 0 Router and Transport zone.

- Now, we need to select the Security Group which will be applied to all the cluster nodes. All the security groups created by you will be listed here.
Select security group(s) has a list of groups with their names, select them as per your requirements.
Click Next.
- Now, we need to select the External Network which will used to expose Kubernetes Cluster API and also for external services. All the external networks created by you will be listed here.
Select external network has a list of external network with their names, select the external network as per your requirement.
(Please make sure that at least two floating IPs are available.)
Click Next.
- Now, we need to select the Internal Network, it should be connected to the External Network via a router and should have atleast one subnet. All the internal networks created by you will be listed here.
Select internal network and Select a subnet has a list of internal networks and subnets with their names, select the internal network and subnet as per your requirement.
Click Next.
- Now, check the Configuration Summary and verify the information.
If you wish to download the JSON of your configurations, click on Download Provider JSON.
Click Finish to add the Cloud Provider.
- The addition of Cloud Provider is pretty quick and it should be added instantly as soon you click Finish. If not then kindly wait for few minutes.
- You can check your Cloud Provider on the page.
It should show the state as ACTIVE, denoting successful addition of Cloud Provider.
- You can get additional information regarding a Cloud Provider by clicking on it's name.

Step 3: Create a Kubernetes Cluster
- Go to Clusters and click on Deploy New Cluster.

- If you have a JSON File with all the configurations, then click on Choose File and upload the JSON.
Otherwise, click Next.
- Select an Infrastructure Provider, it shows a list of all the Cloud Providers you have added.
Select the one on which you want to deploy your Kubernetes Cluster.
Click Next.
- Select an Infrastructure Node Profile, it is the configuration using which your Kubernetes Cluster will be deployed.
If you want to use the default profile, click on the checkbox of Use default node profile.
(You can also add your own profiles from the Cloud Provider section and then select the one on which you want to deploy your Kubernetes Cluster from the list.)
Click Next.

- Now, we need to add Cluster Data.
Give the Cluster Name, Number of Master Nodes, Number of Worker Nodes, DNS Servers and Cluster Type (Shared or Exclusive).
(In an exclusive cluster, multi-tenancy is not supported. In a shared cluster, multi-tenancy is supported and enforced by the Kubernetes namespace.)
Click Next.
- Now, we need to add Users & Groups for this cluster.
Select the Users and Group from the list, or we can provide additional users and groups if they are not created.
Click Next.
- Now, check the Kubernetes Cluster Deployment Summary and verify the information.
If you wish to download the JSON of your configurations, click on Download Cluster JSON.
Click Finish to start the deployment of Kubernetes Cluster.
- The deployment of Kubernetes Cluster takes some time as compared to Cloud Provider.
Please be patient while the Cluster is being deployed. Once deployed, the state of cluster will change from CREATING to READY.
During the deployment process, the cluster state will be CREATING.
After the successful deployment process, the cluster state will be ACTIVE.
Login to your VMware Integrated OpenStack Horizon to verify that the Kubernetes instances have been deployed.
Step 4: Login to Kubernetes Master and Workers Nodes
SSH into the VMware Integrated OpenStack with Kubernetes.

Once you are logged into VMware Integrated OpenStack with Kubernetes, use the following command with the same username and password used during SSH:
#vkube login --insecure

Get the list of all the clusters along with their Cluster ID, use the following command:
#vkube cluster list --insecure
Make a note of the Cluster ID of the cluster you want to access or know more about.

Get the detailed information about the nodes running on a particular cluster, use the following command:
#vkube cluster show <Cluster ID> --insecure
Make a note of the IP of the Master and Worker Nodes.

Get a list of all the docker containers running in background.
#docker ps -a

Get an interactive shell of the docker conatiner with the name app-api.
#docker exec -it <Container ID or Name> /bin/bash
After this command, you'll get a shell of a running container.

Once we are inside a running container, change the directory and go the cluster location using the following command:
#cd /var/lib/vrc/terraform/<ClusterID>

Once you are into the correct directory, use the following command to SSH into the Kubernetes Master or Worker Node depending on the IP Address:
#ssh -i private.key -F ssh-bastion.conf ubuntu@Kubernetes_Host_IP_Address

Once you are inside the Kubernetes Nodes, you can deploy ONAP, or troubleshoot an error as per your requirements.
Step 5: Deploy ONAP
Log in to the Master Node (as described in the steps above) and then follow the steps for ONAP Deployment.
The detailed documentation for the ONAP Deployment can be found on GitHub and ONAP Docs.
Troubleshooting
- During the deployment process if there is an error, the cluster state will be changed to ERROR.

You can delete your cluster in case of an ERROR, the cluster state will be changed to DELETING.

During the creation of your cluster, you can login to your VMware Integrated OpenStack Horizon and check if the correct number of instance have been deployed or not. If they are there then the deployment is in progress else there is a possiblity that the deployment has faced some error.