...
Current ONAP modelling tool versions
- Papyrus: 2020-06 (4.8.0)
- Available here: https://www.eclipse.org/papyrus/download.html
- Based on Eclipse 2020-06 (4.16)
- Note that this version of Papyrus requires a Java 1.8 (or higher) JVM
- GenDoc: version 0.7.2
- Update site here: http://download.eclipse.org/gendoc/updates/releases/0.7.2/2019-09
- Still TBD – check if gendoc will generate documents when the path to the Papyrus files has a space in it.
...
For current versions of Papyrus, both Eclipse and the Papyrus plugin are bundled together in a single installation package. Note that it's possible to install more than one version of Eclipse/Papyrus on the same machine.
Installing Papyrus
...
Check the status of the Eclipse Foundation servers
Before installing any Eclipse software, always check the status of the Eclipse Foundation servers! Installations can fail or act unpredictably if their servers are not fully operational.
The status is reported here: https://www.eclipsestatus.io/
Installing Papyrus
- Papyrus installation packages can be downloaded from here: https://www.eclipse.org/papyrus/download.html
- Select the download link that is appropriate for the machine on which you will be making the install, ex. "Windows 64-bit".
- This results in the download of a zip file.
- Extract the contents of the zip file to a directory from which you will start Papyrus. On a PC, "Program Files" is always a good option.
- The content of the extracted files should look something like this:
...
- GenDoc releases are available here: https://www.eclipse.org/gendoc/downloads/download.php
- The easiest way to install GenDoc is to copy the URL to the update site from that page and use that it directly in Papyrus.
- In Papyrus, go to the menu item "Help" → →"Install new software...". An "Available Software" popup window should appear.
- In the "Work with:" section, paste in the GenDoc update site for the appropriate release (for example http://download.eclipse.org/gendoc/updates/releases/0.7.2/2019-09) and hit enter.
- Select the Gendoc package. You should see something like this:

- Click the "Next >" button and follow the instructions to complete the installation.
- Note: You may get a warning message about installing software that contains unsigned content - select "Install anyway".
- When the installation is finished, restart Eclipse Eclipse will prompt for a restart. Accept the restart to begin to use GenDoc.
Checking the versions of the tools
...
- To verify you have the correct version of Papyrus, go to the menu item "Help" → →"About Papyrus".
- A popup window should appear that shows the Eclipse version (NOTE: not the Papyrus version) and looks something like this:

...
- To verify you have the correct version of Papyrus, open GenDoc, first follow the instructions above for checking the version information for Eclipse (see above).
- Click on In the "Papyrus Installation Details" to popup, when GenDoc is properly installed, you should see something like these:
...

Tips and Tricks in Eclipse
EGit (Eclipse/Git)
If you encounter unanticipated problems when following the procedures below for working with Eclipse/Git, check http://wiki.eclipse.org/EGit/User_Guide for possible solutions.
Workspaces
A workspace is a directory where Eclipse projects, with associated models and files, are stored. It's possible to have several workspaces, but only one is active at a time. Preferences for Eclipse and its plugins are also local to a workspace.
Note that local GIT repositories are not stored in the workspace itself, but there is a link from the workspace to the GIT repository being used in that workspace.
Important: if you open a workspace in a different version of Eclipse than previously used, Eclipse will update the workspace to match that version.
- When Eclipse starts, a popup window normally asks you to select a Workspace, with many different options for selection:
. You can also create a new workspace by writing in a new directory name in the Workspace field.
- Within Eclipse, you can switch between workspaces by going to go to the menu item "File"→"Switch Workspace".
- Clicking "Other..." brings up a popup window similar to the one shown on startup, but that also allows you to copy workspace settings from the current workspace to a new one.Note
Important: It's possible to delete a workspace by simply deleting its directory when it is not active in Eclipse. This will delete all content that is stored locally there, so be sure before deleting!!!
Perspectives
A perspective is a view in Eclipse that contains a series of selection and content editor areas. The perspective has an initial layout that you can change by collapsing, expanding or moving around the different areas.
- Eclipse has a number of pre-defined perspectives associated with different tasks and plugins. In ONAP we mainly use the perspectives for Papyrus and for Git.
- To change perspective, go to the menu item "Window"→"Perspective"→"Open Perspective"→"Other" To change perspective, go to "Window→Perspective→Open Perspective→Other" on the top of your screen and then select the perspective that you want to use:

- Another quick way to change perspective exists on the top right side of your screen. Next to the "Quick Access" bar, you will see a number of small icons:

- Select the icon for the perspective that you want to use. The storage/cylinder icon marked "GIT" is for Git, and the bird icon is for Papyrus.
- If you don't see the icon for the perspective that you want to use, clicking the icon with the "+" to the left of the predefined perspectives brings you to the same popup window as going to the menu item "Window"→"Perspective"→"Open Perspective"→Other".
- If you have moved around or minimized some of the view areas and can't find something you're looking for, you can reset the perspective to its default by first selecting the menu item "Window"→"Perspective"→"Reset Perspective..." and then clicking "Reset Perspective" in the popup window.
EGit (Eclipse/Git)
If you encounter unanticipated problems when following the procedures below for working with Eclipse/Git, check http://wiki.eclipse.org/EGit/User_Guide for possible solutions.
Using the ONAP Model with Gerrit
...
- You must first generate an SSH key within Eclipse/Papyrus.
- Go to the menu item "Window"→ "Preferences", then "General"→ "Network Connection"→ "SSH2".
- Select the "Key Management" tab and click "Generate RSA Key...".
...
- If this is a first-time that you're updating the model, make sure that you first have set up the user information for Gerrit properly. See these instructions: ONAP Gerrit user setup in Eclipse
- Next, go to the Git perspective by selecting "Window"→"Perspective"→"Open Perspective"→"Other..." on the top of your screen and then select "Git".
- Once in the Git Perspective, select the repository where you have changed the files:

- Select the "Git Staging" tab in the lower right hand portion of your screen (it might also be on the right-hand side of your screen based on your layout)
It looks like this: with a little green down-arrow
 - The Git Staging window looks like this:

- You will see all of the files that you have changed in the "Unstaged changes".
- Note: If there is a file in the list that you did not intend to change, you can revert the unwanted changes by right-clicking on that file and selecting "Replace with HEAD revision".
- For each changed file that you want to stage, right-click and select "Add to index". Once they have been added, the files will move to "Staged Changes".
- As a shortcut, you can select the little green "++" sign that will add all the files for you:

- After you hit the green "++" it should look something like this:

- As a shortcut, you can select the little green "++" sign that will add all the files for you:
...
- Now you are ready to select "Commit and Push". This commits your local changes and pushes them to the remote Gerrit repository (which should be the working branch).
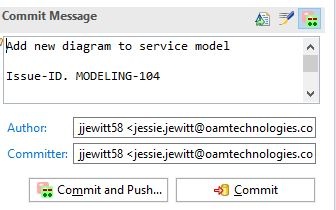
- Note that the "Committer" must correspond to the user name and email you have associated to your Gerrit account. If they don't, follow the instructions here: ONAP Gerrit user setup in Eclipse
- After you press "Commit and Push...", you will see this popup:

- Click "Finish".
...