...
- Make sure to fill in your ONAP Gerrit password. This should be the same as for logging in to Linux Foundation. Once the screen is filled in, select "Next".
- It will then prompt you for the branches to select. Click "Deselect All", then choose just "master" and click "Next". The popup should looks like this:

- You will then be prompted to select create a local directory on your machine into which the model should be loaded by Git.
- It can be any location you want, and not necessarily the workspace you are using for Eclipse/Papyrus projects.
- Check the box "Import all existing Eclipse projects
- after clone finishes". Your screen at this point should look something like this:
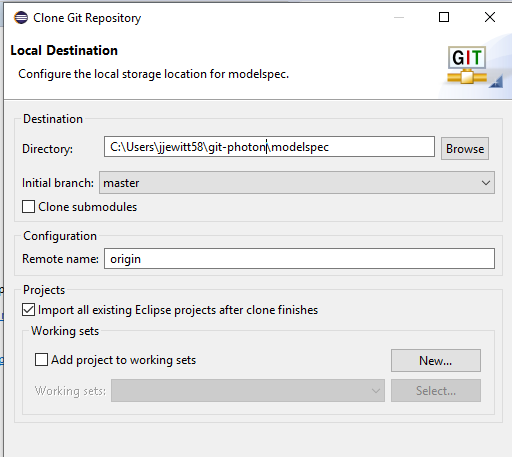
- Select "Finish".
- For a first-time setup, you may get the following message. Select "Yes".

- For a first-time setup, you may get the following message. Select "Yes".
- The cloning process should complete, and the repository should be created on your local machine.
- The view below shows an example of the newly created repository which has been opened up down to the level of the "Local" folder. Only the "master" branch should show up as your "Local".
...
- Go to the Papyrus perspective by selecting , for example by selecting the menu item "Window"→"Perspective"→"Open Perspective"→"Other..." on the top of your screen and then select selecting "Papyrus".
- This perspective should show a "Project Explorer" on the left side of the screen that looks something like this:

- You should see your newly created Eclipse/Papyrus project in the "Project Explorer" on the left side of the screen. (ignore the question mark, it shouldn't be there)

- The text in light brown is telling you that your project is in the modelspec repository you just created, in the branch "master". Note that all model work is being performed in the "master" branch.
- If you do not see the project in the "Project Explorer", probably you forget to check the box to import all existing Eclipse projects when cloning the model. To fix this, switch to the Git perspective, select the repository name or the Working Tree, then right-click and select "Import projects...".
- If you click on the ">" to open/explore the ONAP Information Model folder, you will see something like:

...
Updating the Model in Gerrit
Only approved model editors can update the working branch in Gerrit. To be a model editor you must undergo Papyrus training.
- Current model editors for each submodel are specified here.
Before making changes, always ensure that you have the latest version of the model from the ONAP Gerrit repository.
- If you have not yet cloned the model, the clone process will provide you with the latest version.
- If you have already cloned the model into your workspace, make sure to "Fetch" the latest updates from Gerrit before making any changes.
Once you have finished making your model changes, select "File"→"Save" or click the Save icon.
Staging changes
Only changes that have been staged will be included in the Push to Gerrit.
- If this is a first-time that you're updating the model, make sure that you first have set up the user information for Gerrit properly.
- See these instructions: ONAP Gerrit user setup in Eclipse
- Next, go to the Git perspective, for example by selecting "Window"→"Perspective"→"Open Perspective"→"Other..." on the top of your screen and then select selecting "Git".
- Once in the Git Perspective, select the repository where you have changed the files:

- Select the "Git Staging" tab in the lower right hand portion of your screen (it It might also be on the right-hand side of your screen based depending on your layout.)
- It looks like this

- , with a little green down-arrow:
- The Git Staging window looks like this:

- You will see all of the files that you have changed in the "Unstaged changes".
- Note: If there is a file in the list that you did not intend to change, you can revert the unwanted changes by right-clicking on that file and selecting "Replace with HEAD revision".
- For each changed file that you want to stage, right-click and select "Add to index". Once they have been added, the files will move to "Staged Changes".
- As a shortcut, you can select the little green "++" sign that will add all the files for you:

- After you hit the green "++" it should look something like this:

- As a shortcut, you can select the little green "++" sign that will add all the files for you:
...