- Login to ONAP portal as a designer user
- Navigate to SDC application
- Navigate to ONBOARD tab
Click on CREATE NEW VLM Fill all mandatory parameters Add License Key Groups and fill all mandatory parameters Add Entitlement Pool and fill all mandatory parameters Add Feature Group fill all mandatory parameters and add already created Entitlement Pool and License Key Group Add License Agreement fill mandatory parameters and add already created Feature Group - Press Submit button and next COMMIT & SUBMIT button
- Navigate to ONBOARD tab
Click on CREATE NEW VSP Fill all mandatory parameters: - select Vendor defined in already created VLM
- Name will be used in next steps
- in ONBOARDING PROCEDURE select Network Package
- Click on warning under License Agreement
- Fill Licensing Version, License Agreement and Feature Groups from already created VLM
- Cick Click on Overview from left menu and press SELECT FILE button.
- Select attached pnf pNF.csar file from your PC
- Press Submit button and next COMMIT & SUBMIT button
- Navigate to Home tab
- Click on ADD + IMPORT button and select Add PNF IMPORT VSP
- Select previously created VSP and press IMPORT VSP button
- In newly opened window yoiu can moduify PNF name.
- Next click Create and Certify buttonIn HOME > Create new resource > General page fill all mandatory fields and press Create button in right top corner
- Next press Certify button. Put comment message in Certification confirmation pop-up and press OK button
- Navigate to SDC tab / HOME menu
- Click on ADD + button and select Add Service
- In HOME > Create new service > General page fill all mandatory fields (change service type from defautl default a'lacarte to macro) and press Create button in right top corner
- Go to Composition in left menu
- In search box find crated PNF using its name
- Drag ad drop it to main view
- Next press Submit for Testing button, fill Message field and press OK button
- Re-login as a a tester user
- Navigate to SDC tab / HOME menu
- From main view select Service submitted for testing
- click Certify button
- Next Press Distribute Press Start Testing button in left top corner and next Accept button.
- Press Monitor button in left top corner and verify distribution status, use refresh Put comment message in Certification confirmation pop-up and press OK button
- Re-login as a a governance demo user
- VID Navigate to SDC tab / HOME menu
- From main view select previously created Service
- Press Approve button in left top corner and put comment message in Certification confirmation pop-up and press OK button
- Re-login as a l as a ops user
- Navigate to SDC tab / HOME menu
- From main view select previously created Service
- Press Distribute button in left top corner
- Press Monitor button in left top corner and verify distribution status, use refresh button
- Re-login as a a demo user
- VID Navigate to application
- From left menu select Browse SDC Service Models
- application
- From left menu select Browse SDC Service Models
| - User is logged in
- SDC application is open
- de
- e
- e
- e
- e
- e
- e
- e
- e
- e
- e
- e
- e
- e
- e
- e
- e
- e
- e
- e
- e
- PNF is successfully Certified
- SDC application is open
- Page HOME > Create new service > General with fields that must be filled out is open
- Create/Update saved
- User is logged in
- SDC application is open
- Page HOME > Create new resource > General page with fields that must be filled out is open
- Create/Update saved successfully message is present in left top corner
- PNF is sucesfully Certified
- SDC application is open
- Page HOME > Create new service > General with fields that must be filled out is open
- Create/Update saved successfully message is present in left top corner
- Composition main view is open
- PNF is visible
- PNF is added to service
- Submitted For Testing Submitted successfully for testing message is present in left top corner
- User is re-logged
- SDC application is open and newly created Service is visible in main view
- Page with Service configuration is open
- Start Testing Tested successfully message is present in left top corner
- Accept Accepted successfully message is present in left top corner
- User is re-logged
- SDC application is open and newly created Service is visible in main view
- Page with Service configuration is open
- Approve Approved successfully message is present in left top corner
- User is re-logged
- SDC application is open and newly created Service is visible in main view
- Composition main view is open
- PNF is visible
- PNF is added to service
- Service is Cerified and ready for DistributionPage with Service configuration is open
- Distribute Distribute successfully message is present in left top corner
- Monitor main view is opened with information about distribution
- User is looged to rancher node
- User is looged to mariadb pod
- User is looged to mysql
- Catalogdb is selected
- . Thesr should not be any errors.
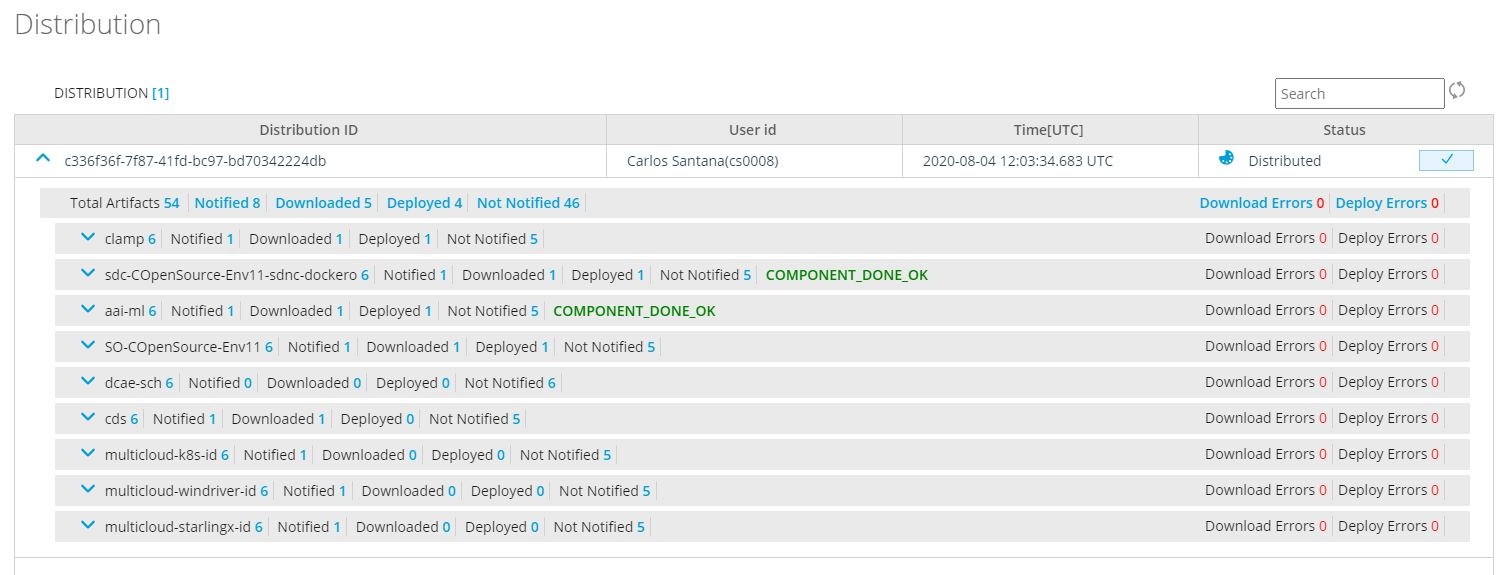 Image Added Image Added - User is
Service recipe is added to service recipe table: User is re-logged - VID application is open
- in In Browse SDC Service Models main view is present entry about newly created service
|