...
- The system will generate a key for you and place the key in the same window. Select "Save private key" which will save your key as id_rsa.
- Note: You may be asked if you want to save this private key without passphrase protection - select OK.

- A window will pop up with a location and a name for the key - just click Save.

- Before you hit "Apply and Close", "copy/paste" that key so that you can upload it into Gerrit.
Uploading an RSA key from Eclipse into ONAP Gerrit
- Login to Gerrit (https://gerrit.onap.org/)
- Click your name at the top right.
- Go to Settings → SSH Public Keys
- Click Add Key.
- Go back to Eclipse and go to "Window→ Preferences→ General→ Network Connection→ SSH2" → LOAD EXISTING KEY
- Paste the text of your public key into the text box.
Click Add.
ONAP Gerrit user
...
setup in Eclipse
To be able to push model changes to Gerrit, your "committer" user information in Eclipse/Git must correspond to the user name and Gerrit need to match.
Cloning the Model
email you have associated with your Gerrit account.
- To see these settings in Gerrit (https://gerrit.onap.org/), click on the drop down next to your name and choose "settings". You will see your user name and email.
- To check the committer information being filled in by Git in Eclipse, go to Eclipse and go to: Window → Preferences → Team → Git-Configuration → User Settings

- If User Settings is empty or the information doesn't match your settings in Gerrit, you will need to update your User Settings. Sometimes on an initial setup, your settings may not be writable.
- First check that the Location field points at a valid Git config file. If you're unsure, click on "Open". This should open the .gitconfig file in the background in Eclipse.
- Note: if you want to switch to the opened file and see its contents, you'll need to close the settings window and reopen it.
- If the specified .gitconfig file isn't valid and writable, you may be able to fix this by exiting Eclipse, specifying your home directory in Windows, and reopening Eclipse. Follow the instructions here: http://wiki.eclipse.org/EGit/User_Guide#Setting_up_the_Home_Directory_on_Windows
- First check that the Location field points at a valid Git config file. If you're unsure, click on "Open". This should open the .gitconfig file in the background in Eclipse.
- Once your User Settings are editable:
- Select "add entry". Type in as a key "user.name" and provide your user name from Gerrit.
- Then select "add entry" again, type in "user.email" as a key and provide your email from Gerrit.
Cloning the Model
The ONAP model currently resides in Gerrit in the modeling/modelspec repository. In order to download the model to your machine, to The ONAP model currently resides in Gerrit in the modeling/modelspec repository. In order to download the model to your machine, to either visualize it or make updates, you will need to clone it in Eclipse/Git. Steps to do this:
- Bring up your Eclipse/Papyrus that you installed in the previous steps, if you haven't done so already.
- Note: you may have to CLOSE THE ECLIPSE WELCOME PAGE.
- Note: If you were previously using Papyrus ONAP model when it was in a "Private" GitHub, you will have to select that repository, right click, and select "Delete Repository". Make sure you delete all files.
- Go to the Git Perspective by selecting "Window->Perspective→Open Perspective→ OtherWindow→Perspective→Open Perspective→Other" on the top of your screen and then select "Git".
- Note: Another quick way to get to this perspective exists on the top right side of your screen. You will see "Quick Access". Select the "Git

- Note: If you were previously using Papyrus ONAP model when it was in a "Private" GitHub, you will have to select that repository, right click, and select "Delete Repository". Make sure you delete all files.
- Note: you may have to CLOSE THE ECLIPSE WELCOME PAGE.
- " perspective.

- " perspective.
- Once in the Git perspective, your screen should have the following on top:
![]()
- On the bottom of the picture above, you see a "cloud" with a repository and a green arrow. That is your "clone repository" function in Git. Select that.
- It looks like this:


- It looks like this:
- You will need to fill-in the screen, Source Git Repository that appears with a URI. The format of that URI is:
- ssh://{LF Userid}@gerrit.onap.org:29418/modeling/modelspec
- Ex. ssh://bencheung@gerrit.onap.org:29418/modeling/modelspec
- Based upon what you have just entered, the rest of the screen gets populated with the correct info. It should look something like this:

- Make sure to fill out your USER and PASSWORDin User and Password with your LF Userid and password. Once the screen is filled in, select "Next"
- The popup should looks like this

- .
- It will then prompt you for the branches to select. Choose: "master" (DESELECT everything else) and Click "Next". The popup should looks like this:

- You will then be prompted to select a local directory on your machine into which the model should be loaded. It can be any location you want, and not necessarily the workspace you are using for Eclipse/Papyrus projects. As an "initial branch", select "master". Select the option "Import all existing Eclipse projects...". Your screen at this point should look like this:


- Also remember to check the box to import all existing Eclipse projects.
- If you forget to do so, you will not see the project in the Papyrus perspective.
- Alternatively, if you forget to select the checkbox,
- In the Git perspective, select the Working Tree, then right click and select import projects
- Note: In order for the above process to work, you may have to exit your corporate VPN.
- Alternatively, go to windows →preferences →general → network connection, and set up a proxy access gerrit, including:
- set to manual
- fill out http and https
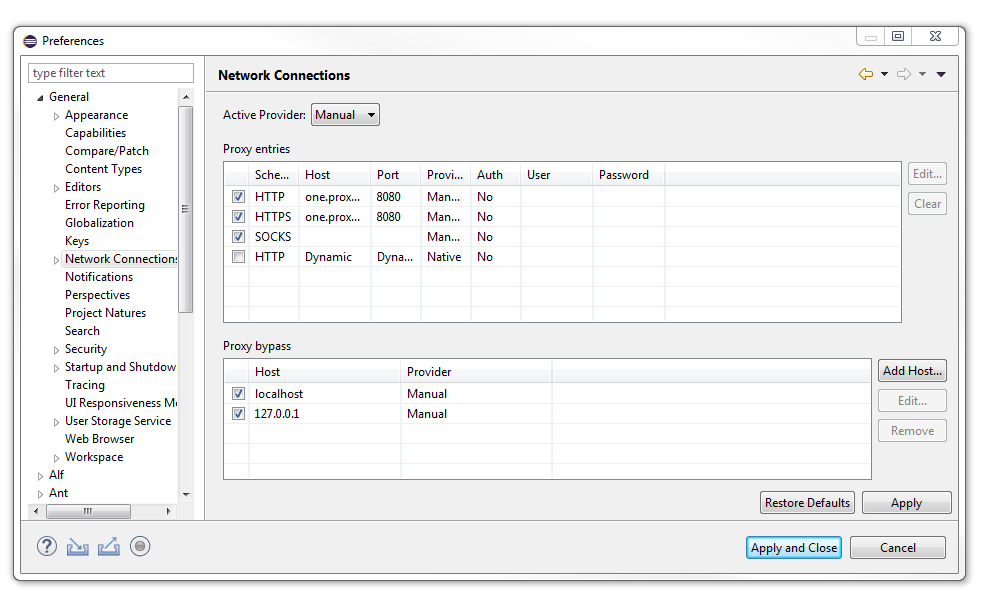
- Alternatively, go to windows →preferences →general → network connection, and set up a proxy access gerrit, including:
...
- Select "finish".
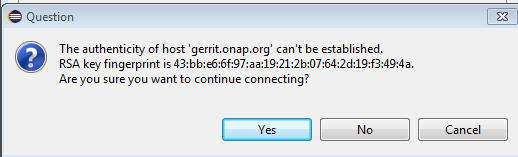
- For a first-time setup, you may get the following message. Select "Yes".
- The cloning process should complete, and the repository should be created on your local machine. If you encounter errors, contact the ONAP model administrator to get help.
- The view below shows an example of the newly created repository which has been opened up down to the level of the "Local" folder. Note: You should have the "master" branch only showing up as your "Local".

Viewing the Model in Papyrus
- Once you have successfully cloned the ONAP model, you can now view it in Papyrus. Go to the Papyrus perspective by selecting "Window->Perspective→Open Perspective→ Other" on the top of your screen and then select "Papyrus". Or, again you can go to "Quick Access" and select the icon that looks like a bird:
- This perspective should show a "Project Explorer" on the left side of the screen.
- You should see a screen that looks like this:
- You should see your newly created Eclipse/Papyrus project in the "Project Explorer" on the left side of the screen. (ignore the question mark, it shouldn't be there)

- The text in light brown is telling you that your project is in the modelspec repository you just created, in the branch "master". We are no longer using the R3working branch. All work is being performed in the master branch.
- If you open up the the ONAP Information Model folder (click on the ">" to open explore the Model), you will see:


- Here is a description of what you have in the ONAP Information Model. Each of the "green birds" represent a Papyrus model. Aside from the Profiles, you have the overall "model" that is composed of "sub-models". Each of the "sub-models" has a model editor that is responsible for editing the model and uploading the changes into Gerrit/Git. Note: two people can not be editing a "sub-model" without clearly communicated coordination, otherwise "model conflicts" arise.
- GenDoc - This is where the GenDoc templates reside for creating an output of the model in Word
- StyleSheets - These are CSS stylesheets to use when formatting the model
- Common - The common submodel of the model (where artifacts used by multiple sub-models are stored)
- Infrastructure - The infrastructure submodel where the multi-cloud artifacts are stored
- model - This is the "umbrella" ONAP model that contains all the submodels
- Nf - Network Function submodel
- Ns - Network Service submodel
- OpenModel_Profile.profile - Contains IISOMI stereotypes
- Party - The party submodel for party related artifacts
- Pnf - The Pnf submodel where PNFD resides
- Resource - The resource submodel for resource related artifacts
- Service - The service submodel for service related artifacts
- Vnf - The Vnf submodel for Vnf specific artifacts
- artifacts
- To see the entire model, double-click on "model". The model will open up in the model explorer which is on the left side of the screen in the center:


- The icon with the triangle saying "model" represents the entire ONAP model. The icons with a little arrow coming out of a circle represent the sub-models.
- Open up any sub-model like you would a folder, and you will see something like the following (in this example it is the Vnf sub-model)


- Each sub-model has the following types of packages
- Associations - Contains all associations used in diagrams.
- Diagrams - Contains UML diagrams
- Interfaces - Contains Component, Interface, and Operation artifacts (usually empty for now)
- ObjectClasses - Contains all class definitions
- TypeDefinitions - Contains all DataTypes and Enumerations.
- Start viewing the model by selecting any diagram, i.e. in the Vnf → Diagrams package.
- Here's a little trick for seeing the associated artifacts in the diagram. In the model explorer bar you will see two arrows opposing each other. Select that double-arrow option:


- What this means, is when you select any artifact on a diagram, i.e. a "Class", the model explorer takes you directly to that artifact in the model explorer tree.
- Now, explore the model yourself by taking a look at all the class diagrams in the sub-models! Note, some of the sub-models are currently empty.
...
- Only approved model editors can update the working branch in Gerrit. To be a model editor you must undergo Papyrus training and attend the weekly Papyrus modeling sessions.
- Current model editors for each submodel are specified here.
- Once you have finished making your model changes, make sure you "save" them in Papyrus, by selecting "File→ Save", or select the file Save icon.
- Next, you will need to go to the "Git" perspective to select the files you have changed and prepare them for uploading to Gerrit.
- Go to the Git perspective by selecting "Window->Perspective→Open Perspective→ Other → Git" like this:


- Once in the Git Perspective, select the repository where you have changed the files.

- Select the "Git Staging" tab in the lower right hand portion of your screen (it might also be on the right-hand side of your screen based on your layout) it
It looks like this:
 with a little green down-arrow
 - You will see the files that you have changed in the "Unstaged changes". Note: If there is a file there that you did not intend to change, right-click on that file and select "Replace with HEAD revision". That will revert any unwanted changes you may have made.
- STAGE CHANGES: Select the files that you did change, right-click and select "Add to index", Or, as a shortcut, you can select the little green "plus" sign that will add the files for you:
- Go to the Git perspective by selecting "Window->Perspective→Open Perspective→ Other → Git" like this:

- The Git Staging window looks like this:

- after you hit the green "++" it looks like this:

- Once they have been added, they will show up in the "Staged Changes"
- COMMIT MESSAGE: Next you will need to prepare to "Commit and Push" your changes. Position your cursor in the "Commit Message" window
- Add a commit message indicating the change you have done, i.e. "Added new diagram to service model" then carriage return twice so that you will have a blank line after your message.
- You can then optionally add a more detailed message about the change.
- JIRA TICKET: Next, you will have to associate the change to a JIRA ticket. Add on the line after the blank line: Issue-ID: MODELING-104
- Note that there is a blank between ":" and "M". The JIRA ticket MODELING-104 is a general ticket for changes to the working branch.
- Note that Git will generate a "Change id" for you, so you don't need to manually add one.
- SIGNOFF (PENCIL) ICON: Then you will need to "Sign-off" on the change by selecting the "Sign-off" button. This is the "Pen" icon next to the "Commit Message". Select that icon
- The Git Staging window looks like this:
![]()
![]()
- Now you are ready to select "Commit and Push". This commits your local changes and pushes them to the remote Gerrit repository (which should be the working branch)


- After you hit the commit and push you will see this popup:

- Note above that the "committer" must correspond to the user name and email you have associated to your Gerrit account. To see these settings in Gerrit, click on the drop down next to your name and choose "settings". You will see your user name and email. If the committer information being filled in by Git is incorrect, go to the following in Eclipse: Window - Preferences- Team - Git-Configuration - User Settings. Select "add entry". Type in as a key "user.name" and give your username in Gerrit. Then type add entry again and type in "user.email" and type in your email in Gerrit.
- Once your changes have been successfully committed and pushed to Gerrit, you will see the results:
- Now you are ready to select "Commit and Push". This commits your local changes and pushes them to the remote Gerrit repository (which should be the working branch)


- This window display the Gerrit identifier (in this case 59893) associated to the change.
- Next you will have to go to Gerrit at: gerrit.onap.org and login to Gerrit
- You can then see the change you have made. Select that change. You will then need to "add" the name of the person to approve that change.
- Approvers are Deng Hui and together with the Model model owner, if you are updating a model for which you are not the owner.

- Once the change has been committed, you will receive an email confirmation of the commit.
- Note: If your commit and push fails for any reason, once you have fixed the problem, you can resend the request by selecting the "Amend (Edit previous commit)" icon in the Commit Message bar.


...
Export the ONAP Model
Export to a Word Document
GenDoc is a tool that enables you to output the model to a Word document. See installation instructions on how to install the GenDoc plug-in.
...
- Output file - This will be a Word document where GenDoc will store the output.

- Diagram file - This is the model file where GenDoc will find the diagrams. Its' format is ".notation". The example below is going to output the diagrams in the Common sub-model

- Uml file - This is the model file where GenDoc will find the uml model artifacts. Its' format is ".uml". The example below is going to output all the Uml artifacts in the Common sub-mode

Running the GenDoc
...
template
- Once you have updated the GenDoc template, right click on the ONAP GenDoc Template file and select the option "Generate documentation using Gendoc"
- The GenDoc utility is invoked and the template is run. Once it has completed, you can find your output in the Output file you specified in the template.
- Note: You do not want to "commit" to Gerrit the updated GenDoc template which contains your specific information.
- As an alternative, you can create your own private folder for Gendoc template by selecting the option "File->New→Folder". Give the folder a name.
- Then you can select "File->Import→ File System" and import the Gendoc template from your ONAP Information Model → Gendoc directory
- When you update this file you imported, it is now your own "private" copy. You can run the template using the same procedure described above.
Export to an Excel File
Creating
...
tables
- Papyrus provides the capability to export fragments of the model to tables.
- Right-click on the folder containing the Uml artifacts you want to output, for example, Common → ObjectClasses and select the option New Table.
- Papryus proposes different formats for you table: Class Tree Table, Generic Tree Table, or even a configuration utility to create your own table format.
- For the purposes of this example, we are going to create a "Class Tree Table".
- The table artifact will be stored in your ObjectClasses folder using the name you provided when you created the table.
- The "Class Tree Table" will be automatically opened up when it is created and will look like this:

- Now, in the model explorer, select all the classes you which to put in the table and "drag/drop" them into the table.
- Note: Another option to create a table is to first select the Uml artifacts you wish to output, then right-click and select New Table.
- Select the table contents and right-click and select "Expand all for selection"
- Now, for Common object classes, the table will look like this:

Putting
...
table into Excel
- You can then "copy/paste" your table to an Excel spreadsheet, or just keep the table in Papyrus for future reference.
...