...
To see the version mapping go to: https://www.eclipse.org/papyrus/download.html

Installing Eclipse
- Eclipse “Photon” Modeling Tools package version 4.8 can 8 can be downloaded from here:
https://www.eclipse.org/downloads/packages/release/photon/r/eclipse-modeling-tools - Select the download link that is appropriate for the machine on which you will be making the install, i.eex. "Windows 64-bit".
- This results in the download of a zip file.
- Extract the contents of the zip file to wherever you would like to install Eclipse. On a PC, "Program Files" is always a good option.
- The content of the extracted files should look something like this:
...
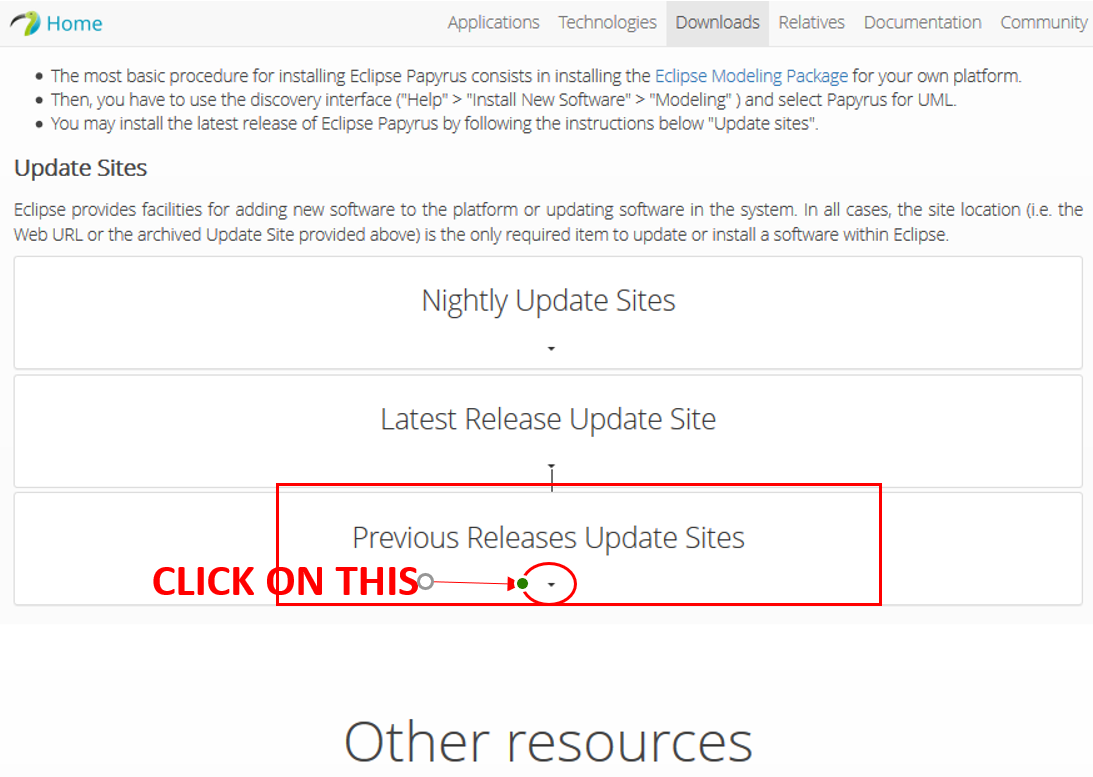
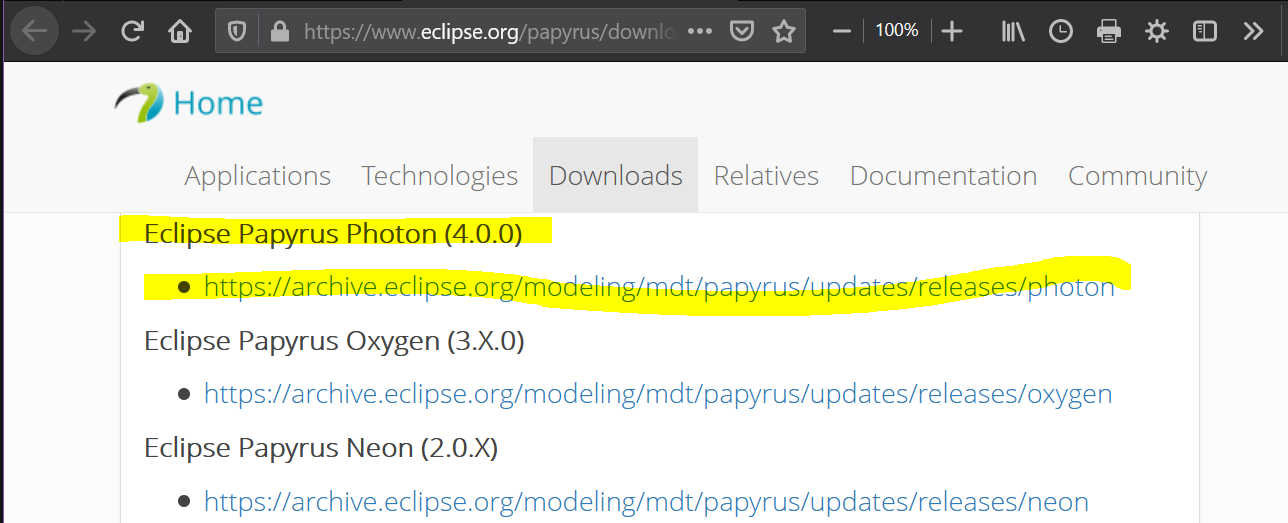
- Papyrus Photon version 4.0.0 can be downloaded from here: https://www.eclipse.org/papyrus/download.html
- Scroll down the page, click on the right side of the page and select: "Previous Releases Update Sites", and copy the URL of the update site for "Papyrus Photon 4.0.0 " and select "Download Page". This takes you to "Papyrus Update Site for Photon"Copy the URL of the update site to which it takes you. Should be something like: https://downloadarchive.eclipse.org/modeling/mdt/papyrus/updates/releases/photon/
- Now go back into Eclipse and select "Help"→"Install new software". An "Available Software" screen comes up.
- Paste the URL of the update site into the "Work with:" box and hit enter.
- There should be multiple "Papyrus" related packages available to install. Select only the box: "Papyrus" and make sure the others are not selected.:

- Click "Next". The installation will check for dependencies and requirements. You will get a screen indicating what will be installed:
- Papyrus for UML
- Papyrus for UML Developer Resources
- Click "Next". The install will then prompt you to "Accept" the license agreement.
- Once accepted, you can select "Finish" and the installation process continues.
- Note: The installation might take a while, and perhaps even appear to hang for a while. You can see install progress in the lower right hand corner of Eclipse the progress on the install .

- When the installation is finished, restart Eclipse to begin to use Papyrus. You may get a popup asking if you want to restart.
- Go to "Window"→"Perspective"→"Open Perspective"→"Other" and select Papyrus. You will now be in the Papyrus Perspective perspective where you can begin to use Papyrus.
...
- To verify you have the correct version of Papyrus, first go to "Help" → → "About Eclipse".
- You should see something that looks like this:


- Click on INSTALLATION DETAILS "Installation Details" to see something like these:


Installing GenDoc within Eclipse
- In Eclipse, go to "Help" → "Install new software". An "Available Software" screen comes up.
- Paste the GenDoc site http://download.eclipse.org/gendoc/updates/releases/0.6.0/ in the "Work with" section and hit enter.
- The "gendoc" package should show. Select this package and hit "Next".

- Follow the instructions to complete the installation. Note: You may get a warning message about installing software that contains unsigned content - select "Install anyway".
- When the installation is finished, restart Eclipse to begin to use GenDoc
Checking the version of GenDoc
- To verify you have the correct version of GenDoc, first go to "Help"→ "About Eclipse".
- You should see something that looks like this:
- Click on "Installation Details" to see something like these:

Using the ONAP Model with Gerrit
...