...
- Eclipse has a number of pre-defined perspectives associated with different tasks and plugins. In ONAP we mainly use the perspectives for Papyrus and for Git.
- To change perspective, go to "Window→Perspective→Open Perspective→Other" on the top of your screen and then select the perspective that you want to use:

- Another quick way to change perspective exists on the top right side of your screen. Next to the "Quick Access" bar, you will see a number of small icons:

- Select the icon for the perspective that you want to use. The storage/cylinder icon marked "GIT" is for Git, and the bird icon is for Papyrus.
- If you don't see the icon for the perspective that you want to use, clicking the icon with the "+" to the left of the predefined perspectives brings you to the same popup window as going to "Window"→"Perspective"→"Open Perspective"→Other".
- If you have moved around or minimized some of the view areas and can't find something you're looking for, you can reset the perspective to its default by first selecting "Window"→"Perspective"→"Reset Perspective..." and then clicking "Reset Perspective" in the popup window.
EGit (Eclipse/Git)
If you encounter unanticipated problems when following the procedures below for working with Eclipse/Git, check http://wiki.eclipse.org/EGit/User_Guide for possible solutions.
Using the ONAP Model with Gerrit
...
This process must be followed if you have never used the Eclipse/Git function with Gerrit.
Setup of RSA Keys in Eclipse and Gerrit
- You must first generate an SSH key within Eclipse/Papyrus.
- Go to "Window→ Preferences→ General→ Network Connection→ SSH2""Window"→ "Preferences", then "General"→ "Network Connection"→ "SSH2".
- Select the tab "Key Management" tab and choose click "Generate RSA Key...".

- The system will generate a key for you and place the key in the same window.
- Select "Save private key", which will save your key as an id_rsa file.
- Note:
- You may be asked if you want to save this private key without passphrase protection - select OK.

- A window will pop up with a location and a name for the key file - just click Save.

- Before you hit Don't click "Apply and Close" , "copy/paste" that key so that you can upload it into Gerrit.
...
- yet.
- Login to Gerrit (https://gerrit.onap.org/).
- Click your name at the top right and click "Settings".
- Go Click or scroll to Settings → "SSH Public KeysClick Add Key".
- Go back to Eclipse and go to "Window"→ "Preferences"→ "General"→ "Network Connection"→ "SSH2" → LOAD EXISTING KEY
- Paste the text of your public key into the text box.
- Switch to the open "SSH2" window in Eclipse and copy the text of your public key.
- Switch back to Gerrit, paste the text of your public key into the "New SSH key" text box and click "Add New SSH Key".
- Now you can go back to Eclipse and click "Apply and Close".
Gerrit user contributor agreement
To be able to push model changes to Gerrit, you need to have a CCLA (Corporate Contributor License Agreement) associated with your account in Gerrit.
- Login to Gerrit (https://gerrit.onap.org/).
- Click your name at the top right and click "Settings".
- Click or scroll to "Agreements".
- If you do not see a CCLA clickable link, click on "New Contributor Agreement" and follow the instructions:
 Click Add.
ONAP Gerrit user setup in Eclipse
...
- Bring up the Eclipse/Papyrus that you installed in the previous steps, if you haven't done so already.
- Note: you may have to CLOSE THE ECLIPSE WELCOME PAGEclose the Eclipse Welcome page.
- Note: If you were previously using Papyrus ONAP model when it was in a "Private" GitHub, you will have to select that repository, right click, and select "Delete Repository". Make sure you delete all files.
- Go to the Git Perspective by selecting "Window"→"Perspective"→"Open Perspective"→"Other..." on the top of your screen and then select "Git".
- Once in the Git perspective, your screen should have the following on top:
...
- Select "Finish".
- For a first-time setup, you may get the following message. Select "Yes".
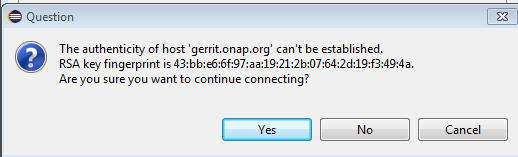
- For a first-time setup, you may get the following message. Select "Yes".
- The cloning process should complete, and the repository should be created on your local machine. If you encounter errors, contact the ONAP model administrator to get help.
- The view below shows an example of the newly created repository which has been opened up down to the level of the "Local" folder. Only the "master" branch should show up as your "Local".
...
- If it looks like Eclipse is not able to connect to Gerrit, you may have to exit your corporate VPN when can try working with the model outside your corporate VPN.
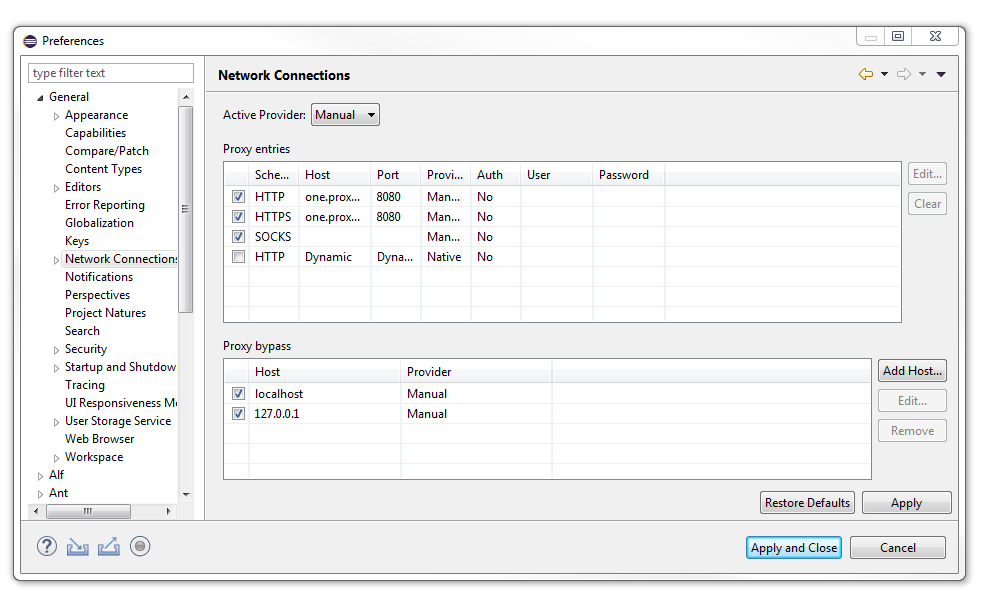
- Alternatively, However, the preferred way to solve this problem is to set up a proxy access to Gerrit:
- Go to "Window"→"Preferences"→"General"→"Network Connections"
- Edit the entries for HTTP and HTTPS that have "Provider" preset to Manual. For both, set the URL for your proxy under "Host" and its port under "Port".
"Host" and its port under "Port". - For "Active Provider" at the top of the window, select "Manual".
- The resulting configuration should look something like this:
Viewing the Model in Papyrus
...
Only approved model editors can update the working branch in Gerrit. To be a model editor you must undergo Papyrus training. Current model editors for each submodel are specified heremodel editor you must undergo Papyrus training. Current model editors for each submodel are specified here.
- Before making changes, always ensure that you have the latest version of the model from the ONAP Gerrit repository.
- If you have not yet cloned the model, the clone process will provide you with the latest version.
- If you have already cloned the model into your workspace, make sure to "Fetch" the latest updates from Gerrit before making any changes.
- Once you have finished making your model changes,
...
- select "
...
- File"→ "Save"
...
- or
...
- click the Save icon.
Staging changes
Only changes that have been staged will be included in the Push to Gerrit.
- If this is a first-time that you're updating the model, make sure that you first have set up the user information for Gerrit properly. See these instructions: ONAP Gerrit user setup in Eclipse
- Next, go to the Git perspective by selecting "Window"→"Perspective"→"Open Perspective"→"Other..." on the top of your screen and then select "Git".
- Once in the Git Perspective, select the repository where you have changed the files:

- Select the "Git Staging" tab in the lower right hand portion of your screen (it might also be on the right-hand side of your screen based on your layout)
It looks like this:
 with a little green down-arrow
 - The Git Staging window looks like this:

- You will see all of the files that you have changed in the "Unstaged changes".
- Note: If there is a file in the list that you did not intend to change, you can revert the unwanted changes by right-clicking on that file and selecting "Replace with HEAD revision".
- For each changed file that you want to stage, right-click and select "Add to index". Once they have been added, the files will move to "Staged Changes".
- As a shortcut, you can select the little green "++" sign that will add all the files for you:

- after you hit the green "++" it should look something like this:

- As a shortcut, you can select the little green "++" sign that will add all the files for you:
Writing the commit message
...
- Once your changes have been successfully pushed to Gerrit, you should see the push result messages from Gerrit in a new window in Eclipse:

- This window display the Gerrit identifier (in this case 59893) associated with the change. Make a note of the identifier.
- Now open a browser and login to Gerrit (https://gerrit.onap.org/).
- You should then see the change you have just made. Select that change.
- Click You will then need to click "Add..." and specify the name of the person to approve that change. Approvers are Deng Hui together with as well as the model owner, if you are updating a model for which you are not the owner.

- Once the change has been committed, you will receive an email confirmation of the commit.
- Note: If your commit and push fails for any reason, once you have fixed the problem, you can try to resend the request by selecting the "Amend (Edit previous commit)" icon in the Commit Message bar.

- Note: If your commit and push fails for any reason, once you have fixed the problem, you can try to resend the request by selecting the "Amend (Edit previous commit)" icon in the Commit Message bar.
Recovering from a failed push to Gerrit
If you want to roll back your failed commits, you should click "reset", and choose Remote Tracking - origin/master, this operation will let your local back to keep align with the remote merged changes, then you can do a new commit. If your work is not based on the latest changes, there may cause some problems.
Export the ONAP Model
Export to a Word Document
...