| Table of Contents |
|---|
1. Description
The simulator exposes standard NSSMF northbound api for 5G network slicing use case. Including allocate, deallocate, activate, deactivate etc. this simulator api exposed only support https.
External Core NSSMF Simulator can be found in integration project. (Created in H release.)
Repo location: https://gerrit.onap.org/r/admin/repos/integration/simulators/core-nssmf-simulator (Created in H release.)
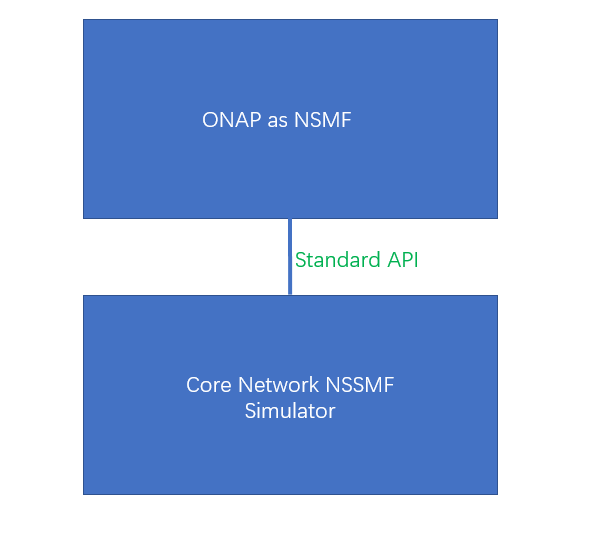
2. Architecture
The high-level architecture of the simulator and its interface to ONAP is shown below.
...

Installation Steps:
Please refer to the following link for the 1-3 steps:
https://docs.onap.org/en/elalto/submodules/oom.git/docs/oom_setup_kubernetes_rancher.html
...
3. Precondition
- Make sure the node where simulator installed can support ssh.
- jdk 1.8 or higher is also required.
4. Installation Steps:
There are two ways to run Core NSSMF simulator. One is to start via jar package. The other is to start via docker-compose.
Start by jar package
there is a packge: simulator.tar.gz below need to be downloaded.
| View file | ||||
|---|---|---|---|---|
|
- cp simulator.tar.gz to a special folder
- unzip simulator.tar.gz
- cd simulator
- modify application.properties
server.port=11111: the value you can modify as you want but not used in this node,
#the values below, please keep them default.
notifyurl=http://192.168.235.110:30472/v1/pm/notification
ftppath=sftp://root:oom@192.168.235.110:22/home/ubuntu/dcae/PM.tar.gz
fixeddelay=900000
filepath=/home/ubuntu/dcae
amffilepath=/home/ubuntu/dcae/AMF.xml.gz
upffilepath=/home/ubuntu/dcae/UPF.xml.gz
5. run the command: java -jar simulator-0.0.1-SNAPSHOT.jar >/dev/null &
Start by docker-compose(Updated in H release)
there is a packge:
| View file | ||||
|---|---|---|---|---|
|
1. Extract the downloaded cn-nssmf-simulator-docker-compose.tar.gz
tar xf cn-nssmf-simulator-docker-compose.tar.gz -C .
cd cn-nssmf-simulator-docker-compose
2. modify application.properties
# vi application.properties
server.port=11111
notifyurl=http://192.168.235.25:30472/v1/pm/notification
ftppath=sftp://root:oom@192.168.235.25:22/home/ubuntu/dcae/PM.tar.gz
fixeddelay=900000
#Configure the output files generated in docker.
filepath=/app/dcae
amffilepath=/app/dcae/AMF.xml.gz
upffilepath=/app/dcae/UPF.xml.gz
3. modify docker-compose.yml
# vi docker-compose.yml
version: '3'
services:
cn-simulator-docker-compose:
image: openjdk:8-jre-slim
container_name: cn-simulator-test-1
ports:
- "11111:11111"
restart: always
# mount the cn-nssmf-simulator-docker-compose directory of the host machine to the /app directory of the container
# If you need to modify the simulator's configuration file application.properties later,
# you can directly modify the host's cn-nssmf-simulator-docker-compose/application.properties to synchronize to the container
volumes:
- ./:/app
working_dir: /app
entrypoint: java -jar simulator-0.0.1-SNAPSHOT.jar
4. start up the application by running " docker-compose up "
5. Register sndc info in AAI-ESR-GUI:
K8S='172.19.0.50' # depned on your k8s
THIRDPARTY_SDNC_ID='12345' # dont' care, anyting ok
ESR_SYSTEM_INFO_ID='12345' # dont' care, anyting ok
VENDER='HW' # only HW
TYPE='cn' # only cn
SIM_IP='172.19.0.11' # depned on your sim
curl -k -X PUT "https://AAI:AAI@${K8S}:30233/aai/v19/external-system/esr-thirdparty-sdnc-list/esr-thirdparty-sdnc/${THIRDPARTY_SDNC_ID}/esr-system-info-list/esr-system-info/${ESR_SYSTEM_INFO_ID}" \
-H 'Accept: application/json' \
-H 'X-FromAppId: AAI' \
-H 'X-TransactionId: 1' \
-H 'Content-Type: application/json' \
-d '{
"system-name": "E2E",
"vendor": "${VENDER}",
"type": "${TYPE}",
"service-url": "",
"user-name": "",
"password": "",
"system-type": "thirdparty_SDNC",
"ip-address": "${SIM_IP}",
"port": "11111"
}'
NSMF-NSSMF API Prososal:
| View file | ||||
|---|---|---|---|---|
|
> git clone http://gerrit.onap.org/r/oom --recurse -submodules
5.Install Helm Plugins required to deploy ONAP:
> cd oom/kubernetes
> sudo cp -R ./helm/plugins/ ~/.helm
6.Currently OOM does not support the chart config , So remove the charts manually. Will work with OOM team to make the chart level configable.
Customize the helm charts to suit use case(from the kubernetes directory):
> rm -rf cds/charts/cds-command-executor/
> rm -rf sdc/charts/sdc-dcae-be/
> rm -rf sdc/charts/sdc-dcae-dt/
> rm -rf sdc/charts/sdc-dcae-fe/
> rm -rf sdc/charts/sdc-dcae-tosca-lab/
> rm -rf sdc/charts/sdc-wfd-be/
> rm -rf sdc/charts/sdc-wfd-fe/
> rm -rf so/charts/so-openstack-adapter/
> rm -rf so/charts/so-sdnc-adapter/
> rm -rf so/charts/so-vfc-adapter/
> rm -rf so/charts/so-vnfm-adapter/
7.To setup a local Helm server to server up the ONAP charts:
> helm serve &
Note the port number that is listed and use it in the Helm repo add as follows: 其它宏
> helm repo add local http://127.0.0.1:8879
8.Build a local Helm repository(from the kubernetes directory):
> make all; make onap
9.To deploy ONAP applications use this command:
> helm deploy dev local/onap --namespace onap -f onap/resources/overrides/onap-5g-network-slicing.yaml -f onap/resources/environments/public-cloud.yaml --set global.masterPassword=onap --verbose --timeout 2000
10.Check the pod status after install:
> kubectl get pods -n onap
11.Health check:
...