Table of Contents
Table of Contents exclude Table of Contents
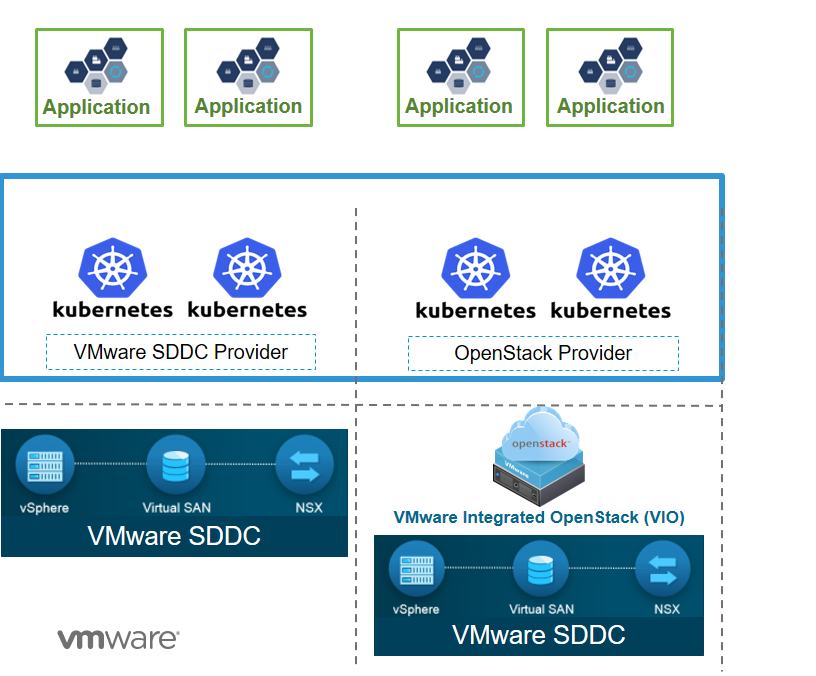
VMware VIO 4.1 Kubernetes Architecture
VMware VIO supports Container Orchestration. Container Orchestration can be used a product or as a service. This page captures the information and steps to deploy ONAP using OOM on VI0 4.1 with Kubernetes
...
using 'OpenStack'
...
as the Cloud Provider
...
.
VMware VIO 4.1 Kubernetes Architecture
Prerequisites
...
- VMware Integrated OpenStack 4.1.
- VMware Integrated OpenStack 4.1 with Kubernetes.
- A SSH Client - (Example: MobaXTerm - Download).
Software Requirements
...
OOM Software Requirements
| Release | Kubernetes | Helm | Kubectl | Docker |
|---|---|---|---|---|
| Amsterdam | 1.7.x | 2.3.x | 1.7.x | 1.12.x |
| Beijing/Master | 1.8.5 | 2.7.x | 1.8.5 | 1.12.x |
Minimum Hardware Configuration
...
OOM Hardware Requirements
| RAM | HD | vCores | Ports |
|---|---|---|---|
| 128 GB | 160 GB | 16 | 0.0.0.0/0 (All Open) |
Procedure
...
Step 1: Login to VMware Intergrated OpenStack 4.1 with Kubernetes
...
Log in to the Master Node (as described in the steps above) and then follow the steps for ONAP Deployment.
The detailed documentation for the ONAP Deployment can be found on GitHub and ONAP Docs.
Troubleshooting
...
- During the deployment process if there is an error, the cluster state will be changed to ERROR.

You can delete your cluster in case of an ERROR, the cluster state will be changed to DELETING.

During the creation of your cluster, you can login to your VMware Integrated OpenStack Horizon and check if the correct number of instance have been deployed or not. If they are there then the deployment is in progress else there is a possiblity that the deployment has faced some error.
Software Requirements:
OOM Software Requirements
...
Release
...
Kubernetes
...
Helm
...
Kubectl
...
Docker
...
Minimum Hardware Configuration:
OOM Hardware Requirements
...
RAM
...
HD
...
vCores
...
Ports
...
Procedure:
Step 1: Login to VMware Intergrated OpenStack 4.1 with Kubernetes
...
Step 2: Create a Cloud Provider
...
Step 3: Create a Kubernetes Cluster
...
Step 4: Login to Kubernetes Master and Worker Nodes
...
Once you are logged into VMware Integrated OpenStack with Kubernetes, use the following command with the same username and password used during SSH:
...
#vkube login --insecure
Get the list of all the clusters along with their Cluster ID, use the following command:
...
#vkube cluster list --insecure
...
Get the detailed information about the nodes running on a particular cluster, use the following command:
...
#vkube cluster show <Cluster ID> --insecure
Make a note of the IP of the Master and Worker Nodes.
Get a list of all the docker containers running in background.
...
#docker ps -a
Get an interactive shell of the docker container with the name app-api.
...
#docker exec -it <Container ID or Name> /bin/bash
After this command, you'll get a shell of a running container.
Once we are inside a running container, change the directory and go the cluster location using the following command:
...
#cd /var/lib/vrc/terraform/<ClusterID>
Once we are inside a running container, change the directory and go the cluster location using the following command:
...
#cd /var/lib/vrc/terraform/<ClusterID>
...
Once you are inside the Kubernetes Nodes, you can deploy ONAP, or troubleshoot an error as per your requirements.
Step 5: Deploy ONAP
Log in to the Master Node (as described in the steps above) and then follow the steps for ONAP Deployment.
The detailed documentation for the ONAP Deployment can be found on GitHub and ONAP Docs.
Prerequisites
Mgmt IP Address, username and password to create Kubernetes cluster .
K8S Master and K8S Node instances should have a OpenStack Flavor attached as per the requirement below
...
| View file | ||||
|---|---|---|---|---|
|
| View file | ||||
|---|---|---|---|---|
|
Steps to create a Kubernetes cluster
Follow the below steps 1 - 4 to create a Kubernetes cluster
Step 5 onwards are needed for getting the Kubernetes Host IP so that user can login to Kubernetes Host and ONAP using OOM can be deployed.
Step-1 - https://MGMT_IP_ADDRESS/LOGIN

Step-2 Create the Cloud Provider before creating a Kubernetes cluster
Cloud Provider creation is a prerequisite to Kubernetes cluster creation. VIO with Kubernetes uses the cloud provider to create the infrastructure required to deploy all your Kubernetes clusters. VMware currently supports 2 options for infrastructure provider. VMware SDDC (vSphere + NSX + VSAN) or OpenStack (i.e. VMware Integrated OpenStack). When choosing the type of provider to create, consider the following:
...

Step-3 Create the Kubernetes cluster
3.1 - Click '+NEW' to create a Kubernetes cluster

3.2 - Click NEXT

3.3 - Select an Infrastructure Provider for creating the Kubernetes
Before you deploy a Kubernetes cluster, you must create the cloud provider. Cloud provides can be SDDC or OpenStack. Select the option as appropriate.
Here, with VIO with Kubernetes, we select 'OpenStack' as cloud provider

3.4 - Select a Node Profile. If you have more than one node profiles, uncheck the box "Use default node profile" to see the list.

3.5 - Provide the Input for the Cluster as indicated in Example Data below
Node Types - A Kubernetes cluster is comprised of two types of nodes. Each node in the VMware Integrated OpenStack with Kubernetes is a VM.
- Master Nodes - A master node provides the Kubernetes API service, scheduler, replicator, and so on. It manages the worker nodes. A cluster with a single master node is valid but has no redundancy.
- Worker Nodes - A worker node hosts your containers. A cluster with a single worker node is valid but has no redundancy.
Cluster Types - VMware Integrated OpenStack with Kubernetes supports two types of clusters.
- Exclusive Cluster - In an exclusive cluster, multi-tenancy is not supported. Any authorized Kubernetes user using the Kubernetes CLI of APIs has namespace management privileges. The exclusive cluster provides a familiar environment for developers who deploy Kubernetes themselves.
- Shared Cluster - In a shared cluster, multi-tenancy is supported and enforced by the Kubernetes namespace. Only a VMware Integrated OpenStack with Kubernetes administrator using the VMware Integrated OpenStack with Kubernetes interface or CLI has namespace management privileges. The shared cluster is an environment where the administrator can manage resource isolation among users.
Example Data:
Cluster Name :testCluster
Number of Master Nodes :1
Number of worker nodes :1
DNS servers : 10.112.64.1
Cluster type: Exclusive Cluster

3.6 - Add Users and Groups for this cluster
Once a Kubernetes cluster is created, you can authorize users or groups for the cluster. The users and groups belong to the SDDC or OpenStack provider where the cluster was created..
In the Configure user and group for cluster dialogue box, check the boxes for users or groups that you want to authorize for access to the cluster.
Or check off the boxes for users or groups that you no longer want to authorize for access to the cluster.

3.7 - Click on FINISH and wait for few minutes for the kubernetes cluster to get created .

Step-4 Verifying the VIO Kubernetes Cluster
If everything in step 3.1 to step 3.6 has been done successfully .The Summary information for the cluster will be filled as given in the example below .

Step-5 How to get Kubernetes host IP Address and login to Kubernetes host .
5.1 - Login via console window to MGMT_IP_ADDRESS . user name and password is same as used in step1 .
5.2 - Once logged into MGMT_IP_ADDRESS session use the command "vkube login --insecure" . use the user name and password same as in step1 .
5.3 - Get the list of clusters using command "vkube cluster list --insecure" . make a note of cluster Id in the output of the command
5.4 - Get the cluster node details using command "vkube cluster show <cluster Id > --insecure " .make note of worker ip address .Worker IP Address KUBERNETES_HOST_IP.
5.5 - Login to app-api docker using docker exec it app-api bash
5.6 - Once inside the app-api docker go to /var/lib/vrc/terraform/<cluserId>
5.7 - ssh to KUBERNETES_HOST_IP_ADDRESS using below command
ssh -i private.key -F ssh.bastion.conf ubuntu@KUBERNETES_HOST_IP_ADDRESS
5.8 - Once inside the KUBERNETES_HOST_IP_ADDRESS , install kubectl and Helm to prepare Kubernetes for OOM installation .
Step-6 Installing kubectl to manage Kubernetes cluster
6.1 - Download the kubectl using below command
curl -LO https://storage.googleapis.com/kubernetes-release/release/v1.7.0/bin/linux/amd64/kubectl
6.2 - Make the kubectl binary executable.
chmod +x ./kubectl
6.3 - Move the kubectl to PATH
sudo mv ./kubectl /usr/local/bin/kubectl
Step-7 Verifying that kubectl config is good
7.1 - On Kubernetes cluster
root@localhost:~# kubectl cluster-info
    Kubernetes master is running at ....
    Heapster is running at....
    KubeDNS is running at ....
    kubernetes-dashboard is running at ...
    monitoring-grafana is running at ....
    monitoring-influxdb is running at ...
    tiller-deploy is running at....
7.2 - On client from Where Kubernetes cluster can be managed Remotely
root@localhost:~# kubectl version
Client Version: version.Info{Major:"1", Minor:"7", GitVersion:"v1.7.0", GitCommit:"d3ada0119e776222f11ec7945e6d860061339aad", GitTreeState:"clean", BuildDate:"2017-06-29T23:15:59Z", GoVersion:"go1.8.3",
Compiler:"gc", Platform:"linux/amd64"}
Server Version: version.Info{Major:"1", Minor:"7+", GitVersion:"v1.7.7-rancher1", GitCommit:"a1ea37c6f6d21f315a07631b17b9537881e1986a", GitTreeState:"clean", BuildDate:"2017-10-02T21:33:08Z",GoVersion:"go1.8.3" Compiler:"gc", Platform:"linux/amd64"}
Step-8 Verifying that kube config is good
8.1 - On Kubernetes cluster
root@localhost:~# cat ~/.kube/config
apiVersion: v1
kind: Config
clusters:
- cluster:
api-version: v1
insecure-skip-tls-verify: true
server: "<SERVER_IP_ADDRESS:8080/r/projects/CLUSTER_NAME/kubernetes:SERVER_PORT_NUMBER"
name: "(CLUSTER_NAME)"
contexts:
- context:
cluster: "(CLUSTER_NAME)"
user: "(CLUSTER_NAME)"
name: "(CLUSTER_NAME)"
current-context: "(CLUSTER_NAME)"
users:
- name: "(CLUSTER_NAME/USER_NAME)"
user:
token: "<SECURITY_TOKEN>"
8.2 - On client from where Kubernetes cluster can be managed Remotely
root@localhost:~# cat ~/.kube/config
current-context: default-context
apiVersion: v1
clusters:
- cluster:
api-version: v1
server: https://SERVER_IP_ADDRESS:SERVER_PORT_NUMBER/
insecure-skip-tls-verify: true
name: CLUSTER_NAME
contexts:
- context:
cluster: CLUSTER_NAME
namespace: default
user: user1
name: default-context
users:
- name: user1
user:
username: "<USERNAME>"
password: "<PASSWORD"
kind: Config
preferences:
colors: true
Step-9 Installing Helm
9.1 - Download the helm using below command
wget http://storage.googleapis.com/kubernetes-helm/helm-v2.3.0-linux-amd64.tar.gz
9.2 - Download the helm using below command
tar -zxvf helm-v2.3.0-linux-amd64.tar.gz
9.3 - Move the helm to /usr/local/bin
sudo mv linux-amd64/helm /usr/local/bin/helm
Step-10 Verifying Helm
10.1 - Type the below command
helm help
10.2 - Helm version .
Client: &version.Version{SemVer:"v2.3.0", GitCommit:"d83c245fc324117885ed83afc90ac74afed271b4", GitTreeState:"clean"}
Server: &version.Version{SemVer:"v2.3.0", GitCommit:"d83c245fc324117885ed83afc90ac74afed271b4", GitTreeState:"clean"}
Step-11 Please follow below instructions for OOM Deployment on VIO 4.0 Kubernetes and rest of the service design creation and instantiation on VIO 4.0 Kubernetes cluster
11.1 - vFW and vDNS service design & creation and service instantiation steps are identical .
11.2 - vFW and vDNS service design & creation and service instantiation steps on VMware Integrated OpenStack(VIO) 4.0 are identical to Vanilla OpenStack .
11.3 - Please refer to below link for OOM deployment and service design creation and instantiation on VIO 4.0 Kubernetes
...