...
Note: in Casablanca you can simply Certify the VSP and continue on with Service Design and Creation (see image below)

Service Design and Creation
...
The customer service includes a VNF vGW and two allotted resources: tunnelxconn and brg. We will need to create the two allotted resources first and then use them together with vG (which was already onboarded and imported as a VF previously) to compose the service.
Create allotted resource tunnelxconn
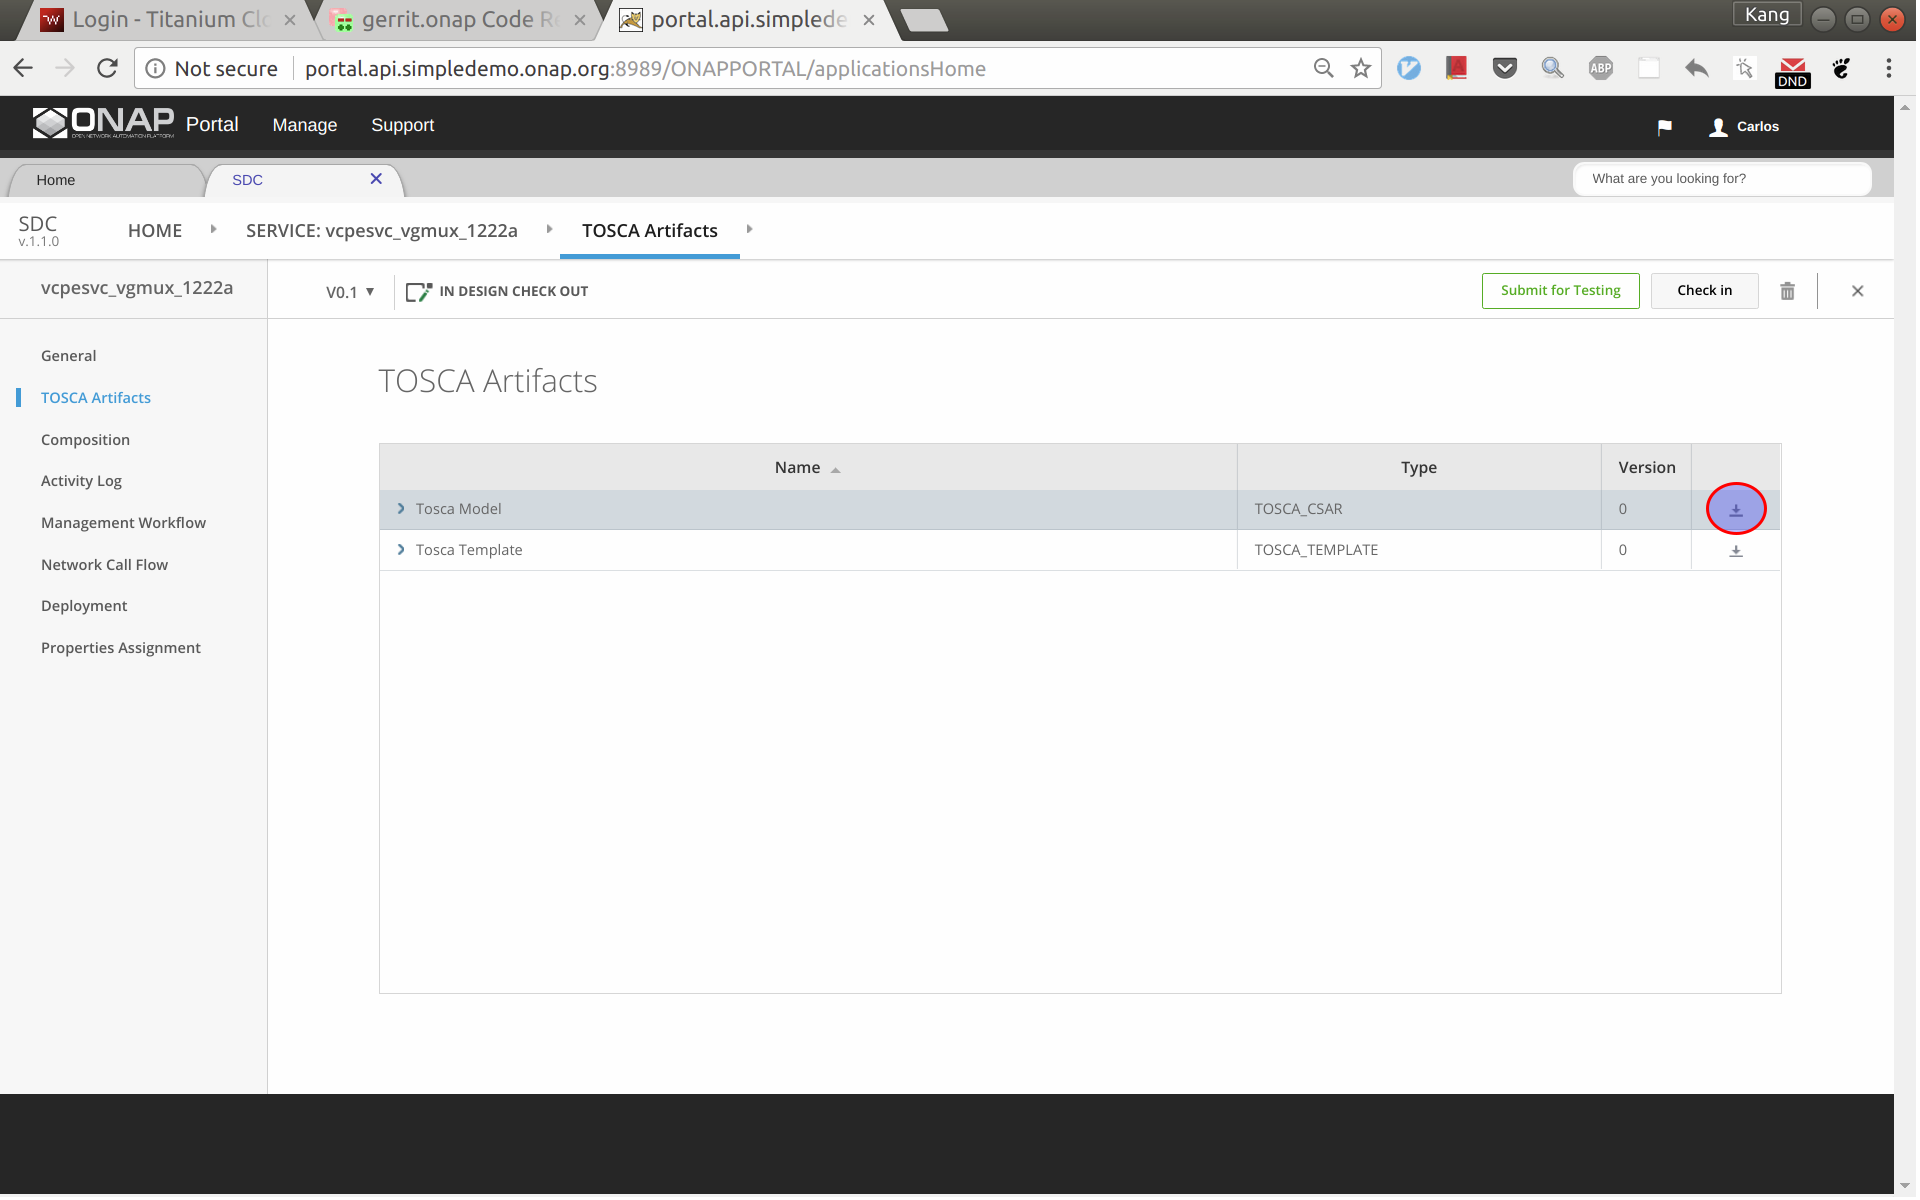
This allotted resource depends on the previous created service vcpesvc_vgmux_1222a. The dependency is described by filling the allotted resource with the UUID, invariant UUID, and service name of vcpesvc_vgmux_1222a. So for preparation, we first download the csar file of vcpesvc_vgmux_1222a from SDC.
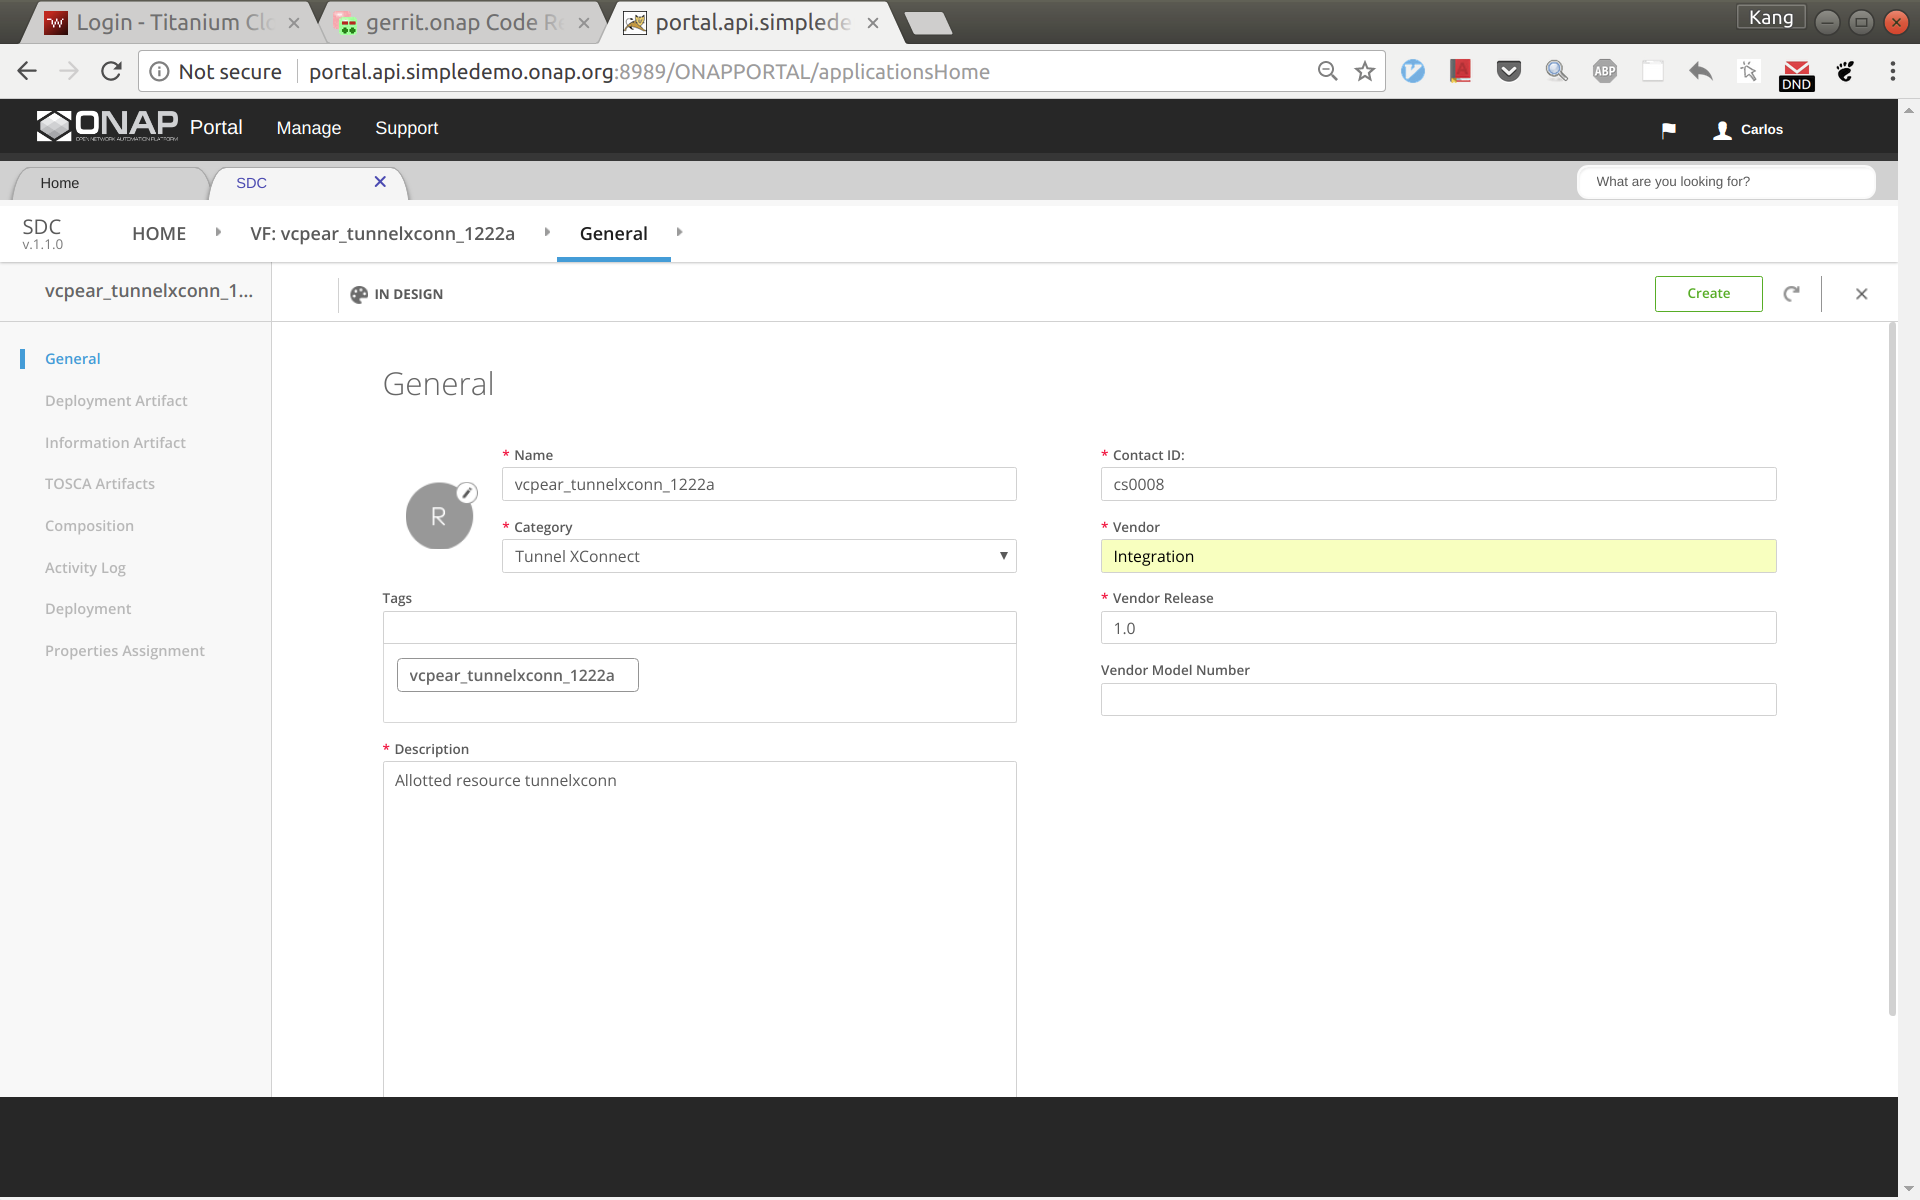
Sign into SDC as designer cs0008, click create a new VF, select 'Tunnel XConnect' as category and enter other information as needed. See below for an example. I'm using vcpear_tunnelxconn_1222a as the name of this allotted resource.
Click create. And then click 'Composition', drag an 'AllottedResource' from the left side panel to the design.

Check Sub Category Tag in SDC
You may need to add an Allotted Resource Category Tag to SDC for the BRG.
Log as the "demo" account and go to SDC.
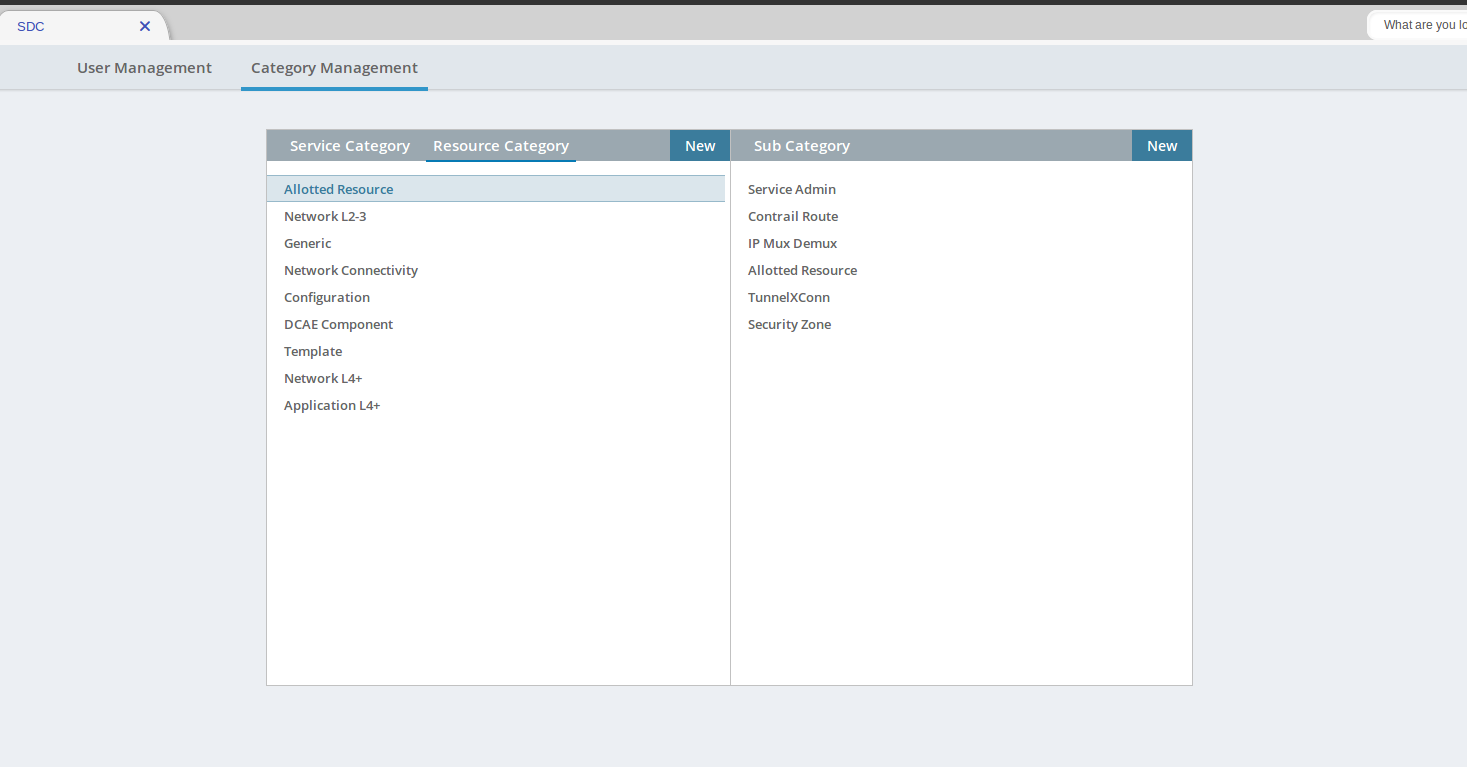
Select "Category Management"
Select "Allotted Resource"
You should have "Tunnel XConn" and "BRG".
If you do not and are missing the "BRG" Sub Category Like the screen shot below. Click on New and add the "BRG" Subcategory.
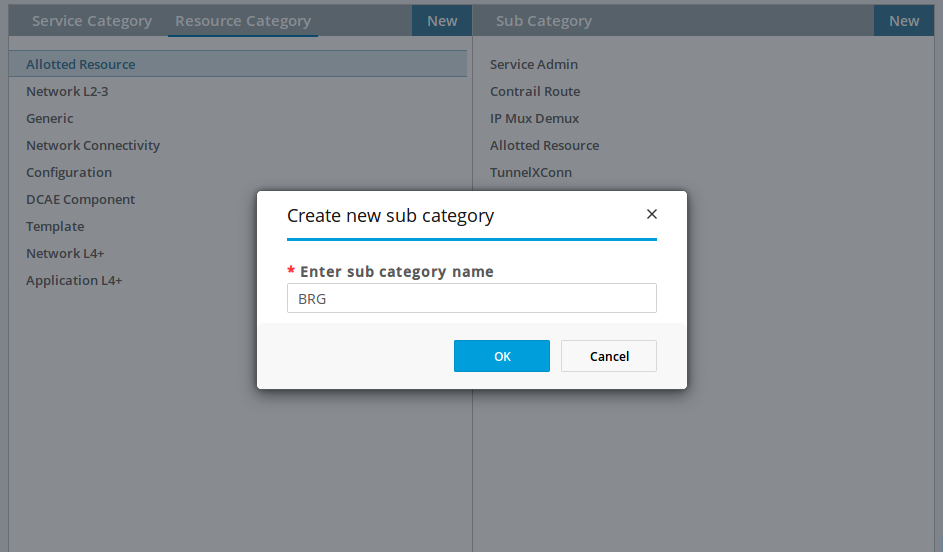
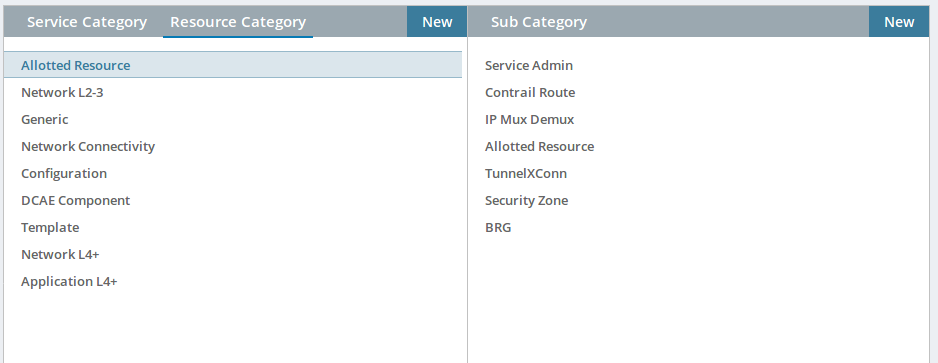
If Chrome browser fails to add BRG, try Firefox browser.
Create allotted resource tunnelxconn
This allotted resource depends on the previous created service vcpesvc_vgmux_1222a. The dependency is described by filling the allotted resource with the UUID, invariant UUID, and service name of vcpesvc_vgmux_1222a. So for preparation, we first download the csar file of vcpesvc_vgmux_1222a from SDC.
Sign into SDC as designer cs0008, click create a new VF, select 'Tunnel XConnect' as category and enter other information as needed. See below for an example. I'm using vcpear_tunnelxconn_1222a as the name of this allotted resource.
Click create. And then click 'Composition', drag an 'AllottedResource' from the left side panel to the design.
Click on VF name link in between HOME link and Composition on the top menu. From here click on Properties Assignment on the left hand menu. Now open the csar file for vcpesvc_vgmux_1222a, under 'Definitions' open file 'service-VcpesvcVgmux1222a-template.yml'. (Note that the actual file name depends on what you name the service at the first place.) Now put the yml file and the Click on VF name link in between HOME link and Composition on the top menu. From here click on Properties Assignment on the left hand menu. Now open the csar file for vcpesvc_vgmux_1222a, under 'Definitions' open file 'service-VcpesvcVgmux1222a-template.yml'. (Note that the actual file name depends on what you name the service at the first place.) Now put the yml file and the SDC window side by side. Now copy&paste the invariantUUID, UUID, and node name to the corresponding fields in SDC. See the two screenshots below. Save and then submit for testing.
...
We name this allotted resource vcpear_brg_1222a. The process to create it is the same as that for the above vcpear_vgmux_1222a, Use catagory: Tunnel Xconnect againBRG. The only differences are the UUID, invariant UUID, and service name parameters being used. Therefore, I will not repeat the steps and screenshots here.
...
Before distributing the customer service, make sure that the other four services for infra, vBNG, vGMUX, and vBRG all have been successfully distributed.
ssh to the sdnc VM and execute 'docker stop sdnc_ueblistener_container'. This is a temporary operation and should not be needed in the future after a little problem in the sdnc ueb listener is fixed.
Now distribute the customer service, sign out and sign back in as operator 'op0001'. Distribute this service and Now distribute the customer service, sign out and sign back in as operator 'op0001'. Distribute this service and check the status to ensure the distribution succeeds. It may take a tens of seconds to complete. The results should look like below.
...
Add operation user ID to AAI. Note that you will need to replace the tenant ID 087050388b204c73a3e418dd2c1fe30b in 2 places and tenant name with the values you use.
| Code Block |
|---|
curl -k -X PUT \
  'https://aai1:8443/aai/v11/business/customers/customer/SDN-ETHERNET-INTERNET' \
  -H 'accept: application/json' \
  -H 'cache-control: no-cache' \
  -H 'content-type: application/json' \
  -H 'X-TransactionId:9999' \
  -H 'X-FromAppId:postman' \
  -u 'AAI:AAI'\
  -d '{
    "global-customer-id": "SDN-ETHERNET-INTERNET",
    "subscriber-name": "SDN-ETHERNET-INTERNET",
    "subscriber-type": "INFRA",
    "service-subscriptions": {
        "service-subscription": [
            {
                "service-type": "vCPE",
                "relationship-list": {
                    "relationship": [
                        {
                            "related-to": "tenant",
                            "related-link": "/aai/v11/cloud-infrastructure/cloud-regions/cloud-region/CloudOwner/RegionOne/tenants/tenant/087050388b204c73a3e418dd2c1fe30b",
                            "relationship-data": [
                                {
                                    "relationship-key": "cloud-region.cloud-owner",
                                    "relationship-value": "CloudOwner"
                                },
                                {
                                    "relationship-key": "cloud-region.cloud-region-id",
                                    "relationship-value": "RegionOne"
                                },
                                {
                                    "relationship-key": "tenant.tenant-id",
                                    "relationship-value": "087050388b204c73a3e418dd2c1fe30b"
                                }
                            ],
                            "related-to-property": [
                                {
                                    "property-key": "tenant.tenant-name",
                                    "property-value": "Integration-SB-01"
                                }
                            ]
                        }
                    ]
                }
            }
        ]
    }
}' |
ssh to the SO VM SDNC VM in HEAT or the host node for pod sdnc-sdnc-0 in OOM, and do the following: (Note: this is not needed anymore in R3)
- Enter the mso docker: docker exec -it testlab_mso_1 bash
- Edit /etc/mso/config.d/mso.bpmn.urn.properties, find the following line
mso.workflow.default.aai.v11.tenant.uri=/aai/v11/cloud-infrastructure/cloud-regions/cloud-region/CloudOwner/DFW/tenants/tenant
and change it to the following
mso.workflow.default.aai.v11.tenant.uri=/aai/v11/cloud-infrastructure/cloud-regions/cloud-region/CloudOwner/RegionOne/tenants/tenant - Exit from the docker
ssh to the SDNC VM in HEAT or the host node for pod sdnc-sdnc-0 in OOM, and do the following: (this step is to make sure SDNC can reach out BRG later for configuration)
- Add a route in HEAT: ip route add 10.3.0.0/24 via 10.0.101.10 dev eth0
- Add a route in OOM: ip route add 10.3.0.0/24 via 10.0.101.10 dev ens3
- Enter the sdnc controller docker
- HEAT: "docker exec -it sdnc_controller_container bash"
OOM: "kubectl -n onap exec -it dev-sdnc-sdnc-0 bash"
In the container, run the following to create IP address pool: /opt/sdnc/bin/addIpAddresses.sh VGW 10.5.0 22 250
- Can also remotely run addIpAddresses.sh: kubectl -n onap exec -it dev-sdnc-sdnc-0 -- /opt/sdnc/bin/addIpAddresses.sh VGW 10.5.0 22 250
- For healthcheck-k8s.py also install curl inside the sdnc container
Deploy Infrastructure
Download and modify automation code
I have developed a python program to automate the deployment. The code will be added to our gerrit repo later. For now you can download from this link: vcpe-0715.zip
Unzip it and then modify vcpecommon.py. You will need to enter your cloud and network information into the following two dictionaries.
step is to make sure SDNC can reach out BRG later for configuration)
- Add a route in HEAT: ip route add 10.3.0.0/24 via 10.0.101.10 dev eth0
- Add a route in OOM: ip route add 10.3.0.0/24 via 10.0.101.10 dev ens3
- Enter the sdnc controller docker
- HEAT: "docker exec -it sdnc_controller_container bash"
OOM: "kubectl -n onap exec -it dev-sdnc-sdnc-0 bash"
In the container, run the following to create IP address pool: /opt/sdnc/bin/addIpAddresses.sh VGW 10.5.0 22 250
- Can also remotely run addIpAddresses.sh: kubectl -n onap exec -it dev-sdnc-sdnc-0 -- /opt/sdnc/bin/addIpAddresses.sh VGW 10.5.0 22 250
- For healthcheck-k8s.py also install curl inside the sdnc container
Deploy Infrastructure
Download and modify automation code
A python program had been developed to automate the deployment. You can download ONAP integration repo by git clone https://gerrit.onap.org/r/integration, and the script is under integration/test/vcpe.
Now go to the vcpe directory and modify vcpecommon.py. You will need to enter your cloud and network information into the following two dictionaries.
| Code Block |
|---|
cloud = {
'--os-auth-url': 'http://10.12.25.2:5000', |
| Code Block |
cloud = { '--os-auth-urlusername': 'http://10.12.25.2:5000', 'kxi', '--os-username': 'kxi', '--os-user-domain-id': 'default', '--os-project-domain-id': 'default', '--os-tenant-id': '087050388b204c73a3e418dd2c1fe30b', '--os-region-name': 'RegionOne', '--os-password': 'yourpassword', '--os-project-domain-name': 'Integration-SB-01', '--os-identity-api-version': '3' } common_preload_config = { 'oam_onap_net': 'oam_onap_oTA1', 'oam_onap_subnet': 'oam_onap_oTA1', 'public_net': 'external', 'public_net_id': '971040b2-7059-49dc-b220-4fab50cb2ad4' } |
Run automation program to deploy services
Sign into SDC as designer and download five csar files for infra, vbng, vgmux, vbrg, and rescust. Copy all the csar files to directory csar.
Now you can simply run 'vcpe.py' to see the instructions.
To get ready for service deployment. First run 'vcpe.py init'. This will modify SO and SDNC database to add service-related information.
Once it is done. Run 'vcpe.py infra'. This will deploy the following services. It may take 7-10 minutes to complete depending on the cloud infrastructure.
- Infra
- vBNG
- vGMUX
- vBRG
If the deployment succeeds, you will see a summary of the deployment from the program.

Validate deployed VNFs
By now you will be able to see 7 VMs in Horizon. However, this does not mean all the VNFs are functioning properly. In many cases we found that a VNF may need to be restarted multiple times to make it function properly. We perform validation as follows:
Preparation
Create subdirectory csar/ and __var/, and download service csar from SDC and put under csar directory
install python-pip and other python modules (see the comment section)
apt install python-pip
pip install ipaddress
pip install pyyaml
pip install mysql-connector-python
pip install progressbar2
pip install python-novaclient
pip install python-openstackclient
pip install kubernetes
Run automation program to deploy services
Sign into SDC as designer and download five csar files for infra, vbng, vgmux, vbrg, and rescust. Copy all the csar files to directory csar.
If robot has done the model onboardin for you the CSARs may also be inside the robot container in the /tmp/csar directory.
Now you can simply run 'vcpe.py' to see the instructions.
To get ready for service deployment. First run 'vcpe.py init'. This will modify SO and SDNC database to add service-related information.
Once it is done. Run 'vcpe.py infra'. This will deploy the following services. It may take 7-10 minutes to complete depending on the cloud infrastructure.
- Infra
- vBNG
- vGMUX
- vBRG
If the deployment succeeds, you will see a summary of the deployment from the program.
Validate deployed VNFs
By now you will be able to see 7 VMs in Horizon. However, this does not mean all the VNFs are functioning properly. In many cases we found that a VNF may need to be restarted multiple times to make it function properly. We perform validation as follows:
- Run healthcheck.py. It checks for three things:
- vGMUX
- vGMUX honeycomb server is running
- vBRG honeycomb server is running
- vBRG has obtained an IP address and its MAC/IP data has been captured by SDNC
...
- There could be situations that the vGW does not fully functioning and cannot be connected to using ssh. Try to restart the VM to solve this problem.
- isc-dhcp-server is supposed to be installed on vGW after it is instantiated. But it could happen that the server is not properly installed. If this happens, you can simply ssh to the vGW VM and manually install it with 'apt install isc-dhcp-server'.
Closed Loop Test
Step 1. Verify /opt/v_gmux_build.sh in vCPE vGMUX VM uses the right tag (3234c8ffab9faf85fd3bccfa720a3869ba39d13c) of demo repo. If not, change to this tag, and run v_gmux_build.sh as root user
| Code Block |
|---|
...

git clone http://gerrit.onap.org/r/demo
wget -O vCPE-vG-MUX-libevel-fixup.patch ${LIBEVEL_PATCH_URL}
cd demo
git checkout 3234c8ffab9faf85fd3bccfa720a3869ba39d13c
patch -p1 < ../vCPE-vG-MUX-libevel-fixup.patch
cd vnfs/VES5.0/evel/evel-library/bldjobs

... |
Step 2. Push closed loop policy from pap
Copy libevel.so to vGMUX VM, and follow steps given by Eric on the comment section of vCPE - Test Status.
Step 2. Push closed loop policy from pap
| Code Block |
|---|
root@oom-rancher:~# kubectl -n onap get pod |grep pap
dev-policy-pap-b74f6775-bvng5 |
| Code Block |
root@oom-rancher:~# kubectl -n onap get pod |grep pap dev-policy-pap-b74f6775-bvng5 2/2 Running 2/2 0 Running 0 6d 6d root@oom-rancher:~# kubectl exec -it dev-policy-pap-b74f6775-bvng5 -c pap -n onap -- bash -c "export PRELOAD_POLICIES=true; /tmp/policy-install/config/push-policies.sh" |
...
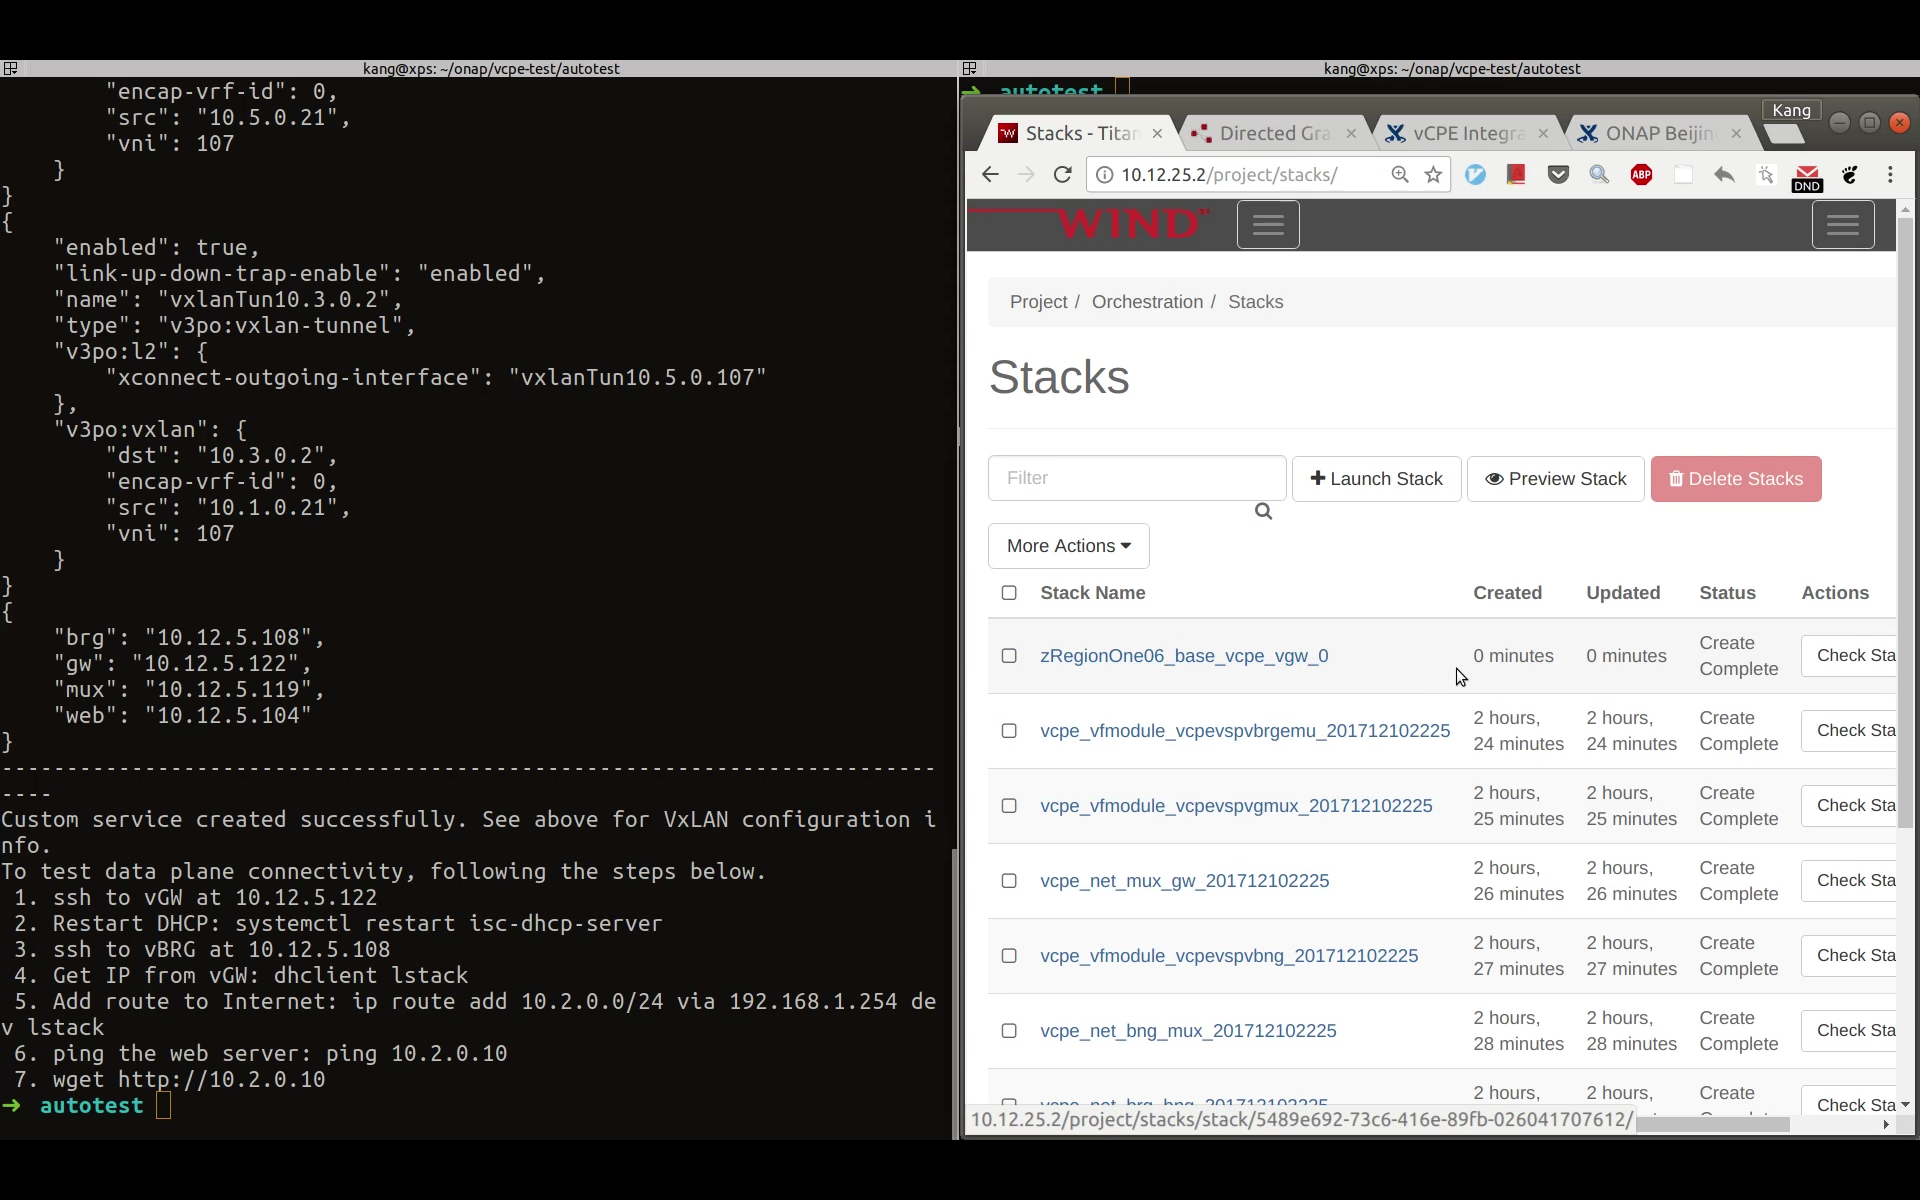
stack_name: from Openstack Horizon→Orchestration→Stack page
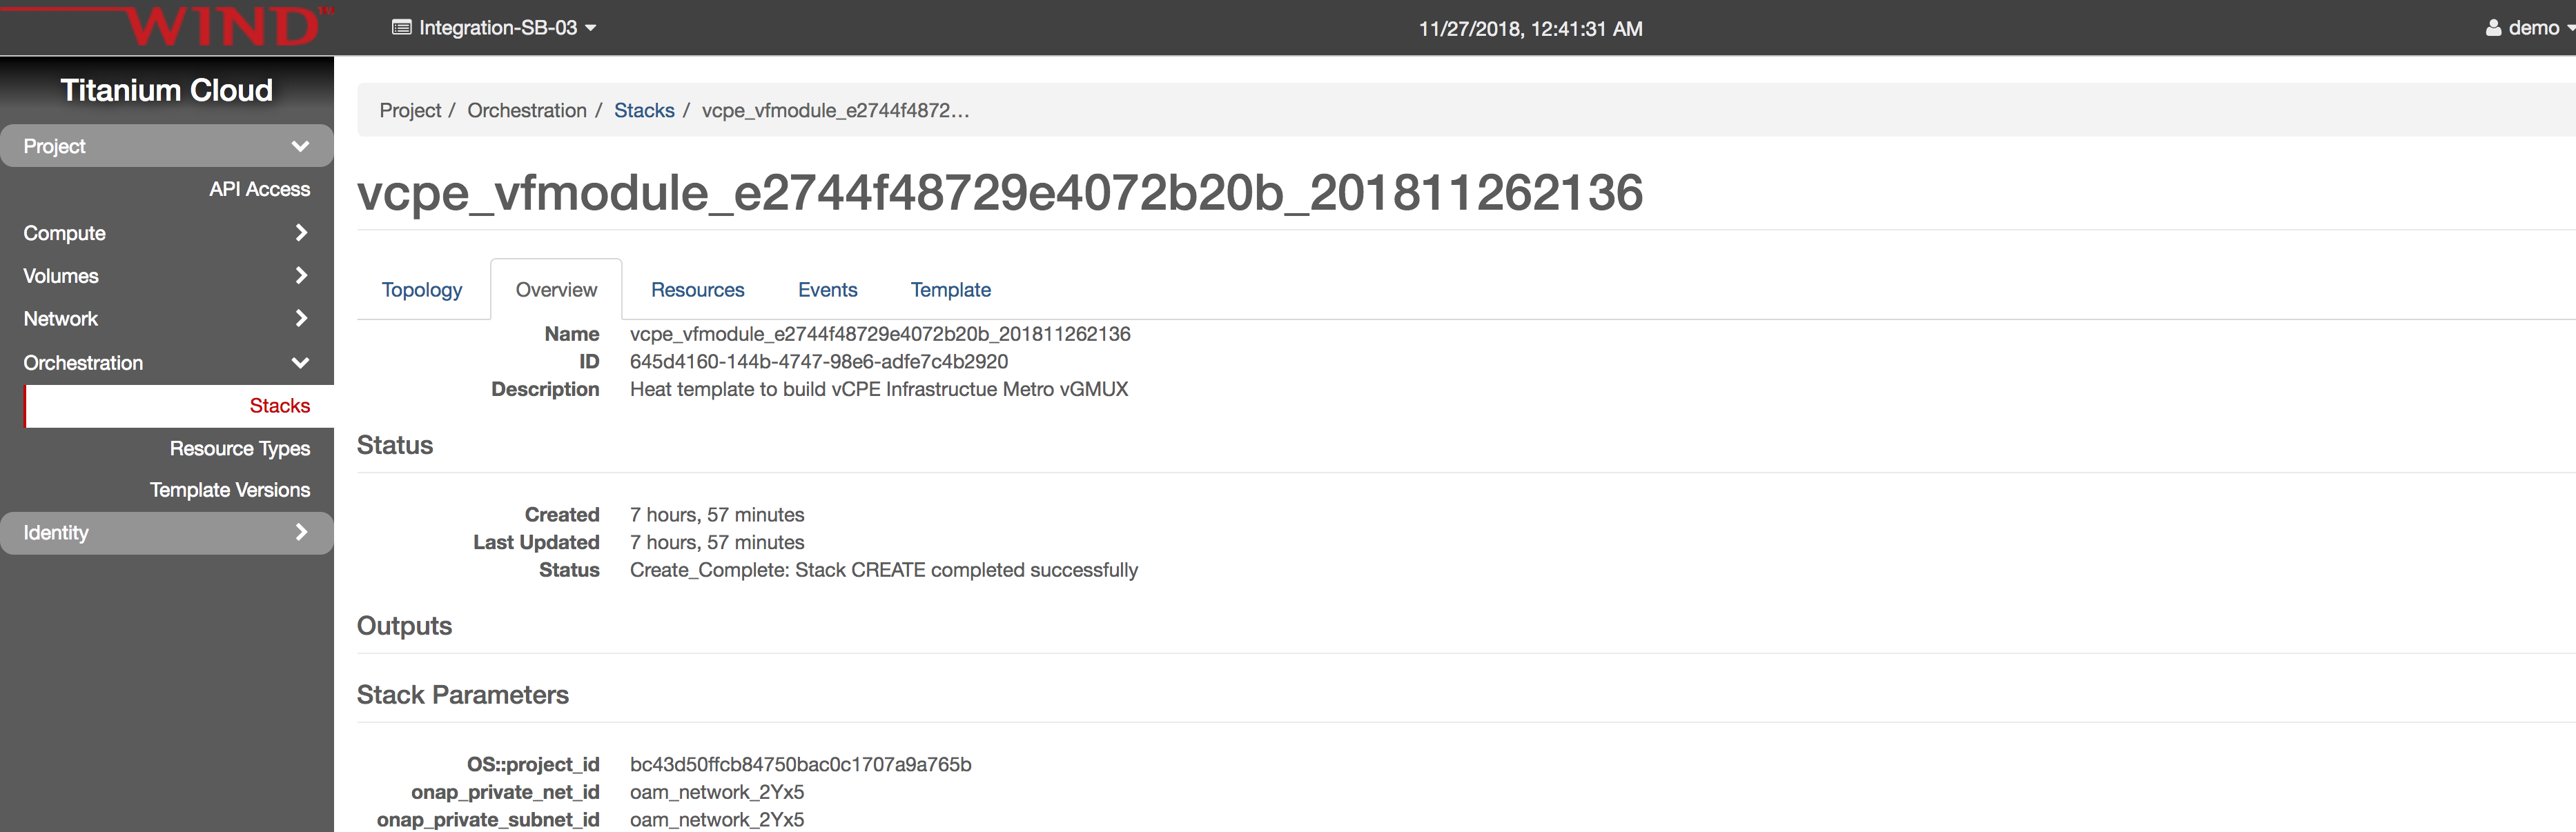
service: vCPEvCPEvGMUX
oam_ip_address: vGMUX VM oam network ip, you can get from Horizon
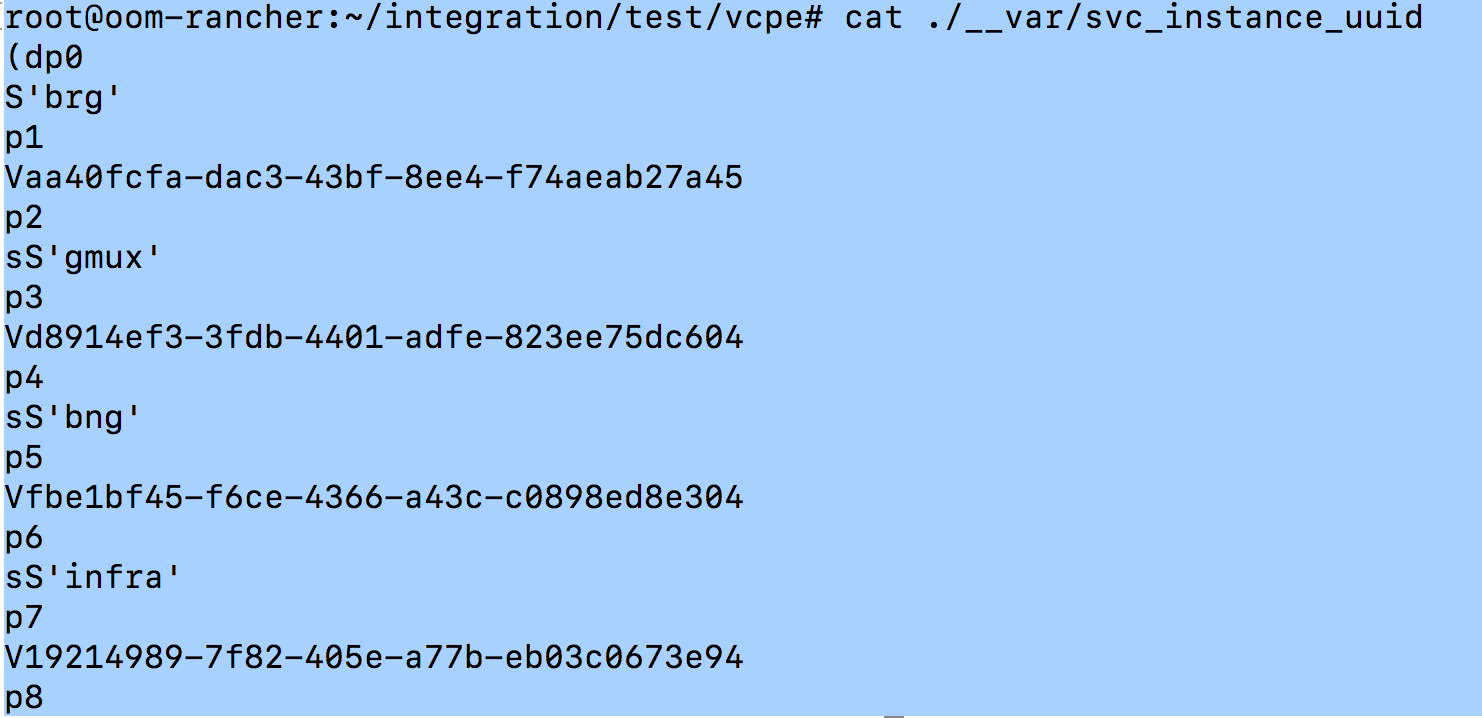
service_instance_id: List all services for user SDN-ETHERNET-INTERNET by querying https://{{aai}}:{{port}}/aai/v14/business/customers/customer/SDN-ETHERNET-INTERNET/service-subscriptions?depth=all, then look for a service instance of vgmux with relationship to generic-vnf.

Take from __var/svc_instance_uuid file. Copy the value for gmux without letter 'V'.
| Code Block |
|---|
#demo-k8s.sh <namespace> heatbridge <stack_name> <service_instance_id> <service> <oam-ip-address>
root@oom-rancher:~/integration/test/vcpe# ~/ |
| Code Block |
#demo.sh <namespace> heatbridge <stack_name> <service_instance_id> <service> <oam-ip-address> root> oom/kubernetes/robot/demo-k8s.sh onap heatbridge vcpe_vfmodule_vcpevspvgmux1111e2744f48729e4072b20b_201811122232201811262136 15f389a9d8914ef3-092f3fdb-44674401-8776adfe-157324ec70ff823ee75dc604 vCPEvCPEvGMUX 10.0.101.21 |
Step 4. Make sure APPC VNF_DB_MAPPING doesn't have table has Restart with Generic_Restart as DG entry, and TRANSACTIONS table are empty (these two issues should be solved in Casablanca release verson)_NAME and 3.0.0 as DG_VERSION
| Code Block |
|---|
MariaDB [sdnctl]> select * from TRANSACTIONS; Empty set (0.00 sec) MariaDB [sdnctl]> SELECT * FROM VNF_DG_MAPPING; +-------------------+-------------------+-------------+----------+-------------+-----------------+------------+-----------+ | VNF_DG_MAPPING_ID | ACTION | API_VERSION | VNF_TYPE | VNF_VERSION | DG_NAME | DG_VERSION | DG_MODULE | +-------------------+-------------------+-------------+----------+-------------+-----------------+------------+-----------+ | 580 | Restart | 2.00 | | | Generic_Restart | 3.0.0 | APPC | | 583 | Configure | NULL | NULL | NULL | DGOrchestrator | 4.0.0 | APPC | | 586 | ConfigModify | NULL | NULL | NULL | DGOrchestrator | 4.0.0 | APPC | | 589 | Rebuild | NULL | NULL | NULL | DGOrchestrator | 4.0.0 | APPC | | 592 | Restart | NULL | NULL | NULL | DGOrchestrator | 4.0.0 | APPC | | 595 | HealthCheck | NULL | NULL | NULL | DGOrchestrator | 4.0.0 | APPC | | 598 | StartApplication | NULL | NULL | NULL | DGOrchestrator | 4.0.0 | APPC | | 601 | StopApplication | NULL | NULL | NULL | DGOrchestrator | 4.0.0 | APPC | | 604 | Migrate | NULL | NULL | NULL | DGOrchestrator | 4.0.0 | APPC | | 607 | Snapshot | NULL | NULL | NULL | DGOrchestrator | 4.0.0 | APPC | | 610 | ConfigRestore | NULL | NULL | NULL | DGOrchestrator | 4.0.0 | APPC | | 613 | ConfigBackup | NULL | NULL | NULL | DGOrchestrator | 4.0.0 | APPC | | 616 | Evacuate | NULL | NULL | NULL | DGOrchestrator | 4.0.0 | APPC | | 619 | Stop | NULL | NULL | NULL | DGOrchestrator | 4.0.0 | APPC | | 622 | Start | NULL | NULL | NULL | DGOrchestrator | 4.0.0 | APPC | | 625 | ConfigScaleOut | NULL | NULL | NULL | DGOrchestrator | 4.0.0 | APPC | | 628 | DistributeTraffic | NULL | NULL | NULL | DGOrchestrator | 4.0.0 | APPC | +-------------------+-------------------+-------------+----------+-------------+-----------------+------------+-----------+ 17 rows in set (0.00 sec) |
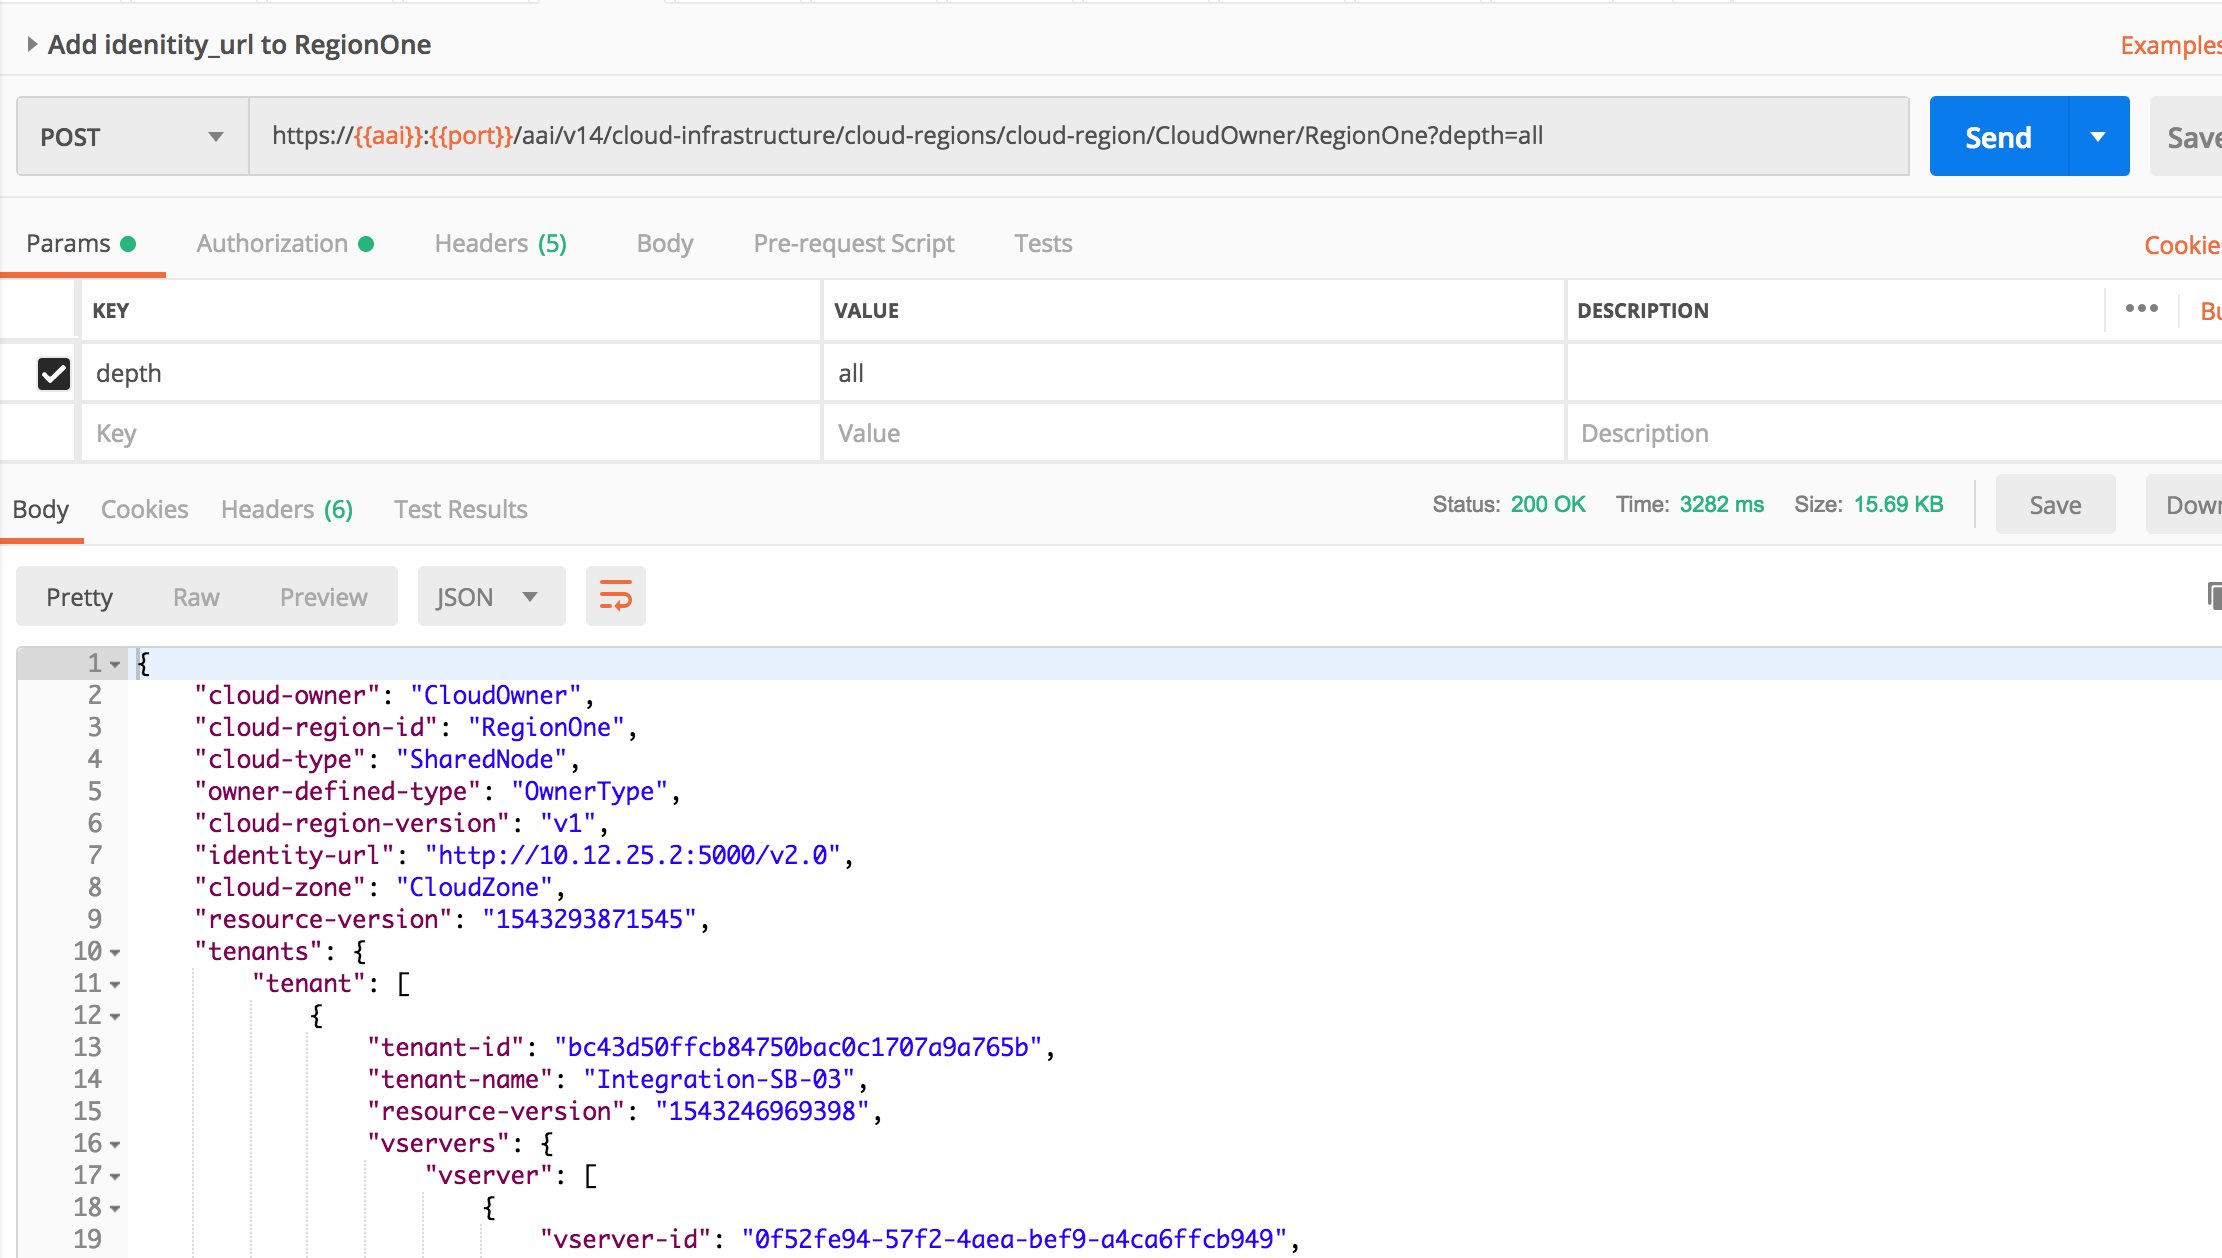
Step 5. run vcpe.py loop, and input brg mac address when prompted. Update RegionOne with identity-url. First query RegionOne from Postman and add idenity-url, then Post updated content back to AAI
Get RegionOne data
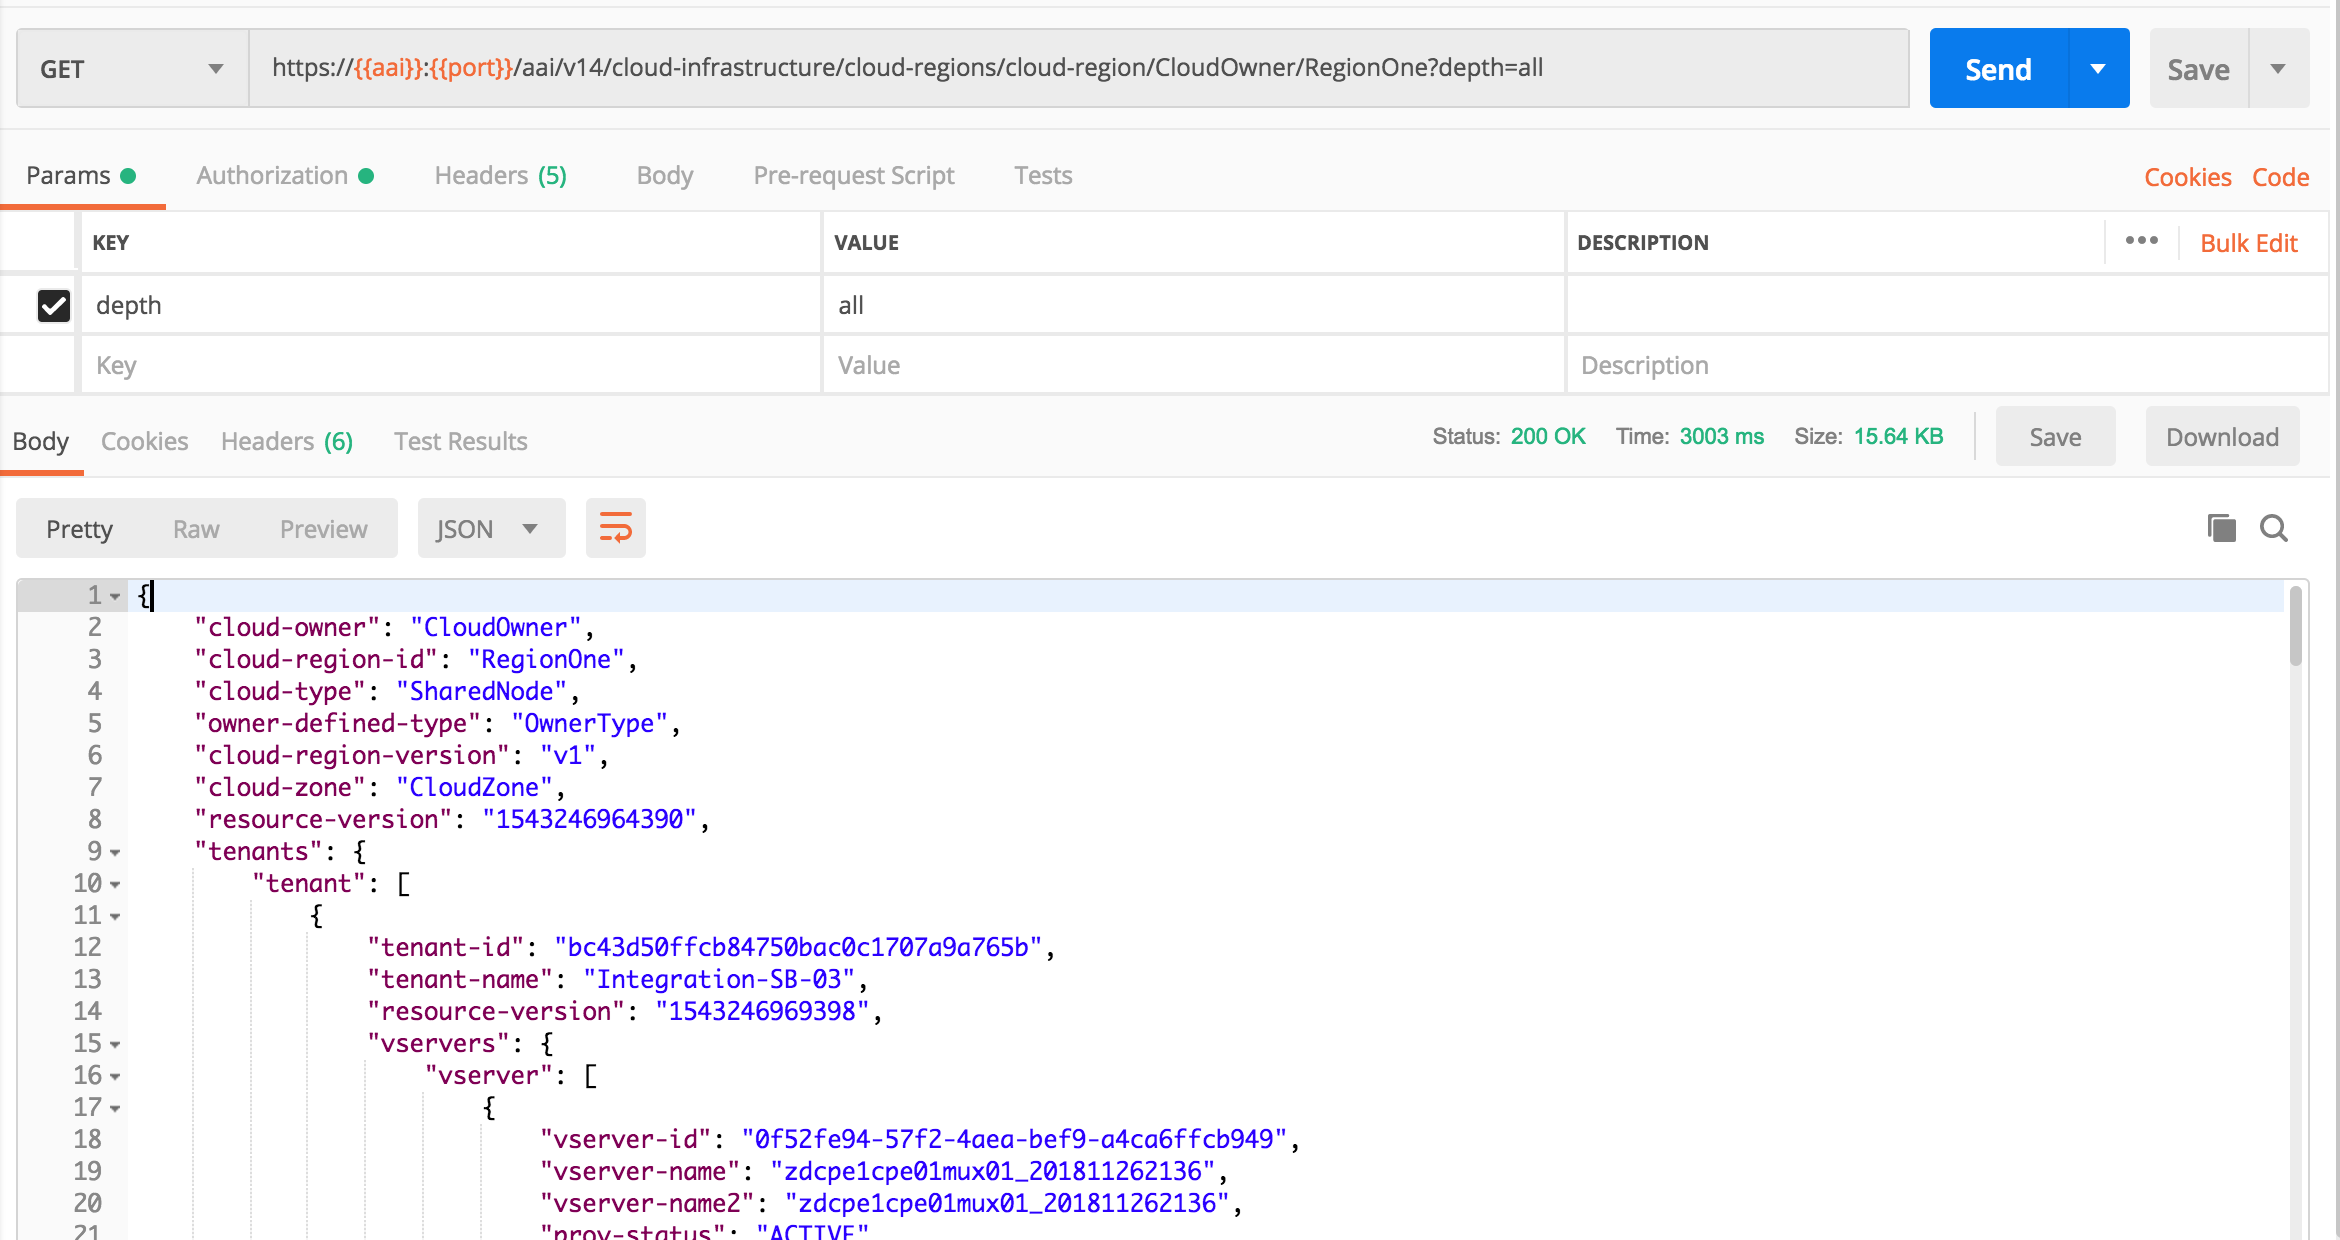
Add only identity-url with Openstack keystone endpoint, and PUT back to AAI
Step 6. run vcpe.py loop. You don't need to stop/start policy (which is suggested by vcpe script and will be changed)
Checklist for Casablanca Release
Assuming you run vcpe script from rancher node, here we put the above steps in summary, you need to see details of each step in the above tutorial.
0. Enable dev-sdnc-sdnc-0 docker karaf log by editing StatefulSet/dev-sdnc-sdnc (remove log mount), then deleting pod dev-sdnc-sdnc-0 to restart it. Note the pod may move to a different cluster node after restart, write down the cluster node IP.
1. model distribution by `demo-k8s.sh onap init`. this will onboard VNFs and 4 services, i.e. infrastructure, brg, bng and gmux.
2. Login in Portal as Demo user, then go to SDC portal to add BRG subcategory to AllottedResource. SDC FE API not working yet:
POST http://sdc.api.fe.simpledemo.onap.org:30206/sdc1/feProxy/rest/v1/category/resources/resourceNewCategory.allotted%20resource/subCategory
Body: {"name":"BRG"}
3. (No need anymore for Casablanca MR) Update SO catalogdb tables temp_network_heat_template_lookup and network_resource tables by setting aic_version_max=3.0 (SO-1184)
4. Update SO catalogdb table heat_template to set Generic NeutronNet entry BODY field with the correct yaml format
| Code Block | ||||
|---|---|---|---|---|
| ||||
mysql -uroot -ppassword -e 'update catalogdb.heat_template set body="
heat_template_version: 2013-05-23
description: A simple Neutron network
parameters:
  network_name:
    type: string
    description: Name of the Neutron Network
    default: ONAP-NW1
  shared:
    type: boolean
    description: Shared amongst tenants
    default: False
outputs:
  network_id:
    description: Openstack network identifier
    value: { get_resource: network }
resources:
  network:
    type: OS::Neutron::Net
    properties:
      name: { get_param: network_name }
shared: { get_param: shared }" where name="Generic NeutronNet"' |
5. Manually create and distribute customer service according to the steps in tutorial
Note: in Casablanca maintenance, this step is automated in Robot by running >ete-k8s.sh onap distributevCPEResCust
5.1 Create csar directory under vcpe, and copy the following 5 csar files from robot docker /tmp/csar/
| Code Block | ||||
|---|---|---|---|---|
| ||||
root@oom-rancher:~/integration/test/vcpe# ls -l csar
total 440
-rw-r--r-- 1 root root 105767 Jan 28 18:21 service-Demovcpeinfra-csar.csar
-rw-r--r-- 1 root root 68772 Jan 28 18:21 service-Demovcpevbng-csar.csar
-rw-r--r-- 1 root root 61744 Jan 28 18:22 service-Demovcpevbrgemu-csar.csar
-rw-r--r-- 1 root root 66512 Jan 28 18:22 service-Demovcpevgmux-csar.csar
-rw-r--r-- 1 root root 70943 Jan 28 18:23 service-Vcperescust2019012820190128180325894-csar.csar |
6. Create availability zone in A&AI
7. Add customer SDN-ETHERNET-INTERNET
7.1 Add route on sdnc cluster node `ip route add 10.3.0.0/24 via 10.0.101.10 dev ens3`. You can find sdnc cluster node name by using kubectl describe sdnc pod
If you have onap_dev key in local, you can run the following commands; otherwise you can find the cluster node ip from Openstack Horizon and login with key.
| Code Block | ||||
|---|---|---|---|---|
| ||||
root@release-rancher:~# kubectl -n onap get pod -o wide | grep sdnc-0
dev-sdnc-sdnc-0 2/2 Running 0 5h38m 10.42.3.22 release-k8s-11 <none> <none>
root@release-rancher:~# source ~/integration/deployment/heat/onap-rke/env/windriver/Integration-SB-04-openrc (source your openstack env file)
root@release-rancher:~# openstack server show -f json release-k8s-11 | jq .addresses
"oam_network_nzbD=10.0.0.10, 10.12.6.36"
root@release-rancher:~# ssh -i ~/.ssh/onap_dev ubuntu@10.12.6.36 -- sudo ip route add 10.3.0.0/24 via 10.0.101.10 dev ens3
|
7.2 Run from Rancher node `kubectl -n onap exec -it dev-sdnc-sdnc-0 -- /opt/sdnc/bin/addIpAddresses.sh VGW 10.5.0 22 250`
8. Install python-pip and other python libraries. See tutorial comments section
| Code Block | ||||
|---|---|---|---|---|
| ||||
apt-get install -y python-pip
pip install ipaddress
pip install pyyaml
pip install mysql-connector-python
pip install progressbar2
pip install python-novaclient
pip install python-openstackclient
pip install netaddr
pip install kubernetes |
9. Change the following env and service related parameters in vcpecommon.py
| Code Block | ||||
|---|---|---|---|---|
| ||||
--os-tenant-id
--os-projet-domain-name
oam_onap_net
oam_onap_subnet
self.vgw_VfModuleModelInvariantUuid |
9.1 Run `vcpe.py init`. You may see some sql command failure, it's ok to ignore.
10. Run `vcpe.py infra`
11. Make sure sniro configuration is run as part of the above step.
12. Install curl command inside sdnc-sdnc-0 container
13. Run `healthcheck-k8s.py onap` to check connectivity from sdnc to brg and gmux. If healthcheck-k8s.sh fails, check /opt/config/sdnc_ip.txt to see it has the SDNC host ip correctly. If you need to change SDNC host ip, you need to clean up and rerun `vcpe.py infra`.
.
If you have changed the SDNC_IP after instantiation of the vBNG and vBRGEMU:
- you need to also update the /opt/sdnc_ip in the vBNG and run v_bng_install.sh to get the vBNG route tables updated.
- you need to change sdnc_ip.txt and ip.txt on the vBRGEMU
| Code Block | ||||
|---|---|---|---|---|
| ||||
root@zdcpe1cpe01brgemu01-201812261515:~# vppctl tap  delete tap-0
Deleted.
root@zdcpe1cpe01brgemu01-201812261515:~# vppctl tap  delete tap-1
Deleted.
[WAIT A FEW SECONDS BEFORE DOING NEXT STEPS or you may get an error since vppctl lstack returns error.]
root@zdcpe1cpe01brgemu01-201812261515:~# /opt/bind_nic.sh
root@zdcpe1cpe01brgemu01-201812261515:~# /opt/set_nat.sh
root@zdcpe1cpe01brgemu01-201812261515:~# vppctl show int
              Name               Idx       State          Counter          Count
GigabitEthernet0/4/0              1         up       tx packets                    12
                                                     tx bytes                    3912
local0                            0        down
tap-0                             2         up       rx packets                     5
                                                     rx bytes                     410
                                                     drops                          7
                                                     ip6                            1
tap-1                             3         up       rx packets                     1
                                                     rx bytes                      70
                                                     drops                          7
ip6 1 |
14. Run `vcpe.py customer`
15. Verify tunnelxconn and brg vxlan tunnels are set up correctly
16. Set up vgw and brg dhcp and route, and ping from brg to vgw. Note vgw public ip on Openstack Horizon may be wrong. Use vgw OAM ip to login.
| Code Block | ||||
|---|---|---|---|---|
| ||||
 1. ssh to vGW
 2. Restart DHCP: systemctl restart isc-dhcp-server
 3. ssh to vBRG
 4. Get IP from vGW: dhclient lstack
 5. Add route to Internet: ip route add 10.2.0.0/24 via 192.168.1.254 dev lstack
 6. ping the web server: ping 10.2.0.10
7. wget http://10.2.0.10 |
17. Add identity-url property in RegionOne with Postman
18. Add new DG in APPC for closed loop. See APPC release note for steps. CCSDK-741
19. Update gmux libevel.so. See Eric comments on vcpe test status wiki
20. Run heatbridge Robot script
21. Push closed loop policy on Pap.
22. Run `vcpe.py loop` and verify vgmux is restarted
| Code Block | ||||
|---|---|---|---|---|
| ||||
VES_MEASUREMENT_OUTPUT event from VES collector to DCAE:
{
	"event": {
		"commonEventHeader": {
			"startEpochMicrosec": 1548802103113302,
			"sourceId": "3dcbc028-45f0-4899-82a5-bb9cc7f14b32",
			"eventId": "Generic_traffic",
			"reportingEntityId": "No UUID available",
			"internalHeaderFields": {
				"collectorTimeStamp": "Tue, 01 29 2019 10:48:33 UTC"
			},
			"eventType": "HTTP request rate",
			"priority": "Normal",
			"version": 1.2,
			"reportingEntityName": "zdcpe1cpe01mux01-201901291531",
			"sequence": 17,
			"domain": "measurementsForVfScaling",
			"lastEpochMicrosec": 1548802113113302,
			"eventName": "Measurement_vGMUX",
			"sourceName": "vcpe_vnf_9ab915ef-f44f-4fe5-a6ce_201901291531"
		},
		"measurementsForVfScalingFields": {
			"cpuUsageArray": [
				{
					"percentUsage": 0,
					"cpuIdentifier": "cpu1",
					"cpuIdle": 47.1,
					"cpuUsageSystem": 0,
					"cpuUsageUser": 5.9
				}
			],
			"measurementInterval": 10,
			"requestRate": 540,
			"vNicUsageArray": [
				{
					"transmittedOctetsDelta": 0,
					"receivedTotalPacketsDelta": 0,
					"vNicIdentifier": "eth0",
					"valuesAreSuspect": "true",
					"transmittedTotalPacketsDelta": 0,
					"receivedOctetsDelta": 0
				}
			],
			"measurementsForVfScalingVersion": 2.1,
			"additionalMeasurements": [
				{
					"name": "ONAP-DCAE",
					"arrayOfFields": [
						{
							"name": "Packet-Loss-Rate",
							"value": "0.0"
						}
					]
				}
			]
		}
	}
}


DCAE_CL_OUTPUT event from DCAE to Policy:
{
	"closedLoopEventClient": "DCAE_INSTANCE_ID.dcae-tca",
	"policyVersion": "v0.0.1",
	"policyName": "DCAE.Config_tca-hi-lo",
	"policyScope": "DCAE",
	"target_type": "VNF",
	"AAI": {
		"generic-vnf.resource-version": "1548788326279",
		"generic-vnf.nf-role": "",
		"generic-vnf.prov-status": "ACTIVE",
		"generic-vnf.orchestration-status": "Active",
		"generic-vnf.is-closed-loop-disabled": false,
		"generic-vnf.service-id": "f9457e8c-4afd-45da-9389-46acd9bf5116",
		"generic-vnf.in-maint": false,
		"generic-vnf.nf-type": "",
		"generic-vnf.nf-naming-code": "",
		"generic-vnf.vnf-name": "vcpe_vnf_9ab915ef-f44f-4fe5-a6ce_201901291531",
		"generic-vnf.model-version-id": "7dc4c0d8-e536-4b4e-92e6-492ae6b8d79a",
		"generic-vnf.model-customization-id": "a1ca6c01-8c6c-4743-9039-e34038d74a4d",
		"generic-vnf.nf-function": "",
		"generic-vnf.vnf-type": "demoVCPEvGMUX/9ab915ef-f44f-4fe5-a6ce 0",
		"generic-vnf.model-invariant-id": "637a6f52-6955-414d-a50f-0bfdbd76dac8",
		"generic-vnf.vnf-id": "3dcbc028-45f0-4899-82a5-bb9cc7f14b32"
	},
	"closedLoopAlarmStart": 1548803088140708,
	"closedLoopEventStatus": "ONSET",
	"closedLoopControlName": "ControlLoop-vCPE-48f0c2c3-a172-4192-9ae3-052274181b6e",
	"version": "1.0.2",
	"target": "generic-vnf.vnf-name",
	"requestID": "0e74d6df-627d-4a97-a679-be85ddad6758",
	"from": "DCAE"
}


APPC-LCM-READ event from Policy to APPC:
{
  "body": {
    "input": {
      "common-header": {
        "timestamp": "2019-01-29T23:05:42.121Z",
        "api-ver": "2.00",
        "originator-id": "923ac972-6ec1-4e34-b6e1-76dc7481d5af",
        "request-id": "923ac972-6ec1-4e34-b6e1-76dc7481d5af",
        "sub-request-id": "1",
        "flags": {}
      },
      "action": "Restart",
      "action-identifiers": {
        "vnf-id": "3dcbc028-45f0-4899-82a5-bb9cc7f14b32"
      }
    }
  },
  "version": "2.0",
  "rpc-name": "restart",
  "correlation-id": "923ac972-6ec1-4e34-b6e1-76dc7481d5af-1",
  "type": "request"
} |
23. To repeat create infra step, you can delete infra vf-module stacks first and the network stacks from Openstack Horizon Orchestration->Stack page, then clean up the record in sdnc DHCP_MAC table before rerun `vcpe.py infra`
24. To repeat create customer step, you can delete customer stack, then clear up tunnles by running `cleanGMUX.py gmux_public_ip` and `cleanGMUX.py brg_public_ip`. After that you can rerun create customer command
25. If SDNC needs to be redeployed, you need again to distribute service model from SDC UI, create ip pool, install curl, and set SDNC VM cluster node routing table. Then you should reinstantiate infra VNFs, otherwise you would need to change sdnc ip address in VNFs for snat config.
Checklist for Dublin and El Alto Releases
- Model distribution by `demo-k8s.sh onap init`. this will onboard VNFs and 4 services, i.e. infrastructure, brg, bng and gmux
- Run Robot `ete-k8s.sh onap distributevCPEResCust`. This step assumes step 1 successfully distributed the 4 models
- Add customer SDN-ETHERNET-INTERNET (need to put into vcpe init)
- Add identity-url to RegionOne
- Add route on sdnc cluster node `ip route add 10.3.0.0/24 via 10.0.101.10 dev ens3`
- Initialize SDNC ip pool by running from Rancher node `kubectl -n onap exec -it dev-sdnc-sdnc-0 -- /opt/sdnc/bin/addIpAddresses.sh VGW 10.5.0 22 250`
- Install python and other python libraries
- In El Alto this can be done via ~integration/test/vcpe/bin/setup.sh
- Change the openstack env parameters and the customer service related parameter in vcpecommon.py
- Make sure to Change vgw_VfModuleModelInvariantUuid in vcpecommon.py based on the CSAR - it changes for every CSAR
- Run `vcpe.py init`
- Insert the custom service workflow entry in SO catalogdb
| Code Block | ||||
|---|---|---|---|---|
| ||||
root@sb04-rancher:~# kubectl exec dev-mariadb-galera-mariadb-galera-0 -- mysql -uroot -psecretpassword -e "INSERT INTO catalogdb.service_recipe (ACTION, VERSION_STR, DESCRIPTION, ORCHESTRATION_URI, SERVICE_PARAM_XSD, RECIPE_TIMEOUT, SERVICE_TIMEOUT_INTERIM, CREATION_TIMESTAMP, SERVICE_MODEL_UUID) VALUES ('createInstance','1','vCPEResCust 2019-06-03 _04ba','/mso/async/services/CreateVcpeResCustService',NULL,181,NULL, NOW(),'6c4a469d-ca2c-4b02-8cf1-bd02e9c5a7ce')"
|
10. Run `vcpe.py infra`
11. Install curl command inside sdnc-sdnc-0 container
12. From Rancher node run `healthcheck-k8s.py onap` to check connectivity from sdnc to brg and gmux
13. Update libevel.so in vGMUX
14. Run heatbridge
15. Push new Policy. Follow Jorge's steps in
| Jira | ||||||
|---|---|---|---|---|---|---|
|
| Code Block | ||||
|---|---|---|---|---|
| ||||
root@dev-robot-robot-66c9dbc759-8j7lr:/# curl -k --silent --user 'healthcheck:zb!XztG34' -X POST "https://policy-api:6969/policy/api/v1/policytypes/onap.policies.controlloop.Operational/versions/1.0.0/policies" -H "Accept: application/json" -H "Content-Type: application/json" -d @operational.vcpe.json.txt
{"policy-id":"operational.vcpe","policy-version":"1","content":"controlLoop%3A%0D%0A++version%3A+2.0.0%0D%0A++controlLoopName%3A+ControlLoop-vCPE-48f0c2c3-a172-4192-9ae3-052274181b6e%0D%0A++trigger_policy%3A+unique-policy-id-1-restart%0D%0A++timeout%3A+3600%0D%0A++abatement%3A+true%0D%0A+%0D%0Apolicies%3A%0D%0A++-+id%3A+unique-policy-id-1-restart%0D%0A++++name%3A+Restart+the+VM%0D%0A++++description%3A%0D%0A++++actor%3A+APPC%0D%0A++++recipe%3A+Restart%0D%0A++++target%3A%0D%0A++++++type%3A+VM%0D%0A++++retry%3A+3%0D%0A++++timeout%3A+1200%0D%0A++++success%3A+final_success%0D%0A++++failure%3A+final_failure%0D%0A++++failure_timeout%3A+final_failure_timeout%0D%0A++++failure_retries%3A+final_failure_retries%0D%0A++++failure_exception%3A+final_failure_exception%0D%0A++++failure_guard%3A+final_failure_guard"}
root@dev-robot-robot-66c9dbc759-8j7lr:/# curl --silent -k --user 'healthcheck:zb!XztG34' -X POST "https://policy-pap:6969/policy/pap/v1/pdps/policies" -H "Accept: application/json" -H "Content-Type: application/json" -d @operational.vcpe.pap.json.txt

{
"policies": [
{
"policy-id": "operational.vcpe",
"policy-version": 1
}
]
}
|
16. Start closeloop by `./vcpe.py loop` to trigger packet drop VES event. You may need to run the command twice if the first run fails
[Note you may need to comment out the set_closed_loop in vcpe.py line 165 if
| Jira | ||||||
|---|---|---|---|---|---|---|
|
#vcpecommon.set_closed_loop_policy(policy_template_file)
| Code Block | ||||
|---|---|---|---|---|
| ||||
[2019-06-04 11:03:49,822][INFO ][pool-5-thread-20][org.onap.dcae.common.EventProcessor] - QueueSize:0 EventProcessor Removing element: {"VESversion":"v5","VESuniqueId":"88f3548c-1a93-4f1d-8a2a-001f8d4a2aea","event":{"commonEventHeader":{"startEpochMicrosec":1559646219672586,"sourceId":"d92444f5-1985-4e15-807e-b8de2d96e489","eventId":"Generic_traffic","reportingEntityId":"No UUID available","eventType":"HTTP request rate","priority":"Normal","version":1.2,"reportingEntityName":"zdcpe1cpe01mux01-201906032354","sequence":9,"domain":"measurementsForVfScaling","lastEpochMicrosec":1559646229672586,"eventName":"Measurement_vGMUX","sourceName":"vcpe_vnf_vcpe_vgmux_201906032354"},"measurementsForVfScalingFields":{"cpuUsageArray":[{"percentUsage":0,"cpuIdentifier":"cpu1","cpuIdle":100,"cpuUsageSystem":0,"cpuUsageUser":0}],"measurementInterval":10,"requestRate":492,"vNicUsageArray":[{"transmittedOctetsDelta":0,"receivedTotalPacketsDelta":0,"vNicIdentifier":"eth0","valuesAreSuspect":"true","transmittedTotalPacketsDelta":0,"receivedOctetsDelta":0}],"measurementsForVfScalingVersion":2.1,"additionalMeasurements":[{"name":"ONAP-DCAE","arrayOfFields":[{"name":"Packet-Loss-Rate","value":"22.0"}]}]}}} |
17. Stop cloed loop for testing with ./vcpe.py noloss
Frankfurt vCPE.py Log for creating networks:
View file name vcpe.20200625.log height 250
Typical Errors and Solutions
SDNC DG error
If you run vcpe.py customer and see an error similar to the following:
...
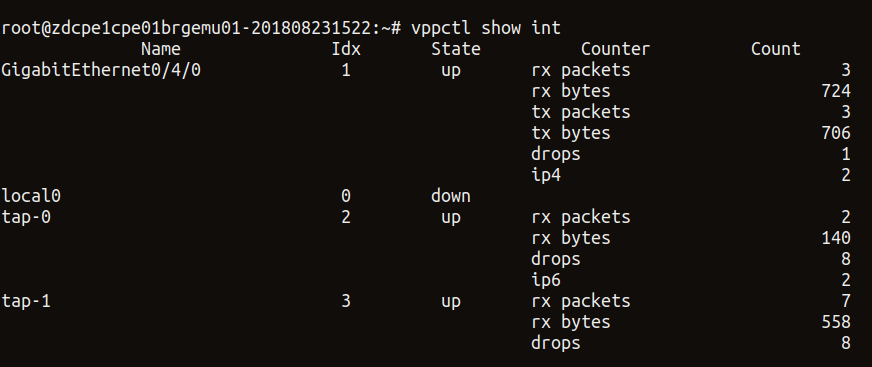
Inside vBRG you can also check the status with 'vppctl show int'. If vpp works properly, you should be able to see that both tap-0 and tap-1 in 'up' state. An example is below.
Unable to change subnet name
see that both tap-0 and tap-1 in 'up' state. An example is below.
Unable to change subnet name
When running "vcpe.py infra" command, if you see error message about subnet can't be found. It may be because your python-openstackclient is not the latest version and don't support "openstack subnet set --name" command option. Upgrade the module with "pip install --upgrade python-openstackclient".
Unable to generate VM name error from SDNC
Received error from SDN-C: Unable to generate VM name: naming-policy-generate-name: input.policy-instance-name is not set and input.policy is ASSIGN.
To resolve this: Check the vgw_VfModuleModelInvariantUuid parameter in the vcpecommon.py script is updated with your ResCust_svc VF_ModuleModelInvariantUuid or not. For every new customer don't forget to update this.
Add this to CheckList:
# CHANGEME: vgw_VfModuleModelInvariantUuid is in rescust service csar, look in service-VcpesvcRescust1118-template.yml for groups vgw module metadata. TODO: read this value automcatically
self.vgw_VfModuleModelInvariantUuid = '26d6a718-17b2-4ba8-8691-c44343b2ecd2'When running "vcpe.py infra" command, if you see error message about subnet can't be found. It may be because your python-openstackclient is not the latest version and don't support "openstack subnet set --name" command option. Upgrade the module with "pip install --upgrade python-openstackclient".