...
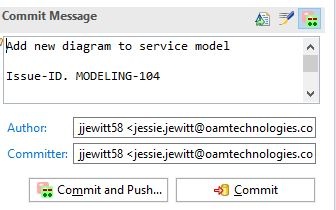
- Position your cursor in the "Commit Message" window.
- Add a commit message indicating the change you have done, i.e. "Added new diagram to service model".
- Then press carriage return twice so that you have a blank line after your message.
- You can then optionally add a more detailed message about the change.
- Next, you will have to associate the change to a JIRA ticket. Add on the line after the blank line: Issue-ID: MODELING-xxx
- The JIRA ticket should be from the Modeling project. List of tickets here: https://jira.onap.org/projects/MODELING/issues/
- Note that there needs to be a blank between ":" and "M".
- Git should generate a "Change-Id" for you, so you don't need to manually add one.
- If there is no "Change-Id" line in the "Commit Message" window, click the "Add Change-ID" icon to the right on the same line as the "Commit Message" title.
- Then "Sign-off" on the change by clicking the "Add Signed-off-by" icon that looks like a pen and is on the same line as the "Commit Message" title:
![]()
...
Commiting to your local repository and
...
pushing to remote Gerrit
- Now you are ready to select "Commit and Push". This commits your local changes and pushes them to the remote Gerrit repository (which should be the working branch).
- Note that the "Committer" must correspond to the user name and email you have associated to your Gerrit account. If they don't, follow the instructions here: ONAP Gerrit user setup in Eclipse
- After you press "Commit and Push...", you will see this popup:

- Click "Finish".
...
- If your commit and push fails for any reason, once you have fixed the problem, you can try to resend the request by selecting the "Amend (Edit previous commit)" icon in the Commit Message bar:

- If you want to roll back your failed commits:
- Go to the Git Perspective by selecting "Window"→"Perspective"→"Open Perspective"→"Other..." on the top of your screen and then select "Git".
- Right-click on the "modelspec" repository and select "Reset...".:

- Select "Remote Tracking"→"origin"→"master", then "Mixed", and then click "Reset".

- This operation will let your local back to keep aligned with the remote merged changes, then you can do a new commit.
...
Exporting the ONAP Model
...
Exporting to a Word Document
GenDoc is a plugin to Eclipse/Papyrus that enables you to output the model to a Word document. (See installation instructions for the GenDoc plug-in above.)
...
- Once you have updated the GenDoc template, right-click on the template file and select "Generate documentation using Gendoc"
- The GenDoc utility is invoked and the template is run.
- By default, the template creates a directory "GenDoc_output" in your workspace, if it doesn't already exist.
- It then creates a Word doc that contains the model name and the current date-time in its name.
To see the newly directory and file, select "File"→"Refresh".
- As an alternative:
- Create your own private folder for the Gendoc template by selecting "File"→"New"→"Folder". Give the folder a name.
- Then select "File"→"Import"→"File System" and import the Gendoc template from your "ONAP Information Model"/Gendoc directory .
- This imported file is now your own private copy. You can run the template using the same procedure described above.
...
Exporting to an Excel File
Papyrus provides the capability to export fragments of the model to tables.
...