| Table of Contents | ||
|---|---|---|
|
Setting
...
Up Your Development Environment
Start by following the page You can set up the SDN-C IDE by following instructions from Setting Up Your Development Environment, this covers items such as signing up for a linux foundation account, configuring git, installing gerrit and IDE recommendations.
Downloading the Source Code
Creating Your Linux Foundation Account
If you already have a Linux Foundation account, you can skip this section.
You will need linux foundation account to submit code change to ONAP projects repos. If you only want to read the code, you can skip this step.
To create your linux foundation account, go to Linux Foundation Identity page, and select I need to create a Linux Foundation ID, the following page will be shown:
Filling the information and click on Create new account to proceed account creation.
Downloading SDN-C Projects
Downloading SDN-C Projects
Follow steps in Get git command from ONAP gerrit to get the git clone command Follow steps in Get git command from ONAP gerrit to get the git clone command and clone each of the following SDNC projects:
...
| Anchor | ||||
|---|---|---|---|---|
|
Use your linux foundation account to login onto ONAP projects.
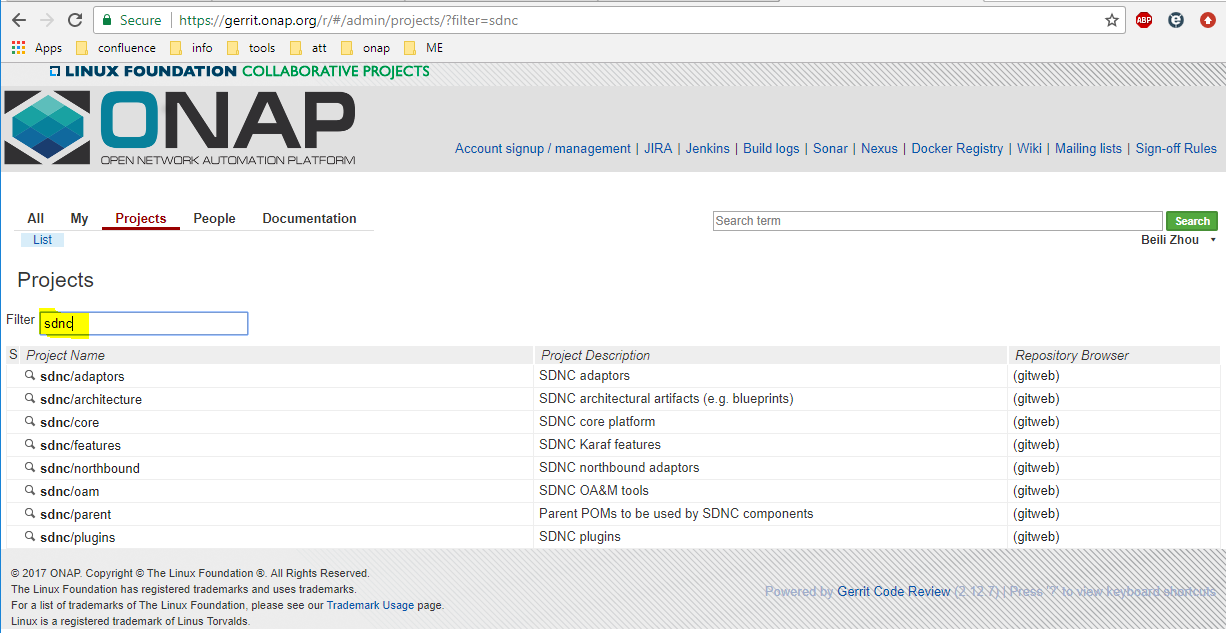
Get Project list by entering the project key name in the Filter, for example sdnc, this list of projects under sdnc will be shown as below:
Click on the wanted project from the list, the General page of the selected project will be shown. the following is the General page of sdnc/adaptors:
Now click on Clone with commit-msg hook, then click on http, then click on the notepad icon.
The git clone command for the selected project is now copied into your clipboard. You do paste to use it at where-ever you want to.
View Code on gerrit Website
ONAP code can also be viewed from gerrit web site as below (sdnc/adaptors project is used as the example here):
To view the coce through gerrit client, first follow steps in Get git command from ONAP gerrit to get the Projects list page.
Then, choose either one of the following option to view the code of the desired project.
Option 1: View Through "gitweb" Option in Project List Page
Note: this option will bring you to, and only to, the HEAD branch which is the master branch.
In the project list page, click on the gitweb under the Repository Browser column of your project row.
The master branch's summary page will be shown up. Click on the tree option.
Now, the repo details page will be shown and you can view the code in master branch from there.
Option 2: View from "Branches" Option in Project Page
Note: This option allows you to select a particular branch to view it code.
In the project list page, click the project under the Project Name column. (using sdnc/adaptors project as example here)
It takes you to the project General page, click on the Branches option.
The project page will be switched to Branches page. Check out the Branch Name column, click the gitweb on the same row of the desired branch.
The project Summary page of the selected branch will be shown up. Click on the tree option.
The below instructions explain how to clone a repository from gerrit with the commit message hook included and it will be configured to use HTTPS. SSH is still the recommended protocol, these instructions serve as a workaround for users behind restrictive networking rules.
If you have worked on other projects in gerrit and are already familiar with cloning from gerrit you can ignore these instructions!
| Info | ||
|---|---|---|
| ||
This should have been done as part of "Setting Up Your Development Environment" and is only needed if you are behind a proxy and plan to use HTTP. If behind proxy, ensure git config has set http.proxy and https.proxy NVPs, check with the following command:
if no http/https proxies exist add them with the following commands:
here's an example:
|
Use your linux foundation account to login onto ONAP projects.
Get Project list by entering the project key name in the Filter, for example sdnc, this list of projects under sdnc will be shown as below:
Click on the wanted project from the list, the General page of the selected project will be shown. the following is the General page of sdnc/adaptors:
Now click on Clone with commit-msg hook, then click on http, then click on the notepad icon.
The git clone command for the selected project is now copied into your clipboard. You do paste to use it at where-ever you want to.
View Code on gerrit Website
ONAP code can also be viewed from gerrit web site as below (sdnc/adaptors project is used as the example here):
To view the coce through gerrit client, first follow steps in Get git command from ONAP gerrit to get the Projects list page.
Then, choose either one of the following option to view the code of the desired project.
Option 1: View Through "gitweb" Option in Project List Page
Note: this option will bring you to, and only to, the HEAD branch which is the master branch.
In the project list page, click on the gitweb under the Repository Browser column of your project row.
The master branch's summary page will be shown up. Click on the tree option.
Now, the repo details page will be shown and you can view the code in master branch from there.
Compiling
Maven
Version has to be version greater or equal to 3.3.3
Ensure your maven is installed / set up as per instruction from Maven section of Setting Up Your Development Environment page.
File settings.xml
Get settings.xml file
Following instruction from Maven Example settings.xml section of Setting Up Your Development Environment page to get your setting.xml file.
Configure settings file in IntelliJ
If you are going to do compiling in your intelliJ, follow steps in this section to configure settings.xml file in your interlliJ.
If you did not make your Maven Project by default shown, do the following:
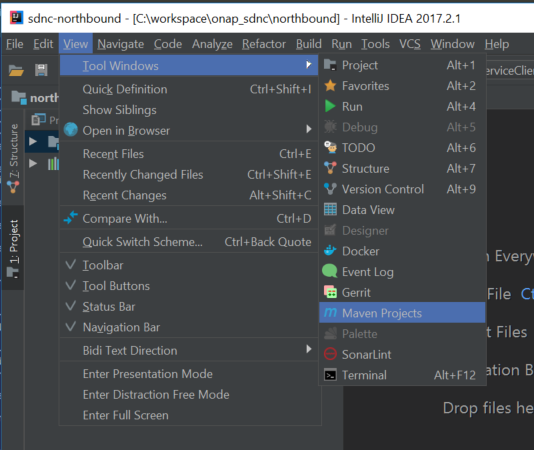
In your interlliJ, Select View -> Tool Windows -> Maven Project
The maven project will shown on the right side of your intelliJ window.
Click the Maven Settings wrench to bring up the Settings window:
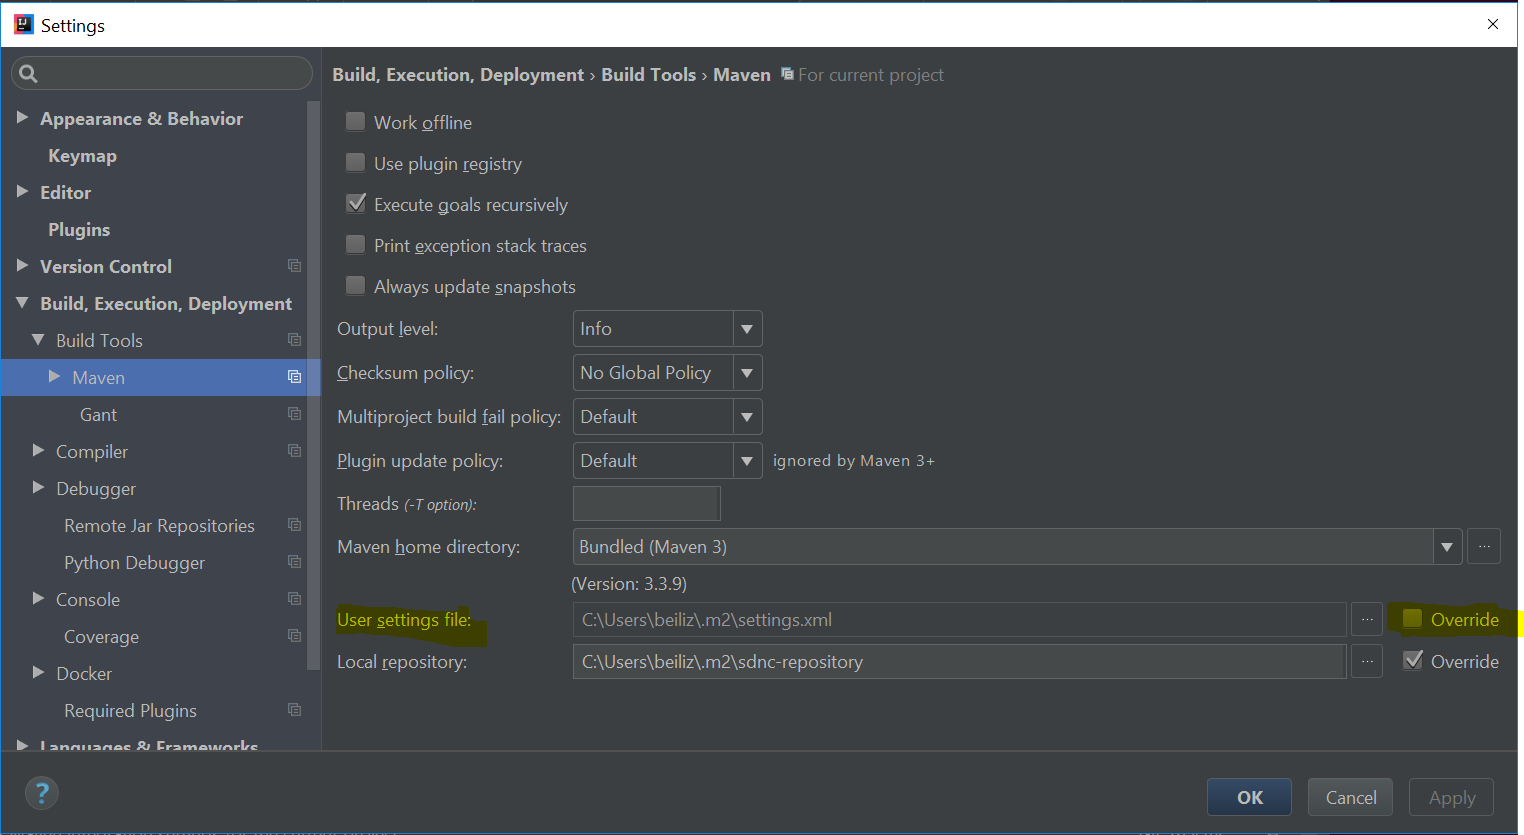
Select the Override of the User settings file, add the settings.xml file full path, the Apply button will be enabled. click on Apply to apply the change.
Build The Code
Projects Build Order
The SDN-C projects repos should be built in the following order:
- sdnc/core
- sdnc/adaptors
- sdnc/northbound
- sdnc/plugins
- sdnc/oam
Run Maven Build
Build From Command Line
Under the directory where your clone code is, run the following command to build the project
mvn clean install -s <the settings.xml file with full path>
Build Within InterlliJ
From interlliJ Maven Projects window, find the module marked with (root), expand it by clicking on the triange on the left side or double clicking the text. It will then show two folders : Lifecycle and Plugins. Use the same way to expand the Lifecycle folder, the build options are now shown:
To run the build, double click the Install or select install and then click on the Run Maven Build triange icon.
To do clean, double click the clean or select clean and then click on the Run Maven Build triange icon.
Tips
Skip Maven Javadoc Build
In the case, maven javadoc compliation failing which causes build process abort. To continue build the code, we need to skip the maven javadoc compilation.
From command line
add the "maven.javadoc.skip=true" in the command line build command as the following:
mvn clean install -Dmaven.javadoc.skip=true -s <the settings.xml file with full path>
From pom file
add the following property definition:
| Info | ||||
|---|---|---|---|---|
| ||||
<properties> <maven.javadoc.skip>true</maven.javadoc.skip> </properties> |
Unit Testing
Option 2: View from "Branches" Option in Project Page
Note: This option allows you to select a particular branch to view it code.
In the project list page, click the project under the Project Name column. (using sdnc/adaptors project as example here)
It takes you to the project General page, click on the Branches option.
The project page will be switched to Branches page. Check out the Branch Name column, click the gitweb on the same row of the desired branch.
The project Summary page of the selected branch will be shown up. Click on the tree option.
Now, the repo details page will be shown and you can view the code in master branch from there.
Compiling
Maven
Version has to be version greater or equal to 3.3.3
Ensure your maven is installed / set up as per instruction from Maven section of Setting Up Your Development Environment page.
File settings.xml
Get settings.xml file
Following instruction from Maven Example settings.xml section of Setting Up Your Development Environment page to get your settings.xml file.
| Info | ||
|---|---|---|
| ||
If behind proxy,
|
Configure settings file in IntelliJ
If you are going to compile with intelliJ, follow steps in this section to configure settings.xml file in intelliJ.
If you did not make your Maven Project by default shown, do the following:
In intelliJ, Select View -> Tool Windows -> Maven Project
The maven project will shown on the right side of the intelliJ window.
Click the Maven Settings wrench to bring up the Settings window:
Select the Override of the User settings file, add the settings.xml file full path, the Apply button will be enabled. click on Apply to apply the change.
Build The Code
Projects Build Order
The SDN-C projects repositories should be built in the following order:
- sdnc/core
- sdnc/adaptors
- sdnc/northbound
- sdnc/plugins
- sdnc/oam
Run Maven Build
Build From Command Line
Under the directory where your clone code is, run the following command to build the project
mvn clean install -s <the settings.xml file with full path>
Build Within IntelliJ
From intelliJ Maven Projects window, find the module marked with (root), expand it by clicking on the triangle on the left side or double clicking the text. It will then show two folders : Lifecycle and Plugins. Use the same way to expand the Lifecycle folder, the build options are now shown:
To run the build, double click the Install or select install and then click on the Run Maven Build triangle icon.
To do clean, double click the clean or select clean and then click on the Run Maven Build triangle icon.
Tips
Skip Maven Javadoc Build
In the case, maven javadoc compliation failing which causes build process abort. To continue build the code, we need to skip the maven javadoc compilation.
From command line
add the "maven.javadoc.skip=true" in the command line build command as the following:
mvn clean install -Dmaven.javadoc.skip=true -s <the settings.xml file with full path>
From pom file
add the following property definition:
| Info | ||||
|---|---|---|---|---|
| ||||
<properties> <maven.javadoc.skip>true</maven.javadoc.skip> </properties> |
Unit Testing
Definition of Good Unit Test
...
In anywhere of this class editor, do Ctrl+Shift+T or right click to bring up right click menu, then select Go To, then Test in the cascaded menu:
This will bring up the Choose Test for... window as below.
Choose Create New Test... for creating brand new JUnit Test, or just choose the test class to go to the existing tests.
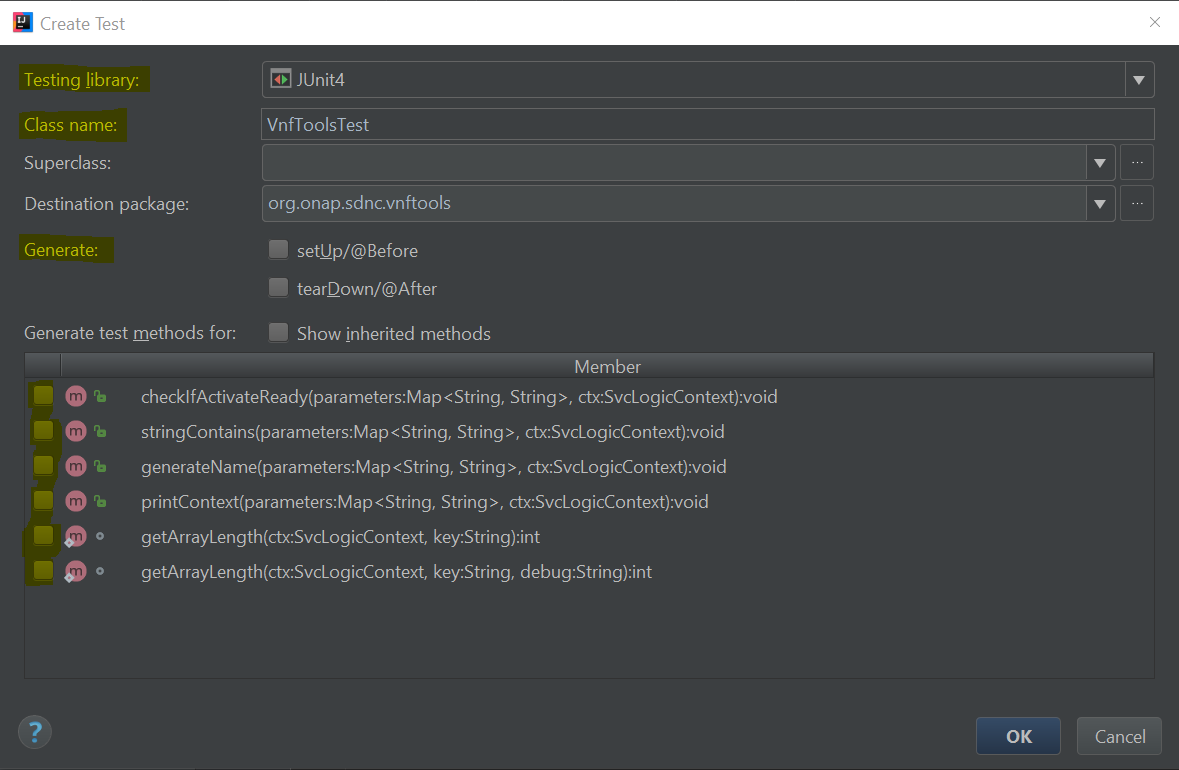
When Create New Test... is selected, the Create Test window will be brough brought up:
The test Class name is automatically generated and shown in the window. Ensure the Testing library is selected with JUnit4.
...
If the Junit and mockito dependencies are not in the module and its parent pom file, add them to the module's pom.xml file as the following. A sample snippet is below:
| Info | ||||
|---|---|---|---|---|
| ||||
<dependency> |
...
To commit code to ONAP, you must have git-review installed. The steps in this section only need to be done one time, except the Tips . This should have been done already during Setting Up Your Development Environment.
On Linux
run the following command to check if git-review is installed as part of your OS image.
...
Click the Add button in the Reviewers section, to add reviewers (who is going to review your code) and committers (who is going to review your code as well as approve and commit your code).
Note:
- The ONAP Jobbuilder will be added automatically within one or two minutes after the review created, and a verfiy build will also be automatically triggered for your review in ONAP jenkins server.
- The committer can be found from Software Defined Newtork Controller secion in Resources and Repositories (Deprecated) page.
By now, you will just wait and check your email for information of
...
| Steps | Command | Notes |
|---|---|---|
| 1 | git commit --amend | update the comment as desired |
| 2 | git log --shortstat | validate your commit now has the updated comments, as well as the Change-Id as the one in the gerrit review |
| 3 | git review | push the changed comment to the review again. Once the command is completed, go to your review, you will see
|
How to Update the Code in a Review
...
| Steps | command | notes |
|---|---|---|
| 1 | git commit -sam "my updated code" | To create a new commit with your updated code |
| 2 | git log --shortstat | you will see the most 2 recent commits are from
|
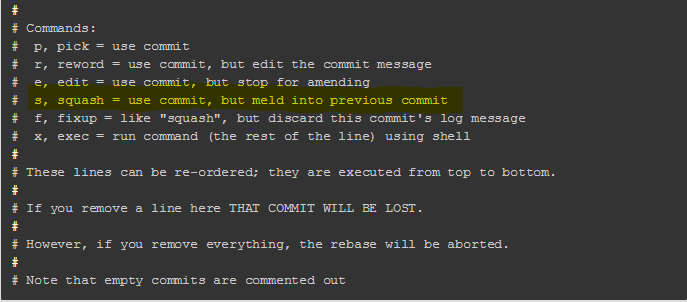
| 3 | git rebase -i HEAD~2 | To run rebase interactively for the most recent 2 commits In the interactive mode, it will bring up the text which contains pick for your last 2 commits along with the following content: Do the following:
Once this command is completed, 2 commits will be merged into 1 commit. |
| 4 | git log --shortstat | you will see there's only 1 commit which replaces the 2 commit you have seen in step 2. validate your commit has the Change-Id as the one in the gerrit review |
| 5 | git review | push the changed comment to the review again. Once the command is completed, go to your review, you will see
|
| Anchor | ||||
|---|---|---|---|---|
|
...
| Steps | Command | Notes |
|---|---|---|
| 1 | git reset HEAD~1 | to undo the commit |
| 2 | from github helper page, download commit-msg, and place it under your <repo>/.git/hook directoryhooks directory if your O/S adds and extension to the file, remove. It must be named "commit-msg" | set the proper commit-msg hook this will set the Change-Id properly in your commit |
| 3 | Use your previous command to create the commit again | |
| 4 | git log --shortstat | to check the existence of Change-Id |
...
To find all of your changes, you can type in "is:closed(owner:self)" in the Search field at Gerrit self dashboard, then click on the Search button.
Deployment
Deploying a Minimal ONAP SDN-C Environment
This tutorial is based on ONAP-integration project[1] which utilizes Vagrant[2], a deployment tool to build an ONAP environment.
...
| Info | ||
|---|---|---|
| ||
"Integration framework, automated tools, code and scripts, best practice guidance related to cross-project Continuous System Integration Testing (CSIT), and delivery of ONAP." |
...
Setup
| Tool | Version | Introduction |
|---|---|---|
| Vagrant | 1.9.5 | https://www.vagrantup.com/ |
| Virtualbox | 5.1.20 | https://www.virtualbox.org/ |
Git | 2.14.3 | https://git-scm.com/ |
(1) After installation, make sure that your system is restarted in order to let configuration be activated.
Basic Installations
Windows 10
(2) Instead of using Git bash, Cygwin could be also used and make sure "dos2unix" package is installed which will be used during setup
Basic Installations
Windows 10
Download the exe of the following (from the link listed in the above table) and installDownload the exe of the following (from the link listed in the above table) and install:
- vagrant
- virtualbox
- git
Ubuntu 16.04
Do the following:
...
| Table of Contents |
|---|
...
|
...
|
...
|
...
Install virtualbox
Add the following line to your /etc/apt/sources.list:
...
sudo apt-get install virtualbox-5.2...
1Create Virtualbox "vboxnet0" Host-only networking
On windows installation this may have been created already.
See "https://www.virtualbox.org/manual/ch06.html#network_hostonly"
VBoxManage hostonlyif create
...
Install vagrant
wget https://releases.hashicorp.com/vagrant/1.9.5/vagrant_1.9.5_x86_64.deb
sudo dpkg -i vagrant_1.9.5_x86_64.deb
...
Install git
sudo apt-get install git
...
sudo apt install dos2unixIntegration Project
Download The Project
Clone the intergration project with the following command:
...
Hint: More information could be found under integration\bootstrap\vagrant-onap\README.md
Convert Line Endings
If in windows, open Gitbash As Administrator.
Run the following commands:
cd integration/bootstrap/vagrant-onap/libfind . -type f -print0 | xargs -0 dos2unix
Hint: This issue might be fixed later
Configure Deployment Mode
Configure Deployment Mode
There is an settings.yaml.development under integration\bootstrap\vagrant-onap\etc (deprecated - /etc directory has been moved to project integration/devtool)There is an settings.yaml.development under integration\bootstrap\vagrant-onap\etc used for different deployment scenarios.
The goal is to have a running SDN-C environment, so in the configuration, it turns off clone and build project. Only file name called settings.yaml will be picked-up by the deployment script.Note: There is an issue in the sample file that "build_images" should be replaced by "build_image", otherwise, this configuration won't work.
Run the following command to create settings.yaml file from the repo's settings.yaml.development file:
cp settings.yaml.developmenttest settings.yaml
vim settings.yaml
...
- Under integration\bootstrap\vagrant-onap\doc\source\features\configure_execution.rst, it talks about the functionality of these attributes.
- Under integration\bootstrap\vagrant-onap\doc\source\features\example_usage.rst, it talks about the use cases of using this tool.
Modify Vagrantfile
vim integration/bootstrap/vagrant-onap/Vagrantfile
In configuration = {...}, find docker_version and update the corresponding value to '
1.2-STAGING-latest'
For example,
latest'
If you are using VirtualBox provider and have an issue with the VM vagrant creates not resolving hostnames then enable the natdnshostresolver1
Here is the diff that worked at the time of writting this.
| Code Block | |||
|---|---|---|---|
| |||
| |||
...
configuration = {
	...
	'docker_version' => '1.2-STAGING-latest',
	...
}
... |
Modify the SDN-C Deployment Script
...
diff --git a/bootstrap/vagrant-onap/Vagrantfile b/bootstrap/vagrant-onap/Vagrantfile index 0664e5f..667d3bf 100644 --- a/bootstrap/vagrant-onap |
...
Find function get_sdnc_images{...} in the file and modify
Mainly use pull_onap_image to replace pull_openecomp_image
Pull onap/ccsdk-dgbuilder-image instead of openecomp one
For example,
| Code Block | ||
|---|---|---|
| ||
... # get_sdnc_images() - Build or retrieve necessary images function get_sdnc_images { if [[ "$build_image" == "True" ]]; then /Vagrantfile +++ b/bootstrap/vagrant-onap/Vagrantfile @@ -13,7 +13,7 @@ configuration = { 'nexus_password' => 'docker', 'dmaap_topic' _build_sdnc_images=> 'AUTO', else 'artifacts_version' => '1.0.0', - 'docker_version' # pull_openecomp_image sdnc-image openecomp/sdnc-image:latest => '1.0-STAGING-latest', + 'docker_version' => 'latest', # pull_openecomp_image admportal-sdnc-image openecomp/admportal-sdnc-image:latest Parameters for DCAE instantiation 'dcae_zone' # pull_openecomp_image dgbuilder-sdnc-image openecomp/dgbuilder-sdnc-image:latest => 'iad4', pull_onap_image sdnc-image onap/sdnc-image:latest 'dcae_state' pull_onap_image admportal-sdnc-image onap/admportal-sdnc-image:latest pull_docker_image nexus3.onap.org:10001/onap/ccsdk-dgbuilder-image:latest onap/ccsdk-dgbuilder-image:latest fi pull_docker_image mysql/mysql-server:5.6 } ... |
Deployment
Start Deployment
cd integration/bootstrap/vagrant-onap./tools/run.sh sdncConfigure Port Forwarding
This could be replaced by adding scripts in Vagrantfile.
Open RestConf Page
http://127.0.0.1:8282/apidoc/explorer/index.html
Credentials: admin/Kp8bJ4SXszM0WXlhak3eHlcse2gAw84vaoGGmJvUy2U
Basic Usage of Vagrant and Docker
// check running vm instances
vagrant global-status// ssh to the vm
vagrant ssh ${vm-id}// check docker images
docker images// check running docker instances
docker ps -a// ssh to the docker instance
...
=> 'vi',
@@ -302,6 +302,11 @@ end

 Vagrant.configure("2") do |config|

+   if provider == :virtualbox && "sdnc".eql?(requested_machine)
+     config.vm.network "forwarded_port", guest: 8282, host: 8282, protocol: "tcp", auto_correct: true
+     config.vm.network "forwarded_port", guest: 8201, host: 8201, protocol: "tcp", auto_correct: true
+   end
+
   # PROXY definitions
     if ENV['http_proxy'] != nil and ENV['https_proxy'] != nil and ENV['no_proxy'] != nil
       if not Vagrant.has_plugin?('vagrant-proxyconf')
@@ -340,6 +345,7 @@ Vagrant.configure("2") do |config|
         # Common Settings:

         nodeconfig.vm.provider "virtualbox" do |vbox|
+          vbox.customize ['modifyvm', :id, '--natdnshostresolver1', 'on']
           vbox.customize ['modifyvm', :id, '--nictype1', 'virtio']
           vbox.customize ['modifyvm', :id, '--audio', 'none']
           vbox.customize ['modifyvm', :id, '--vram', '1']
|
Also
Modify the SDN-C Deployment Script
The get_sdnc_images function in the "integration/bootstrap/vagrant-onap/lib/sdnc" may need to be synchronized with the images defined in the docker compose file [sdnc/oam.git] / installation / src / main / yaml / docker-compose.yml. If these are not synchroned you will get a
pull access denied for [image name], repository does not exist or may require 'docker login'
In addition to the synchonizing the images the keyword openecomp has changed to onap.
Here is the diff that worked at the time of writting this.
| Code Block | ||||
|---|---|---|---|---|
| ||||
diff --git a/bootstrap/vagrant-onap/lib/sdnc b/bootstrap/vagrant-onap/lib/sdnc
index a69ce18..ff582fe 100755
--- a/bootstrap/vagrant-onap/lib/sdnc
+++ b/bootstrap/vagrant-onap/lib/sdnc
@@ -3,7 +3,7 @@
 source /var/onap/functions
 source /var/onap/ccsdk

-sdnc_src_folder=$git_src_folder/openecomp/sdnc
+sdnc_src_folder=$git_src_folder/onap/sdnc
 sdnc_repos=("sdnc/adaptors" "sdnc/architecture" "sdnc/core" "sdnc/features" \
 "sdnc/northbound" "sdnc/oam" "sdnc/parent" "sdnc/plugins")

@@ -45,9 +45,11 @@ function get_sdnc_images {
     if [[ "$build_image" == "True" ]]; then
         _build_sdnc_images
     else
-        pull_openecomp_image sdnc-image openecomp/sdnc-image:latest
-        pull_openecomp_image admportal-sdnc-image openecomp/admportal-sdnc-image:latest
-        pull_openecomp_image dgbuilder-sdnc-image openecomp/dgbuilder-sdnc-image:latest
+        pull_onap_image sdnc-image onap/sdnc-image:latest
+        pull_onap_image admportal-sdnc-image onap/admportal-sdnc-image:latest
+        pull_onap_image ccsdk-dgbuilder-image onap/ccsdk-dgbuilder-image:latest
+        pull_onap_image sdnc-ueb-listener-image onap/sdnc-ueb-listener-image:latest
+        pull_onap_image sdnc-dmaap-listener-image onap/sdnc-dmaap-listener-image:latest
     fi
     pull_docker_image mysql/mysql-server:5.6
 }
|
Deployment
Start Deployment
cd integration/bootstrap/vagrant-onap
./tools/run.sh sdnc
This will configure and start the guess VM
configure and start the sdnc docker resources on the guest VM.
and finnaly the SDNC will start
| Gliffy Diagram | ||||
|---|---|---|---|---|
|
| Tip | ||
|---|---|---|
| ||
Once the vagrant has completed running it will still take some time for SDNC to come up. Have patience. |
Connecting to your deployment
Basic Usage of Vagrant
Vagrant commands are executed on the Base OS.
Get Detail about the vagrant Commands
Print the usage use the '-h' option
vagrant -h
vagrant <command> -h
check running vm instances
From the Base OS use the following command to see the running guest VM id and name.
vagrant global-status
Port Forwarding
The guest VM is running in its own private network and is using the NAT to get the the Base OS network. To see the port forwarding run the following command.
vagrant port sdnc
If you don't see any ports Oops. Configuring port-forwarding should have been configured earlier when editing the [integration.git] / bootstrap / vagrant-onap / Vagrantfile. Something must of went wrong. Here is the example of a snippet that can be added to the Vagrant file.
 Vagrant.configure("2") do |config|

   if provider == :virtualbox && "sdnc".eql?(requested_machine)
     config.vm.network "forwarded_port", guest: 8282, host: 8282, protocol: "tcp", auto_correct: true
     config.vm.network "forwarded_port", guest: 8281, host: 8202, protocol: "tcp", auto_correct: true
   end
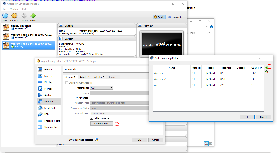
Port forwarding can also be configured in the Virtual Box Gui. Here is an example
ssh to the Guest OS
The follow command will open a ssh terminal to the running guess vm. The guest vm name or id can be used.
vagrant ssh sdnch
Basic Usage of Docker
docker commands are executed on the guest OS
Get Detail about the dockerCommands
Print the usage use the '-h' option
vagrant -h
vagrant <command> -h
List docker container images
On the Guess VM execute the docker commands
docker images
List the running docker containers
The following command will list the running docker containers. The container's id, name and which ports are forwarded to the Guess OS can be found in this list.
docker ps -a
open a terminal to a docker running docker container
Use the docker container id or name use the following command to open a terminal to that container.
docker exec -i -t sdnc_controller_container bash
OpenDaylight RestConf API Web GUI
To connect to the running sdnc port forwarding must be configured correctly. The port forwarded in the instruction above was 8282.
http://baseoshostip:8282/apidoc/explorer/index.html
The credentials to connect to the SDNC Web GUI are can be found in the file [sdnc/oam.git] / installation / sdnc / src / main / scripts / startODL.sh. Look for the variable ODL_ADMIN_PASSWORD
Here is an example
Credentials: admin/Kp8bJ4SXszM0WXlhak3eHlcse2gAw84vaoGGmJvUy2U
Reference:
[1] ONAP integration: https://git.onap.org/integration/
...
[3] ONAP SDC setup: Using Vagrant-Onap for local deployment of SDC project - WIP!!!#OnapforlocaldeploymentofSDCproject-WIP!!!-InitialSetup
[4] Virtualbox Download link: https://www.virtualbox.org/wiki/Linux_Downloads
Deploying New Code (based on the standard ONAP lab setup)
This tutotial talks about one way to deploy new sdnc code into the corresponding docker image which is based on the prevjous chapter "Deploying a Minimal ONAP SDN-C Environment"
Example: Deploy feature.zip
...
File into
...
Docker Image
The example is about adding a new rpc in the generic-resource-api which is a sub-module of northbound project.
Download Project
Download sdnc-northbound project and put it under integration/boostrap/vagrant-onap/opt/openecomp/sdnc
This step is not necssary which is used to align with the folder path where ONAP-integeration clone, complie project.
Add
...
a New RPC
Edit northinboud/generic-resources-api/model/src/main/yang/GENERIC-RESOURCES-API.yang
...
| Code Block |
|---|
...
rpc haok-sdnc-test {
    output {
      leaf hello-world {
         type string;
         mandatory true;
      }
    }
}
... |
Use
...
Maven to
...
Build Project
build generic-resources-api/model
Write a
...
Simple Implemenation
Implement the new rpc generated by YANG model in GenericResourcesApiProvider
...
rm -rf sdnc-generic-resource-api
Re-install Feature
/opt/opendaylight/current/bin/client -u karaf feature:uninstall sdnc-generic-resource-api/opt/opendaylight/current/bin/client -u karaf feature:repo-remove mvn:org.onap.sdnc.northbound/generic-resource-api-resource-api-features/1.2.0-SNAPSHOT/xml/features
/opt/opendaylight/current/bin/client -u karaf feature:repo-remove mvnadd mvn:org.onap.sdnc.northbound/generic-resource-api-features/1.2.0-SNAPSHOT/xml/features
/opt/opendaylight/current/bin/client -u karaf feature:install sdnc-generic-resource-api docker restart $(docker ps -a | grep "/current/bin/client -u karaf feature:repo-add mvn:org.onap.sdnc.northbound/generic-resource-api-features/1.2.0-SNAPSHOT/xml/features
/opt/opendaylight/current/bin/client -u karaf feature:install sdnc-generic-resource-api docker restart $(docker ps -a | grep "/sdnc-image" | awk '{print $1}')sdnc-image" | awk '{print $1}')Hint: The version 1.2.0-SNAPSHOT could be updated in the future. Please update the version according to the current project version.
Here is an simple sdnc-docker-auto-deploy script if you would like to use.
Download Link: sdnc-docker-auto-deploy.zip
After download this link, unzip the file under integration//vagrant-onap/opt.
Use Vagrant ssh to connect your running sdnc vm.
and find the script, run ./sdnc-docker-auto-deploy.cfg.
The corresponding configuation is in sdnc-docker-auto-delpoy.cfgHint: The version 1.2.0-SNAPSHOT could be updated in the future. Please update the version according to the current project version.
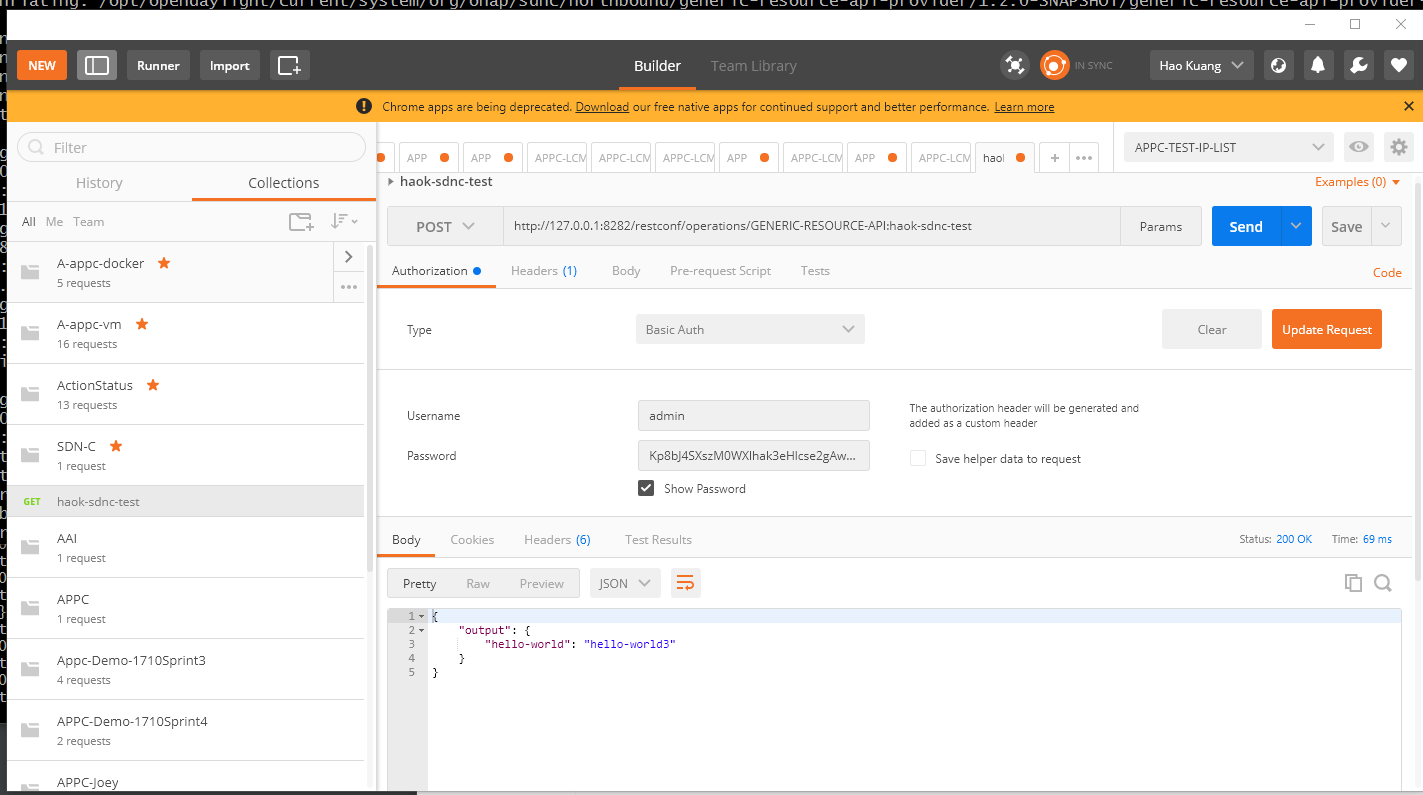
Verify new rpc
It takes a miniute to restart the karaf platform which really depends on the performance of your host machine.
Remote Debugging
...
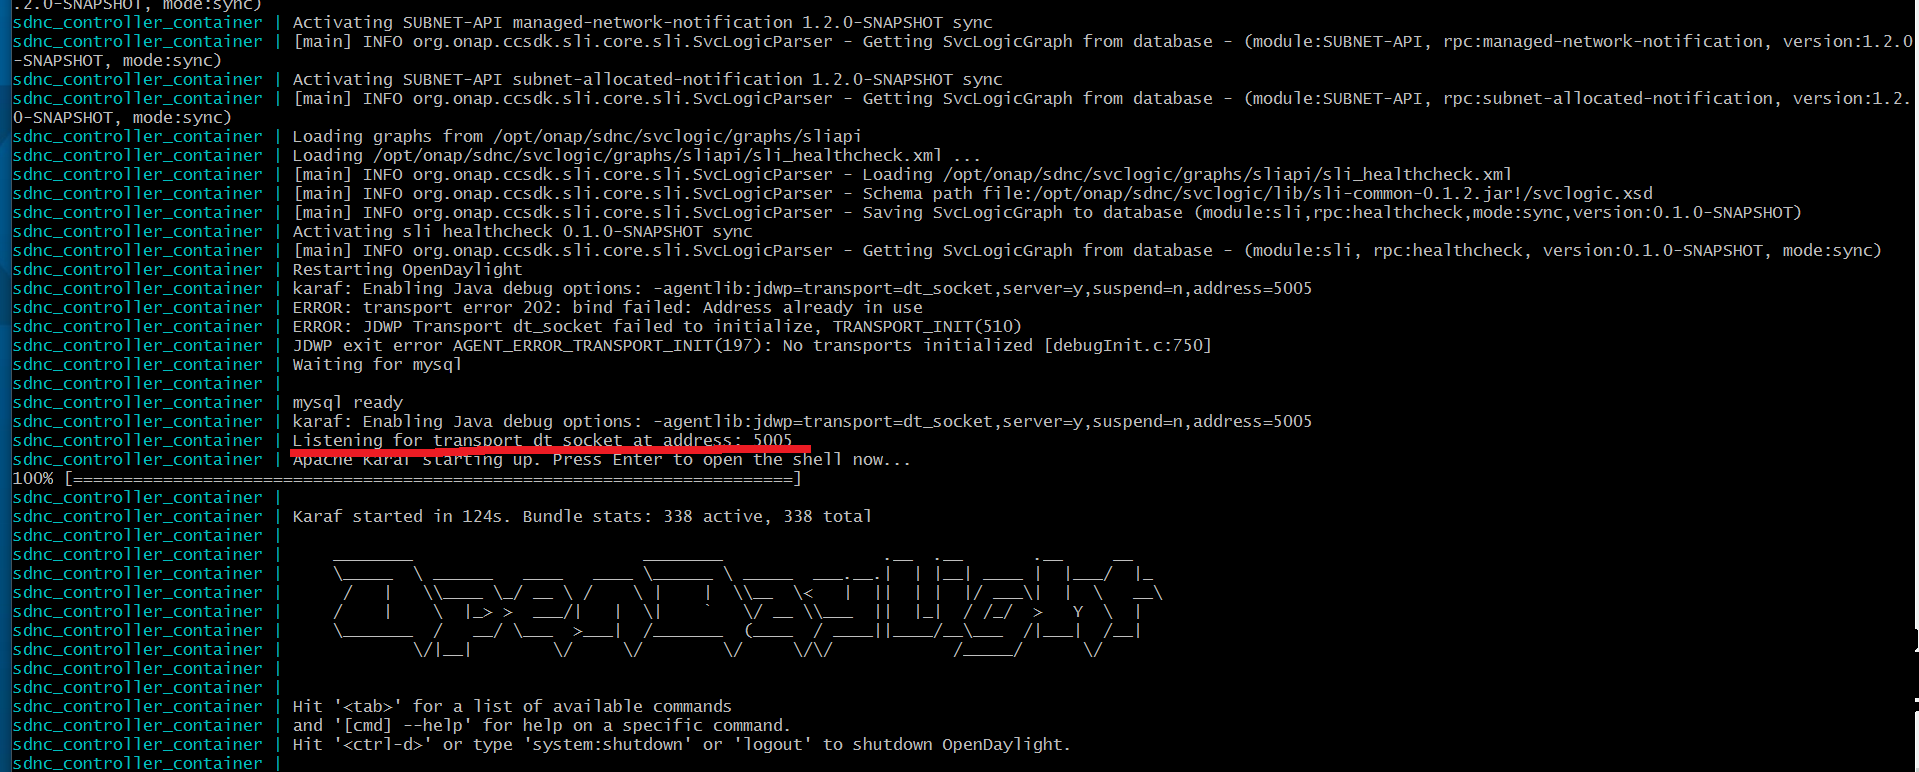
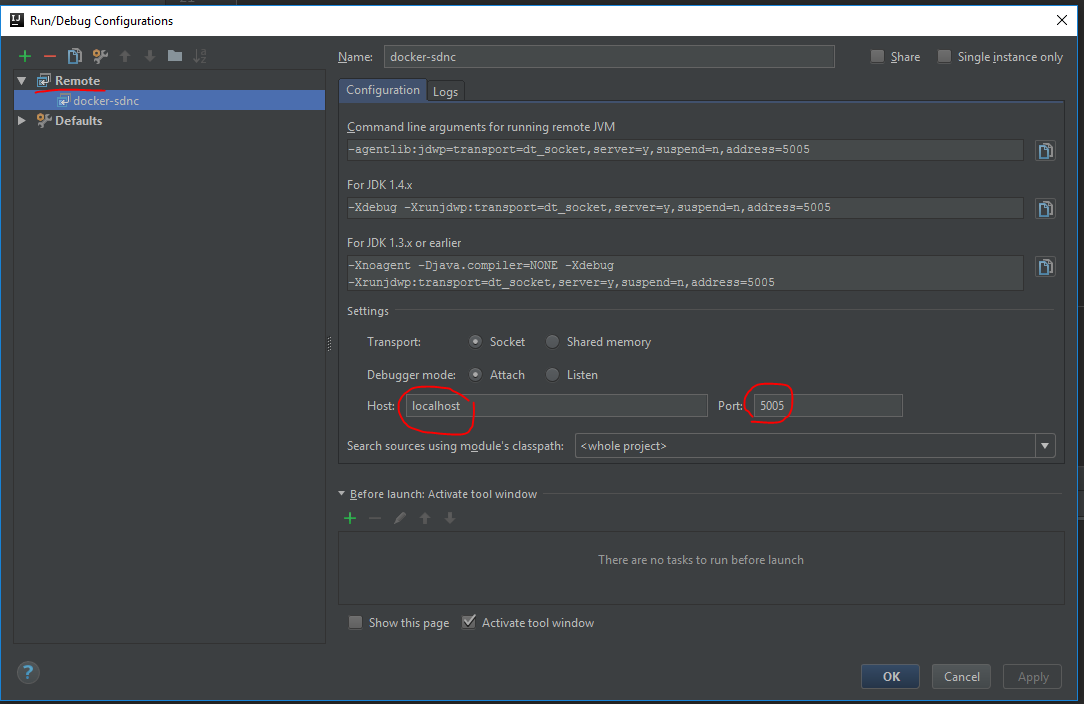
After the docker instances fully started, you should see the karaf log information below with 5005 port open.


