| Table of Contents |
|---|
Preparation
Install ONAP
Make sure that you've installed ONAP R1 (Amsterdam) R2 release. For installation instructions, please refer ONAP Installation in Vanilla OpenStack.
...
| User | Role |
|---|---|
| demo | Operator |
| cs0008 | DESIGNER |
| jm0007 | TESTER |
| op0001 | OPS |
| gv0001 | GOVERNOR |
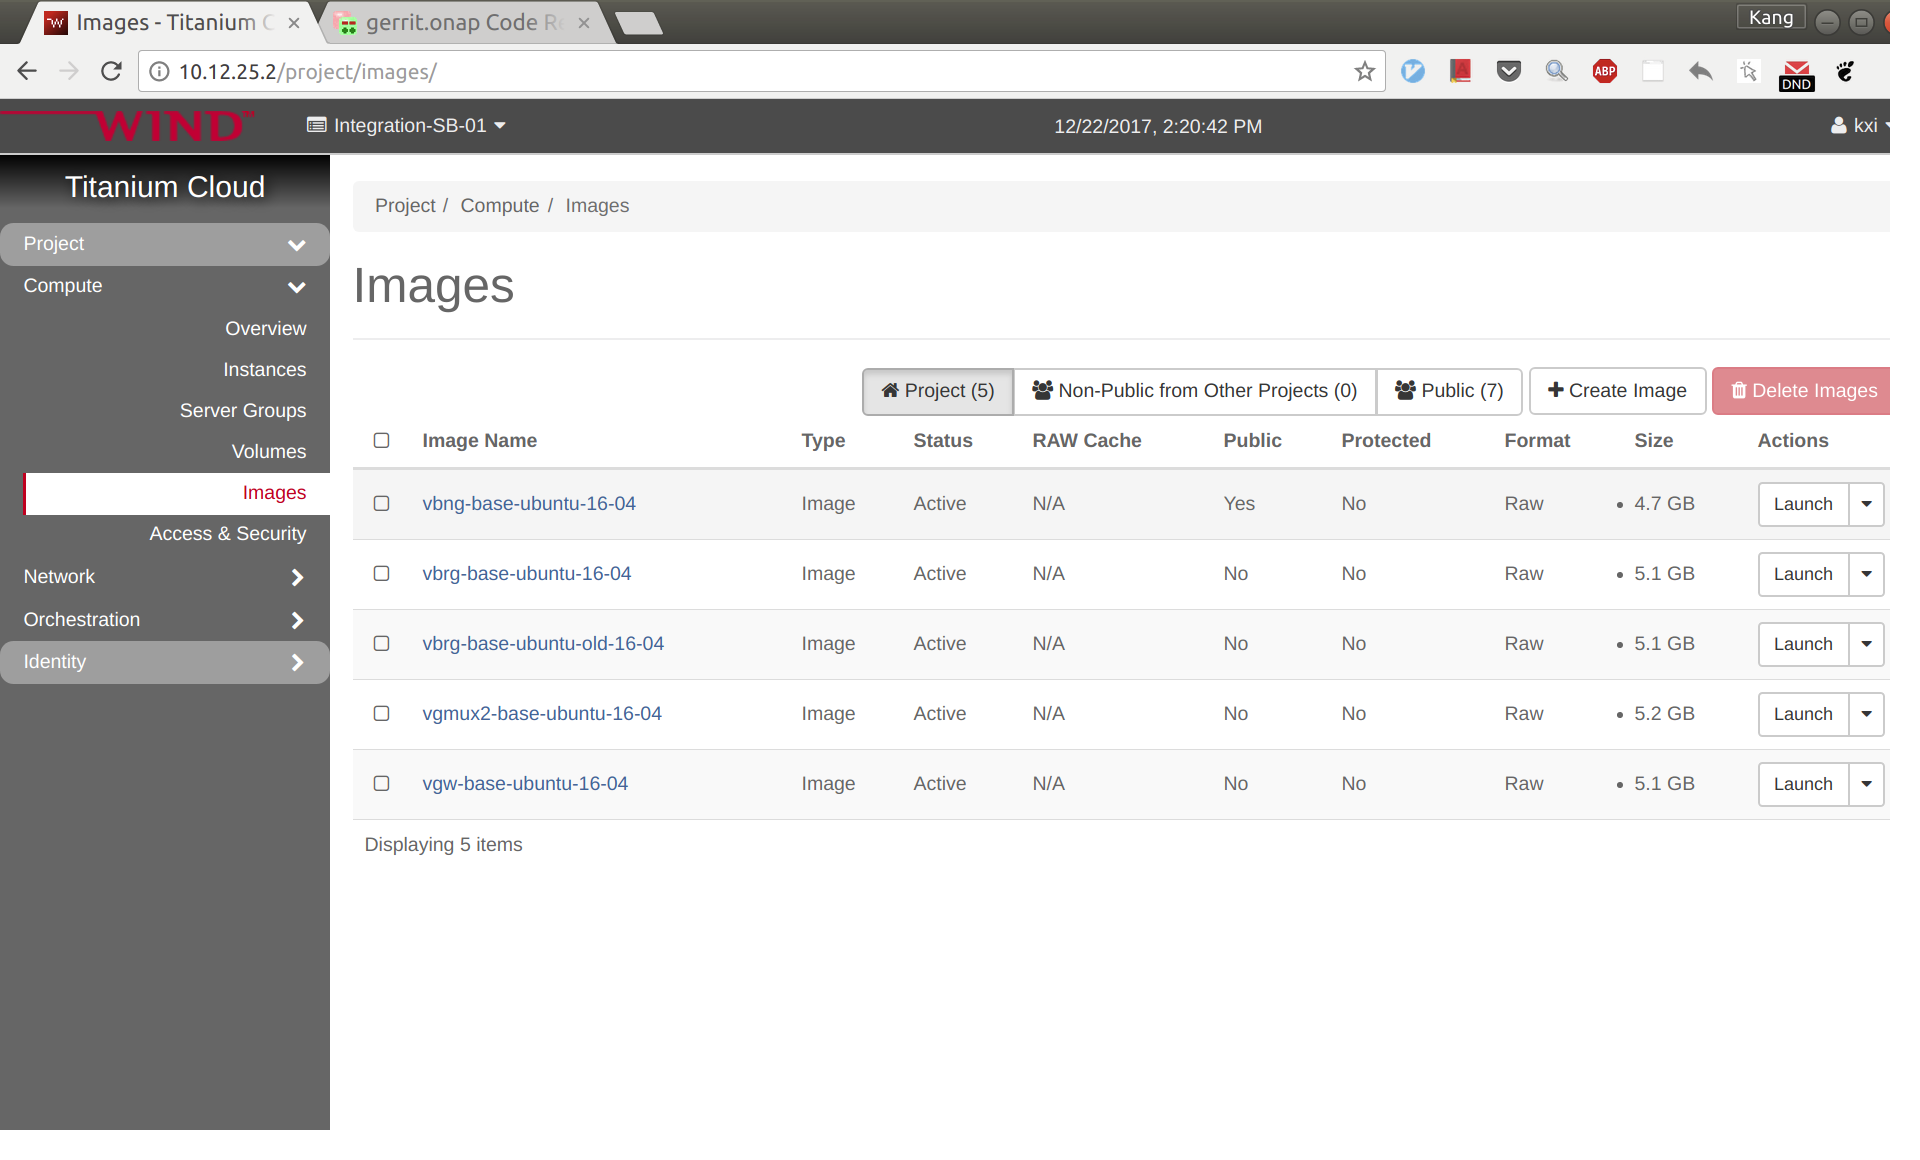
Create images for vBRG, vBNG, vGMUX, and vG
Follow the following instructions to build an image for each VNF and save them in your Openstack: ONAP vCPE VPP-based VNF Installation and Usage Information
To avoid unexpected mistakes, you may want to give each image a meaningful name and also be careful when mixing upper case and lower case characters. After this you should see images like below.
VNF Onboarding
Create license model in SDC
Log in to SDC portal as designer. Create a license that will be used by the subsequent steps. The detailed steps are here: Creating a Licensing Model
Prepare HEAT templates
vCPE uses five VNFs: Infra, vBRG, vBNG, vGMUX, and vG, which are described using five HEAT templates. For each HEAT template, you will need to fill the env file with appropriate parameters. The HEAT templates can be obtained from gerrit: [demo.git] / heat / vCPE /
...
For each VNF, compress the three env, yaml, and json files into a zip package, which will be used for onboarding. If you want to get the zip packages I used for reference, download them here: infra-sb01.zip, vbng-sb01.zip, vbrg-sb01.zip, vgmux-sb01.zip, vgw-sb01.zip.
VNF onboarding in SDC
Onboard the VNFs in SDC one by one. The process is the same for all VNFs. The suggested names for the VNFs are given below (all lower case). The suffix can be a date plus a sequence letter, e.g., 1222a.
...
Sign out and sign back in as tester: jm0007, select the VF you created a moment ago, test and accept it.
Service Design and Creation
The entire vCPE use case is divided into five services as show below. Each service is described below with suggested names.
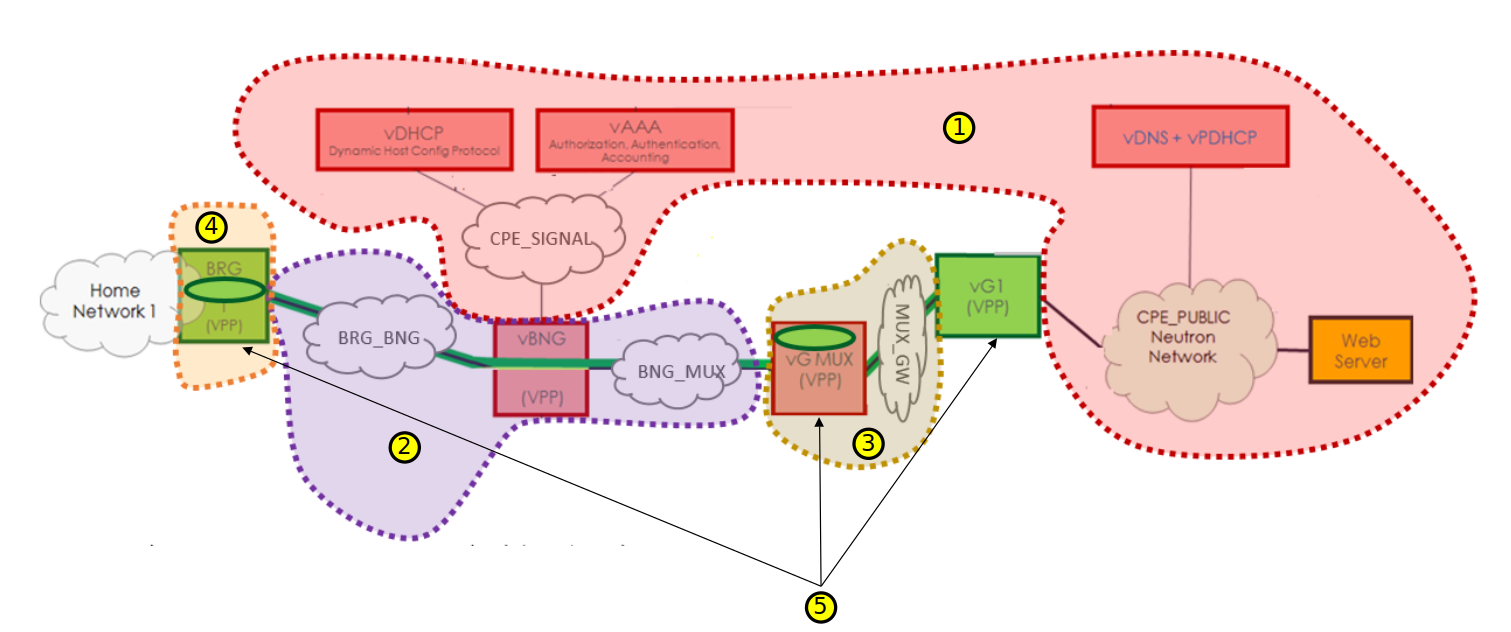
- vcpesvc_infra_[suffix]: includes two generic neutron networks named cpe_signal and cpe_public (all names are lower case) and a VNF infra.
- vcpesvc_vbng_[suffix]: includes two generic neutron networks named brg_bng and bng_mux and a VNF vBNG.
- vcpesvc_vgmux_[suffix]: includes a generic neutron network named mux_gw and a VNF vGMUX
- vcpesvc_vbrg_[suffix]: includes a VNF vBRG.
- vcpesvc_rescust_[suffix]: includes a VNF vGW and two allotted resources that will be explained shortly.
Service design and distribution for infra, vBNG, vGMUX, and vBRG
The process for creating these four services are the same. Below are the steps to create vcpesvc_infra_1222a. Follow the same process to create the other three services.
...
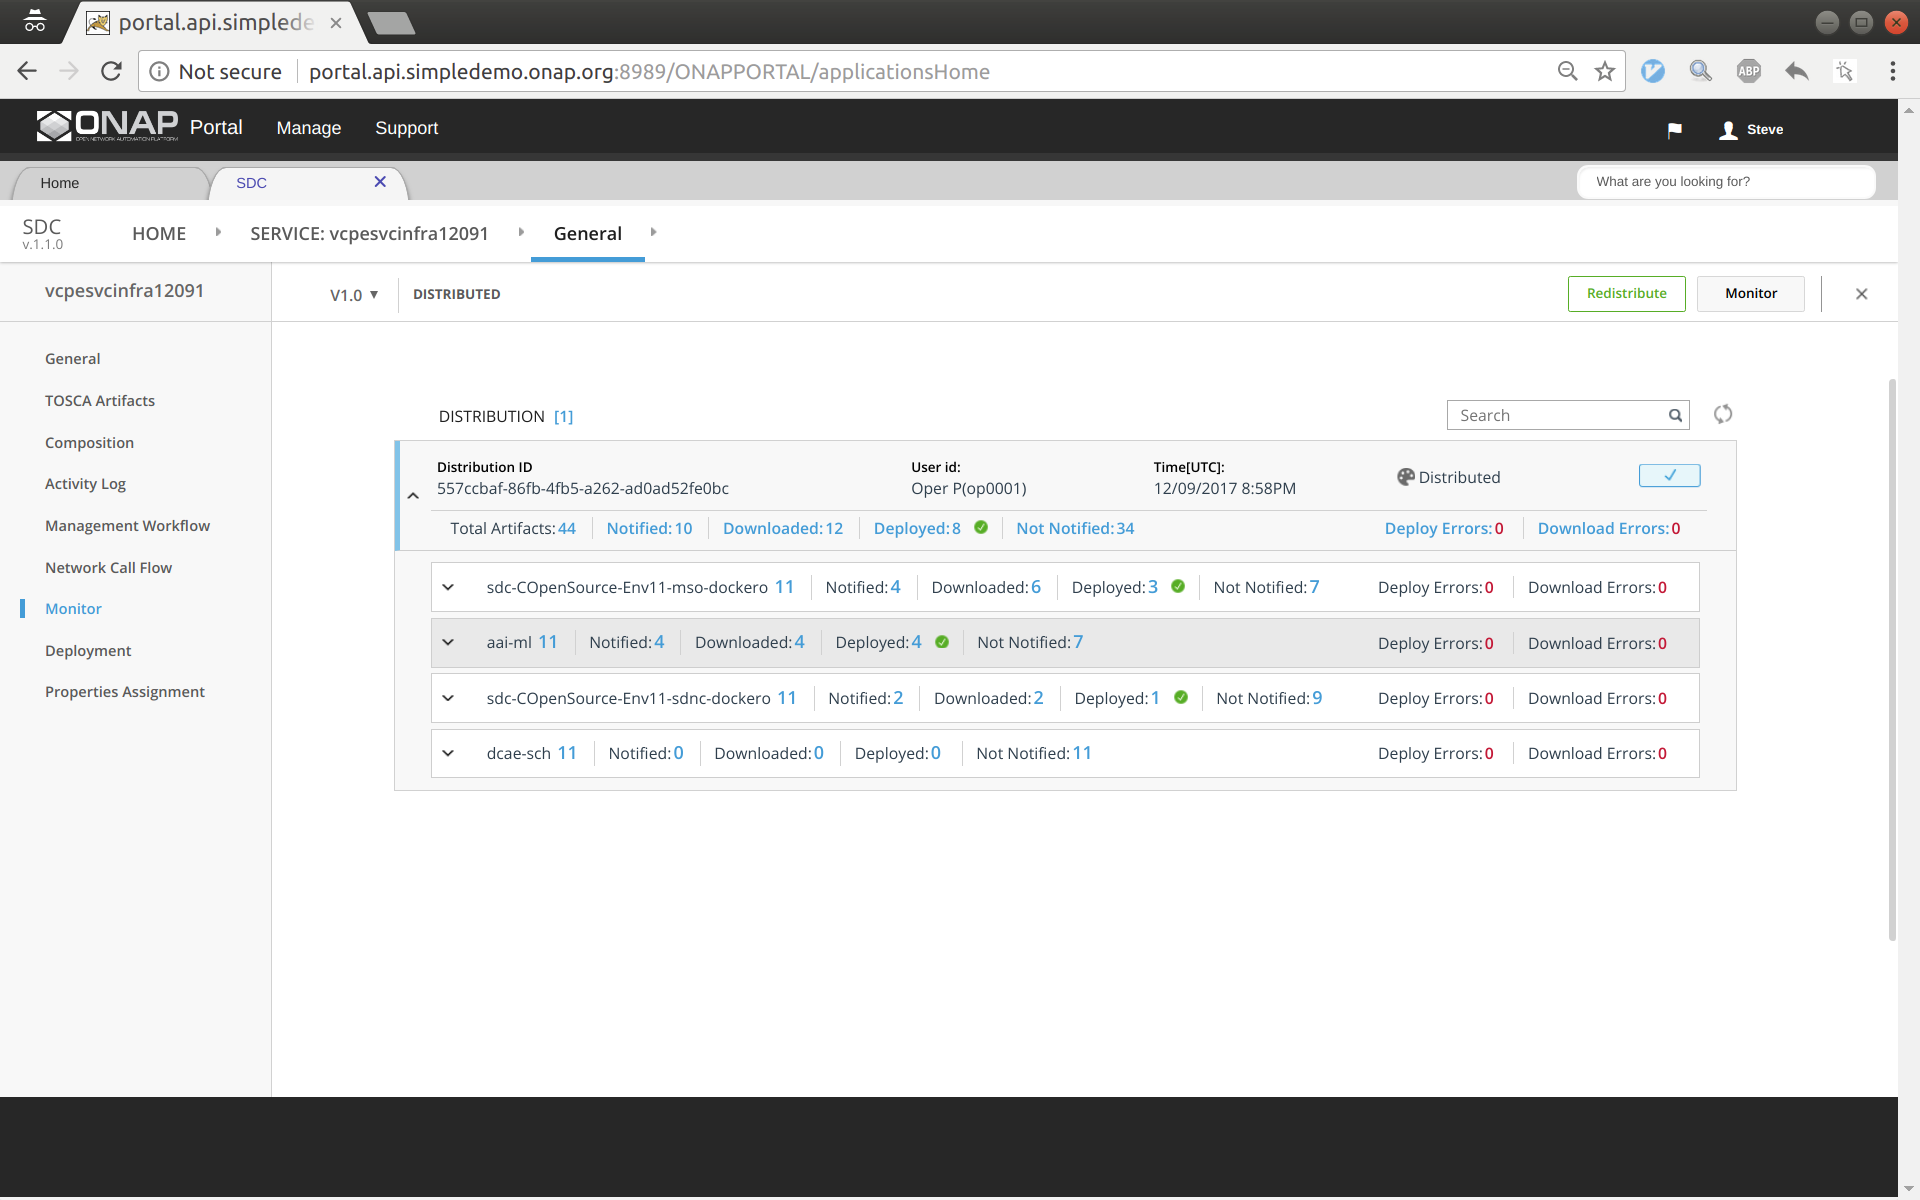
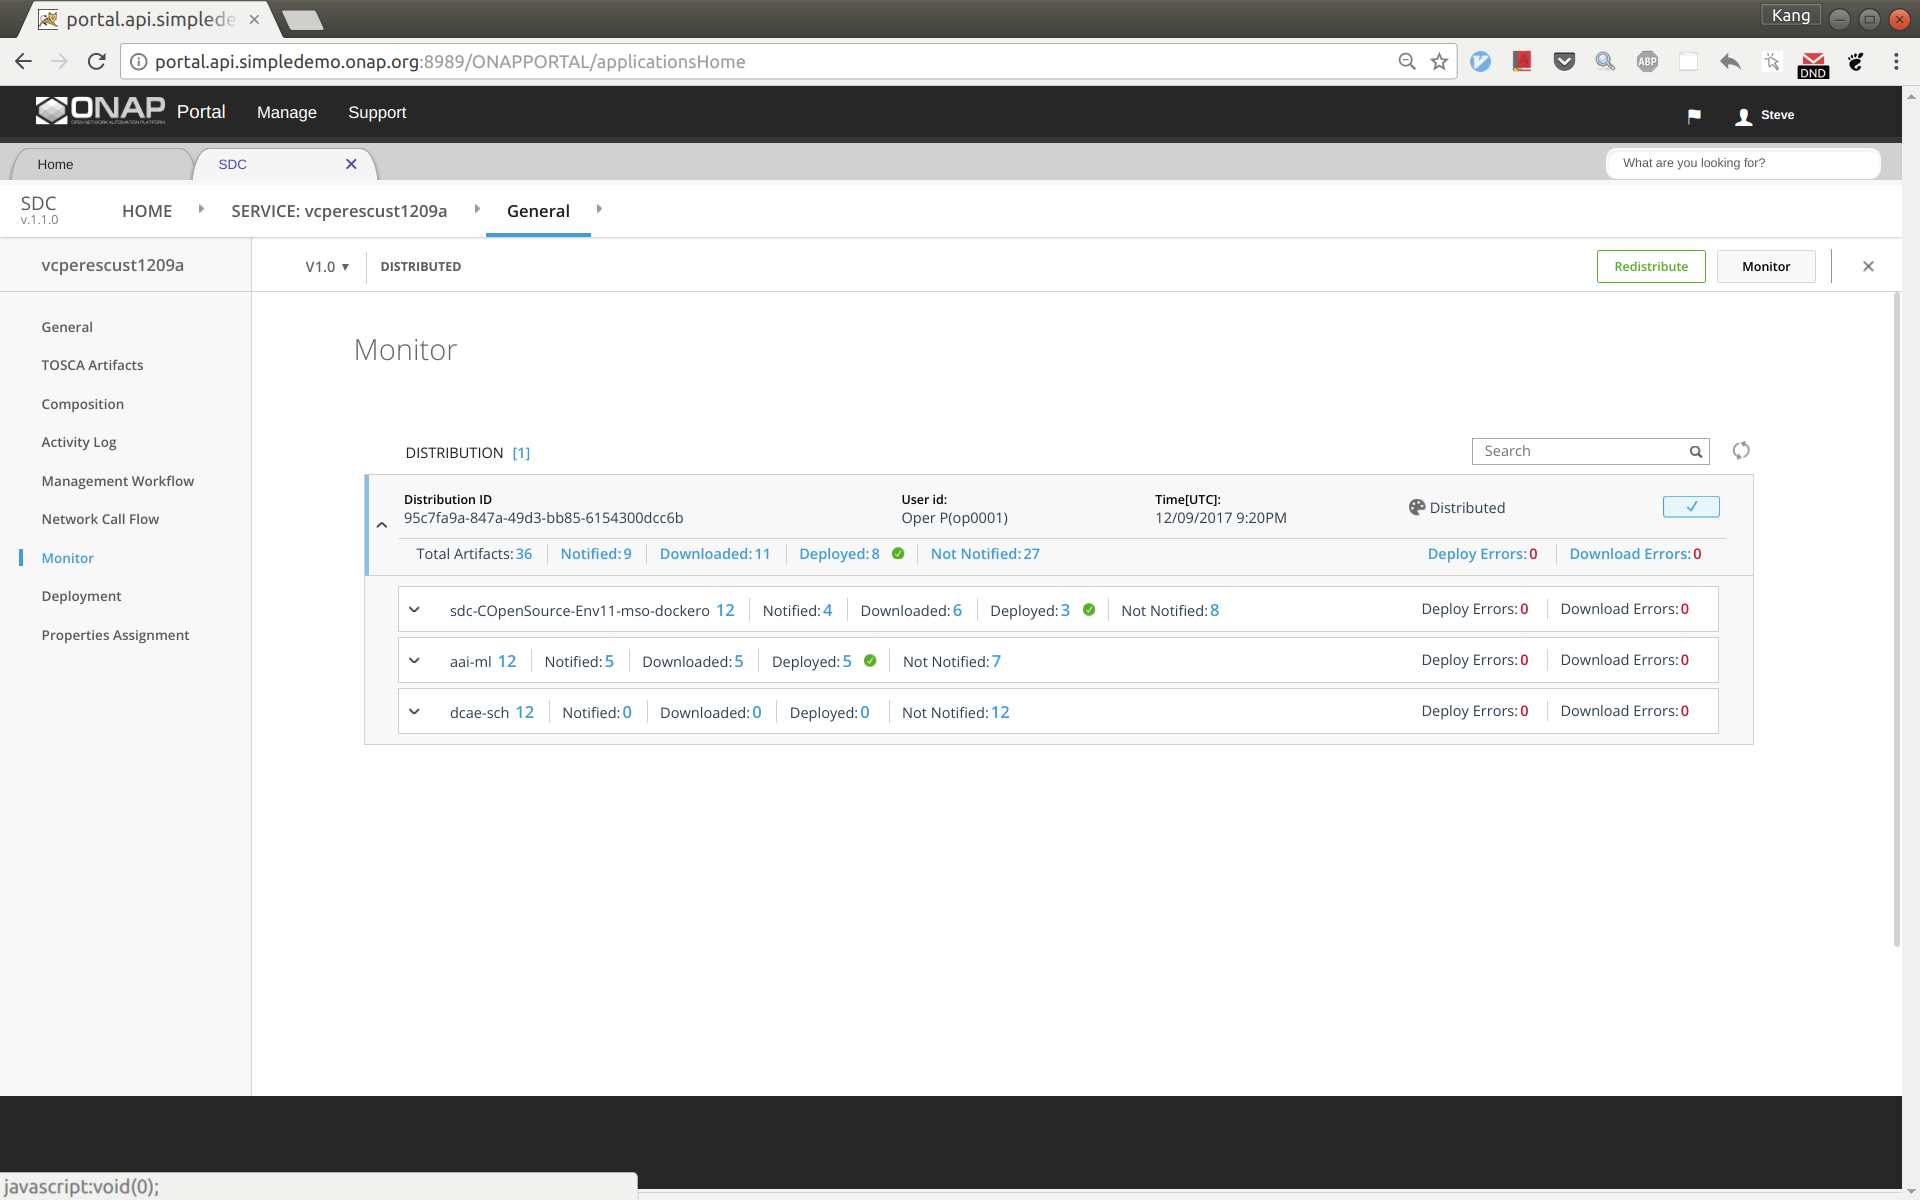
Sign out and sign back in as operator 'op0001'. Distribute this service. Click monitor to see the results. After some time (could take 30 seconds or more), you should see the service being distributed to AAI, SO, SDNC.
Service design and distribution for customer service
First of all, make sure that all the previous four services have been created and distributed successfully.
The customer service includes a VNF vGW and two allotted resources: tunnelxconn and brg. We will need to create the two allotted resources first and then use them together with vG (which was already onboarded and imported as a VF previously) to compose the service.
Create allotted resource tunnelxconn
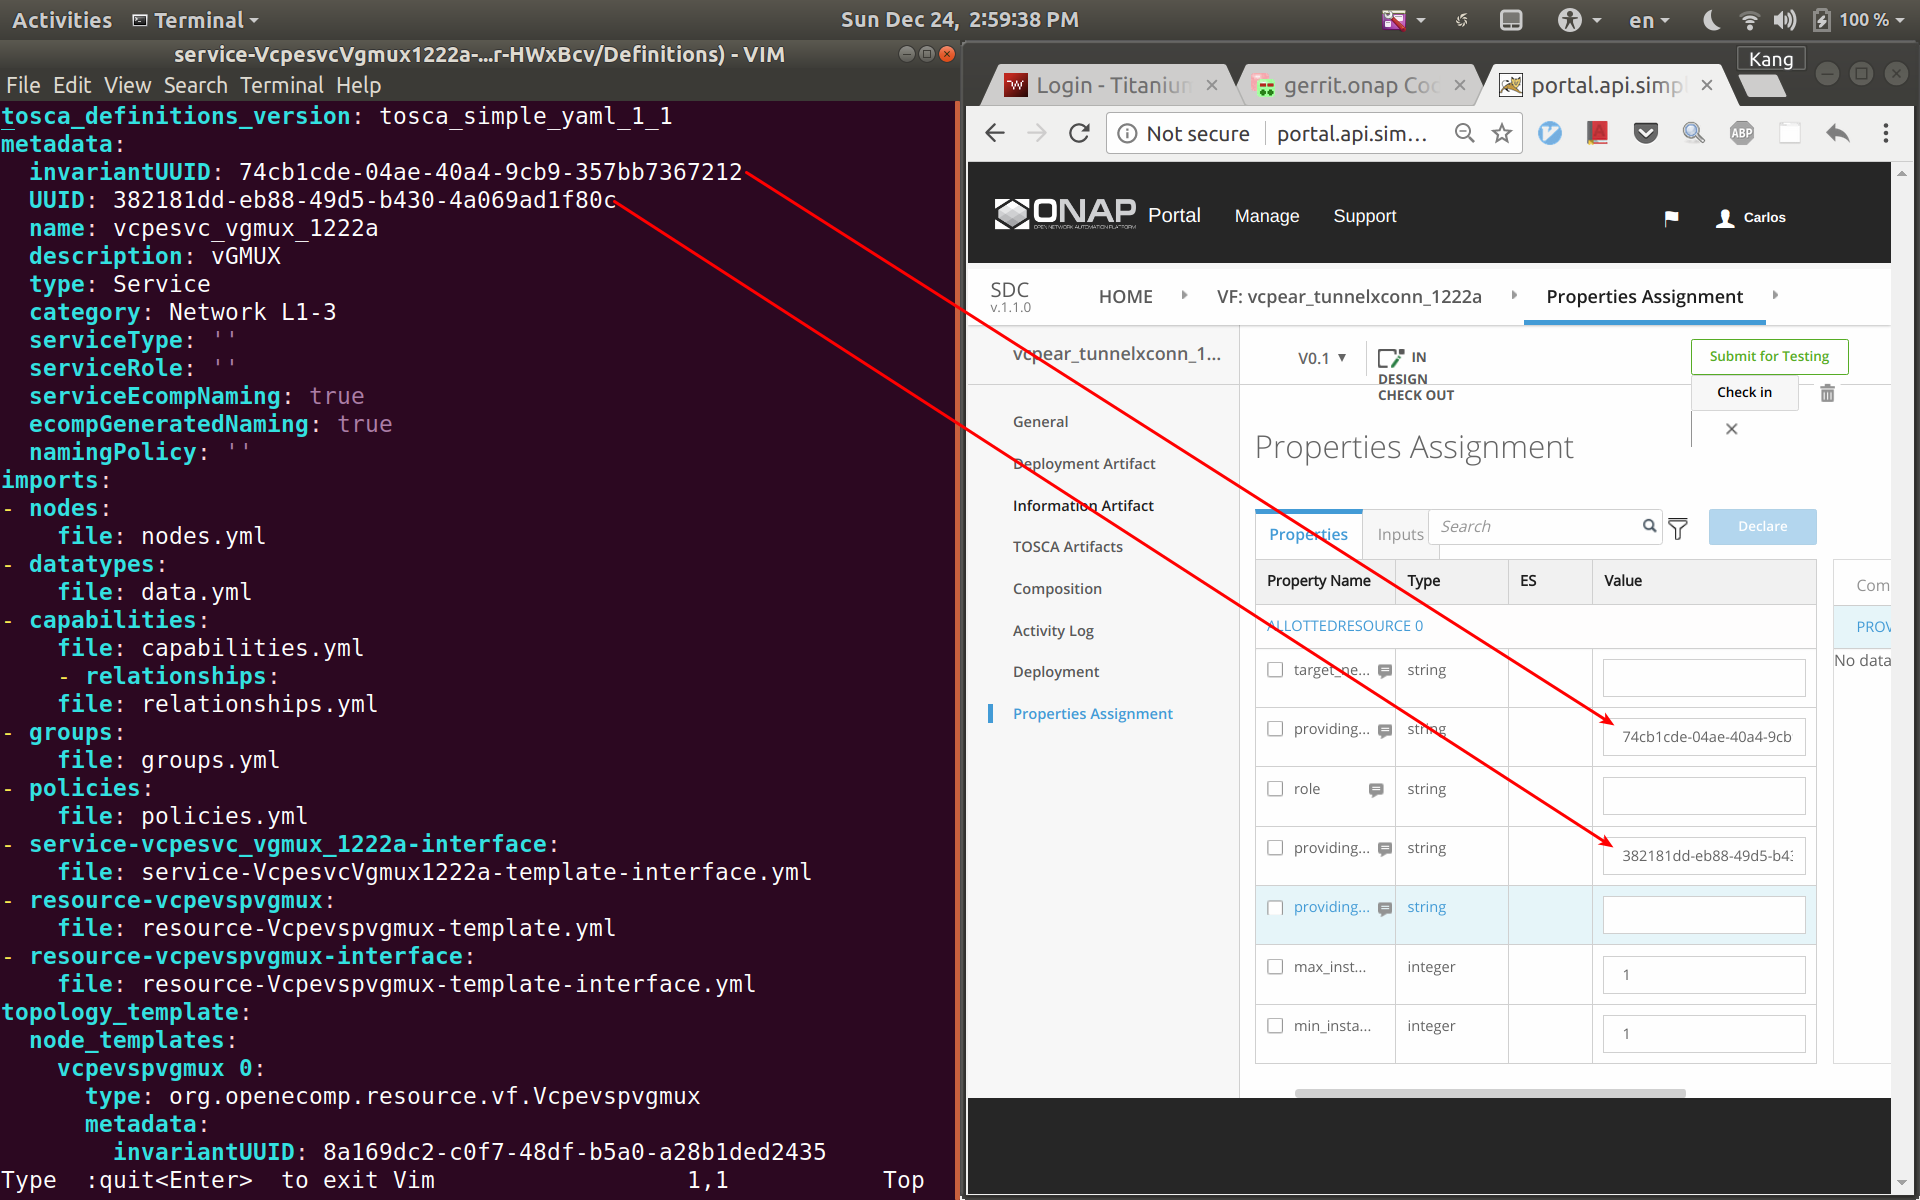
This allotted resource depends on the previous created service vcpesvc_vgmux_1222a. The dependency is described by filling the allotted resource with the UUID, invariant UUID, and service name of vcpesvc_vgmux_1222a. So for preparation, we first download the csar file of vcpesvc_vgmux_1222a from SDC.
...
Now open the csar file for vcpesvc_vgmux_1222a, under 'Definitions' open file 'service-VcpesvcVgmux1222a-template.yml'. (Note that the actual file name depends on what you name the service at the first place.) Now put the yml file and the SDC window side by side. Now copy&paste the invariantUUID, UUID, and node name to the corresponding fields in SDC. See the two screenshots below.

Create allotted resource brg
This allotted resource depends on the previous created service vcpesvc_vbrg_1222a. The dependency is described by filling the allotted resource with the UUID, invariant UUID, and service name of vcpesvc_vbrg_1222a. So for preparation, we first download the csar file of vcpesvc_vbrg_1222a from SDC.
We name this allotted resource vcpear_brg_1222a. The process to create it is the same as that for the above vcpear_vgmux_1222a except the parameters being used. Therefore, I will not repeat the steps and screenshots here.
Create customer service
We name the service vcpesvc_rescust_1222a and follow the steps below to create it.
...
Sign out and sign back in as governer to approve the service.
Distribute the customer service to AAI, SO, and SDNC
Before distributing the customer service, make sure that the other four services for infra, vBNG, vGMUX, and vBRG all have been successfully distributed.
...
Now distribute the customer service and check the status to ensure the distribution succeeds. It may take a tens of seconds to complete. The results should look like below.
Initial Configuration of ONAP to Deploy vCPE
Add an availability zone to AAI by executing the following:
...
- Add a route: ip route add 10.3.0.0/24 via 10.0.101.10 dev eth0
- Enter the sdnc controller docker: docker exec -it sdnc_controller_container bash
In the container, run the following to create IP address pool: /opt/sdnc/bin/addIpAddresses.sh VGW 10.5.0 22 250
Deploy Infrastructure
Download and modify automation code
I have developed a python program to automate the deployment. The code will be added to our gerrit repo later. For now you can download from this link: vcpe.zip
...
| Code Block |
|---|
cloud = {
    '--os-auth-url': 'http://10.12.25.2:5000',
    '--os-username': 'kxi',
    '--os-user-domain-id': 'default',
    '--os-project-domain-id': 'default',
    '--os-tenant-id': '087050388b204c73a3e418dd2c1fe30b',
    '--os-region-name': 'RegionOne',
    '--os-password': 'yourpassword',
    '--os-project-domain-name': 'Integration-SB-01',
    '--os-identity-api-version': '3'
}

common_preload_config = {
    'oam_onap_net': 'oam_onap_oTA1',
    'oam_onap_subnet': 'oam_onap_oTA1',
    'public_net': 'external',
    'public_net_id': '971040b2-7059-49dc-b220-4fab50cb2ad4'
} |
Run automation program to deploy services
Sign into SDC as designer and download five csar files for infra, vbng, vgmux, vbrg, and rescust. Copy all the csar files to directory csar.
...
If the deployment succeeds, you will see a summary of the deployment from the program.

Validate deployed VNFs
By now you will be able to see 7 VMs in Horizon. However, this does not mean all the VNFs are functioning properly. In many cases we found that a VNF may need to be restarted multiple times to make it function properly. We perform validation as follows:
...
(Please note that the four VPP-based VNFs (vBRG, vBNG, vGMUX, and vGW) were developed by the ONAP community in a tight schedule. We are aware that vBRG may not be stable and sometimes need to be restarted multiple times to get it work. The team is investigating the problem and hope to make it better in the near future. Your patience is appreciated.)
Deploy Customer Service and Test Data Plane
After passing healthcheck, we can deploy customer service by running 'vcpe.py customer'. This will take around 3 minutes depending on the cloud infrastructure. Once finished, the program will print the next few steps to test data plane connection from the vBRG to the web server. If you check Horizon you should be able to see a stack for vgw created a moment ago.
...