THIS PAGE IS UNDER CONSTRUCTION
Get Ubuntu
Get the Ubuntu ISO image from ubuntu.com. The recommended version is 16.04 LTS (Long Term Support). You can use the server or desktop edition. I used the server edition.
Get VirtualBox Guest Additions
Make sure you have the VirtualBox Guest Additions ISO for your version of VirtualBox. I'm using VirtualBox 5.0.16. Save the Guest Additions ISO on your host computer along with the Ubuntu ISO. Get the Guest Additions ISO from here:
http://download.virtualbox.org/virtualbox
Create a new VM in VirtualBox for Ubuntu
Type: Linux
Version: Ubuntu (64-bit)
At least 2048 MB memory
At least 40 GB VDI
Create a port-forwarding rule for SSH
If your host computer uses a VPN client that blocks access to local subnets, it's helpful to create a port-forwarding rule so that you can use PuTTY (or any other SSH client) to connect to the VM. You probably don't need this unless you're using a VPN client on your host.
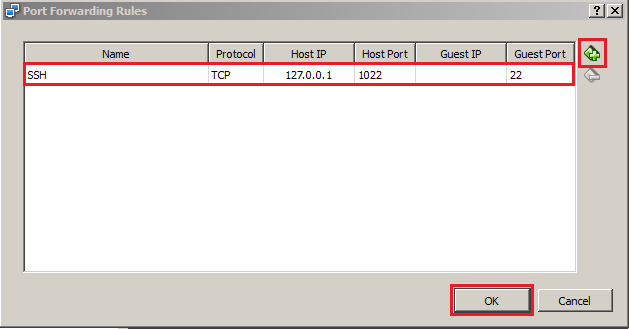
Go to "Network" settings in VirtualBox, add a port forwarding rule:
Name: SSH
Protocol: TCP
Host IP: 127.0.0.1
Host Port: 1022
Guest IP: <leave blank>

Create Shared Folder
This is for Windows users. If you're using a MAC or a Linux host, things may be quite different. The shared folder allows you to easily transfer files between the guest VM and the host computer.
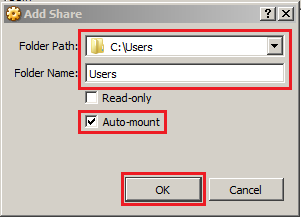
Go to "Shared Folders" settings in VirtualBox, add a share:
Folder Path: C:\Users
Folder Name: Users
Auto-mount: <checked>
Read-only: <unchecked>

Install Ubuntu in the VM
On the "Storage" panel in VirtualBox, click on "[ optical drive ]" and then "Choose Disk Image". Select your Ubuntu ISO image.
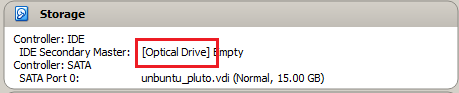
After selecting the image, start the VM.
Ubuntu Configuration
Proxy Setting (if you need it):
System Settings → Network → Network proxy
Create Shared Folder
This is for Windows users. If you're using a MAC or a Linux host, things may be quite different. The shared folder allows you to easily transfer files between the guest VM and the host computer.
Create Shared Folder
This is for Windows users. If you're using a MAC or a Linux host, things may be quite different. The shared folder allows you to easily transfer files between the guest VM and the host computer.
Create Shared Folder
This is for Windows users. If you're using a MAC or a Linux host, things may be quite different. The shared folder allows you to easily transfer files between the guest VM and the host computer.
Create Shared Folder
This is for Windows users. If you're using a MAC or a Linux host, things may be quite different. The shared folder allows you to easily transfer files between the guest VM and the host computer.
Related articles