Please be aware, this is a draft version of the documentation, hence it still requires a couple of additions.
Should you find any issues with the document, please contact/inform gareth.roper@est.tech
Introduction
This guide will describe the steps required to execute the ETSI “Instantiate VNF” and “Terminate VNF” workflows using ONAP. The initial requirements you need for this guide are as follows:
- A stable Dublin ONAP installation.
ESR component enabled in ONAP installation.
VNFM-Adapter component enabled ONAP in installation.
- A VNFM that is aligned to the Sol003 Interface (https://www.etsi.org/deliver/etsi_gs/NFV-SOL/001_099/003/02.03.01_60/gs_NFV-SOL003v020301p.pdf)
- A Sol004 Aligned VNF package (https://www.etsi.org/deliver/etsi_gs/NFV-SOL/001_099/004/02.03.01_60/gs_nfv-sol004v020301p.pdf)
Pre-Check Guide: (To be added)
Initial Configurations
The following configurations need to be complete in order to execute the ETSI workflows and instantiate through the VNFM-Adapter.
Enable the ETSI “Instantiate/Create” & “Terminate/Delete” building blocks.
Firstly, you will need to add the ETSI Create & Delete building blocks, this is done by inserting them into the “building_block_detail” table in the Mariadb’s “catalogdb” database.
Logging into Mariadb Database.
Find your Mariadb pod:
kubectl -n onap get pods | grep maria
Exec into the Mariadb pod (replace <PODNAME> with Mariadb pod name):
kubectl -n onap -it exec <PODNAME> bash
Log into the SQL database:
mysql -uroot -psecretpassword
Connect to the catalogdb database:
connect catalogdb;
Insert the ETSI Create & Delete Building Blocks into the table.
Insert Create Building Block:
insert into building_block_detail(building_block_name, resource_type, target_action) values (“EtsiVnfInstantiateBB”, “VNF”, “ACTIVATE”);
Insert Delete Building Block:
insert into building_block_detail(building_block_name, resource_type, target_action) values (“EtsiVnfDeleteBB”, “VNF”, “DEACTIVATE”);
View the “building_block_detail” table:
select * from building_block_detail;
You should now have entries in your “building_block_detail” table as shown in the image below.

Update the orchestration_flow_reference table
The next step to take is to set which building blocks are triggered on a VNF instantiate request. We will also be setting the correct sequence for these building blocks.
Find your Mariadb pod:
kubectl -n onap get pods | grep maria
Exec into the Mariadb pod (replace <PODNAME> with Mariadb pod name):
kubectl -n onap -it exec <PODNAME> bash
Log into the SQL database.:
mysql -uroot -psecretpassword
Connect to the catalogdb database:
connect catalogdb;
Retrieve “ID” from “northbound_request_ref_lookup” table. Take note of the “ID” value for “VNF-Create” and “VNF-Delete”:
select * from northbound_request_ref_lookup where REQUEST_SCOPE='Vnf' and IS_ALACARTE is true;
View the VNF Create/Delete sequences from the “orchestration_flow_reference” table:
select * from orchestration_flow_reference where COMPOSITE_ACTION="VNF-Create";
Remove current entries for “VNF-Create” & “VNF-Delete” and add updated ones:
Create:
delete from orchestration_flow_reference where COMPOSITE_ACTION = "VNF-Create";

insert into orchestration_flow_reference (COMPOSITE_ACTION,SEQ_NO,FLOW_NAME,FLOW_VERSION,NB_REQ_REF_LOOKUP_ID ) values ("VNF-Create",1,"AssignVnfBB",1,119);
insert into orchestration_flow_reference (COMPOSITE_ACTION,SEQ_NO,FLOW_NAME,FLOW_VERSION,NB_REQ_REF_LOOKUP_ID ) values ("VNF-Create",2,"EtsiVnfInstantiateBB",1, 119);
insert into orchestration_flow_reference (COMPOSITE_ACTION,SEQ_NO,FLOW_NAME,FLOW_VERSION,NB_REQ_REF_LOOKUP_ID ) values ("VNF-Create",3,"ActivateVnfBB",1, 119);
Delete:
delete from orchestration_flow_reference where COMPOSITE_ACTION = "VNF-Delete";

insert into orchestration_flow_reference (COMPOSITE_ACTION,SEQ_NO,FLOW_NAME,FLOW_VERSION,NB_REQ_REF_LOOKUP_ID ) values ("VNF-Delete",1,"UnassignVnfBB",1,122);
insert into orchestration_flow_reference (COMPOSITE_ACTION,SEQ_NO,FLOW_NAME,FLOW_VERSION,NB_REQ_REF_LOOKUP_ID ) values ("VNF- Delete ",2,"EtsiVnfDeleteBB",1, 122);
You have now enabled the ETSI building blocks and configured the sequence of building blocks to execute. Your “orchestration_flow_reference” should now be the same as shown below.

Note: Standard VNF instantiation is unlikely to work once this step has been completed.
Update the “orchestration_status_state_transition_directive” table
The last step that needs to be taken in the MariaDB, is to update the state transition table, in order to allow our ETSI Create building blocks to correctly change the operation status of a VNF. If the operation status is not allowed to change correctly, then our ETSI building block will be skipped and will not be executed.
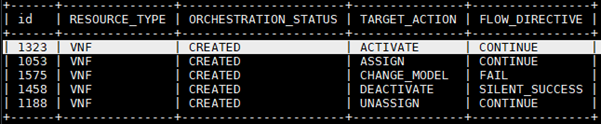
View the current “orchestration_status_state_transition_directive” setup. It should look the same as the image shown below.
select * from orchestration_status_state_transition_directive where RESOURCE_TYPE='VNF' and ORCHESTRATION_STATUS='Created';

Update the row that decides when a “VNF” with an orchestration status of “CREATED” has a target action of “ACTIVATE” to “CONTINUE” instead of “FAIL” using the following command:
update orchestration_status_state_transition_directive set FLOW_DIRECTIVE='CONTINUE' where RESOURCE_TYPE='VNF' and ORCHESTRATION_STATUS='CREATED' and TARGET_ACTION='ACTIVATE' and FLOW_DIRECTIVE='FAIL';
The image below shows how your DB should look after running the previous command.
The transition directive is now set up correctly, allowing all of your ETSI building blocks to be executed correctly.
Note: It is currently unknown if this change, alone, will break VNF instantiation.
Adding your VNFM to ONAP ESR
There are multiple ways to enter this information. You can go to the ESR Dashboard and add it through the GUI, or you can send a curl command to A&AI to add the VNFM to ESR yourself. I find the curl commands quicker/easier.
Please ensure you have ESR added to your ONAP installation before attempting this step. Here is a link to setting up ESR and accessing it's GUI: ESR setup. Next, you will need to populate the ESR VNFM List with information relating to the VNFM that you want to instantiate your VNFs through.
The URL for viewing the VNFM GUI is:
http://<MSB_SERVER_IP>:80/iui/aai-esr-gui/extsys/vnfm/vnfmView.html
Where <MSB_SERVER_IP> is replaced with the IP of the VM that is running your “msb_iag” pod. You can figure out which VM is running your pod by using this command:
kubectl -n onap get pods -o wide | grep msb
It will give you the name of the VM running the “msb_iag” pod. Then you will need to retrieve this VM’s IP from your Openstack/etc.
In order to use the curl command method, you will need to log into one of your ONAP pods and then send the command. (This prevents us needing to go and get the AAI service IP and external port.)
In order to log into one of your pods, first find any pod, this example with use the BPMN-INFRA pod, with this command:
kubectl -n onap get pods | grep bpmn
Then take the full pod name and put it into this command instead of <PODNAME>:
kubectl -n onap exec -it <PODNAME> sh
Once inside the pod you can run the following command which creates a VNFM, in ESR, with ID “ExampleVnfmId”. Edit this curl command to your needs before using it.
curl -X PUT -H 'Accept: application/json' -H 'Authorization: Basic YWFpQGFhaS5vbmFwLm9yZzpkZW1vMTIzNDU2IQ==' -H 'Content-Type: application/json' -H 'X-FromAppId:12' -H 'X-TransactionId: 12' https://aai.onap:8443/aai/v15/external-system/esr-vnfm-list/esr-vnfm/ExampleVnfmId -d '{"vnfmId": "ExampleVnfmId", "name": "ExampleVnfmName", "type": "ExampleVnfm", "vendor": "est"}'
One important thing to note in this curl command is the type: "ExampleVnfm". This will be used in a later step for specifying which VNFM you want to instantiate through.
Once you have entered the previous information you need to add the “service-url” to your “esr-system-info” section of this VNFM you just added. This is done with the following curl command:
curl -X PUT -H 'Accept: application/json' -H 'Authorization: Basic YWFpQGFhaS5vbmFwLm9yZzpkZW1vMTIzNDU2IQ==' -H 'Content-Type: application/json' -H 'X-FromAppId:12' -H 'X-TransactionId: 12' https://aai.onap:8443/aai/v15/external-system/esr-vnfm-list/esr-vnfm/ExampleVnfmId/esr-system-info-list/esr-system-info/ExampleEsrSystemInfoId -d '{"esr-system-info-id": "ExampleEsrSystemInfoId", "type": "ExampleVnfm", "user-name": "user", "password": "password", "system-type": "VNFM", "service-url": "http://so-vnfm-simulator.onap:9093/vnflcm/v1"}'
Please note, that the “service-url” in this curl command was designed to work with the “so-vnfm-simulator”, you will need to change this to match your VNFM’s “service-url”.
You have now entered your VNFM into the ESR/AAI components.
Here are the equivalent GET commands for checking what is currently in your ESR/AAI list (change the IDs to match the IDs you used earlier):
curl -H 'Accept: application/json' -H 'Authorization: Basic YWFpQGFhaS5vbmFwLm9yZzpkZW1vMTIzNDU2IQ==' -H 'Content-Type: application/json' -H 'X-FromAppId:12' -H 'X-TransactionId: 12' https://aai.onap:8443/aai/v15/external-system/esr-vnfm-list/


curl -H 'Accept: application/json' -H 'Authorization: Basic YWFpQGFhaS5vbmFwLm9yZzpkZW1vMTIzNDU2IQ==' -H 'Content-Type: application/json' -H 'X-FromAppId:12' -H 'X-TransactionId: 12' https://aai.onap:8443/aai/v15/external-system/esr-vnfm-list/esr-vnfm/ExampleVnfmId/esr-system-info-list/esr-system-info
Change the SDC Endpoint from HTTPS to HTTP
Next we will need to enable our VNFM-Adapter to communicate with SDC, this is done by changing the communication from using HTTPS to use HTTP. This will be done by editing the “override.yaml” in the VNFM-Adapter’s Helm charts.
The file that needs to be edited is the “override.yaml” found, by default, in the directory:
/root/oom/kubernetes/so/charts/so-vnfm-adapter/resources/config/overrides
Within this file you will need to find the following endpoint attribute:
endpoint: https://sdc-be.{{ include "common.namespace" . }}:8443
This endpoint, needs to be changed to the following:
endpoint: http://sdc-be.{{ include "common.namespace" . }}:8080
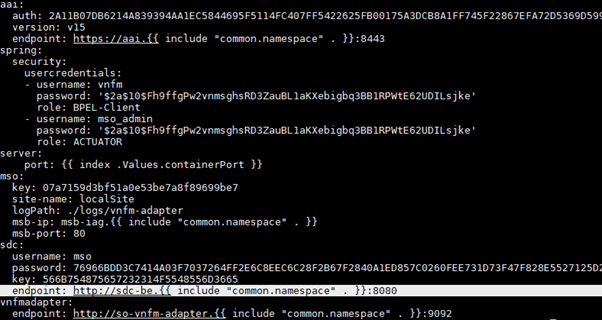
You will then need to update and redeploy your Helm charts in order to pick up the change. Once this is done, your VNFM-Adapter pod should terminate and recreate a pod which has the endpoint changes.
Your “override.yaml” for the VNFM-Adapter should be the same as the following image:
Zip Package VNFD Path
The next and final step related to the Helm charts of the VNFM-Adapter, is to add a custom variable to the “override.yaml” of the VNFM-Adapter that points the VNFM-Adapter to the VNFD within your services’ package. You will need to add the following entry to the “sdc” section of the “override.yaml” (found here: /root/oom/kubernetes/so/charts/so-vnfm-adapter/resources/config/overrides):
toscametapath: Artifacts/Deployment/OTHER/TOSCA.meta
This entry needs to be entered in the sdc section of the “override.yaml”, as shown in the image below:

Onboarding a Virtual Software Product (VSP) with an ETSI HEAT/TOSCA* Template.
*Not currently supported by SDC.
Login to the ONAP Portal as the designer. Select the SDC App.
Designer Login: cs0008
Password: demo123456!
- Click the “ONBOARD” tab near the top of the window.
- Create “VLM”if you have not created a "VLM" before.
- From the “ONBOARD” page, click create VLM.
- Enter name and description, then select create.
- Click on the plus button beside Entitlement Pool.
- Add Name and Manufacturing Reference Number, then click save.
- Click on the plus button beside License Key Groups.
- Add Name and select type, then click save.
- Click on the plus button beside Feature Groups.
- In the general tab, add name, Description and Part Number. Move to the Entitlements Pools tab, select the entitlement pool you just created and click the rightward arrow. Move to the License Key Group tab, select the license key group you just created and click the rightward arrow. Once these three things are done, click save.
- Click on the plus button beside License Agreement.
- Add Name and select License Term. Next move to the Feature Groups tab, select the Feature Group you just created and click the rightward arrow. Lastly click save.
- On the overview page, select submit in the top right corner of the screen.
- Click “CREATE NEW VSP” and fill in the required information. Make sure to select “Network Package” for the “ONBOARDING PROCEDURE” section. Then click “CREATE”.

- Now you will need to click where it says “! Missing” underneath “License Agreement”. Simply select a “Licensing Version” and “License Agreement/Feature Group” from the drop downs.

- Next click the “Overview” tab on the left hand side. Then press “Select File” in the “SOFTWARE PRODUCT ATTACHMENTS” section and select your prepared zip or csar file. If you are onboarding a supported zip, then click “PROCEED TO VALIDATION” once you can see your added files. You can safely ignore any warnings that come up at this step, but not any errors. (Note: The package validation does not support csars currently. This is due to change in the future however.) For this guide, you will need to onboard a package matching the example package’s format/structure, found at the bottom of this guide. Currently we use a zip folder with an artifact that contains the VNFD.


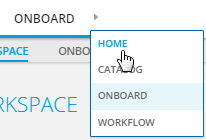
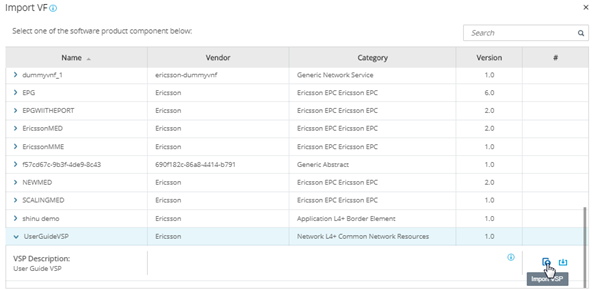
6. Now click “Submit”. Then click “ONBOARD” in the top left. Hover your mouse over the small grey triangle that is just to the right of the “ONBOARD” tab and select “HOME”.
7. Hover over the “IMPORT” square and select “Import VSP”. Find your VSP click the drop-down arrow beside it and then press the “Import VSP” icon at the far right of the line that drops down. As shown here:
You will now be brought to the draft page of your VF. Follow the instructions below in order to certify it.
- First, give your VF a name you will remember, as we will be using this in the following section.
- Here you can go to the “Composition” tab on the left-hand side. You can drag/drop different components into the central window, depending on your VF’s needs, but you should leave it as default for now. When importing your VSP package it should configure the VF correctly.
- You can also edit the properties of any VFs and their components by going to the “Properties Assignment” tab on the left-hand side, then selecting the VF on the right-hand side.

- Once you have configured your VF, click “Certify” in the top right-hand corner.
- Your VF is certified and has been added to the SDC Catalog. It can be added into new Services now.
Creating a Service and Approving/Distributing it
- Logged in as “cs0008”, in the “HOME” tab of the SDC ONAP Portal, hover over the “ADD” square and select “ADD SERVICE”. Fill in the required fields and press “Create” in the top right-hand corner.
- Now you will be brought to the draft page of your Service. (Note: You can also select the instantiation type at the bottom right of the page. In most cases you should use the Alacarte instantiation type.)
- Now go to the “Composition” tab on the left-hand side and drag/drop the VF, that you just created, into this service (you can search for the VF by name in the top left).
- Next you will need to edit the properties of the VF that you just added to your Service by going to the “Properties Assignment” tab on the left-hand side, then selecting your VF on the right-hand side. You should see something similar to the following image:

- Here you will need to change the property “nf_role” to match the type that you gave to your VNFM when entering it into the ESR VNFM list, the example earlier used “simulator” as the type. Make sure to press the blue “Save” button above the properties after making your change. This update ensures that the correct VNFM is selected when sending the instantiate requests through the VNFM-Adapter.
- Once you have configured your Service, click “Submit for Testing” in the top right-hand corner.
- Now you will need to logout and sign into the Portal as the Tester account (jm0007). Then go into SDC. You should see your Service in the “HOME” tab of SDC.
- Click on your Service then click “Start Testing” in the top right-hand corner. Then click “Accept” and fill in the required field.
- Now your complete Service has been certified and added to the SDC Catalog.
- The next step is approving the Service for distribution. You will need to sign into the Governor account in the ONAP Portal (gv0001) and then click into SDC.
- Find your Service in the “HOME” tab of SDC, it should say “Waiting for Distribution” beneath it, click into it.

12. Now click “Approve” in the top right-hand corner and fill in the required field.
13. The final step in SDC is to distribute the Service, as it has been approved for distribution.
14. Sign into the ONAP Portal as the Operator (op0001) and find your Service in the SDC “HOME” tab, then click into it.
15. Now click the “Distribute” button in the top right-hand corner.(After distributing, you can click the “Monitor” button in the top right-hand corner to see the status of the distribution.)

16. Your Service, and it’s contained VFs, are now distributed and will be sent to the required components. (i.e A&AI, SDNC etc.)
17. Monitor the distribution status and ensure there are no errors received.

Preloading SDNC (To be added)
---------------------
Using VID to send Instantiate Request
Before executing this section you will need to preload SDNC, as per previous step, or the VNF instantiation will fail.
In order to access the VID (Virtual Infrastructure Deployment) component through the portal, you will need to login with the id “demo”. Once logged in to VID, first ensure that the GR-API is set. First you will need to instantiate the service, once this is done you can then instantiate the VNF. This will be when the ETSI Workflows are run.
Then you will need to select “Deploy an SDC Service” on the left-hand side of the GUI. You should see your distributed service in the list of services shown here. (Note: if you cannot see your services here then you will need to go back to SDC, logged in as op0001, to check the status of the distribution.)
- Press "Deploy" on the left-hand side of the service you have distributed.
- Fill out the required fields and press "Confirm".
- Wait for the Service to be instantiated.
- Press "Close" at bottom of pop-up window.
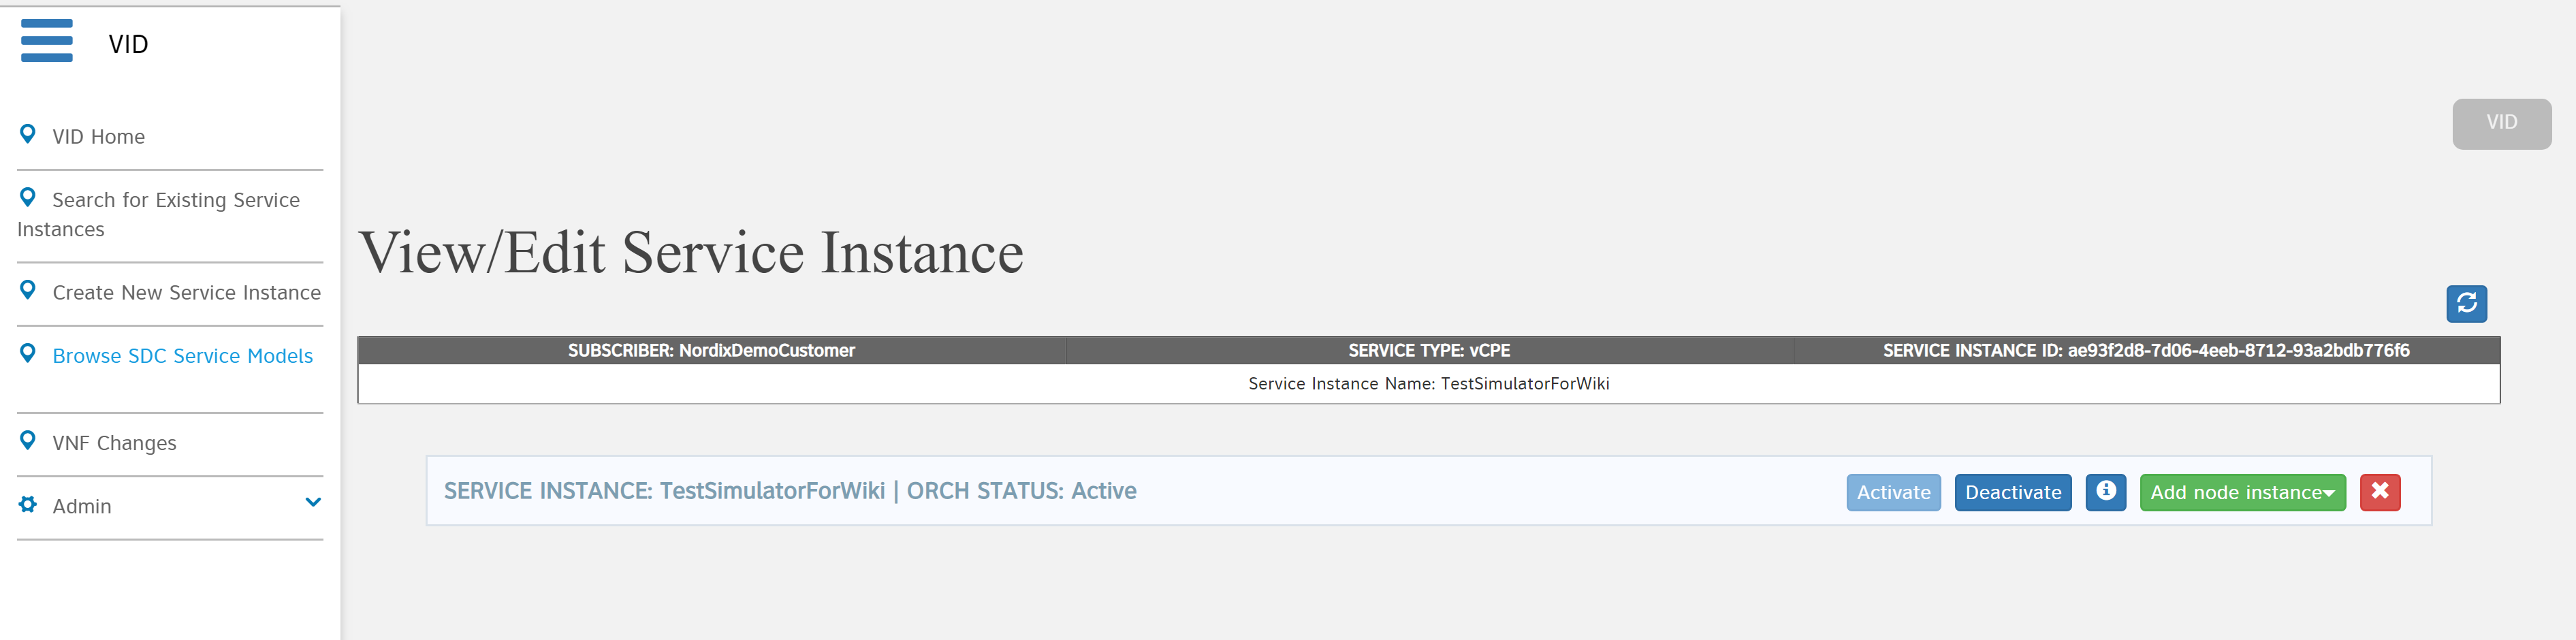
Now you should be brought to the "View/Edit Service Instance" page, focused on the service you just instantiated, as shown below:
Instantiate VNF:
- Press "Add node instance" and select your VNF.
- Fill out the required fields and press "Confirm".
- Leave this VID page open, as this step can take quite some time, depending on a number of factors.
- Monitor the VNF instantiation through your VNFM GUI and back through the VNFM-Adapter logs and finally the BPMN logs.
- Upon success, your VNF should be instantiated correctly.
Deleting VNF:
- If you wish to delete the VNF you will need to simply travel back to the service instance that you instantiated your VNF through.
- Select the red X on the right-hand side of the VNF instance, as shown in the image below:

3. The VNF should begin terminating now, it may take quite some time, depending on a number of factors.
4. Monitor the VNFM GUI and other logs until success.
Monitoring Logs (BPMN, VNFM-Adapter and VNFM)
There are 3 stages of logs to monitor throughout the process of instantiating your service, and sending your request through the VNFM-Adapter, to your VNFM.
The initial service instantiation request will be recorded in the BPMN-INFRA pod’s logs, so if you log into this pod you will be able to view them.
The VNF instantiation request will appear first in the BPMN-INFRA pod’s logs, then once the ETSI Building Block is being executed you will see entries going through the VNFM-Adapter pod’s logs. Followed finally by the VNFM itself receiving a request from the VNFM-Adapter. This should all be recorded throughout the “debug.logs” on each of the mentioned pods.
The other areas to monitor would be your VNFM’s GUI (if applicable), your Openstack Tenant’s logs as well as it’s server list and the SO-Monitoring tool (in order to see the BPMN flow’s progress).
Example Zip VNF Package (More to be added)
Please follow the structure laid out below for creating your onboarding package.
Structure:
- 5 files (2 .yaml, 1 .meta, 1 .json, 1 .env)
- base.yaml
- descriptor.yaml
- base.env
- MANIFEST.json
- TOSCA.meta
- Compressed in a Zip folder.
- No directories. (Flat structure)
Files:
base.yaml - This file will be a very simple HEAT template, as it is just required in order to be able to instantiate the Service once its distributed.
descriptor.yaml - This file will contain the VNFD (Virtual Network Function Descriptor). It must be structured to match waht the VNFM-Adapter searches for.
base.env - This file simply contains some environment variables for the base.yaml.
MANIFEST.json - This file lists all of the other files contained within it's package.
TOSCA.meta - This important file contains the path of the VNFD, which will be used by the VNFM-Adapter.
Please find example versions of the files below:
heat_template_version: 2013-05-23

description: Simple template to deploy a single compute instance

parameters:
  simple_name_0:
    type: string
    label: Key Name
    description: Name of key-pair to be used for compute instance
  simple_key:
    type: string
    label: Key Name
    description: Name of key-pair to be used for compute instance
  simple_image_name:
    type: string
    label: Image ID
    description: Image to be used for compute instance
  simple_flavor_name:
    type: string
    label: Instance Type
    description: Type of instance (flavor) to be used
  vnf_id:
    type: string
    label: VNF ID
    description: The VNF ID is provided by ONAP
  vf_module_id:
    type: string
    label: vFirewall module ID
    description: The vFirewall Module ID is provided by ONAP
  simple_netid:
    type: string
    label: Netid
    description: netid
  public_net_id:
    type: string
    label: Netid
    description: public NetId
  ves_ip:
    type: string
    label: Netid
    description: public ves_ip
  node_ip:
    type: string
    label: Netid
    description: public ves_ip


resources:

  simple_0_private_port:
    type: OS::Neutron::Port
    properties:
      network: { get_param: simple_netid }
      fixed_ips:
      - ip_address: { get_param: node_ip }


  simple_0:
    type: OS::Nova::Server
    properties:
      availability_zone: nova
      key_name: { get_param: simple_key }
      image: { get_param: simple_image_name }
      flavor: { get_param: simple_flavor_name }
      name: { get_param: simple_name_0 }
      metadata: {vnf_id: { get_param: vnf_id }, vf_module_id: { get_param: vf_module_id }}
      networks:
      - port: { get_resource: simple_0_private_port }
      user_data_format: RAW
      user_data:
        str_replace:
          params:
            __ves_ip__: { get_param: ves_ip }
            __vnfId__: { get_param: vnf_id }

          template: |
            #!/bin/bash

            echo "the value we got for vndID was : __vnfId__" >> /tmp/vnfid.log

outputs:
  oam_management_v4_address:
    description: The IP address of the oam_management_v4_address
    value: { get_param: node_ip  }
To be added.
parameters:
  simple_image_name: UBUNTU16
  simple_flavor_name: m1.small
  simple_name_0: SIMPLEUBU
  simple_key: demo-key
  vnf_id: VESMED
  vf_module_id: vfModuleId
  simple_netid:  onap_vip
  public_net_id: nova_floating
  ves_ip: 172.55.10.10
  node_ip: 172.55.10.10
{
  "name": "MMEPackage",
  "description": "Test",
  "version": "0.0",
  "data": [
    {
      "isBase": true,
      "file": "base.yaml",
      "type": "HEAT",
      "data": [
        {
          "file": "base.env",
          "type": "HEAT_ENV"
        }
      ]
    },
    {
      "file": "descriptor.yaml",
      "type": "OTHER"
    },
    {
      "file": "TOSCA.meta",
      "type": "OTHER"
    }
  ]
}
TOSCA-Meta-File-Version: 1.0
CSAR-Version: 1.1
Created-by: Demo
Entry-Definitions: Artifacts/Deployment/OTHER/descriptor.yaml
The MANIFEST.json and TOSCA.meta are extremely important, if either are incorrectly formatted it will either fail to onboard or fail to distribute when you get to that step.
Ensure that the file names all match and your indentation/quotes are all correct, as it could save you a lot of time.