| Table of Contents |
|---|
Introduction
This tutorial is going to explain how to setup a local Kubernetes cluster and minimal helm setup to run and deploy SDC (but can be extended to several/all ONAP components) on a single host.
...
- Install/remove Microk8s with appropriate version
- Install/remove Helm with appropriate version
- Tweak Microk8s
- Download oom repo
- Install the needed Helm plugins
- Install ChartMuseum as a local helm repo
- Install docker (now needed to build oom charts)
- Build all oom charts and store them in the chart repo
- Tweak oom override file to fine tune deployment based on your VM capacity and component needs
- Deploy/Undeploy charts
- Enable local UI access
- Full Deployment Override on a single VM
- Run testsuites
1) Install/Upgrade Microk8s with appropriate version
...
2) it is not using docker as the container runtime, it's using containerd, it's not an issue, just be aware of that as you won't see containers using classic docker commands
How to remove/install /remove microk8s ?
If you have a previous version of microk8s, you first need to uninstall it (upgrade is possible but it is not recommended between major versions so I recommend to uninstall as it's fast and safe)
...
| Code Block |
|---|
sudo snap install microk8s --classic --channel=1.19/stable |
You may need to change your firewall configuration to allow pod to pod communication and pod to internet communication :
| Code Block |
|---|
sudo ufw allow in on cni0 && sudo ufw allow out on cni0
sudo ufw default allow routed |
Addons ?
MicroK8s is lightweight but comes with several possible addons, OOM and ONAP requires just a few to be enabled, you can choose to enable more if you want to
18/stable
sudo snap refresh microk8s --classic --channel=1.19/stable

Or (when the master node bug will be fixed on 1.19 kubernetes snap install)

sudo snap install microk8s --classic --channel=1.19/stable |
You may need to change your firewall configuration to allow pod to pod communication and pod to internet communication :
| Code Block |
|---|
sudo ufw allow in on cni0 && sudo ufw allow out on cni0
sudo ufw default allow routed |
Addons ?
MicroK8s is lightweight but comes with several possible addons, OOM and ONAP requires just a few to be enabled, you can choose to enable more if you want to
DNS addon : we need the DNS addon so that pods can 'see' each other by host name.
Storage addon : we will enable the default Host storage class, this allows local volume storage that are used by some pods to exchange folders between containers.
| Code Block |
|---|
sudo microk8s enable dns storage |
...
As Helm is self contained, it's pretty straightforward to install/upgrade
I recommend putting helm in local bin folder as a softlink, this way it's easy to switch between versions if you need to
| Code Block |
|---|
 wget https://get.helm.sh/helm-v3.5.2-linux-amd64.tar.gz
 tar -zxvf helm-v3.5.2-linux-amd64.tar.gz
 sudo mv linux-amd64/helm /usr/local/bin/helm-v3.5.2
 sudo ln -s /usr/local/bin/helm-v3.5.2 /usr/local/bin/helm
|
3) Tweak Microk8s
The below tweaks are not strictly necessary, but they help in making the setup more simple and flexible.
A) Increase the max number of pods
, we can also use snap to install the right version
| Code Block |
|---|
sudo snap install helm --classic --channel=3.5/stable
|
Note: You may encounter some log issues when installing helm with snap
Normally the helm logs are available in "~/.local/share/helm/plugins/deploy/cache/onap/logs", if you notice that the log files are all equal to 0, you can uninstall the helm with snap and reinstall it manually
| Code Block |
|---|
wget https://get.helm.sh/helm-v3.5.4-linux-amd64.tar.gz
|
| Code Block |
|---|
tar xvfz helm-v3.5.4-linux-amd64.tar.gz
|
| Code Block |
|---|
sudo mv linux-amd64/helm /usr/local/bin/helm
|
3) Tweak Microk8s
The below tweaks are not strictly necessary, but they help in making the setup more simple and flexible.
A) Increase the max number of pods & Add priviledged config
As As ONAP may deploy a significant amount of pods, we need to inform kubelet to allow more than the basic configuration (as we plan an all in box setup), if you only plan to run a limited number of components, this is not needneeded
to change the max number of pods, we need to add a parameter to the startup line of kubelet.edit
1. Edit the file located at :
| Code Block |
|---|
sudo nano /var/snap/microk8s/current/args/kubelet |
...
| Code Block |
|---|
sudo service snap.microk8s.daemon-kubelet restart |
B) run a local copy of kubectl
...
2. Edit the file located at :
| Code Block |
|---|
microk8ssudo kubectl describe node |
to make things simpler as we will most likely interact a lot with kubectl, let's install a local copy of kubectl so we can use it to interact with the kubernetes cluster in a more straightforward way
We need kubectl 1.19 to match the cluster we have installed
| Code Block |
|---|
curl -LO https://storage.googleapis.com/kubernetes-release/release/v1.19.7/bin/linux/amd64/kubectl
chmod +x ./kubectl
sudo mv ./kubectl /usr/local/bin/kubectl |
If you want to use a the same link trick as for helm (see above) this could allow you to switch between kubectl versions if needed
Now we need to provide our local kubectl client with a proper config file so that it can access the cluster, microk8s allows to retrieve the cluster config very easily
Simply create a .kube folder in your home directory and dump the config there
| Code Block |
|---|
cd
mkdir .kubecd .kube
microk8s.config > config
chmod 700 config |
the last line is there to avoid helm complaining about too open permission
you should now have helm and kubectl ready to interact with each other, you can verify this by trying :
| Code Block |
|---|
kubectl version |
this should output both the local client and server version
nano /var/snap/microk8s/current/args/kube-apiserver |
add the following line at the end :
| Code Block |
|---|
--allow-privileged=true |
save the file and restart kubelet to apply the change :
| Code Block |
|---|
sudo service snap.microk8s.daemon-apiserver restart |
B) run a local copy of kubectl
Microk8s comes bundled with kubectl, you can interact with it by doing:
| Code Block |
|---|
sudo microk8s kubectl describe node |
to make things simpler as we will most likely interact a lot with kubectl, let's install a local copy of kubectl so we can use it to interact with the kubernetes cluster in a more straightforward way
We need kubectl 1.19 to match the cluster we have installed, let's again use snap to quickly choose and install the one we need
| Code Block |
|---|
sudo snap install kubectl --classic --channel=1.19/stable |
Now we need to provide our local kubectl client with a proper config file so that it can access the cluster, microk8s allows to retrieve the cluster config very easily
Simply create a .kube folder in your home directory and dump the config there
| Code Block |
|---|
cd
mkdir .kube
cd .kube
sudo microk8s.config > config
chmod 700 config |
the last line is there to avoid helm complaining about too open permission
you should now have helm and kubectl ready to interact with each other, you can verify this by trying :
| Code Block |
|---|
kubectl version |
this should output both the local client and server version
Client Version: version.InfoClient Version: version.Info{Major:"1", Minor:"19", GitVersion:"v1.19.7", GitCommit:"1dd5338295409edcfff11505e7bb246f0d325d15", GitTreeState:"clean", BuildDate:"2021-01-13T13:23:52Z", GoVersion:"go1.15.5", Compiler:"gc", Platform:"linux/amd64"}
Server Version: version.Info{Major:"1", Minor:"19+", GitVersion:"v1.19.7-34+02d22c9f4fb254", GitCommit:"02d22c9f4fb2545422b2b28e2152b1788fc27c2f", GitTreeState:"clean", BuildDate:"2021-02-11T20:13:16Z", GoVersion:"go1.15.8", Compiler:"gc", Platform:"linux/amd64"}
...
the example below pulls the latest version from master, it's probably wiser to select the right version (honolulu branch or a specific review you want to test)
| Code Block |
|---|
cd
git clone --recursive "https://gerrit.onap.org/r/oom" |
...
| Code Block |
|---|
helm plugin install https://--version v0.9.0 https://github.com/chartmuseum/helm-push.git |
Once all plugins are installed, you should see them as available helm commands when doing :
| Code Block |
|---|
helm --help |
6) Install the
...
chartmuseum repository
To align with how the previous release were deployed, we will setup a local chart repository.
...
unless you already have docker, in which case you can skip this part altogether.
Or use snap:
| Code Block |
|---|
sudo snap install docker |
8) Build all oom charts and store them in the chart repo
You should be ready to build all helm charts, go into the oom/kubernetes folder and run a full make
Ensure you have "make" installed:
| Code Block |
|---|
sudo apt install make |
Then build OOM
| Code Block |
|---|
cd ~/oom/kubernetes make all |
...
don't forget to create the namespace again before deploying again (helm won't complain if it is not there, but you'll end up with an empty cluster after if finishes)
10) Enable UI access
Note : you could also reset the K8S cluster by using the microk8s feature : microk8s reset
but that's a more drastic approach, you would need to reinstall the addons, dump again the config for kubectl etc.... this can be useful if you get weird behavior though.
10) Enable UI access
Once all pods are running Once all pods are running and all jobs are completed,
...
| Code Block |
|---|
# for myVM ONAP 127.0.0.1 portal.api.simpledemo.onap.orgaaf-gui 127.0.0.1 sdcaai.apiui.simpledemo.onap.org 127.0.0.1 sdcappc.api.fe.simpledemo.onap.org 127.0.0.1 sdccds.workflow.pluginapi.simpledemo.onap.org 127.0.0.1 vidcdt.api.simpledemo.onap.org 127.0.0.1 policyclamp.api.simpledemo.onap.org 127.0.0.1 aainbi.uiapi.simpledemo.onap.org 127.0.0.1 nbipolicy.api.simpledemo.onap.org 127.0.0.1 clampportal.api.simpledemo.onap.org 127.0.0.1 so-monitoring 127.0.0.1 robot-onap.onap.org 127.0.0.1 aaf-gui 127.0.0.1 robot-onapsdc.api.fe.simpledemo.onap.org 127.0.0.1 cdtsdc.api.simpledemo.onap.org 127.0.0.1 appcsdc.workflow.apiplugin.simpledemo.onap.org 127.0.0.1 cdsso-monitoring 127.0.0.1 vid.api.simpledemo.onap.org |
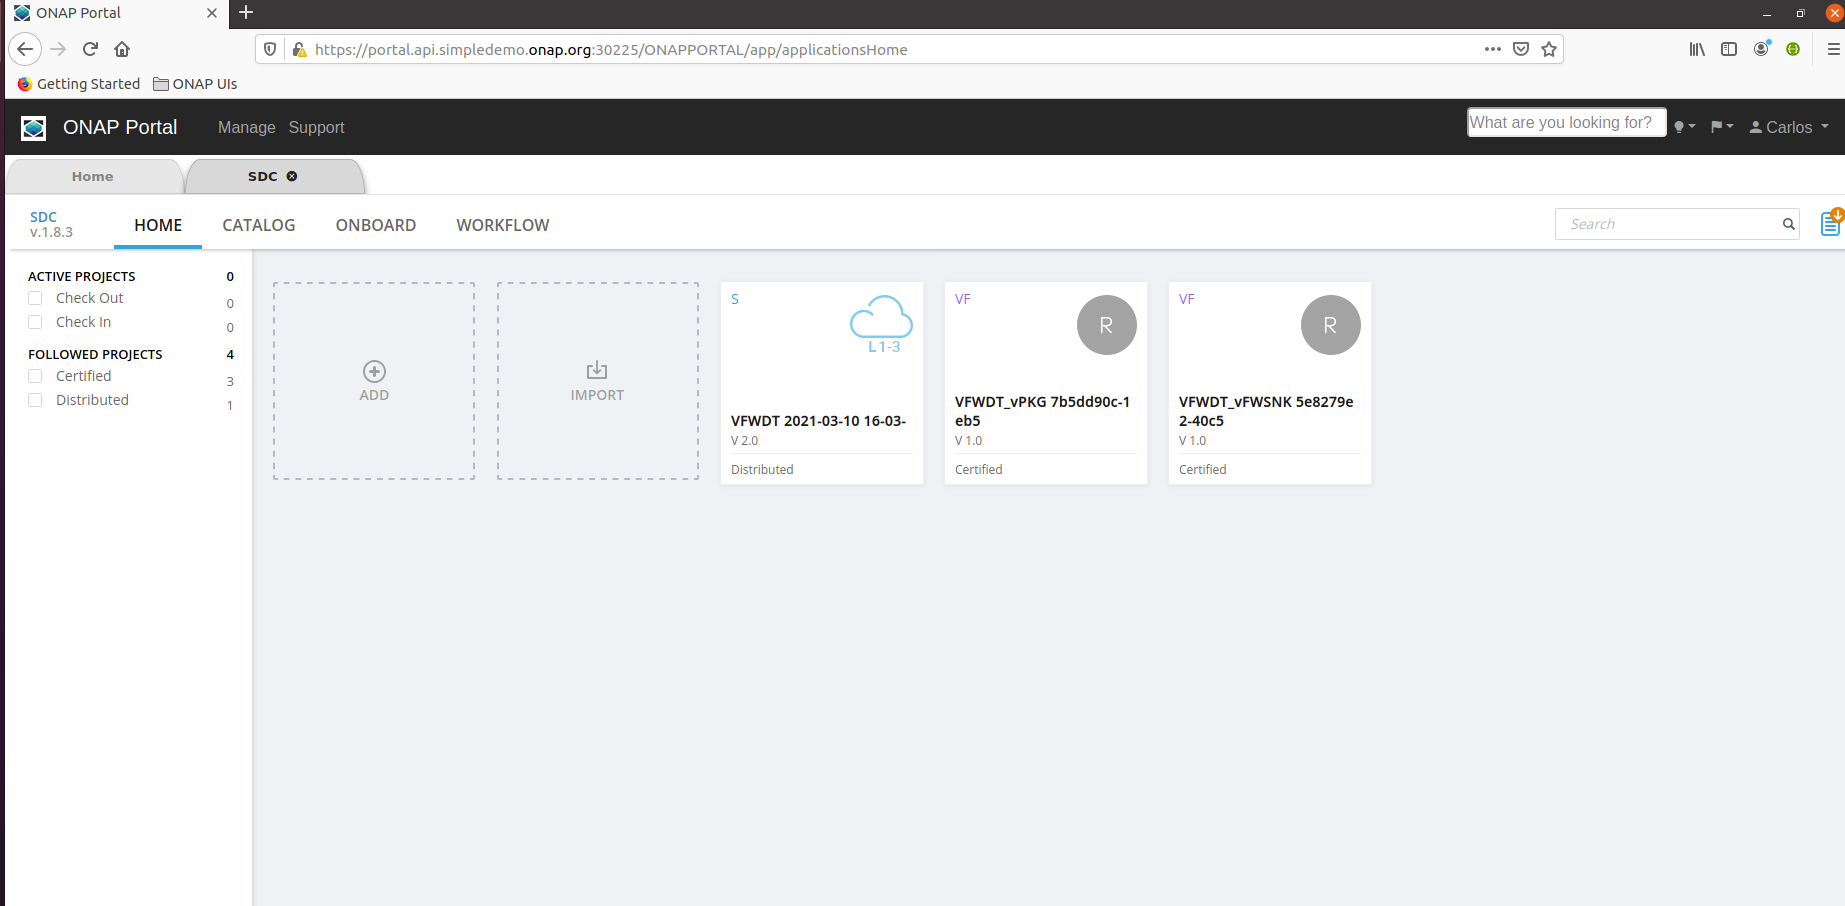
You can then access the portal UI by opening your browser to :
https://portal.api.simpledemo.onap.org:30225/ONAPPORTAL/login.htm
user/pass is cs0008/demo123456!
Note : Since SDC (and other UIs) are embedded into the portal UI frame, you browser may complain about trusting its certificate, to work around this issue, open the SDC UI directly first (to get your browser to accept the certificate), once done you should be able to open the SDC UI through the portal. To do so, open another tab of your browser to :
https://sdc.api.fe.simpledemo.onap.org:30207/
https://sdc.workflow.plugin.simpledemo.onap.org:30256/
Note : you need to repeat the above for each deployment, as certificates are generated by AAF during startup, certificates will change each time you deploy
You should now be able to use SDC :
:30207/
https://sdc.workflow.plugin.simpledemo.onap.org:30256/
Note : you need to repeat the above for each deployment, as certificates are generated by AAF during startup, certificates will change each time you deploy
You should now be able to use SDC :
11) Full Deployment Override on a single VM
Below is a full blown override file used to run mostly all Honolulu components, this was tested working on Windriver Lab on a VM with 12VCpu and 128G Ram
| Code Block |
|---|
# Copyright © 2017 Amdocs, Bell Canada
#
# Licensed under the Apache License, Version 2.0 (the "License");
# you may not use this file except in compliance with the License.
# You may obtain a copy of the License at
#
#       http://www.apache.org/licenses/LICENSE-2.0
#
# Unless required by applicable law or agreed to in writing, software
# distributed under the License is distributed on an "AS IS" BASIS,
# WITHOUT WARRANTIES OR CONDITIONS OF ANY KIND, either express or implied.
# See the License for the specific language governing permissions and
# limitations under the License.

#################################################################
# Global configuration overrides.
#
# These overrides will affect all helm charts (ie. applications)
# that are listed below and are 'enabled'.
#################################################################
global:
  # Change to an unused port prefix range to prevent port conflicts
  # with other instances running within the same k8s cluster
  nodePortPrefix: 302
  nodePortPrefixExt: 304
  masterPassword: secretpassword
  addTestingComponents: true
  cmpv2Enabled: true
  flavor: unlimited
  # ONAP Repository
  # Uncomment the following to enable the use of a single docker
  # repository but ONLY if your repository mirrors all ONAP
  # docker images. This includes all images from dockerhub and
  # any other repository that hosts images for ONAP components.
  #repository: nexus3.onap.org:10001

  # readiness check - temporary repo until images migrated to nexus3
  readinessRepository: oomk8s
  # logging agent - temporary repo until images migrated to nexus3
  loggingRepository: docker.elastic.co

  # image pull policy
  pullPolicy: IfNotPresent

  # override default mount path root directory
  # referenced by persistent volumes and log files
  persistence:
    mountPath: /dockerdata-nfs

  # flag to enable debugging - application support required
  debugEnabled: false

#################################################################
# Enable/disable and configure helm charts (ie. applications)
# to customize the ONAP deployment.
#################################################################
aaf:
  enabled: true
  aaf-service:
    readiness:
      initialDelaySeconds: 150
aai:
  enabled: true
  flavorOverride: unlimited
  global:
    flavorOverride: unlimited
    cassandra:
      replicas: 3
  aai-cassandra:
    flavorOverride: unlimited
    replicaCount: 3
  aai-babel:
    flavorOverride: unlimited
  aai-data-router:
    flavorOverride: unlimited
  aai-elasticsearch:
    flavorOverride: unlimited
  aai-graphadmin:
    flavorOverride: unlimited
  aai-modelloader:
    flavorOverride: unlimited
  aai-resources:
    flavorOverride: unlimited
  aai-schema-service:
    flavorOverride: unlimited
  aai-search-data:
    flavorOverride: unlimited
  aai-sparky-be:
    flavorOverride: unlimited
    readiness:
      initialDelaySeconds: 150
      periodSeconds: 20
      timeoutSeconds: 10
    liveness:
      timeoutSeconds: 10
  aai-traversal:
    flavorOverride: unlimited
appc:
  enabled: false
cassandra:
  enabled: true
  replicaCount: 3
  config:
    cluster_domain: cluster.local
    heap:
      max: 1G
      min: 256M
  liveness:
    initialDelaySeconds: 60
    periodSeconds: 20
    timeoutSeconds: 10
    successThreshold: 1
    failureThreshold: 3
    # necessary to disable liveness probe when setting breakpoints
    # in debugger so K8s doesn't restart unresponsive container
    enabled: true

  readiness:
    initialDelaySeconds: 120
    periodSeconds: 20
    timeoutSeconds: 10
    successThreshold: 1
    failureThreshold: 3
cds:
  enabled: true
clamp:
  enabled: true
cli:
  enabled: true
consul:
  enabled: true
contrib:
  enabled: true
  awx:
    enabled: true
  netbox:
    enabled: false
dcaegen2:
  enabled: true
  dcae-cloudify-manager:
    readiness:
      periodSeconds: 120
      timeoutSeconds: 20
    liveness:
      timeoutSeconds: 10
dmaap:
  enabled: true
esr:
  enabled: false
log:
  enabled: false
  log-logstash:
    replicaCount: 1
sniro-emulator:
  enabled: false
oof:
  enabled: false
mariadb-galera:
  enabled: true
msb:
  enabled: true
multicloud:
  enabled: true
nbi:
  enabled: true
platform:
  enabled: true
policy:
  enabled: true
pomba:
  enabled: false
portal:
  enabled: true
robot:
  enabled: true
  flavor: small
  appcUsername: "appc@appc.onap.org"
  appcPassword: "TBD"
  openStackKeyStoneUrl: "http://10.12.25.2:5000"
  openStackKeystoneAPIVersion: "v3"
  openStackPublicNetId: "TBD"
  openStackTenantId: "TBD"
  openStackUserName: "TBD"
  openStackUserDomain: "TBD"
  openStackProjectName: "TBD"
  ubuntu14Image: "trusty-server-cloudimg-amd64-disk1"
  ubuntu16Image: "xenial-server-cloudimg-amd64-disk1"
  openStackPrivateNetCidr: "10.0.0.0/16"
  openStackPrivateNetId: "TBD"
  openStackPrivateSubnetId: "TBD"
  openStackSecurityGroup: "TBD"
  openStackOamNetworkCidrPrefix: "10.0"
  dcaeCollectorIp: "yourhostip"
  vnfPubKey: "ssh-rsa AAAAB3NzaC1yc2EAAAADAQABAAABAQDKXDgoo3+WOqcUG8/5uUbk81+yczgwC4Y8ywTmuQqbNxlY1oQ0YxdMUqUnhitSXs5S/yRuAVOYHwGg2mCs20oAINrP+mxBI544AMIb9itPjCtgqtE2EWo6MmnFGbHB4Sx3XioE7F4VPsh7japsIwzOjbrQe+Mua1TGQ5d4nfEOQaaglXLLPFfuc7WbhbJbK6Q7rHqZfRcOwAMXgDoBqlyqKeiKwnumddo2RyNT8ljYmvB6buz7KnMinzo7qB0uktVT05FH9Rg0CTWH5norlG5qXgP2aukL0gk1ph8iAt7uYLf1ktp+LJI2gaF6L0/qli9EmVCSLr1uJ38Q8CBflhkh"
  demoArtifactsVersion: "1.4.0"
  demoArtifactsRepoUrl: "https://nexus.onap.org/content/repositories/releases"
  scriptVersion: "1.4.0"
  nfsIpAddress: "yourhostip"
  config:
    openStackEncryptedPasswordHere: "TBD"
    openStackSoEncryptedPassword: "TBD"
sdc:
  enabled: true
  config:
    environment:
      vnfRepoPort: 8703
  sdc-be:
    config:
      javaOptions: "-Xmx1g -Xms512m"
    liveness:
      periodSeconds: 300
      timeoutSeconds: 180
    readiness:
      periodSeconds: 300
      timeoutSeconds: 240
  sdc-fe:
    resources:
      small:
        limits:
          cpu: 1
          memory: 2Gi
        requests:
          cpu: 100m
          memory: 500Mi
sdnc:
  enabled: true

  replicaCount: 1

  mysql:
    replicaCount: 1
so:
  enabled: true
  so-catalog-db-adapter:
    config:
      openStackUserName: "TBD"
      openStackKeyStoneUrl: "http://10.12.25.2:5000/v3"
      openStackEncryptedPasswordHere: "TBD"
      openStackKeystoneVersion: "KEYSTONE_V3"
uui:
  enabled: false
vfc:
  enabled: false
vid:
  enabled: true
vnfsdk:
  enabled: true
|
If you want to use SO / Robot - you need to fill in proper properties in the override, this depends on your openstack instance / tenant
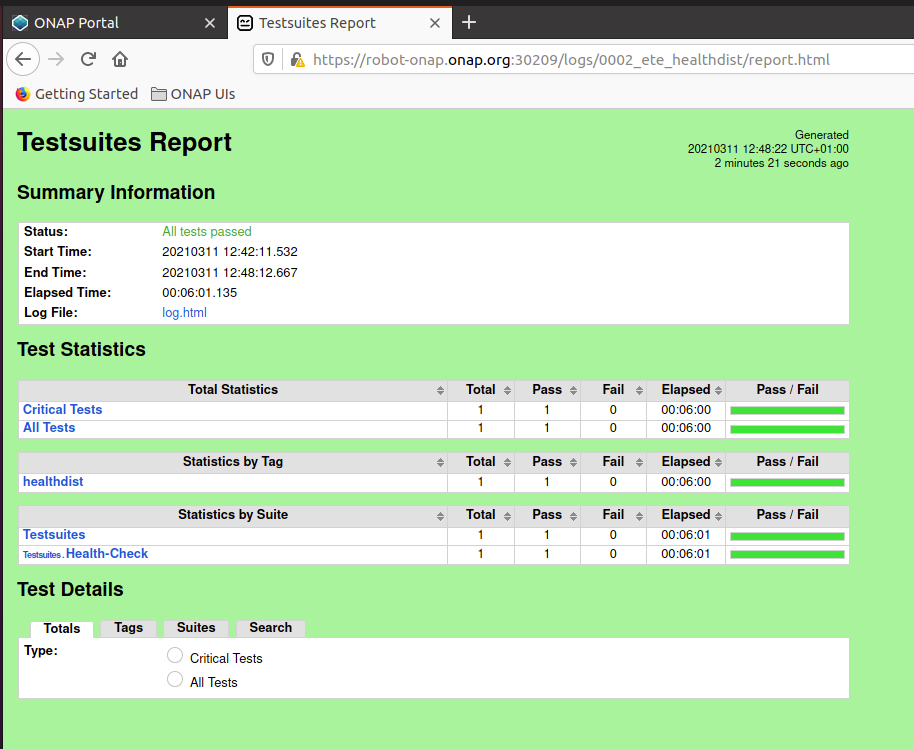
12) Run testsuites
If you have deployed the robot pod, you can perform some tests using the provided scripts in the oom repo
go to the oom/kubernetes/robot folder and run ete-k8s.sh to see the available test suites
| Code Block |
|---|
cd ~/oom/kubernetes/robot
./ete-k8s.sh |
to run a specific test suite, just provide the namespace and the testsuite tag, below is testing distribution with SDC (beware that some tests require the availability of several components to succeed)
| Code Block |
|---|
cd ~/oom/kubernetes/robot
./ete-k8s.sh onap healthdist |
the script will contact the robot pod within the cluster and execute the tests (may take a while)
| Code Block |
|---|
++ kubectl --namespace onap exec onap-robot-8569b648b9-5x49x -- /var/opt/ONAP/runTags.sh -V /share/config/robot_properties.py -v GLOBAL_BUILD_NUMBER:10433 -d /share/logs/0002_ete_healthdist -i healthdist --display 92
Starting Xvfb on display :92 with res 1280x1024x24
Executing robot tests at log level TRACE
==============================================================================
Testsuites
==============================================================================
/var/opt/ONAP/robot/library/paramiko/transport.py:33: CryptographyDeprecationWarning: Python 2 is no longer supported by the Python core team. Support for it is now deprecated in cryptography, and will be removed in a future release.
  from cryptography.hazmat.backends import default_backend
Testsuites.Health-Check :: Test that ONAP components are available via basi...
==============================================================================
Health Distribution Test                                              | PASS |
------------------------------------------------------------------------------
Testsuites.Health-Check :: Test that ONAP components are available... | PASS |
1 critical test, 1 passed, 0 failed
1 test total, 1 passed, 0 failed
==============================================================================
Testsuites                                                            | PASS |
1 critical test, 1 passed, 0 failed
1 test total, 1 passed, 0 failed
==============================================================================
Output:  /share/logs/0002_ete_healthdist/output.xml
Log:     /share/logs/0002_ete_healthdist/log.html
Report:  /share/logs/0002_ete_healthdist/report.html
|
if you have enabled UI access you can see the test logs in a browser by connecting to
https://robot-onap.onap.org:30209
(user/pass is test/test)

browse to the test suite you have started and open the folder, click the report.html to see robot test results