...
Sample Service Templates for Option 1:
| View file | ||
|---|---|---|
|
|
...
Table of Contents
Create Service Category
...
CST,ServiceProfile,AN SliceProfile,AN NF Slice Profile, CN SliceProfile,TN SliceProfile,NST, TN BH NSST, TN MH NSST, TN FH NSST, TN Network Requirement,AN NF NSST,CN NSST, AN NSST.
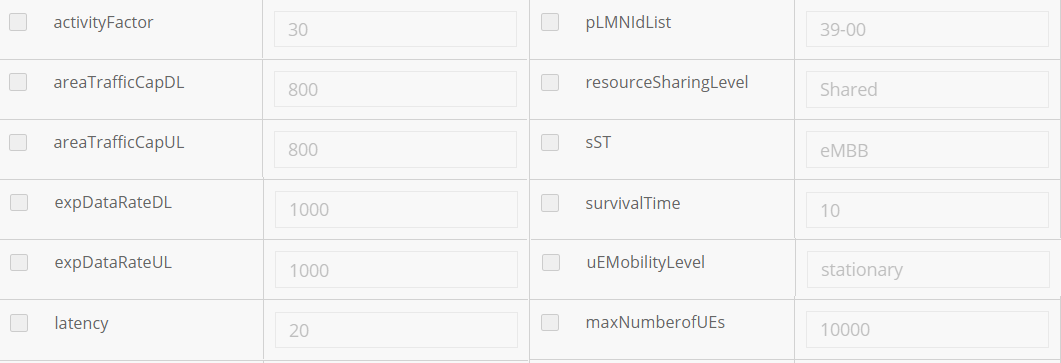
1.Create CN_NSST
...
- Suggest 'CN_NSST' as the name to indicate the meaning of the service.
- Select ‘CN NSST’ as Category.
- Provide 'ONAP_internal' as Service Role
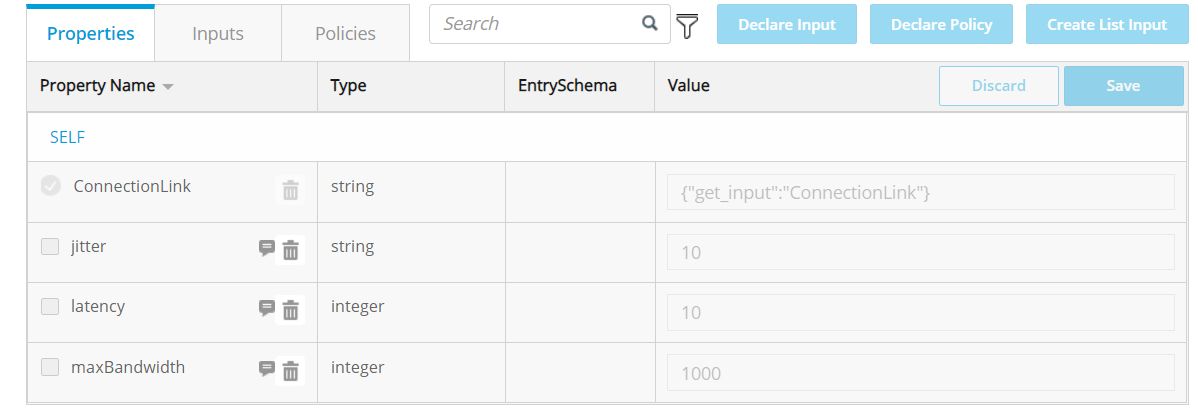
2. In Composition section, add artifacts at the service level:
a. Click an empty area in the canvas and click Deployment Artifacts (right pane).
b. Click 
c. Click Browse, upload the file provided bellow.
| View file | ||||
|---|---|---|---|---|
|
d. Select ’WORKFLOW‘ as type because SDC doesn't provide type extension and the ‘Ohter’ type is deleted in the latest version.
3. In Properties Assignment section,define Service properties.
a. Click 
c. Set property values as shown bellow.
...
NSST should be composed of network service(NS). For NS helm artifacts, CBA package and other design time activities, please follow below link:
https://wiki.onap.org/display/DW/5GC+Instantiation+and+Modify+Config+flow+through+CDS
E2E Network Slicing Meeting Notes for Oct 12, 2020 – Design Time Demo (32:00 - 58:00)
3. In Composition section, drag the elements of ‘Fiveg’(NS) from the Elements palette to the service canvas.
4. In Properties Assignment section,define Service properties.
a. Click
c. Set property values as shown bellow.
2.Create TN_Network_Req_T
Login SDC HOME page with Designer Role, add new service.
1. In the General section, complete all required fields.
- Suggest 'TN_Network_Req_T' as the name to indicate the meaning of the service.
- Select ‘TN Network Requirement’ as Category.
- Provide 'ONAP_internal' as Service Role
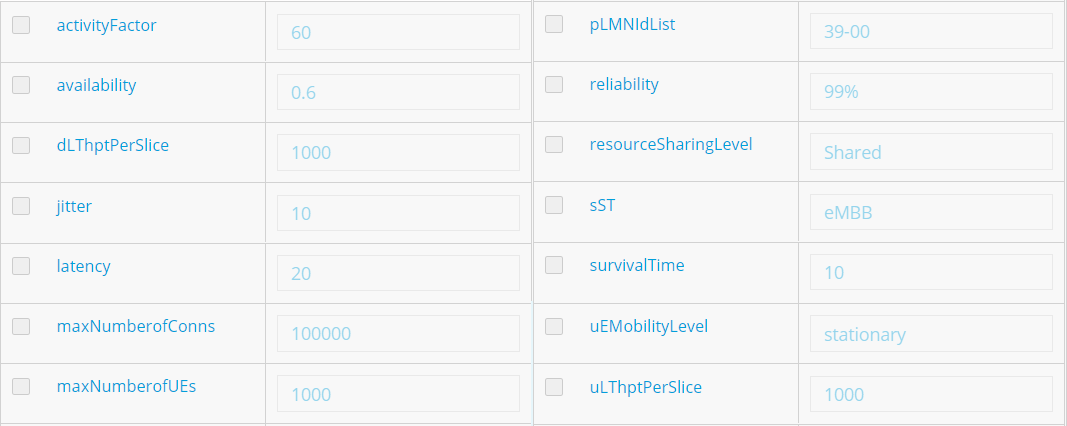
2. In Properties Assignment section, define the following service properties.
3. Distribute the service model and check the results.
3.Create TN_Network_Req_AR(Allotted Resource)
Login SDC HOME page with Designer Role and add VF.
1. In the General section, complete all required fields.
- Suggest 'TN_Network_Req_AR' as the name to indicate the meaning of the service.
- Select ‘Allotted Resource’ as Category.
- Provide 'ONAP' as Vendor Name.
- Provide '1.0' as Vendor Release.
2. In Composition section,search 'Allotted Resource', drag the element from the Elements palette to the service canvas.
3. In Properties Assignment section, define Service properties.
a. Click 'AllottedResource 0' in the right pane
b. Use the value of TN_Network_Req_T to set 'providing_service_invariant_uuid' and 'providing_service_uuid' and 'providing_service_name'.

4.Create TN_BH_NSST
Login SDC HOME page with Designer Role, add new service.
1. In the General section, complete all required fields.
- Suggest 'TN_BH_NSST' as the name to indicate the meaning of the service.
- Select ‘TN BH NSST’ as Category.
- Provide 'ONAP_internal' as Service Role
2. In Composition section,search 'TN_Network_Req_AR', drag the element from the Elements palette to the service canvas.
3.In Properties Assignment section, define the following service properties.

4. Distribute the service model and check the results.
5.Create TN_FH_AR(Allotted Resource)
Login SDC HOME page with Designer Role and add VF.
1. In the General section, complete all required fields.
- Suggest 'TN_FH_AR' as the name to indicate the meaning of the service.
- Select ‘Allotted Resource’ as Category.
- Provide 'ONAP' as Vendor Name.
- Provide '1.0' as Vendor Release.
2. In Composition section,search 'Allotted Resource', drag the element from the Elements palette to the service canvas.
3. In Properties Assignment section, define Service properties.
a. Click 'AllottedResource 0' in the right pane
b. Use the value of TN_Network_Req_T to set 'providing_service_invariant_uuid' and 'providing_service_uuid' and 'providing_service_name'.
6.Create TN_MH_AR(Allotted Resource)
Login SDC HOME page with Designer Role and add VF.
1. In the General section, complete all required fields.
- Suggest 'TN_MH_AR' as the name to indicate the meaning of the service.
- Select ‘Allotted Resource’ as Category.
- Provide 'ONAP' as Vendor Name.
- Provide '1.0' as Vendor Release.
2. In Composition section,search 'Allotted Resource', drag the element from the Elements palette to the service canvas.
3. In Properties Assignment section, define Service properties.
a. Click 'AllottedResource 0' in the right pane
b. Use the value of TN_Network_Req_T to set 'providing_service_invariant_uuid' and 'providing_service_uuid' and 'providing_service_name'.
7.Create TN_MH_NSST
Login SDC HOME page with Designer Role, add new service.
1. In the General section, complete all required fields.
- Suggest 'TN_MH_NSST' as the name to indicate the meaning of the service.
- Select ‘TN MH NSST’ as Category.
- Provide 'TRANSPORT' as Service Type.
- Provide 'TN_MH' as Service Role.
2. In Composition section,search 'TN_MH_AR', drag the element from the Elements palette to the service canvas.
8.Create TN_FH_NSST
Login SDC HOME page with Designer Role, add new service.
1. In the General section, complete all required fields.
- Suggest 'TN_FH_NSST' as the name to indicate the meaning of the service.
- Select ‘TN FH NSST’ as Category.
- Provide 'TRANSPORT' as Service Type.
- Provide 'TN_FH' as Service Role.
2. In Composition section,search 'TN_FH_AR', drag the element from the Elements palette to the service canvas.
9.Create NrtRIC_resource
Login SDC HOME page with Designer Role, add new serviceVF.
...
In the General section, complete all required fields.
- Suggest '
...
- NrtRIC_resource' as the name to indicate the meaning of the service.
- Select ‘
...
- Network
...
- Elements’ as Category.
- Provide '5G RAN' as Vendor Name.
- Provide '
...
- 1' as
...
- Vendor Release.
2. In Properties Assignment section, define the following service properties.
3. Distribute the service model and check the results.
...
Composition section,search 'ExtCP2' from Generic Category, drag the element from the Elements palette to the service canvas.
- Rename ExtCP2 as 'EP_E2'.
10.Create CUCP_Resource
Login SDC HOME page with Designer Role and add , add new VF.
1. In In the General section, complete all required fields.
- Suggest 'TN_Network_Req_ARCUCP_Resource' as the name to indicate the meaning of the service.
- Select ‘Allotted Resource’ ‘Network Elements’ as Category.
- Provide 'ONAP_internal' as Service Role'5G RAN' as Vendor Name
- Provide '1' as Vendor Release
2. In Composition section,search 'Allotted Resource', drag the element from the Elements palette to the service canvas.
3. In Properties Assignment section, define Service properties.
a. Click 'AllottedResource 0' in the right pane
b. Use the value of TN_Network_Req_T to set 'providing_service_invariant_uuid' and 'providing_service_uuid' and 'providing_service_name'.
...
'ExtCP2' from Generic Category, drag the element from the Elements palette to the service canvas.
- Rename ExtCP2 as 'EP_NG_c'.
- drag another 'ExtCP2' element from Generic Category and rename ExtCP2 as 'EP_E1'.
- drag another 'ExtCP2' element from Generic Category and rename ExtCP2 as 'EP_E2'.
- drag another 'ExtCP2' element from Generic Category and rename ExtCP2 as 'EP_F1C'.
11.Create CUUP_Resource
Login SDC HOME page with Designer Role, add new serviceVF.
...
In the General section, complete all required fields.
- Suggest '
...
- CUUP_
...
- Resource' as the name
...
- to indicate the meaning of the service.
- Select ‘Network Elements’ as Category.
- Provide '5G RAN' as Vendor Name
- Provide '1' as Vendor Release
2. In Composition section,search 'ExtCP2' from Generic Category, drag the element from the Elements palette to the service canvas.
- Rename ExtCP2 as 'EP_NG_u'.
- drag another 'ExtCP2' element from Generic Category and rename ExtCP2 as 'EP_E1'.
- drag another 'ExtCP2' element from Generic Category and rename ExtCP2 as 'EP_E2'.
- drag another 'ExtCP2' element from Generic Category and rename ExtCP2 as 'EP_F1U'.
12.Create DU_Resource
...
2. In Composition section,search 'TN_Network_Req_AR', drag the element from the Elements palette to the service canvas.
3.In Properties Assignment section, define the following service properties.
4. Distribute the service model and check the results.
...
Login SDC HOME page with Designer Role, add new serviceVF.
...
In the General section, complete all required fields
...
.
- Suggest 'DU_Resource' as the name to indicate the meaning of the service.
- Select ‘Network Elements’ as Category.
- Provide '5G RAN' as Vendor Name
- Provide '1' as Vendor Release
2. In Composition section,search 'ExtCP2' from Generic Category, drag the element from the Elements palette to the service canvas.
- Rename ExtCP2 as 'EP_E2'.
- drag another 'ExtCP2' element from Generic Category and rename ExtCP2 as 'EP_FH'.
- drag another 'ExtCP2' element from Generic Category and rename ExtCP2 as 'EP_F1C'.
- drag another 'ExtCP2' element from Generic Category and rename ExtCP2 as 'EP_F1U'.
13.Create RAN_NF Service Template
- Suggest 'TN_MH_NSST' as the name to indicate the meaning of the service.
- Select ‘TN MH NSST’ as Category.
- Provide 'ONAP_internal' as Service Role
2. In Composition section,search 'TN_Network_Req_AR', drag the element from the Elements palette to the service canvas.
...
Login SDC HOME page with Designer Role, add new service.
1. In the General section, complete all required fields.
- Suggest 'TNRAN_FH_NSST' as the name to indicate the meaning of the service.
- Select ‘TN FH NSST’ as Category.
- Provide 'ONAP_internal' as Service Role
2. In Composition section,search 'TN_Network_Req_AR', drag the element from the Elements palette to the service canvas.
7.Create RAN_NF Service Template
Login SDC HOME page with Designer Role, add new service.
1. In the General section, complete all required fields.
- Suggest 'RAN_NF_NSST' as the name to indicate the meaning of the service.
- Select ‘AN NF NSST’ as Category.
- NF_NSST' as the name to indicate the meaning of the service.
- Select ‘AN NF NSST’ as Category.
- Provide 'RAN' as Service Type.
- Provide 'AN_NF' as Service Role.
2. In Composition section,drag the elements of ‘NrtRIC_resource’,‘CUCP_Resource’,‘CUUP_Resource’, 'DU_Resource' from the Elements palette to the service canvas.
32. In Properties Assignment section,define Service properties.
...

...
14.Create TESTRANTOPNSST(TOP RAN Service Template)
Login SDC HOME page with Designer Role, add new service.
...
- Suggest 'TESTRANTOPNSST' as the name to indicate the meaning of the service.of the service.
- Select ‘AN NSST’ as Category.
- Provide 'RAN' as Service Type.
- Provide 'ONAP_internal' as Service RoleSelect ‘AN NSST’ as Category.
2. In Composition section,drag the elements of ‘RAN_NF_NSST’,‘TN_MH_NSST’,‘TN_FH_NSST’ from the Elements palette to the service canvas.
...
...
15.Create CN_AR(Allotted Resource)
Login SDC HOME page with Designer Role and add VF.
...
- Select ‘Allotted Resource’ as Category.
- Provide 'ONAP_internal' as Service Role' as Vendor Name.
- Provide '1.0' as Vendor Release.
2. In Composition section,search 'Allotted Resource', drag the element from the Elements palette to the service canvas.
...
b. Use the value of CN_NSST to set 'providing_service_invariant_uuid' and 'providing_service_uuid' and 'providing_service_name'.
...
16.Create Tn_BH_AR(Allotted Resource)
Login SDC HOME page with Designer Role and add VF.
1. In the General section, complete all required fields.
- Select ‘Allotted Resource’ as Category.
- Provide 'ONAP' as Vendor Name.
- Provide '1.0' as Vendor ReleaseSelect ‘Allotted Resource’ as Category.
2. In Composition section,search 'Allotted Resource', drag the element from the Elements palette to the service canvas.
...
b. Use the value of TN_BH_NSST to set 'providing_service_invariant_uuid' and 'providing_service_uuid' and 'providing_service_name'.
...
17.Create AN_AR(Allotted Resource)
Login SDC HOME page with Designer Role and add VF.
...
- Select ‘Allotted Resource’ as Category.
- Provide 'ONAP' as Vendor Name.
- Provide '1.0' as Vendor Release.
2. In Composition section,search 'Allotted Resource', drag the element from the Elements palette to the service canvas.
...
a. Click 'AllottedResource 0' in the right pane
b. Use the value of RAN_NSST TESTRANTOPNSST to set 'providing_service_invariant_uuid' and 'providing_service_uuid' and 'providing_service_name'.
...
18.Create NSTO1 Service Template
Login SDC HOME page with Designer Role, add new service.
...
- Suggest 'NSTO1' as the name to indicate the meaning of the service.
- Select ‘Network ServiceNST’ as Category.
- Suggest 'ONAP_iternalinternal' as Service Role
2. In Composition section,drag the elements of ‘AN_AR’,‘Tn_BH_AR’,‘CN_AR’ from the Elements palette to the service canvas.
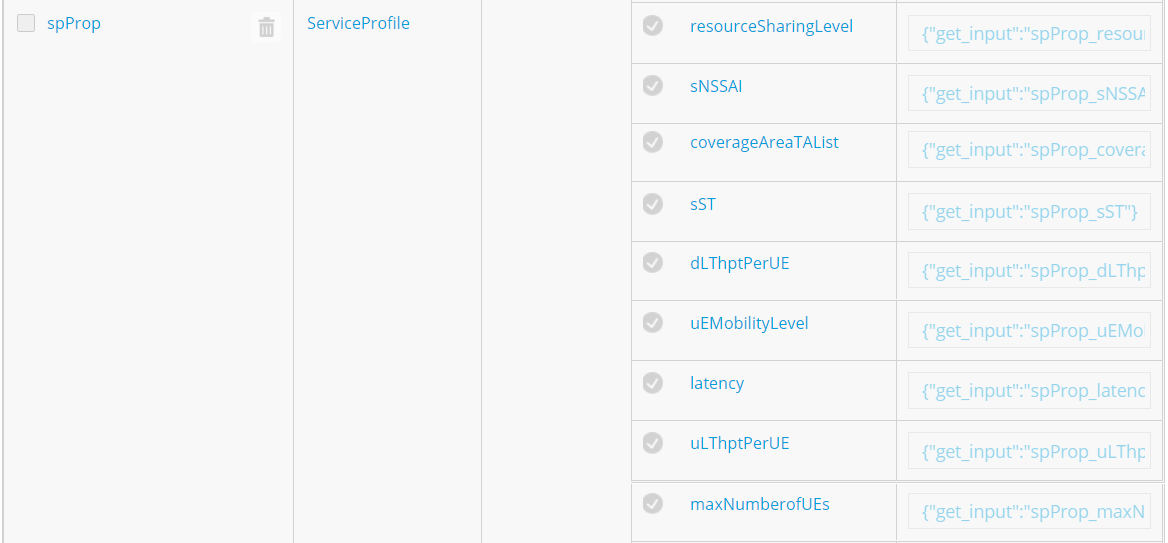
3. In Properties Assignment section, define Service properties.a. Click .
a. Click
Set property values as shown bellow.
...
19.Create Slice_AR(Allotted Resource)
Login SDC HOME page with Designer Role and add VF.
...
b. Select 'providing_service_invariant_uuid' and 'providing_service_uuid' and click Declare Input.

...
20.Create TN_SliceProfile Service Template
Login SDC HOME page with Designer Role, add new service.
...
4. Distribute the service model and check the results.
...
21.Create CN_SliceProfile Service Template
Login SDC HOME page with Designer Role, add new service.
...
...
22.Create SliceProfile_AN_NF_O1 Service Template
Login SDC HOME page with Designer Role, add new service.
...
4. Distribute the service model and check the results.
...
23.Create SliceProfile_AN_O1 Service Template
Login SDC HOME page with Designer Role, add new service.
...
2. In Composition section,drag the elements of ‘SliceProfile_AN_NF_O1’,‘TN_SliceProfile’ from the Elements palette to the service canvas.
...
24.Create ServiceProfile_O1 Service Template
Login SDC HOME page with Designer Role, add new service.
...
...
25.Create CST_O1 Service Template
Login SDC HOME page with Designer Role, add new service.
...
- Suggest 'CST_O1' as the name to indicate the meaning of the service.
- Select ‘CST’ as Category.
- Fill in the "Service Type" field with the value "embb"
2. In Composition section,search 'ServiceProfile_O2O1', drag the element from the Elements palette to the service canvas.
...