Overview
For ONAP SDN-R load and stress test and Proof of concept, June 19 a three node SDN-R cluster is used. Version is El Alto.
Precondition
- Running physical server cluster (The hardware requirements)
- OpenStack installed
- Virtual Machine cloud image Ubuntu 18.04-server-image
Goal of this description is to setup a complete ONAP with focus of SDNC services
Steps
- Installing Docker, Kubernetes and Rancher
- Initiation of HELM
- Downloading OOM charts
- Installation of all OOM based ONAP componnents
- Installation of Device Simulators
OpenStack Preparation
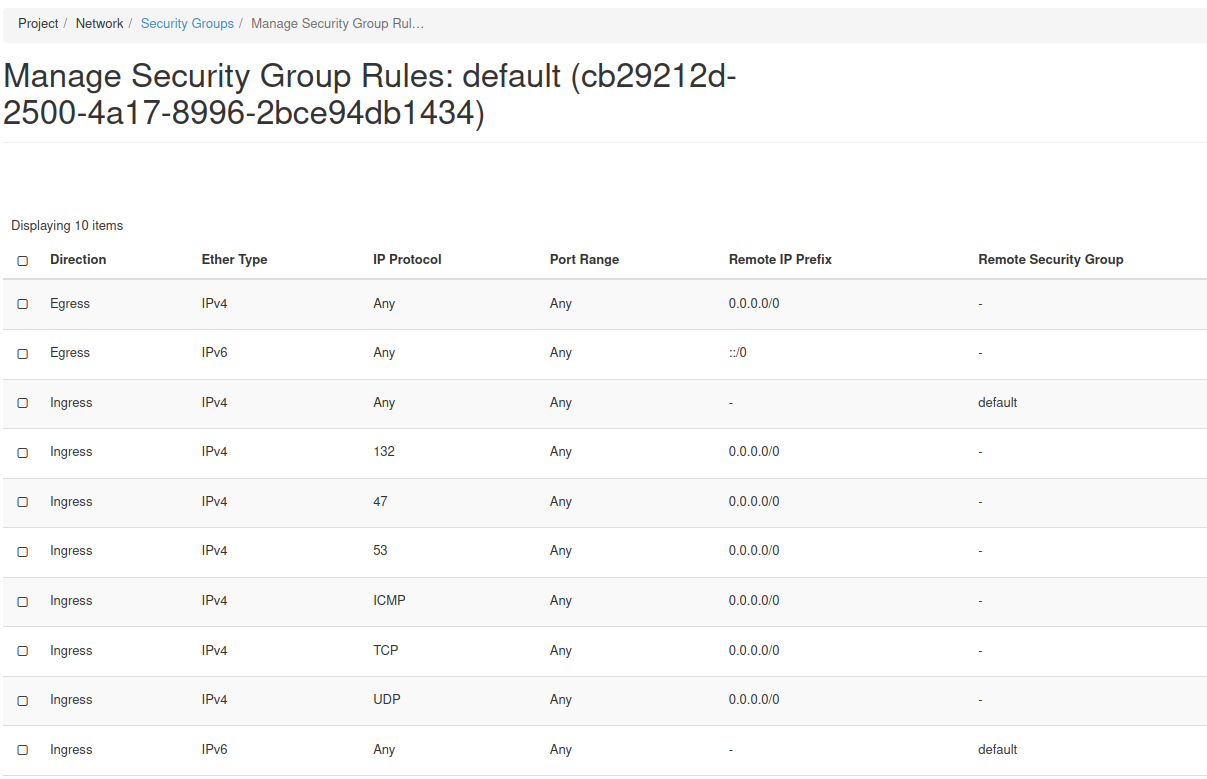
Required Security Groups Rules
Installing Kubernetes and Rancher
Create the Rancher 3 nodes control cluster named as onap-control on OpenStack
The following instructions describe how to create 3 OpenStack VMs to host the Highly-Available Kubernetes Control Plane. ONAP workloads will not be scheduled on these Control Plane nodes.
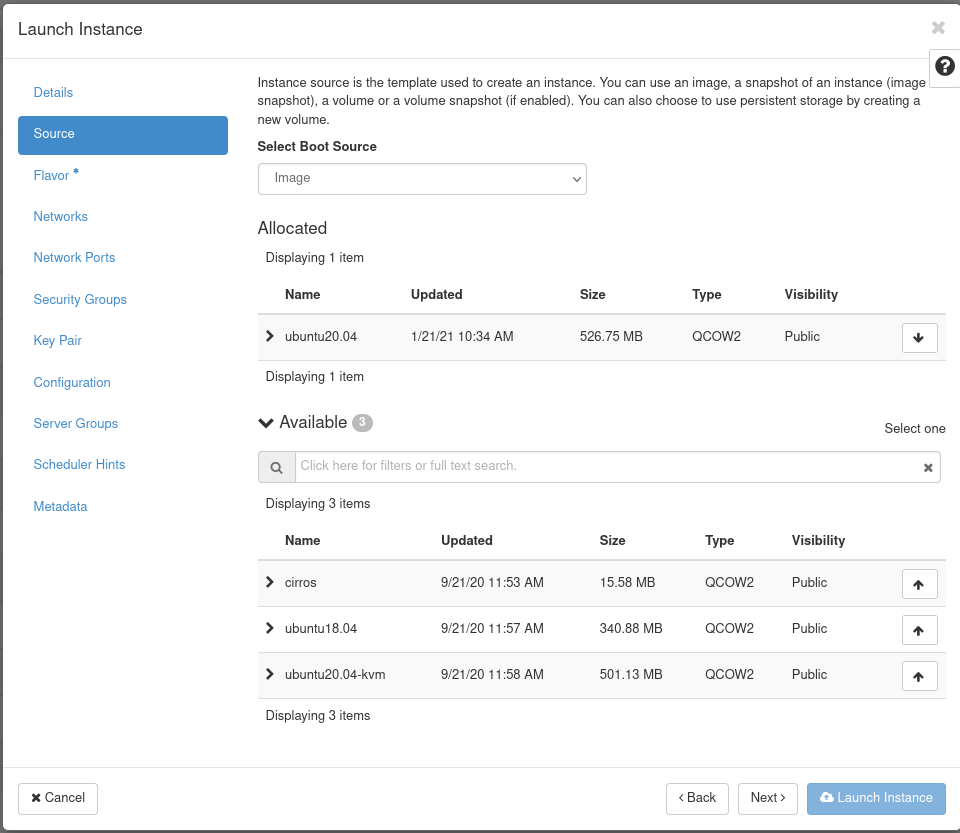
Launch new VMs in OpenStack.

Select Ubuntu 20.04 as the boot image for the virtual machine without any volume
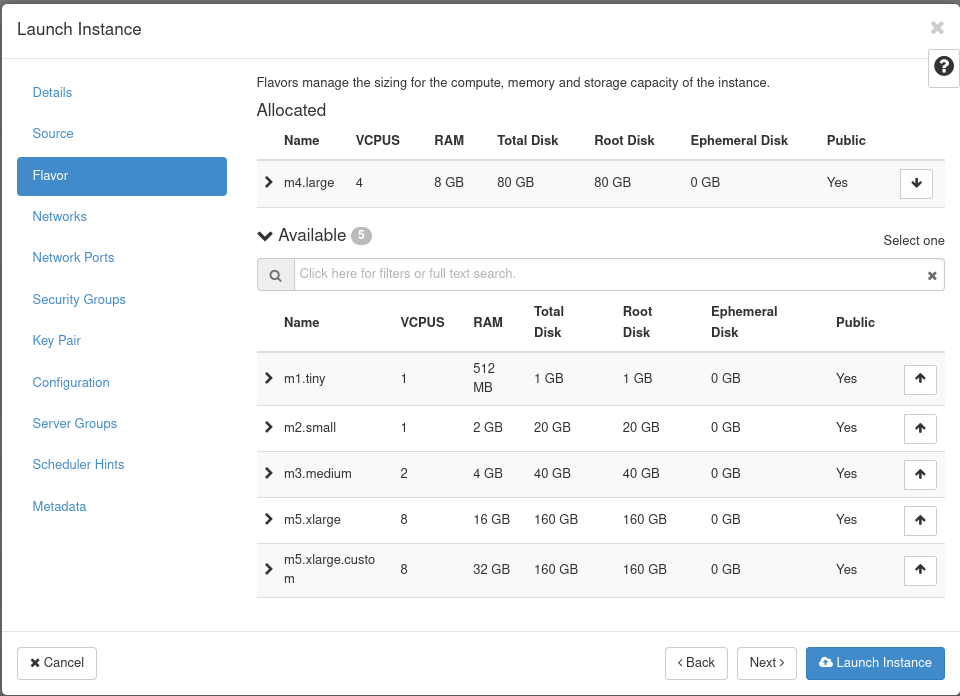
Select m4.large flavor
Networking

Apply customization script for Control Plane VMs

The script to be copied:
#!/bin/bash

DOCKER_VERSION=19.03.15

sudo apt-get update

curl https://releases.rancher.com/install-docker/$DOCKER_VERSION.sh | sh

cat > /etc/docker/daemon.json << EOF
{
"insecure-registries" : [ "nexus3.onap.org:10001" ],
"log-driver": "json-file",
"log-opts": {
"max-size": "1m",
"max-file": "9"
},
"mtu": 1450,
"ipv6": true,
"fixed-cidr-v6": "2001:db8:1::/64",
"registry-mirrors": ["https://nexus3.onap.org:10001"]
}
EOF

sudo usermod -aG docker ubuntu

sudo systemctl daemon-reload
sudo systemctl restart docker
sudo apt-mark hold docker-ce

IP_ADDR=`ip address |grep ens|grep inet|awk '{print $2}'| awk -F / '{print $1}'`
HOSTNAME=`hostname`

echo "$IP_ADDR $HOSTNAME" >> /etc/hosts

docker login -u docker -p docker nexus3.onap.org:10001

sudo apt-get install make -y

#nfs server
sudo apt-get install nfs-kernel-server -y
sudo mkdir -p /dockerdata-nfs
sudo chown nobody:nogroup /dockerdata-nfs/


exit 0
This customization script will:
- Update Ubuntu
- Install docker and hold the docker version to 19.03.15
- set hosts file with IP and hostname
- install nfs-kernel-server
Launched Instances

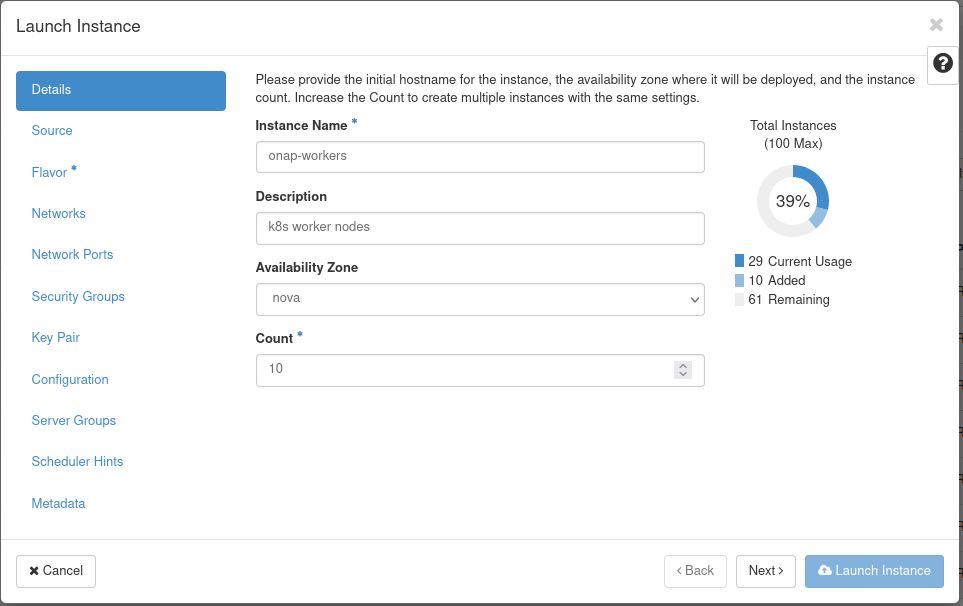
Create the Kubernetes 12 nodes worker cluster named as onap-workers on OpenStack cloud
The following instructions describe how to create OpenStack VMs to host the Highly-Available Kubernetes Workers. ONAP workloads will only be scheduled on these nodes.
Launch new VM instances in OpenStack
Select Ubuntu 20.04 as base image
Select Flavor
The size of Kubernetes hosts depend on the size of the ONAP deployment being installed.
If a small subset of ONAP applications are being deployed (i.e. for testing purposes), then 16GB or 32GB may be sufficient.

Networking
Apply customization script for Kubernetes VM(s)
The scrip to be copied:
#!/bin/bash

DOCKER_VERSION=19.03.15

sudo apt-get update

curl https://releases.rancher.com/install-docker/$DOCKER_VERSION.sh | sh

cat > /etc/docker/daemon.json << EOF
{
"insecure-registries" : [ "nexus3.onap.org:10001" ],
"log-driver": "json-file",
"log-opts": {
"max-size": "1m",
"max-file": "9"
},
"mtu": 1450,
"ipv6": true,
"fixed-cidr-v6": "2001:db8:1::/64",
"registry-mirrors": ["https://nexus3.onap.org:10001"]
}
EOF

sudo usermod -aG docker ubuntu

sudo systemctl daemon-reload
sudo systemctl restart docker
sudo apt-mark hold docker-ce

IP_ADDR=`ip address |grep ens|grep inet|awk '{print $2}'| awk -F / '{print $1}'`
HOSTNAME=`hostname`

echo "$IP_ADDR $HOSTNAME" >> /etc/hosts

docker login -u docker -p docker nexus3.onap.org:10001

sudo apt-get install make -y

# install nfs
sudo apt-get install nfs-common -y


exit 0
This customization script will:
- Update Ubuntu
- Install docker and hold the docker version to 19.03.15
- insert hostname and IP in the hosts file
- install nfs common
Launched onap-workers instances

Configure Rancher Kubernetes Engine
Install RKE
Download and install RKE on the onap-control-01 VM. Binaries can be found here for Linux and Mac: https://github.com/rancher/rke/releases/download/v1.2.7/
Perform this on the onap-control-01 VM which has key to access the created VMs.
In our setup, the key of OpenStack controller has also been placed in onap-control-01 and used to login into VMs, so these steps have been performed on onap-control-01 VM.
mkdir rke
cd rke/
wget https://github.com/rancher/rke/releases/download/v1.2.7/rke_linux-amd64
mv rke_linux-amd64 rke
chmod 754 rke

RKE requires a cluster.yml as input. An example file is show below that describes a Kubernetes cluster that will be mapped onto the OpenStack VMs created earlier in this guide.
Example: cluster.yml

The example file:
# An example of an HA Kubernetes cluster for ONAP
nodes:
- address: 10.31.4.11
  port: "22"
  role:
  - controlplane
  - etcd
  hostname_override: "onap-control-01"
  user: ubuntu
  ssh_key_path: "~/.ssh/id_ecdsa"
- address: 10.31.4.12
  port: "22"
  role:
  - controlplane
  - etcd
  hostname_override: "onap-control-02"
  user: ubuntu
  ssh_key_path: "~/.ssh/id_ecdsa"
- address: 10.31.4.13
  port: "22"
  role:
  - controlplane
  - etcd
  hostname_override: "onap-control-03"
  user: ubuntu
  ssh_key_path: "~/.ssh/id_ecdsa"
- address: 10.31.4.21
  port: "22"
  role:
  - worker
  hostname_override: "onap-workers-01"
  user: ubuntu
  ssh_key_path: "~/.ssh/id_ecdsa"
- address: 10.31.4.22
  port: "22"
  role:
  - worker
  hostname_override: "onap-workers-02"
  user: ubuntu
  ssh_key_path: "~/.ssh/id_ecdsa"
- address: 10.31.4.23
  port: "22"
  role:
  - worker
  hostname_override: "onap-workers-03"
  user: ubuntu
  ssh_key_path: "~/.ssh/id_ecdsa"
- address: 10.31.4.24
  port: "22"
  role:
  - worker
  hostname_override: "onap-workers-04"
  user: ubuntu
  ssh_key_path: "~/.ssh/id_ecdsa"
- address: 10.31.4.25
  port: "22"
  role:
  - worker
  hostname_override: "onap-workers-05"
  user: ubuntu
  ssh_key_path: "~/.ssh/id_ecdsa"
- address: 10.31.4.26
  port: "22"
  role:
  - worker
  hostname_override: "onap-workers-06"
  user: ubuntu
  ssh_key_path: "~/.ssh/id_ecdsa"
- address: 10.31.4.27
  port: "22"
  role:
  - worker
  hostname_override: "onap-workers-07"
  user: ubuntu
  ssh_key_path: "~/.ssh/id_ecdsa"
- address: 10.31.4.28
  port: "22"
  role:
  - worker
  hostname_override: "onap-workers-08"
  user: ubuntu
  ssh_key_path: "~/.ssh/id_ecdsa"
- address: 10.31.4.29
  port: "22"
  role:
  - worker
  hostname_override: "onap-workers-09"
  user: ubuntu
  ssh_key_path: "~/.ssh/id_ecdsa"
- address: 10.31.4.30
  port: "22"
  role:
  - worker
  hostname_override: "onap-workers-10"
  user: ubuntu
  ssh_key_path: "~/.ssh/id_ecdsa"
services:
  kube-api:
    service_cluster_ip_range: 10.43.0.0/16
    pod_security_policy: false
    always_pull_images: false
  kube-controller:
    cluster_cidr: 10.42.0.0/16
    service_cluster_ip_range: 10.43.0.0/16
  kubelet:
    cluster_domain: cluster.local
    cluster_dns_server: 10.43.0.10
    fail_swap_on: false
network:
  plugin: canal
authentication:
  strategy: x509
ssh_key_path: "~/.ssh/id_ecdsa"
ssh_agent_auth: false
authorization:
  mode: rbac
ignore_docker_version: false
kubernetes_version: "v1.19.9-rancher1-1"
private_registries:
- url: nexus3.onap.org:10001
  user: docker
  password: docker
  is_default: true
cluster_name: "onap"
restore:
  restore: false
  snapshot_name: ""
Prepare cluster.yml
Before this configuration file can be used the IP address must be mapped for each control and worker node in this file.
Run RKE
From within the same directory as the cluster.yml file, simply execute:
ubuntu@onap-control-01:~/rke$ ./rke up
./rke up
The output will look something like:
ubuntu@onap-control-01:~/rke$ ./rke up
INFO[0000] Running RKE version: v1.2.7
INFO[0000] Initiating Kubernetes cluster
INFO[0000] [dialer] Setup tunnel for host [10.31.4.26]
INFO[0000] [dialer] Setup tunnel for host [10.31.4.29]
INFO[0000] [dialer] Setup tunnel for host [10.31.4.24]
INFO[0000] [dialer] Setup tunnel for host [10.31.4.27]
INFO[0000] [dialer] Setup tunnel for host [10.31.4.25]
INFO[0000] [dialer] Setup tunnel for host [10.31.4.11]
INFO[0000] [dialer] Setup tunnel for host [10.31.4.22]
INFO[0000] [dialer] Setup tunnel for host [10.31.4.30]
INFO[0000] [dialer] Setup tunnel for host [10.31.4.21]
INFO[0000] [dialer] Setup tunnel for host [10.31.4.13]
INFO[0000] [dialer] Setup tunnel for host [10.31.4.28]
INFO[0000] [dialer] Setup tunnel for host [10.31.4.12]
INFO[0000] [dialer] Setup tunnel for host [10.31.4.23]
. . . .
. . . .
. . . .
INFO[0236] [sync] Successfully synced nodes Labels and Taints
INFO[0236] [network] Setting up network plugin: canal
INFO[0236] [addons] Saving ConfigMap for addon rke-network-plugin to Kubernetes
INFO[0236] [addons] Successfully saved ConfigMap for addon rke-network-plugin to Kubernetes
INFO[0236] [addons] Executing deploy job rke-network-plugin
INFO[0241] [addons] Setting up coredns
INFO[0241] [addons] Saving ConfigMap for addon rke-coredns-addon to Kubernetes
INFO[0241] [addons] Successfully saved ConfigMap for addon rke-coredns-addon to Kubernetes
INFO[0241] [addons] Executing deploy job rke-coredns-addon
INFO[0251] [addons] CoreDNS deployed successfully
INFO[0251] [dns] DNS provider coredns deployed successfully
INFO[0251] [addons] Setting up Metrics Server
INFO[0251] [addons] Saving ConfigMap for addon rke-metrics-addon to Kubernetes
INFO[0251] [addons] Successfully saved ConfigMap for addon rke-metrics-addon to Kubernetes
INFO[0251] [addons] Executing deploy job rke-metrics-addon
INFO[0256] [addons] Metrics Server deployed successfully
INFO[0256] [ingress] Setting up nginx ingress controller
INFO[0256] [addons] Saving ConfigMap for addon rke-ingress-controller to Kubernetes
INFO[0257] [addons] Successfully saved ConfigMap for addon rke-ingress-controller to Kubernetes
INFO[0257] [addons] Executing deploy job rke-ingress-controller
INFO[0262] [ingress] ingress controller nginx deployed successfully
INFO[0262] [addons] Setting up user addons
INFO[0262] [addons] no user addons defined
INFO[0262] Finished building Kubernetes cluster successfully
Validate RKE deployment
copy the file "kube_config_cluster.yml" to .kube directory on home of onap-control-01 VM.
ubuntu@onap-control-01:~/rke$ cd

ubuntu@onap-control-01:~$ mkdir .kube
ubuntu@onap-control-01:~$ cp rke/kube_config_cluster.yml .kube/
ubuntu@onap-control-01:~$ cd .kube/
ubuntu@onap-control-01:~/.kube$ ll
total 16
drwxrwxr-x 2 ubuntu ubuntu 4096 Jun 14 15:09 ./
drwxr-xr-x 8 ubuntu ubuntu 4096 Jun 14 15:09 ../
-rw-r----- 1 ubuntu ubuntu 5375 Jun 14 15:09 kube_config_cluster.yml
ubuntu@onap-control-01:~/.kube$ mv kube_config_cluster.yml config
ubuntu@onap-control-01:~/.kube$ ll
total 16
drwxrwxr-x 2 ubuntu ubuntu 4096 Jun 14 15:10 ./
drwxr-xr-x 8 ubuntu ubuntu 4096 Jun 14 15:09 ../
-rw-r----- 1 ubuntu ubuntu 5375 Jun 14 15:09 config
In "onap-control-1" vm download kubectl to execute kubectl commands for the cluster:
ubuntu@onap-control-01:~$ wget https://storage.googleapis.com/kubernetes-release/release/v1.19.9/bin/linux/amd64/kubectl
--2021-06-14 15:27:27--  https://storage.googleapis.com/kubernetes-release/release/v1.19.9/bin/linux/amd64/kubectl
Resolving storage.googleapis.com (storage.googleapis.com)... 142.250.72.112, 142.250.64.112, 142.250.64.80, ...
Connecting to storage.googleapis.com (storage.googleapis.com)|142.250.72.112|:443... connected.
HTTP request sent, awaiting response... 200 OK
Length: 42987520 (41M) [application/octet-stream]
Saving to: ‘kubectl.1’

kubectl.1                                          100%[===============================================================================================================>]  41.00M   128MB/s    in 0.3s

2021-06-14 15:27:31 (128 MB/s) - ‘kubectl.1’ saved [42987520/42987520]

ubuntu@onap-control-01:~$ chmod +x kubectl
ubuntu@onap-control-01:~$ sudo mv ./kubectl /usr/local/bin/kubectl
Perform these above operations on all control nodes as well as worker nodes to run kubectl and helm commands
Create "onap" namespace and set that as default in kubernetes.
ubuntu@onap-control-01:~$ kubectl create namespace onap

ubuntu@onap-control-01:~$ kubectl config set-context --current --namespace=onap
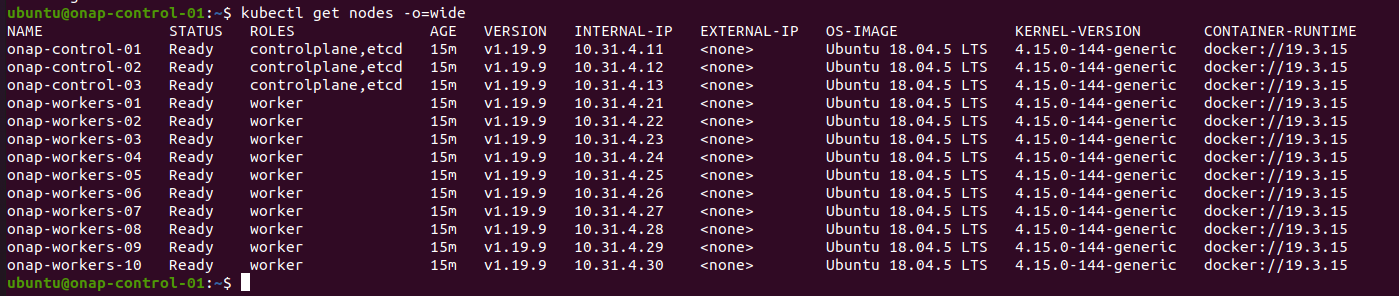
Verify the kubernetes cluster
ubuntu@onap-control-1:~$ kubectl get nodes -o=wide
Result:
Install Helm
ubuntu@onap-control-01:~$ wget https://get.helm.sh/helm-v3.5.2-linux-amd64.tar.gz
ubuntu@onap-control-01:~$ tar -zxvf helm-v3.5.2-linux-amd64.tar.gz
ubuntu@onap-control-01:~$ sudo mv linux-amd64/helm /usr/local/bin/helm

Initialize Kubernetes Cluster for use by Helm
Perform this on onap-control-1 VM only during the first setup.
Create folder for local charts repository on onap-control-01.
ubuntu@onap-control-01:~$ mkdir charts; chmod -R 777 charts
Run a docker server to serve local charts
ubuntu@onap-control-01:~$ docker run -d -p 8080:8080 -v $(pwd)/charts:/charts -e DEBUG=true -e STORAGE=local -e STORAGE_LOCAL_ROOTDIR=/charts chartmuseum/chartmuseum:latest
Install helm chartmuseum plugin
ubuntu@onap-control-01:~$ helm plugin install https://github.com/chartmuseum/helm-push.git
Setting up the NFS share for multinode kubernetes cluster:
Deploying applications to a Kubernetes cluster requires Kubernetes nodes to share a common, distributed filesystem. In this tutorial, we will setup an NFS Master, and configure all Worker nodes a Kubernetes cluster to play the role of NFS slaves.
It is recommneded that a separate VM, outside of the kubernetes cluster, be used. This is to ensure that the NFS Master does not compete for resources with Kubernetes Control Plane or Worker Nodes.
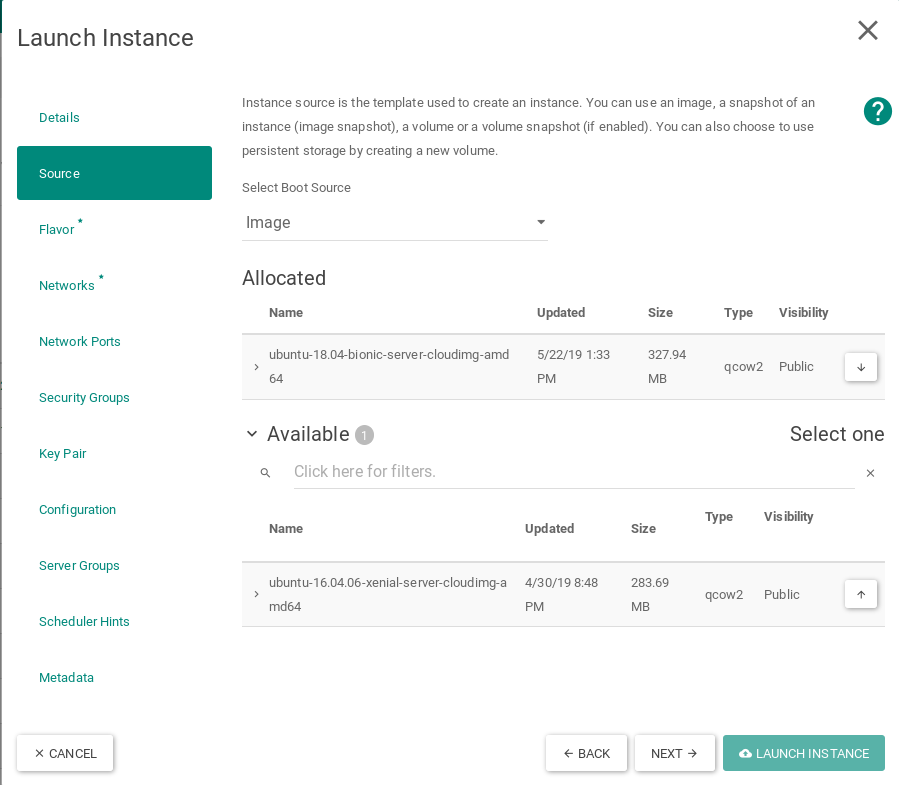
Launch new NFS Server VM instance
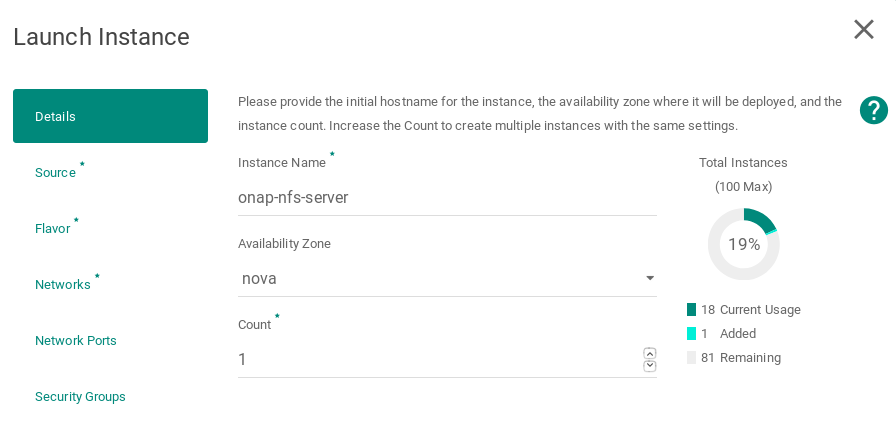
Select Ubuntu 18.04 as base image
Select Flavor

Networking

Apply customization script for NFS Server VM
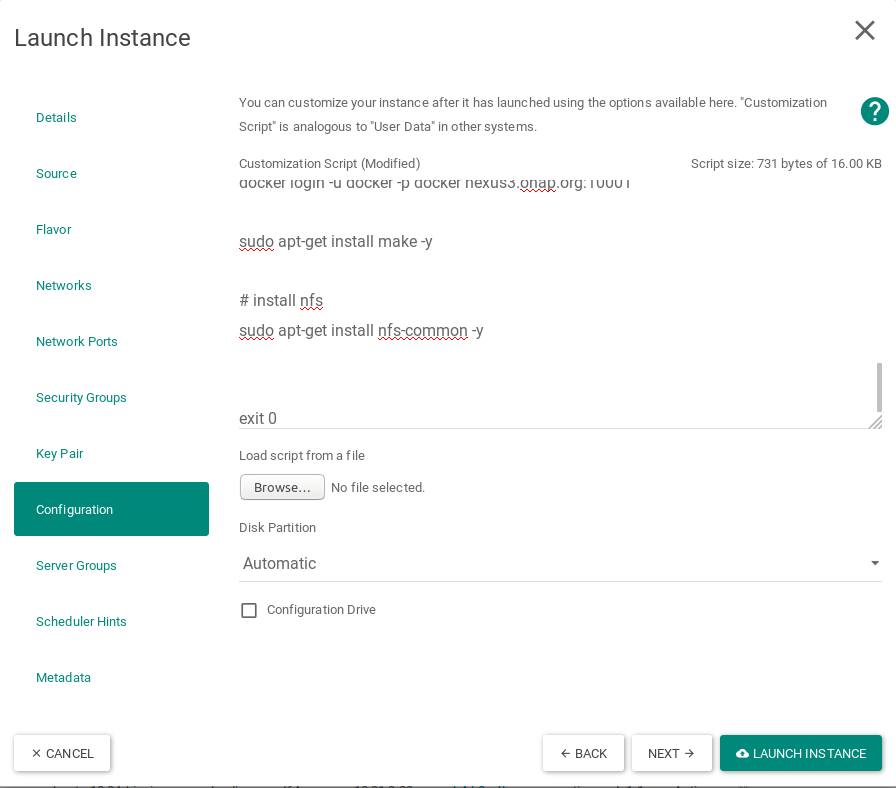
Script to be added:
#!/bin/bash

DOCKER_VERSION=18.09.5
export DEBIAN_FRONTEND=noninteractive
apt-get update

curl https://releases.rancher.com/install-docker/$DOCKER_VERSION.sh | sh
cat > /etc/docker/daemon.json << EOF
{
    "insecure-registries" : [ "nexus3.onap.org:10001","10.20.6.10:30000" ],
    "log-driver": "json-file",
    "log-opts": {
        "max-size": "1m",
        "max-file": "9"
    },
    "mtu": 1450,
    "ipv6": true,
    "fixed-cidr-v6": "2001:db8:1::/64",
    "registry-mirrors": ["https://nexus3.onap.org:10001"]
}
EOF

sudo usermod -aG docker ubuntu

systemctl daemon-reload
systemctl restart docker
apt-mark hold docker-ce

IP_ADDR=`ip address |grep ens|grep inet|awk '{print $2}'| awk -F / '{print $1}'`

HOSTNAME=`hostname`

sudo echo "$IP_ADDR $HOSTNAME" >> /etc/hosts

docker login -u docker -p docker nexus3.onap.org:10001

sudo apt-get install make -y

# install nfs
sudo apt-get install nfs-common -y

sudo apt update


exit 0
This customization script will:
- Install docker and hold the docker version to 18.09.5
- insert hostname and IP address of the onap-nfs-server in the hosts file
- install nfs server
Resulting example

Configure NFS Share on Master node
Login into onap-nfs-server and perform the below commands
Create a master_nfs_node.sh file as below:
#!/bin/bash

usage () {
  echo "Usage:"
  echo "   ./$(basename $0) node1_ip node2_ip ... nodeN_ip"
  exit 1
}

if [ "$#" -lt 1 ]; then
  echo "Missing NFS slave nodes"
  usage
fi

#Install NFS kernel
sudo apt-get update
sudo apt-get install -y nfs-kernel-server

#Create /dockerdata-nfs and set permissions
sudo mkdir -p /dockerdata-nfs
sudo chmod 777 -R /dockerdata-nfs
sudo chown nobody:nogroup /dockerdata-nfs/

#Update the /etc/exports
NFS_EXP=""
for i in $@; do
  NFS_EXP+="$i(rw,sync,no_root_squash,no_subtree_check) "
done
echo "/dockerdata-nfs "$NFS_EXP | sudo tee -a /etc/exports

#Restart the NFS service
sudo exportfs -a
sudo systemctl restart nfs-kernel-server
Make the above created file as executable and run the script in the onap-nfs-server with the IP's of the worker nodes:
chmod +x master_nfs_node.sh
sudo ./master_nfs_node.sh {list kubernetes worker nodes ip}
example from the WinLab setup:
sudo ./master_nfs_node.sh 10.31.4.21 10.31.4.22 10.31.4.23 10.31.4.24 10.31.4.25 10.31.4.26 10.31.4.27 10.31.4.28 10.31.4.29 10.31.4.30
Login into each kubernetes worker node, i.e. onap-k8s VMs and perform the below commands
Create a slave_nfs_node.sh file as below:
#!/bin/bash

usage () {
  echo "Usage:"
  echo "   ./$(basename $0) nfs_master_ip"
  exit 1
}

if [ "$#" -ne 1 ]; then
  echo "Missing NFS mater node"
  usage
fi

MASTER_IP=$1

#Install NFS common
sudo apt-get update
sudo apt-get install -y nfs-common

#Create NFS directory
sudo mkdir -p /dockerdata-nfs

#Mount the remote NFS directory to the local one
sudo mount $MASTER_IP:/dockerdata-nfs /dockerdata-nfs/
echo "$MASTER_IP:/dockerdata-nfs /dockerdata-nfs  nfs auto,nofail,noatime,nolock,intr,tcp,actimeo=1800 0 0" | sudo tee -a /etc/fstab
Make the above created file as executable and run the script in all the worker nodes:
chmod +x slave_nfs_node.sh
sudo ./slave_nfs_node.sh {master nfs node IP address}
example from the WinLab setup:
sudo ./slave_nfs_node.sh 10.31.3.11
ONAP Installation
Perform the following steps in onap-control-01 VM.
Clone the OOM helm repository
Perform these on the home directory
- Clone oom repository with recursive submodules option
- Add deploy plugin to helm
- Add undeploy plugin to helm
- Add helm local repository to the local running server
ubuntu@onap-control-01:~$ git clone -b master http://gerrit.onap.org/r/oom --recurse-submodules

ubuntu@onap-control-01:~$ helm plugin install ~/oom/kubernetes/helm/plugins/deploy

ubuntu@onap-control-01:~$ helm plugin install ~/oom/kubernetes/helm/plugins/undeploy

ubuntu@onap-control-01:~$ helm repo add local http://127.0.0.1:8080
Make charts from oom repository
Do not use sudo to perform the 'make' operation
This will take somewhere around 20-30 minutes of time to make all the helm charts and save the charts into local helm repository.
ubuntu@onap-control-01:~$ cd ~/oom/kubernetes; make all -e SKIP_LINT=TRUE; make onap -e SKIP_LINT=TRUE
Using Helm binary helm which is helm version v3.5.2

[common]
make[1]: Entering directory '/home/ubuntu/oom/kubernetes'
make[2]: Entering directory '/home/ubuntu/oom/kubernetes/common'

[common]
make[3]: Entering directory '/home/ubuntu/oom/kubernetes/common'
==> Linting common
[INFO] Chart.yaml: icon is recommended

1 chart(s) linted, 0 chart(s) failed
Pushing common-8.0.0.tgz to local...
Done.
make[3]: Leaving directory '/home/ubuntu/oom/kubernetes/common'

[repositoryGenerator]
make[3]: Entering directory '/home/ubuntu/oom/kubernetes/common'
==> Linting repositoryGenerator
[INFO] Chart.yaml: icon is recommended

1 chart(s) linted, 0 chart(s) failed
Pushing repositoryGenerator-8.0.0.tgz to local...
Done.
make[3]: Leaving directory '/home/ubuntu/oom/kubernetes/common'

[readinessCheck]
make[3]: Entering directory '/home/ubuntu/oom/kubernetes/common'
Hang tight while we grab the latest from your chart repositories...
...Successfully got an update from the "local" chart repository
Update Complete. ⎈Happy Helming!⎈
Saving 2 charts
Deleting outdated charts
==> Linting readinessCheck
[INFO] Chart.yaml: icon is recommended

..
..
..
..
[onap]
make[1]: Entering directory '/home/ubuntu/oom/kubernetes'
Hang tight while we grab the latest from your chart repositories...
...Successfully got an update from the "local" chart repository
Update Complete. ⎈Happy Helming!⎈
Saving 39 charts
Downloading aaf from repo http://127.0.0.1:8080
Downloading aai from repo http://127.0.0.1:8080
Downloading appc from repo http://127.0.0.1:8080
Downloading cassandra from repo http://127.0.0.1:8080
Downloading cds from repo http://127.0.0.1:8080
Downloading cli from repo http://127.0.0.1:8080
Downloading common from repo http://127.0.0.1:8080
Downloading consul from repo http://127.0.0.1:8080
Downloading contrib from repo http://127.0.0.1:8080
Downloading cps from repo http://127.0.0.1:8080
Downloading dcaegen2 from repo http://127.0.0.1:8080
Downloading dcaegen2-services from repo http://127.0.0.1:8080
Downloading dcaemod from repo http://127.0.0.1:8080
Downloading holmes from repo http://127.0.0.1:8080
Downloading dmaap from repo http://127.0.0.1:8080
Downloading esr from repo http://127.0.0.1:8080
Downloading log from repo http://127.0.0.1:8080
Downloading sniro-emulator from repo http://127.0.0.1:8080
Downloading mariadb-galera from repo http://127.0.0.1:8080
Downloading msb from repo http://127.0.0.1:8080
Downloading multicloud from repo http://127.0.0.1:8080
Downloading nbi from repo http://127.0.0.1:8080
Downloading policy from repo http://127.0.0.1:8080
Downloading portal from repo http://127.0.0.1:8080
Downloading oof from repo http://127.0.0.1:8080
Downloading repository-wrapper from repo http://127.0.0.1:8080
Downloading robot from repo http://127.0.0.1:8080
Downloading sdc from repo http://127.0.0.1:8080
Downloading sdnc from repo http://127.0.0.1:8080
Downloading so from repo http://127.0.0.1:8080
Downloading uui from repo http://127.0.0.1:8080
Downloading vfc from repo http://127.0.0.1:8080
Downloading vid from repo http://127.0.0.1:8080
Downloading vnfsdk from repo http://127.0.0.1:8080
Downloading modeling from repo http://127.0.0.1:8080
Downloading platform from repo http://127.0.0.1:8080
Downloading a1policymanagement from repo http://127.0.0.1:8080
Downloading cert-wrapper from repo http://127.0.0.1:8080
Downloading roles-wrapper from repo http://127.0.0.1:8080
Deleting outdated charts
Skipping linting of onap
Pushing onap-8.0.0.tgz to local...
Done.
make[1]: Leaving directory '/home/ubuntu/oom/kubernetes'
ubuntu@onap-control-01:~/oom/kubernetes$
Deploying ONAP
Deploying ONAP with helm command
ubuntu@onap-control-01:~/oom/kubernetes$ helm deploy demo local/onap --namespace onap --set global.masterPassword=WinLab_NetworkSlicing -f onap/resources/overrides/onap-all.yaml -f onap/resources/overrides/environment.yaml -f onap/resources/overrides/openstack.yaml --timeout 900s
Verify the deploy
ubuntu@onap-control-01:~$ helm ls -n onap<
NAME               	REVISION	UPDATED                 	STATUS  	CHART               	APP VERSION	NAMESPACE
demo               	1       	Fri Nov 29 16:26:16 2019	DEPLOYED	onap-5.0.0          	El Alto    	onap
demo-aaf           	1       	Fri Nov 29 16:26:17 2019	DEPLOYED	aaf-5.0.0           	           	onap
demo-aai           	1       	Fri Nov 29 16:26:28 2019	DEPLOYED	aai-5.0.0           	           	onap
demo-appc          	1       	Fri Nov 29 16:27:30 2019	DEPLOYED	appc-5.0.0          	           	onap
demo-cassandra     	1       	Fri Nov 29 16:27:41 2019	DEPLOYED	cassandra-5.0.0     	           	onap
demo-cds           	1       	Fri Nov 29 16:27:56 2019	DEPLOYED	cds-5.0.0           	           	onap
demo-clamp         	1       	Fri Nov 29 16:28:58 2019	DEPLOYED	clamp-5.0.0         	           	onap
demo-cli           	1       	Fri Nov 29 16:29:31 2019	DEPLOYED	cli-5.0.0           	           	onap
demo-consul        	1       	Fri Nov 29 16:29:45 2019	DEPLOYED	consul-5.0.0        	           	onap
demo-contrib       	1       	Fri Nov 29 16:30:04 2019	DEPLOYED	contrib-5.0.0       	           	onap
demo-dcaegen2      	1       	Fri Nov 29 16:31:03 2019	DEPLOYED	dcaegen2-5.0.0      	           	onap
demo-dmaap         	1       	Fri Nov 29 16:35:47 2019	DEPLOYED  	dmaap-5.0.0         	           	onap
demo-esr           	1       	Fri Nov 29 16:50:24 2019	DEPLOYED	esr-5.0.0           	           	onap
demo-log           	1       	Fri Nov 29 16:50:38 2019	DEPLOYED	log-5.0.0           	           	onap
demo-mariadb-galera	1       	Fri Nov 29 16:51:08 2019	DEPLOYED	mariadb-galera-5.0.0	           	onap
demo-modeling      	1       	Fri Nov 29 16:51:29 2019	DEPLOYED	modeling-5.0.0      	           	onap
demo-msb           	1       	Fri Nov 29 16:51:45 2019	DEPLOYED	msb-5.0.0           	           	onap
demo-multicloud    	1       	Fri Nov 29 16:52:23 2019	DEPLOYED	multicloud-5.0.0    	           	onap
demo-nbi           	1       	Fri Nov 29 16:53:26 2019	DEPLOYED	nbi-5.0.0           	           	onap
demo-oof           	1       	Fri Nov 29 16:54:03 2019	DEPLOYED	oof-5.0.0           	           	onap
demo-policy        	1       	Fri Nov 29 16:56:27 2019	DEPLOYED	policy-5.0.0        	           	onap
demo-pomba         	1       	Fri Nov 29 16:59:13 2019	DEPLOYED	pomba-5.0.0         	           	onap
demo-portal        	1       	Fri Nov 29 17:01:44 2019	DEPLOYED	portal-5.0.0        	           	onap
demo-robot         	1       	Fri Nov 29 17:03:10 2019	DEPLOYED	robot-5.0.0         	           	onap
demo-sdc           	1       	Fri Nov 29 17:03:24 2019	DEPLOYED	sdc-5.0.0           	           	onap
demo-sdnc          	1       	Fri Nov 29 17:05:27 2019	DEPLOYED	sdnc-5.0.0          	           	onap
demo-sniro-emulator	1       	Fri Nov 29 17:08:24 2019	DEPLOYED	sniro-emulator-5.0.0	           	onap
demo-so            	1       	Fri Nov 29 17:10:33 2019	DEPLOYED	so-5.0.0            	           	onap
demo-uui           	1       	Fri Nov 29 17:24:55 2019	DEPLOYED	uui-5.0.0           	           	onap
demo-vfc           	1       	Fri Nov 29 17:24:59 2019	DEPLOYED	vfc-5.0.0           	           	onap
demo-vid           	1       	Fri Nov 29 17:26:05 2019	DEPLOYED	vid-5.0.0           	           	onap
demo-vnfsdk        	1       	Fri Nov 29 17:26:38 2019	DEPLOYED	vnfsdk-5.0.0        	           	onap
ubuntu@onap-control-1:~/oom/kubernetes$
In case of failures in deployment
If the deployment of any onap module fails, please go through these steps to redeploy the modules.
In this example, we demonstrate failure of dmaap, which normally occurs due to timeout issues.
Check the failed modules
perform 'helm ls' on the control node.
ubuntu@onap-control-1:~/overrides$ helm ls
NAME               	REVISION	UPDATED                 	STATUS  	CHART               	APP VERSION	NAMESPACE
demo               	1       	Fri Nov 29 16:26:16 2019	DEPLOYED	onap-5.0.0          	El Alto    	onap
demo-aaf           	1       	Fri Nov 29 16:26:17 2019	DEPLOYED	aaf-5.0.0           	           	onap
demo-aai           	1       	Fri Nov 29 16:26:28 2019	DEPLOYED	aai-5.0.0           	           	onap
demo-appc          	1       	Fri Nov 29 16:27:30 2019	DEPLOYED	appc-5.0.0          	           	onap
demo-cassandra     	1       	Fri Nov 29 16:27:41 2019	DEPLOYED	cassandra-5.0.0     	           	onap
demo-cds           	1       	Fri Nov 29 16:27:56 2019	DEPLOYED	cds-5.0.0           	           	onap
demo-clamp         	1       	Fri Nov 29 16:28:58 2019	DEPLOYED	clamp-5.0.0         	           	onap
demo-cli           	1       	Fri Nov 29 16:29:31 2019	DEPLOYED	cli-5.0.0           	           	onap
demo-consul        	1       	Fri Nov 29 16:29:45 2019	DEPLOYED	consul-5.0.0        	           	onap
demo-contrib       	1       	Fri Nov 29 16:30:04 2019	DEPLOYED	contrib-5.0.0       	           	onap
demo-dcaegen2      	1       	Fri Nov 29 16:31:03 2019	DEPLOYED	dcaegen2-5.0.0      	           	onap
demo-dmaap         	1       	Mon Dec  2 05:45:05 2019	FAILED  	dmaap-5.0.0         	           	onap
demo-esr           	1       	Fri Nov 29 16:50:24 2019	DEPLOYED	esr-5.0.0           	           	onap
demo-log           	1       	Fri Nov 29 16:50:38 2019	DEPLOYED	log-5.0.0           	           	onap
demo-mariadb-galera	1       	Fri Nov 29 16:51:08 2019	DEPLOYED	mariadb-galera-5.0.0	           	onap
demo-modeling      	1       	Fri Nov 29 16:51:29 2019	DEPLOYED	modeling-5.0.0      	           	onap
demo-msb           	1       	Fri Nov 29 16:51:45 2019	DEPLOYED	msb-5.0.0           	           	onap
demo-multicloud    	1       	Fri Nov 29 16:52:23 2019	DEPLOYED	multicloud-5.0.0    	           	onap
demo-nbi           	1       	Fri Nov 29 16:53:26 2019	DEPLOYED	nbi-5.0.0           	           	onap
demo-oof           	1       	Mon Dec  2 07:04:11 2019	DEPLOYED	oof-5.0.0           	           	onap
demo-policy        	1       	Fri Nov 29 16:56:27 2019	DEPLOYED	policy-5.0.0        	           	onap
demo-pomba         	1       	Fri Nov 29 16:59:13 2019	DEPLOYED	pomba-5.0.0         	           	onap
demo-portal        	1       	Fri Nov 29 17:01:44 2019	DEPLOYED	portal-5.0.0        	           	onap
demo-robot         	1       	Fri Nov 29 17:03:10 2019	DEPLOYED	robot-5.0.0         	           	onap
demo-sdc           	1       	Fri Nov 29 17:03:24 2019	DEPLOYED	sdc-5.0.0           	           	onap
demo-sdnc          	1       	Fri Nov 29 17:05:27 2019	DEPLOYED	sdnc-5.0.0          	           	onap
demo-sniro-emulator	1       	Fri Nov 29 17:08:24 2019	DEPLOYED	sniro-emulator-5.0.0	           	onap
demo-so            	1       	Mon Dec  2 08:58:33 2019	DEPLOYED	so-5.0.0            	           	onap
demo-uui           	1       	Fri Nov 29 17:24:55 2019	DEPLOYED	uui-5.0.0           	           	onap
demo-vfc           	1       	Fri Nov 29 17:24:59 2019	DEPLOYED	vfc-5.0.0           	           	onap
demo-vid           	1       	Fri Nov 29 17:26:05 2019	DEPLOYED	vid-5.0.0           	           	onap
demo-vnfsdk        	1       	Fri Nov 29 17:26:38 2019	DEPLOYED	vnfsdk-5.0.0        	           	onap
Delete the failed module
use the right release name from the name as shown in helm ls.
The below commands will delete all the pods and dependencies.
helm delete demo-dmaap --purge
kubectl get persistentvolumeclaims -n onap | grep demo-dmaap | sed -r 's/(^[^ ]+).*/kubectl delete persistentvolumeclaims -n onap \1/' | bash
kubectl get persistentvolumes      -n onap | grep demo-dmaap | sed -r 's/(^[^ ]+).*/kubectl delete persistentvolumes      -n onap \1/' | bash
kubectl get secrets                -n onap | grep demo-dmaap | sed -r 's/(^[^ ]+).*/kubectl delete secrets                -n onap \1/' | bash
kubectl get clusterrolebindings    -n onap | grep demo-dmaap | sed -r 's/(^[^ ]+).*/kubectl delete clusterrolebindings    -n onap \1/' | bash
kubectl get jobs                   -n onap | grep demo-dmaap | sed -r 's/(^[^ ]+).*/kubectl delete jobs                   -n onap \1/' | bash
kubectl get pods                   -n onap | grep demo-dmaap | sed -r 's/(^[^ ]+).*/kubectl delete pods                   -n onap \1/' | bash
Delete any residue data from onap-nfs-server.
cd /dockerdata-nfs/
sudo rm -r demo-dmaap/
Reinstall module
Reinstall the deleted module with the same release name as used in the deletion
helm install --namespace onap -n demo-dmaap local/dmaap --timeout 900
You can verify the deployment in a parallel terminal by checking the pods using the command
kubectl get pods -n onap | grep demo-dmaap
This shall show you the status of the upcoming pods during the deployment wait time.
Once this is deployed, you can verify using the "helm ls" command to check all the required modules are up and running.
Undeploy ONAP
For the release name 'demo' and namespace 'onap':
Perform these below commands in onap-control-1 where the helm was deployed.
helm undeploy demo --purge
kubectl get persistentvolumeclaims -n onap | grep demo | sed -r 's/(^[^ ]+).*/kubectl delete persistentvolumeclaims -n onap \1/' | bash
kubectl get persistentvolumes      -n onap | grep demo | sed -r 's/(^[^ ]+).*/kubectl delete persistentvolumes      -n onap \1/' | bash
kubectl get secrets                -n onap | grep demo | sed -r 's/(^[^ ]+).*/kubectl delete secrets                -n onap \1/' | bash
kubectl get clusterrolebindings    -n onap | grep demo | sed -r 's/(^[^ ]+).*/kubectl delete clusterrolebindings    -n onap \1/' | bash
kubectl get jobs                   -n onap | grep demo | sed -r 's/(^[^ ]+).*/kubectl delete jobs                   -n onap \1/' | bash
kubectl get pods                   -n onap | grep demo | sed -r 's/(^[^ ]+).*/kubectl delete pods                   -n onap \1/' | bash
Perform the below commands in onap-nfs-server.
This is to delete all the network shared data which will not be deleted on purge delete of helm release.
cd /dockerdata-nfs/
sudo rm -r *

e.g.
ubuntu@onap-nfs-server:~$ cd /dockerdata-nfs/
ubuntu@onap-nfs-server:/dockerdata-nfs$ sudo rm -r *
Access SDN-R
ODLUX-GUI at winlab
The {user} should be replaced by your user id created in orbit-lab.
ssh -A -t {user}@console.sb10.orbit-lab.org -L 31939:localhost:31939 ssh -A -t native@node1-1.sb10.orbit-lab.org -L 31939:localhost:31939 ssh -A -t ubuntu@10.31.3.2 -L 31939:localhost:31939
On your browser:
http://localhost:31939/odlux/index.html
The login credentials are:
username: admin
password: Kp8bJ4SXszM0WXlhak3eHlcse2gAw84vaoGGmJvUy2U
ODLUX-GUI at your labs
Check the IP on the sdnc service bound to port 8282:
ubuntu@onap-control-1:~$ kubectl get service | grep sdnc
pomba-sdncctxbuilder               ClusterIP      10.43.145.187   <none>                                 9530/TCP                                                      2d18h
sdnc                               NodePort       10.43.103.106   <none>                                 8282:31939/TCP,8202:31510/TCP,8280:30246/TCP,8443:30267/TCP   7m52s
sdnc-ansible-server                ClusterIP      10.43.113.226   <none>                                 8000/TCP                                                      7m52s
sdnc-cluster                       ClusterIP      None            <none>                                 2550/TCP                                                      7m52s
sdnc-dgbuilder                     NodePort       10.43.62.50     <none>                                 3000:30203/TCP                                                7m52s
sdnc-dmaap-listener                ClusterIP      None            <none>                                 <none>                                                        7m52s
sdnc-portal                        NodePort       10.43.116.73    <none>                                 8443:30201/TCP                                                7m52s
sdnc-ueb-listener                  ClusterIP      None            <none>                                 <none>                                                        7m52s
so-sdnc-adapter                    ClusterIP      10.43.27.8      <none>                                 8086/TCP                                                      142m
vfc-zte-sdnc-driver                ClusterIP      10.43.189.170   <none>                                 8411/TCP                                                      2d17h
Look for sdnc service only and the port bound to 8282.
In the above result it is 31939.
http://{ip-address}:{sdnc-port-bound-to-8282}/odlux/index.html
The {ip-address} is the IP address of the onap-control-1 machine.
Troubleshooting
Documentation for troubleshooting.
ES-DB index read only – NFS out of disc space
ONAP log (elastic DB) consumes approx 1 GB per day. If disc space crosses a threshold, indindices of SDNC elastic DB are set to read-only.
** FORBIDDEN/12/index read-only / allow delete (api)] **
Housekeeping of elastic db can be done by Curator.
install curator
pip install elasticsearch-curator
#show indices with size
curator_cli show_indices --verbose
curator_cli show_indices --verbose|wc -l
# delete older indices
# test with dry run
curator --dry-run delete_index.yml
# delete!
curator delete_index.yml
delete_index.yml
---
actions:
  1:
    action: delete_indices
    description: >-
      Delete indices older than 45 days (based on index name), for logstash-
      prefixed indices. Ignore the error if the filter does not result in an
      actionable list of indices (ignore_empty_list) and exit cleanly.
    options:
      ignore_empty_list: True
      timeout_override:
      continue_if_exception: False
      disable_action: False
    filters:
    - filtertype: pattern
      kind: prefix
      value: logstash-
      exclude:
    - filtertype: age
      source: name
      direction: older
      timestring: '%Y.%m.%d'
      unit: days
      unit_count: 30
      exclude:
configuration of curator:
/home/ubuntu/.curator/curator.yml for curator-cli
/etc/curator/config.yaml for curator
client:
  hosts:
    - 127.0.0.1
  port: 30254
  url_prefix:
  use_ssl: False
  certificate:
  client_cert:
  client_key:
  ssl_no_validate: False
  http_auth:
  timeout: 30
  master_only: False

logging:
  loglevel: INFO
  logfile:
Define as a cron job (e.g. every 24h)
00 6 * * * root curator /home/ubuntu/curator/delete-indices.yml — config /etc/curator/config.yml
Set SDNC elastic DB indices back to read-write
PUT _settings
    {
    "index": {
    "blocks": {
    "read_only_allow_delete": "false"
    }
    }
    }
helm repo add local http://127.0.0.1:8080