In this tutorial we show how to take a service design that has been distributed and create a running instance of the service. To simplify this we are going to use scripts (with some selenium robot scripts) to create the design, pre-load customer and network information, and orchestrate parts of the virtual firewall closed loop example. The following steps assume that you have completed and understand basic concepts from the setting up the platform and using the portal tutorials.
Let's start by finding the IP Address of vm1-robot in the Rackspace list of servers. Use this vm1-robot IP address, your Rackspace private key, and the PuTTY client to login to vm1-robot as root.
Note: The current default LCP Region is IAD - to use DFW switch the example zip in the last section.
osx$ ssh-add onap_rsa osx$ ssh root@104.130.170.232 |
|---|
At the command prompt type
root@vm1-robot:~# cd /opt root@vm1-robot:/opt# ls config demo.sh docker ete.sh eteshare robot_vm_init.sh testsuite root@vm1-robot:/opt# ./demo.sh init |
|---|
Wait for all steps to complete (will take 60-120 sec) as shown below
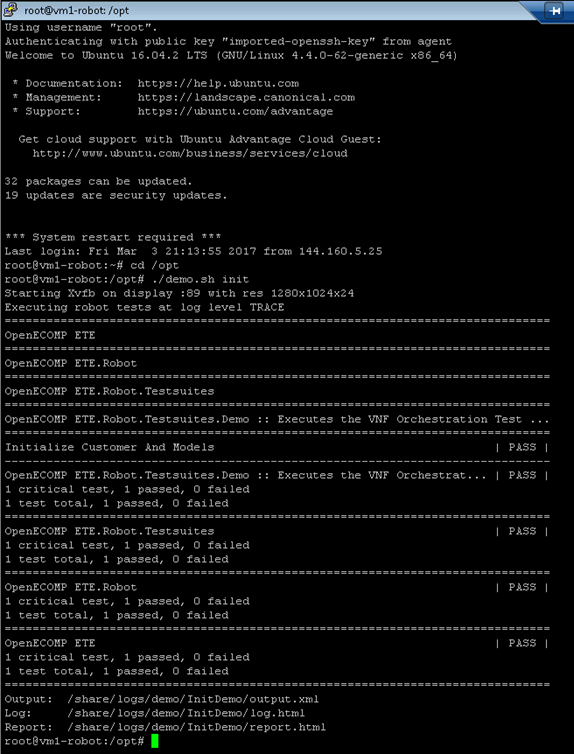
If you want to see the details of what ran, you can open report.html in a browser. (located within openecompete_container docker container)
Starting Xvfb on display :89 with res 1280x1024x24 Executing robot tests at log level TRACE ============================================================================== OpenECOMP ETE ============================================================================== OpenECOMP ETE.Robot ============================================================================== OpenECOMP ETE.Robot.Testsuites ============================================================================== OpenECOMP ETE.Robot.Testsuites.Demo :: Executes the VNF Orchestration Test ... ============================================================================== Initialize Customer And Models | PASS | ------------------------------------------------------------------------------ OpenECOMP ETE.Robot.Testsuites.Demo :: Executes the VNF Orchestrat... | PASS | 1 critical test, 1 passed, 0 failed 1 test total, 1 passed, 0 failed ============================================================================== OpenECOMP ETE.Robot.Testsuites | PASS | 1 critical test, 1 passed, 0 failed 1 test total, 1 passed, 0 failed ============================================================================== OpenECOMP ETE.Robot | PASS | 1 critical test, 1 passed, 0 failed 1 test total, 1 passed, 0 failed ============================================================================== OpenECOMP ETE | PASS | 1 critical test, 1 passed, 0 failed 1 test total, 1 passed, 0 failed ============================================================================== Output: /share/logs/demo/InitDemo/output.xml Log: /share/logs/demo/InitDemo/log.html Report: /share/logs/demo/InitDemo/report.html root@vm1-robot:/opt# root@vm1-robot:/opt# docker ps CONTAINER ID IMAGE COMMAND CREATED STATUS PORTS NAMES f99954f00ab2 nexus3.onap.org:10001/openecomp/testsuite:1.0-STAGING-latest "lighttpd -D -f /e..." 19 hours ago Up 19 hours 0.0.0.0:88->88/tcp openecompete_container root@vm1-robot:/opt# docker exec -it openecompete_container bash root@f99954f00ab2:/# cat /share/logs/demo/InitDemo/ log.html output.xml report.html |
|---|
From the ONAP portal, login to the VID application using demo user, browse to locate the demo SDC Service Models, and Deploy an instance of the service you created - not the pre-populated demoVFW.
(Note: service - is the one you created - not demoVFW or demoVLB - these 2 are leftover pre-population artifacts of the init script and will be removed)

Fill in the information for a Service Instance as shown below and press Confirm.

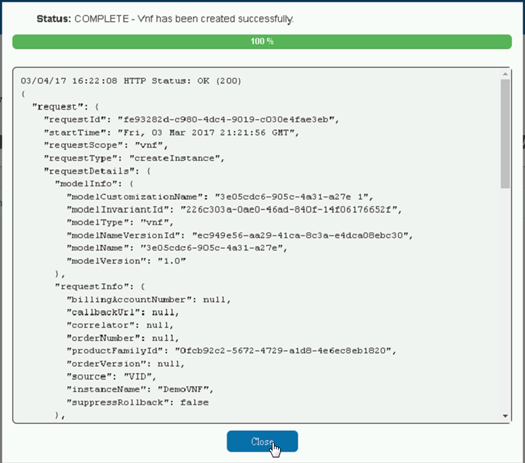
Wait for a response and close the window

You should now see a service instance displayed.

Add a VNF using the drop down button, complete, and enter the following information. The tenant and LCP region drop down choices may be different for your Rackspace account. Both IAD and DFW support heat templates - but currently only IAD is supported in this demo until DOC-6 - Getting issue details... STATUS

Wait for and close the response window.
Return to the PuTTY window and type the command to load VNF configuration information
DO NOT Navigate from the Deploy page before adding the VF Module below - or you will need to search for it - then hit edit
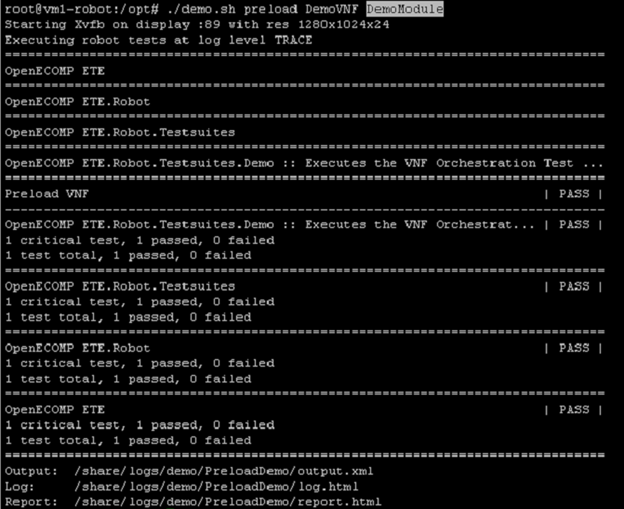
    ./demo.sh preload <vnf_name> <module_name>
    example
    ./demo.sh preload DemoVNF DemoModule
Wait for the results as shown below
Add a VF Module using the drop down button.

Fill in information for the VF module and confirm.

Handle MSO Failure on RAM Quota exceeded
A default rackspace account is only allocated 128G but we will require
      "requestState": "FAILED",
      "statusMessage": "Received vfModuleException from VnfAdapter: category='INTERNAL' message='Exception during create VF 0 : Stack error (CREATE_FAILED):
Resource CREATE failed: Forbidden: resources.vsn_0: Quota exceeded for ram: Requested 4096, but already used 130048 of 131072 ram (HTTP 403) (Request-ID: req-02439f0a-c8a4-4fe7-8d79-d6fa99bd4f57) - stack successfully deleted' rolledBack='true'",
"percentProgress": 100,
"finishTime": "Tue, 23 May 2017 22:19:11 GMT" |
|---|
Handle MSO Failure on Create VF Module
Update: 20170523: looks like the template defaults are not being modified - and pass through
UCA-17 - Getting issue details... STATUS
This type of MSO failure means the demo VNF was retried with the same defaults - a retry will just fail on another IP conflict for the port.
The openstack tenant also happens to have other instances of the VNF that look like they are causing a port resource contention - clean/reset your VM's for now.
onap@server-01:~/onap$ openstack port list | grep ip_address=.10.1.0. | 6d4c9ef9-ceec-4c62-85b1-fa6f2de34256 | FirewallSvcModule-vfw_private_2_port-ewvqxhjdm2tv | BC:76:4E:20:57:DB | ip_address='10.1.0.11', subnet_id='5a4808b2-2fca-40ab-ba43-10d21a9e5b64' | ACTIVE | | 7861e542-600f-4bfa-96d0-47e1be19331d | FirewallSvcModule-vpg_private_1_port-ctu2jymvh2yr | BC:76:4E:20:3B:75 | ip_address='10.1.0.12', subnet_id='5a4808b2-2fca-40ab-ba43-10d21a9e5b64' | ACTIVE | | b22e7d79-58e6-4c16-8acc-f1a4c358c8c9 | FirewallSvcModule-vsn_private_1_port-xit2fdnpz2yd | BC:76:4E:20:3B:63 | ip_address='10.1.0.13', subnet_id='5a4808b2-2fca-40ab-ba43-10d21a9e5b64' | ACTIVE | |
|---|

05/18/17 15:05:57 HTTP Status: OK (200)
{
  "request": {
    "requestId": "6c0afeaf-42a4-4628-9312-2305e533f673",
    "startTime": "Wed, 17 May 2017 19:04:56 GMT",
    "requestScope": "vfModule",
    "requestType": "createInstance",
...
    "requestStatus": {
      "requestState": "FAILED",
      "statusMessage": "Received vfModuleException from VnfAdapter: category='INTERNAL' message='Exception during create VF 0 : Stack error (CREATE_FAILED): Resource CREATE failed: IpAddressInUseClient: resources.vsn_private_1_port:
Unable to complete operation for network 6dfab28d-183e-4ffd-8747-b360aa41b078. The IP address 10.1.0.13 is in use. - stack successfully deleted' rolledBack='true'",
"percentProgress": 100,
"finishTime": "Wed, 17 May 2017 19:05:48 GMT"
}
}
}
|
|---|
Wait for the response and close the window as was done in prior steps. The VF Module creation can also be viewed as a stack in Rackspace as shown below.

To complete the service instance we will run one more script that mounts the Traffic Generator on the Application Controller to enable policy driven configuration changes. Return to the PuTTY window, type the command and wait for the response as shown below.
./demo.sh appc DemoModule

The platform and virtual function interactions in the control loop are summarized here.
