NOTE: Tested on APP-C ONAP Component only, on a single Ubuntu 16.04 LTS VM
See also Developing ONAP
General Requirements:
- A Gerrit Account – to create a Gerrit account, please create one here: https://identity.linuxfoundation.org

- An Ubuntu 16.04 LTS Desktop VM (14.04 LTS should work as well)
- No less than 8 GB
- 40 GB of hard disk drive
- 4 vCPUs should suffice
- Software Download Requirements:
- Eclipse IDE for Java EE Developers (latest stable release is neon 3): http://www.eclipse.org/downloads/packages/eclipse-ide-java-ee-developers/neon3
- Nexus OSS 2 (to upload ONAP Component’s Maven Artifacts locally): https://www.sonatype.com/download-oss-sonatype - grab the bundle.tar.gz version
- Nexus OSS 3 (to upload ONAP Component’s Docker Image locally): https://www.sonatype.com/download-oss-sonatype - grab the bundle.tar.gz version
- Apache Maven (latest stable version is 3.3.9): https://maven.apache.org/download.cgi - grab the binary tar.gz archive
Installation procedure:
General Setup
- First, download all of the Ubuntu apt packages needed:
$ sudo apt-get -y install openjdk-8-jdk maven git-review
Setting up Git
- Set up your git information:
$ git config --global user.email your_LF_account@email
$ git config --global --add gitreview.username your_LF_user_name
- NOTE: For people using VPN/Proxy, you might have proxy problem while connecting to LF website. To avoid the problem, you should add the proxy setting in git config, using the following command:
$ git config --global https.proxy https://<proxy username>:<proxy password>@<proxy url>
$ git config --global http.proxy http://<proxy username>:<proxy password>@<proxy url>
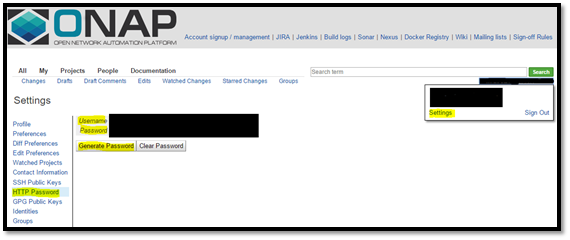
- Generate an HTTP Password in order to clone the necessary git repos:
- Go to https://gerrit.onap.org/r/#/settings/http-password
- As highlighted below, go to Settings --> HTTP Password --> Generate Password.
- On a clean folder on your Desktop (or your preferred path), create a folder and clone the ONAP APP-C Git Repositories that we will test with (NOTE: Use the previously generated HTTP Password to authenticate):
$ git clone http://<LF_USER_ID>@gerrit.onap.org/r/a/appc
$ git clone http://<LF_USER_ID>@gerrit.onap.org/r/a/appc/deployment
Docker Engine Installation
- Go to this link to set up the Docker Engine on your local machine (you will need this to store the Docker Images that will be uploaded in the local Nexus 3’s Docker Registry)
Setting up Nexus 2 and 3 OSS Repositories
- Install & run Nexus OSS 2 without sudo rights as a non-root user (detailed and clear instructions on how to do install it are here & how to run it are here)
- Default Nexus 2 OSS Local Webpage: http://localhost:8081/nexus
- Check nexus logs: $NEXUS_HOME/logs/wrapper.log
- Default credentials: username is deployment, password is deployment123
- Install & run Nexus OSS 3 without sudo rights as a non-root user (detailed and clear instructions on how to do are here)
- IMPORTANT: Since both Nexus 2 and Nexus 3’s web sites run on port 8081, the Nexus 3 OSS needs to modify its configuration to start up as a process in another port so as to avoid a conflict. Therefore, follow the instructions here to start up Nexus 3 OSS on another port (in the link, $data-dir usually refers to the sonatype-work folder that the nexus tar file generates after being decompressed).
- Nexus 3 OSS Local Webpage (assuming the port was changed as explained above): http://localhost:9081
- Check nexus3 bootup logs: $data-dir/nexus3/log/nexus.log
- Check nexus3 logs: $data-dir/nexus3/log/jvm.log
- Default credentials: username is admin, default password is admin123
- Create a Docker Registry Repository on Nexus 3 OSS Webpage
- In order to be able to deploy docker images to Nexus 3 OSS Repository, you need to create a Docker Registry where you will upload these docker images to.
- Go to http://localhost:9081 to access the Nexus 3 OSS Webpage, log on, click on settings icon, and then click on “Repositories” which will give you the option to “Create Repository” as shown below:

- On the next window, choose the “Docker (Hosted)” option
- NOTE: you can choose the “Docker (Proxy)” option if you have a docker registry outside of your local Nexus 3 OSS that you want to externally connect to, such as the public docker.io registry for example.
- On the next window, fill out the required fields as highlighted below and click on “Create Repository” to create your local docker registry (NOTE: you can see that the HTTP port is at 8082, which will be your local docker registry port):

Setting up Eclipse Java EE & Importing the ONAP Maven Projects
- As root, open up Eclipse (preference is to create a new workspace):
$ sudo -i
$ cd <ECLIPSE_BIN_FOLDER>
$ ./eclipse
- Set up general Eclipse configuration as below:
- Go to Window --> Preferences
- On the left side of the pop up window, go to Maven --> User Settings. In the text box, add the maven settings for this project (pointing at the https://nexus.onap.org repositories), then click on Update Settings --> Apply --> OK

- Go to Maven --> Installations, then “Add…” the downloaded Apache Maven (tested with 3.3.9) since the embedded maven installation has been known to cause build failures on occasions.

- Go to Java --> Installed JREs, then “Add...” the downloaded Java 8 OpenJDK (usually located on /usr/lib/jvm/java-8-openjdk-amd64) as a “Standard VM”

- Repeat the same steps below for APP-C & deployment repos:
- Go to File --> Import… --> Maven --> Select Existing Maven Projects

- Pick the folder where you cloned the git repository
- Checking the “Add project(s) to working set” and defining a new working set name is suggested to separate multiple git repositories

Initial build of the APP-C Core Maven Project
This section will guide you on the steps to take in order to compile the APP-C Core Project into your local maven repository (usually located on the /root/.m2/repository path).
- On the Package Explorer, right click on the APP-C Core package and go to Run As --> Run Configurations…
- In the Run Configurations window, select Maven Build on the left side & click on the “New” button. Set up your maven build configuration as follows (relevant parts are highlighted):

- NOTE: In the above figure, it is recommended to uncheck the “Skip Tests” option to run the test cases of the APP-C Core Package to make sure that APP-C Core Features are tested beforehand.
- Make sure that you are pointing to the previously installed Java 8:

- For debugging purposes, it helps to output all build maven logs generated to a file where you can check for any errors:

- Finally, click on “Run.” Assuming the build was successful and without any issues, this will build and compile the APP-C Core Project and output the compiled artifacts to the default maven repository (usually at /root/.m2/repository).
Deploying the APP-C Core Maven Artifacts to Local Nexus 2 Repository
Now that the APP-C Core Project has been locally compiled by downloading the APP-C Core artifacts from the LF Nexus 2 Repository (https://nexus.onap.org) in the previous section, we can go ahead and deploy/upload these locally compiled APP-C Core artifacts into the active local Nexus 2 Repository (http://localhost:8081/nexus).
- You can use the same maven build item that was created in the previous section “Initial building of the APP-C Core Maven Project” but just change the maven goal from “clean install” to “clean deploy”
- Make sure that the <distributionManagement> snapshot repository <site> in the APP-C Core’s rootpom file (appc/pom.xml) is correctly configured to point to the maven settings’s <servers><server> authentication credentials of the local Nexus 2 OSS (by default, it is deployment/deployment123). If not, then the upload will fail with an Unauthorized error since it will try to default to uploading to the LF Nexus 2 OSS Repository instead:

- You can now run the maven build in the Run Configurations window.
- Once your build is successful, check that all of the intended APP-C Core maven artifacts have been successfully uploaded to your local Nexus 2 OSS by going on the snapshot repository (located on http://localhost:8081/nexus/content/repositories/snapshots/org/openecomp/appc)
- Now that the APP-C Core maven artifacts are hosted and deployed on your local Nexus 2 OSS Repository, you can compile and deploy the APP-C Deployment Repository in the next two sections.
Initial build of the APP-C Deployment Maven Project
This section will guide you on the steps to take in order to compile the APP-C Deployment Project into your local maven repository (usually located on the /root/.m2/repository path). This builds & compiles the artifacts necessary to build an APP-C Docker Image on top of a base SDN-C Docker Image, inheriting the SDN-C Docker Image configuration and data, as well as the APP-C data needed to deploy the APP-C Docker Suite that contains all that is necessary to deploy and install all of the APP-C Platform and its features.
- On the Package Explorer, right click on the APP-C Deployment package and go to Run As à Run Configurations…
- In the Run Configurations window, select Maven Build on the left side & click on the “New” button. Set up your maven build configuration as follows (relevant parts are highlighted):

- Make sure that you are pointing to the previously installed Java 8:

- For debugging purposes, it helps to output all build maven logs generated to a file where you can check for any errors:

- Finally, click on “Run.” Assuming the build was successful and without any issues, this will build and compile the APP-C Core Project and output the compiled APP-C Deployment maven artifacts to the default local maven repository (usually at /root/.m2/repository).
Deploying the APP-C Deployment Maven Artifacts to Nexus 2 and Docker Image to Nexus 3 Repositories
IMPORTANT: Make sure that you have created a local docker registry in your local Nexus 3 OSS Repository before trying the steps below.
Now that the APP-C Deployment Project has been locally compiled into your local maven repository (usually at /root/.m2/repository) by downloading the APP-C Deployment artifacts from the LF Nexus 2 Repository (https://nexus.onap.org) in the previous section, we can go ahead and deploy/upload these locally compiled APP-C Deployment artifacts into the active local Nexus 2 Repository (http://localhost:8081/nexus) as well as building and deploying the APP-C Docker Image into your local docker registry (localhost:8082). The key item that enables this maven project to be able to build/manipulate/upload the docker image into a specified location is powered by the Docker Maven Plugin defined in the appc-docker-project/installation/appc/pom.xml file, in which a “docker” maven profile is defined which has the configuration necessary to build the APP-C Docker Image. More information on this maven docker plugin can be found on https://dmp.fabric8.io/.
- Make sure that the <distributionManagement> snapshot repository <site> in the APP-C Deployment’s rootpom file (appc-docker-project/pom.xml) is correctly configured to point to the maven settings’s <servers><server> authentication credentials of the local Nexus 2 OSS (by default, it is deployment/deployment123). If not, then the upload will fail with an Unauthorized error since it will try to default to uploading to the LF Nexus 2 OSS Repository instead:

- Go to the Run Configurations window. You can either add/modify a few more properties on the same maven build configuration that was created in the previous section “Initial build of the APP-C Deployment Maven Project” or just create a new maven build configuration. The additional properties and maven goal change are highlighted below:
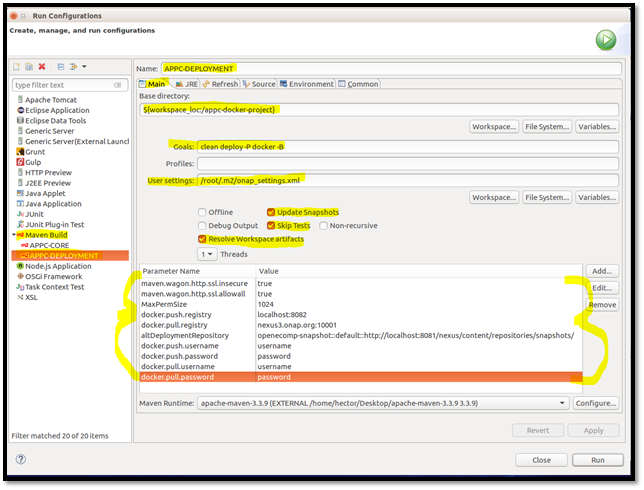
- From the new maven build configuration below, the following properties were added to be able to download the dependent SDN-C Docker Image from LF Nexus 3 Docker Registry, as well as uploading the finalized APP-C Docker Image itself:
- docker.push.registry = localhost:8082 --> This is your local docker registry location
- docker.push.username & docker.push.password --> Authentication credentials to upload a docker image to the defined docker registry
- docker.pull.registry = nexus3.onap.org:10001 --> This is the LF Nexus 3 docker registry location
- docker.pull.username & docker.pull.password --> Authentication credentials to download a docker image from the defined docker registry
- altDeploymentRepository=openecomp-snapshot::default::http://localhost:8081/nexus/content/repositories/snapshots/ --> This serves as the alternative repository on which maven artifacts should be deployed on in case that it was not defined in <distributionManagement>. Therefore, this is optional.
- You can now run your maven build configuration.
- Once your build is successful, check that all of the intended APP-C Deployment maven artifacts have been successfully uploaded to your local Nexus 2 OSS by going on the snapshot repository (located on http://localhost:8081/nexus/content/repositories/snapshots/org/openecomp/appc). Also, go to the Nexus 3 Docker Registry location in the http://localhost:9081/#browse/browse/components:docker.local to make sure that your APP-C Docker Image has been uploaded.
- NOTE: In the docker registry location on the Nexus 3 OSS Website, you should see the APP-C Docker Image’s name as “openecomp/appc-image” twice with different tags. The number of tags for the image will be decided by what is defined on the docker maven plugin’s section (note that there are properties to be defined in the <tags> section):

- As you change the tag names as more tags are uploaded on your local docker registry, we have experienced scenarios where the “latest” tag will not always be the actual latest version of the image you last uploaded. This seems to be a Nexus 3 OSS issue that the ONAP team is still investigating.
- Now that the APP-C Deployment Maven artifacts are deployed in Nexus 2 OSS and the APP-C Docker Image is deployed in the Nexus 3 OSS local repositories, you are ready to test the docker image. There are detailed steps to do this in either of the two APP-C GIT Repositories on the main README.md section.
5 Comments
Michael O'Brien
Good and detailed page - we may want to correlate this with procedures general to all of ONAP and those specific to appc for example.
Setting Up Your Development Environment
Jacopo Pianigiani
Michael
1) the link Install JAVA for Ubuntu refers to RedHat.
2) for Ubuntu (whether 14.04 or 16.04) you can just refer the manpage of Ubuntu installation of java via apt-get update + install of the following
Installation of Java Runtime Environment
Install the openjdk-7-jre package using any installation method.
Browser plugin
Install the icedtea-7-plugin package using any installation method.
This plugin works with the browsers: Epiphany, Firefox and Opera.
On Konqueror, go to Settings → Configure Konqueror... and from menu select Java & JavaScript, then tick Enable Java globally option.
OpenJDK v7 SDK (Software Development Kit)
In Java parlance the Java Development Kit (JDK) is sometimes used for SDK. (More about that here.)
Install the openjdk-7-jdk package using any installation method.
Michael O'Brien
Sounds good, I would recommend developers stick to JDK8 as ONAP is currently a mix of Java 7/8 and let the poms build for 7 or 8. I had a RHEL copy paste error into the Ubuntu section - fixed (apt instead of yum) - thank you for the heads up.
/michael
shubhra garg
Hi All,
Could you please let us know how to build and test the individual components of ONAP. Their installation and compilation steps , if performed on single Ubuntu 16.04 LTS VM on an individual basis.
The above link is : to build and test APP-C. But, for other components , do we have any similar links/ documents, where steps are mentioned. Basically, I am looking for which softwares each and every component required and the installation of the same.
I am looking for all the modules of ONAP like AAI , DCAE, MSO, policy, portal, SDC, SDNC, VDI, message router etc ?
Kindly share the links for the latest documents ( ONAP 1.1 Amsterdam) if available.
-Shubhra
vignesh k
Hi,
I'm not sure about the installation of ONAP in a single ubuntu machine unless and until it possess powerful processor and huge RAM configuration.Alternatively, you can install ONAP in a cluster of PC's in a local environment.
Regarding the compilation you can clone the ONAP code's of individual components(like AAI , DCAE, MSO, policy, portal, SDC, SDNC, VDI) and compile in a ubuntu machine.(REF: Building Entire ONAP).
Vikee