Follow the steps below to set up the development environment on your client machine, and to establish credentials with which you may access the repositories.
Create a Linux Foundation Account
Follow the instructions on the identity portal to create a Linux Foundation account and get access to the OpenECOMP Gerrit instance. Then verify that you can log in at https://gerrit.openecomp.org/ and that you can see the OpenECOMP list of repositories.
Mac/OSX
get your MBP 2016 ready for development
generate keys - either ssh-add the key or rename it as id_rsa and put it into your ~/.ssh dir
Install the JDK (as dmg) - http://www.oracle.com/technetwork/java/javase/downloads/jdk8-downloads-2133151.html
Install homebrew package manager -
/usr/bin/ruby -e "$(curl -fsSL https://raw.githubusercontent.com/Homebrew/install/master/install)"python should already be installed. - do a --version check
install pip - sudo easy_install pip
install openstack tools
install docker (dmg) - https://docs.docker.com/docker-for-mac/install/#download-docker-for-mac
install maven - apache-maven-3.5.0-bin.tar, create and ~./m2 and place settings.xml there
git comes with Xcode or Homebrew - do a --version check
Unix Setup
Redhat/CentOS
set JAVA_HOME in ~/.bashrc | yum install java-1.8.0-openjdk-devel get it via alternatives --config javac |
| install git and development tools | yum install git yum groupinstall 'Development Tools' |
| install npm (will also be installed automatically by the ecomp build) | |
download and install Maven 3.5.0 create an ~/.m2 folder and copy our settings.xml there add maven to your path - check it with mvn --version | http://maven.apache.org/download.cgi tar -xvf apache-maven-3.5.0-bin.tar.gz |
| Add the following option to your MAVEN_OPTS in order not to periodically hang on downloading artifacts in linux | -Djava.net.preferIPv4Stack=true |
| Install docker (required for some repos like dcae-inventory off dcae | sudo yum install -y yum-utils sudo yum-config-manager --add-repo https://download.docker.com/linux/centos/docker-ce.repo sudo yum-config-manager --enable docker-ce-edge sudo yum makecache fast sudo yum install docker-ce sudo systemctl start docker |
Ubuntu 16.04
set JAVA_HOME in ~/.bashrc | |
| install git and development tools | |
| install npm (will also be installed automatically by the ecomp build) | sudo apt install npm |
download and install Maven 3.5.0 create an ~/.m2 folder and copy our settings.xml there add maven to your path - check it with mvn --version | http://maven.apache.org/download.cgi tar -xvf apache-maven-3.5.0-bin.tar.gz or sudo apt install maven |
| Add the following option to your MAVEN_OPTS in order not to periodically hang on downloading artifacts in linux | -Djava.net.preferIPv4Stack=true |
| Install docker (required for some repos like dcae-inventory off dcae | sudo apt-add-repository 'deb https://apt.dockerproject.org/repo ubuntu-xenial main' |
root@obriendev:/home/ubuntu/onap# mvn clean install -U -DskipTests=true -Dmaven.test.skip=true -Dmaven.javadoc.skip=true
-Dadditionalparam=-Xdoclint:none
Install git-review
<<TODO: describe a Linux client set-up for Git and git-review>>
To install git-review on Linux (Ubuntu), type the following command.
sudo apt-get install git-review
Windows Setup
Note: The DCAE and SDC repo will not fully clone in a windows environment (even git-bash) until some file paths are reduced below 255 chars - DCAE-24 - Getting issue details... STATUS and SDC-21 - Getting issue details... STATUS - you may use Linux or OSX native or VMs as an alternative for now.
Enabling long paths in windows - thanks Michael Lando
| git config --system core.longpaths true |
|---|
Installing Git
To install Git on your client, visit: https://www.atlassian.com/git/tutorials/install-git, and download the appropriate installation image for your host. Once downloaded, execute the installation script ("open" the .msi file).
During installation, you will see the following dialog box. Include the "Git Bash" and "Git GUI" components (this is the default).To do this, leave the following boxes checked:

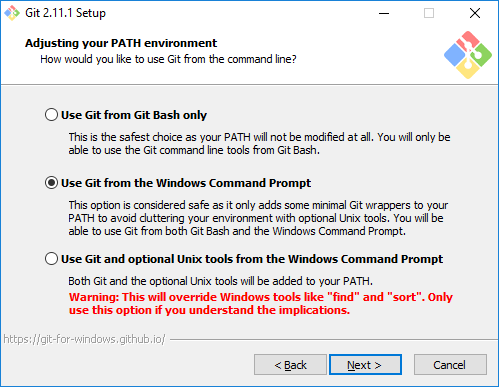
If you intend to type Git commands from the Windows Command Prompt, leave the default setting for adjusting the PATH environment:
The repositories use Unix-style line-feed for line termination, so on your windows Git client, select the conversion option:

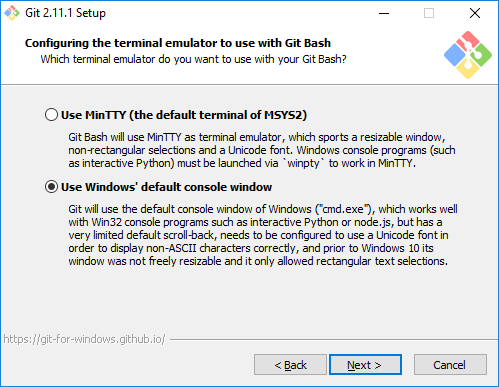
Select the following option based on your own preference (non-default shown, so 'winpty' is not required):
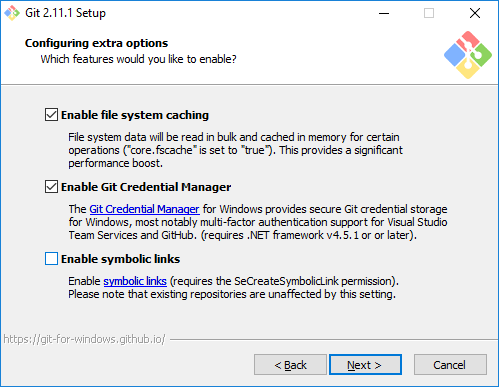
Choose the defaults here:
The installer lets you choose the experimental 'difftool'; either choice will work. Continue with the installation dialogs until the installation is complete.
Install Python on Windows (optional)
Not all components require Python for development. See the documentation for your component in the Development Guides section. (Note: the "node-gyp" tool requires Python.)
Download Python version 2.7.10:
Execute the install file that you just downloaded. (You must have administrative privileges.) During installation, select "Add python.exe to Path", overriding the default setting. Also, be sure to install "pip" (this is the default).

Continue with the installation until it is completed.
Set up Git review and Configure Git
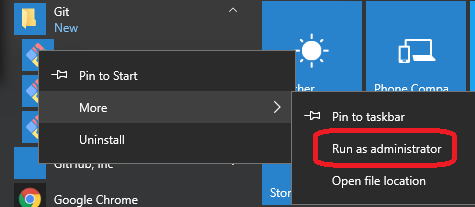
Run Git Bash as Administrator (for example, in Windows 10, use the Windows menu, scroll to the Git directory, right-click on Git-bash, and select "Run as administrator":
Within Git Bash, type the following command:
$ pip install git-review
To use git review, you have to be in a Git clone directory that already contains a (possibly hidden) .gitreview configuration file (see Gerrit/Advanced usage#Setting up a repository for git-remote), otherwise you will get the error message UnboundLocalError: local variable 'no_git_dir' referenced before assignment.
The Git and git-review installation steps above are derived from the description at: https://www.mediawiki.org/wiki/Gerrit/git-review#Windows
Configure Git to remember your Linux Foundation user name and email address (the user name and email address associated with your Linux Foundation login):
git config --global user.email <your_LF_account_email>
git config --global --add gitreview.username <your_LF_user_name>
If you are using VPN, you might encounter a proxy problem while connecting to the Linux Foundation website. To avoid the problem, you should add the proxy setting in git config, using the following command:
git config --global https.proxy https://<proxy username>:<proxy password>@<proxy url>
git config --global http.proxy http://<proxy username>:<proxy password>@<proxy url>
NOTE: When entering the proxy username, you might be required to add the domain name in front of the username.
Install Putty and Generate Keys
An alternate method for creating public and private keys, without using PuTTY, is given here: https://help.github.com/articles/generating-a-new-ssh-key-and-adding-it-to-the-ssh-agent/
If you already have keys registered with PuTTY, skip this section.
PuTTY is a terminal emulator that uses Secure SHell (SSH) to communicate with a host. You need to install PuTTY in order to create a public/private encryption key pair. This pair of keys enables Git to communicate securely with the repositories.
To install PuTTY, visit, www.putty.org and follow the links to the appropriate Windows installation for your machine (32-bit or 64 bit). The downloaded file will be named putty-0.67-installer.msi or the like.
Execute the .msi file. Use all the default settings, thereby ensuring that you will install pageant.exe, plink.exe, and puttygen.exe.
Generate Public and Private Keys
OSX
ssh-keygen -t rsa |
|---|
Windows
The puttygen utility, installed with putty, generates public and private keys used for secure communication with Gerrit.
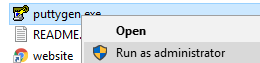
You should execute puttygen.exe as an Administrator, otherwise, the key files will be stored in %localappdata%\VirtualStore\PuTTY, typically C:\Users\<user>\AppData\Local\VirtualStore\Program Files (x86)\PuTTY.
To do this, right-click on C:\Program Files (x86)\PuTTY\puttygen.exe and select Run as Administrator:
Answer "Yes" to the User Account Control challenge. Then click the "Generate" button in the puttygen window. puttygen will ask you to move your mouse over its dialog box to generate random seed bits. After it has computed a public key, it will display a dialog box resembling the following:

If you want to edit this key pair in the future, create a text file containing a short phrase, called a "passphrase". Copy and paste this passphrase into the "Key passphrase" and "Confirm passphrase" lines, then select "Save public key" and choose a filename (e.g. public.txt); also "Save private key" and choose another filename (e.g. private.ppk). Since you ran puttygen as Administrator, the files are visible to Windows Explorer.
Close puttygen.
Load Your Private Key Into Pageant
Pageant is an SSH authentication agent. It holds your private keys in memory, already decoded, so that you can use them often without needing to type a passphrase.
To load your private key into pageant, right-click on the private key file (e.g. private.ppk in this example), and select Load into pageant:
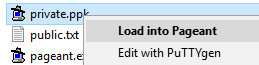
This action not only loads private.ppk into pageant, but also starts pageant if it is not already running. You will be prompted for the passphrase that you entered into puttygen when you created the key. If successful, pageant will load the key without further interaction.
pageant runs without opening any visible window. When it is running, it puts an icon of a computer wearing a hat ( ) into the System tray.
You can right-click on this icon to perform actions with pageant, including "View Keys" (which brings up a dialog box that allows you to add or remove keys.)
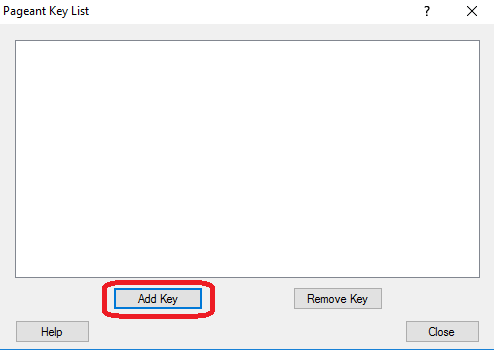
The "Add Key" button offers another way to enter your private key into pegeant: after clicking on "Add Key", select the file containing your private key (for example, private.ppk).
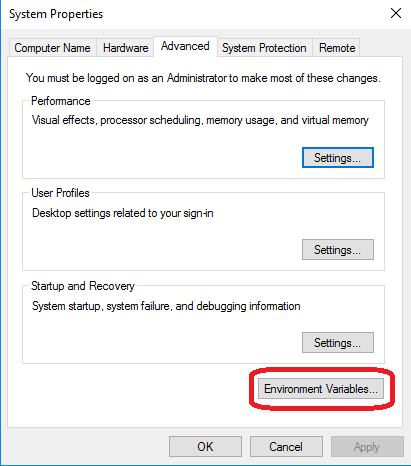
Set the GIT_SSH Environment Variable
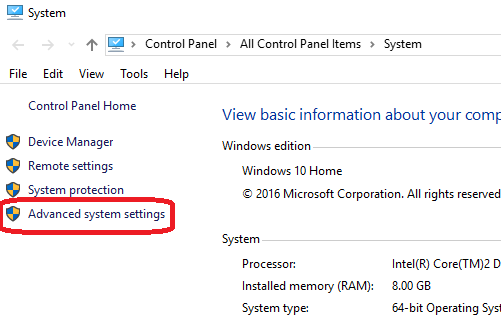
From the Desktop, right-click the Windows logo at the very bottom left corner of the screen,  , and select "System". Within the System dialog box, select "Advanced system settings" to get the Power User Task Menu.
In the next dialog box, select "Environment Variables":
If you don't already have a GIT_SSH entry in your System Variables list, click "New..." and create GIT_SSH, defined to be the location of plink.exe :

Copy/paste the known_hosts entries listed, into a file named known_hosts under your .ssh profile (something like C:\Users\<my-id>\.ssh) (if known_hosts does not exist, create it).
Install NodeJS
The dcae build will install npm in most cases - however if you run into issues like the following - install it yourself
| Failed to execute goal com.github.eirslett:frontend-maven-plugin:1.3:npm (npm install) on project ecompportal-FE-os: Failed to run task: 'npm install' failed. (error code -4048) |
|---|
Install NodeJs from https://nodejs.org/en/
verify your install by doing
$ npm -version
3.10.10
From git bash
- npm install bower -g
- npm install grunt-cli -g
IDEs
IDE: Eclipse: Does Not Support Gerrit Plugin
Eclipse plugins (including the Mylin Gerrit connector plugin and Egit) do not support a 2.12 Gerrit server, so if you use Eclipse as your development IDE, you must do reviews using the Gerrit web interface.
IDE: IntelliJ
Installing IntelliJ Community Edition and the Java SDK on Windows
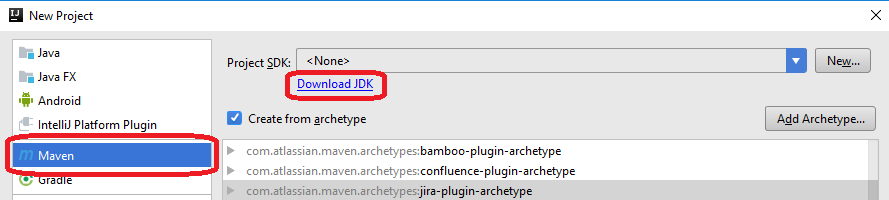
If you are using IntelliJ to do Java compilations, download the IntelliJ installation image from https://www.jetbrains.com/idea/. The installation dialog gives you the opportunity to associated IntelliJ with file type .java, among others. Installation takes several minutes.
When you start your first IntelliJ project, you will need to specify the Java Software Development Kit (SDK) as the project's. If you do not have the Java SDK installed on your machine, you can download it from within IntelliJ by selecting Maven as the New Project type and clicking on "Download SDK": (Or, visit http://www.oracle.com/technetwork/java/javase/downloads/index.html).
Installing the Gerrit plugin in IntelliJ
Open File -> Settings -> Plugins of IntelliJ, and click on the Browse repositories... button.
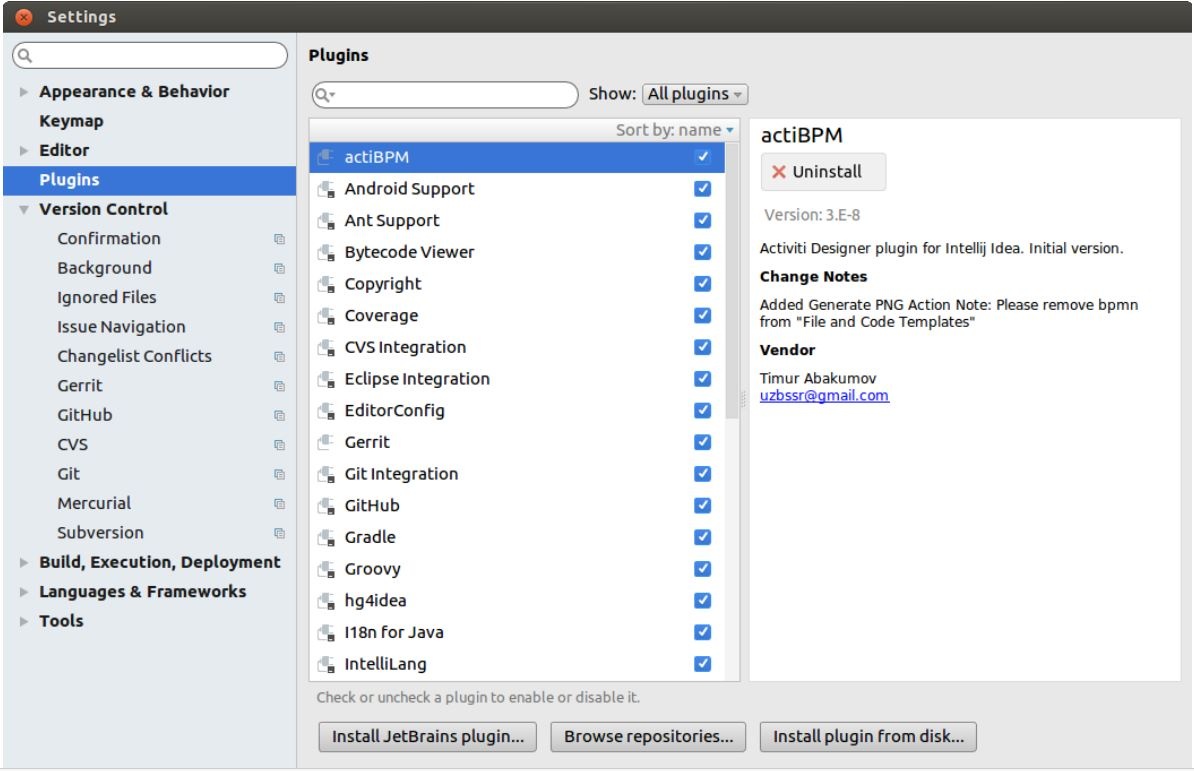
In the new window, search for Gerrit, click Install to install the plugin, and finally restart IntelliJ.

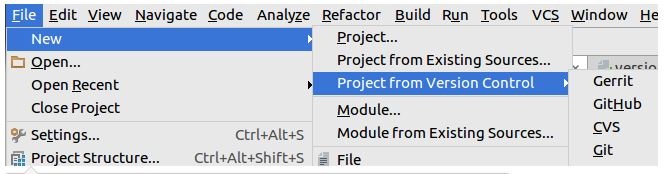
To verify whether the Gerrit plugin is installed successfully, you can click File -> New -> Project from Version Control and verify whether Gerrit is present.
Other Tools
The component you are working on may require additional tool installations, see the relevant section under Development Guides.
Maven
For console (mvn) Install maven 3.3.3+ (currently 3.5.0) - as 3.2.x will have issues with the ODL certificate not matching
Selecting a connection method
Once Git is installed, you will need to select a connection method to the Gerrit host, https://gerrit.openecomp.org/.
We recommend using SSH, in which case you need to register your private key in your account settings on the Gerrit host. However, if you are using a Virtual Private Network (VPN), you will require the HTTPS method, since most VPNs won't allow an ssh connection.
SSH Connection (Recommended)
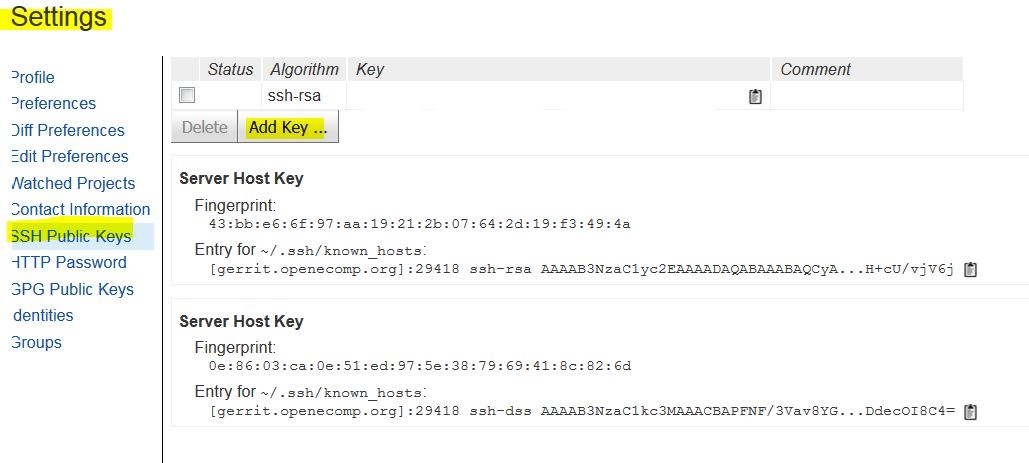
Log in to the Gerrit host https://gerrit.openecomp.org/, pull down the menu under your user name (at the extreme top right of the browser window), click on "Settings":
Click your account name on the top right corner of the website and click on Settings.

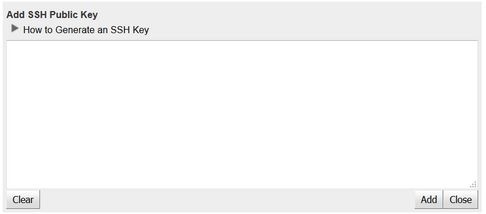
In the Settings window, select SSH Public Keys, and then click Add Key... .
HTTPS Connection (Alternate)
If you choose to use HTTP/HTTPS, you'll need to generate an access password. Log in to the Gerrit host https://gerrit.openecomp.org/, pull down the menu under your user name (at the extreme top right of the browser window), click on "Settings", and select "HTTP Password":

The icon at the right of the generated password allows you to copy the generated password to your clipboard, it will be needed when you interact with Git/Gerrit.
This password may have a limited time to live, so you might get errors like this one:
Problem running 'git remote update gerrit'
Fetching gerrit
fatal: unable to access 'https://USERNAME@gerrit.openecomp.org/r/a/mso/ ': Unknown SSL protocol error in connection to gerrit.openecomp.org:443 error: Could not fetch gerrit
Regenerating a password will most likely solve the connectivity issue. Sometimes, the Gerrit interface on HTTPS might be temporarily faulty, so retries might be needed.
Working with a Proxy
For developers working with a proxy, you might have proxy issues connecting to Linux Foundation website. To avoid the connection issue, you must define the proxy setting for both IntelliJ and Git.
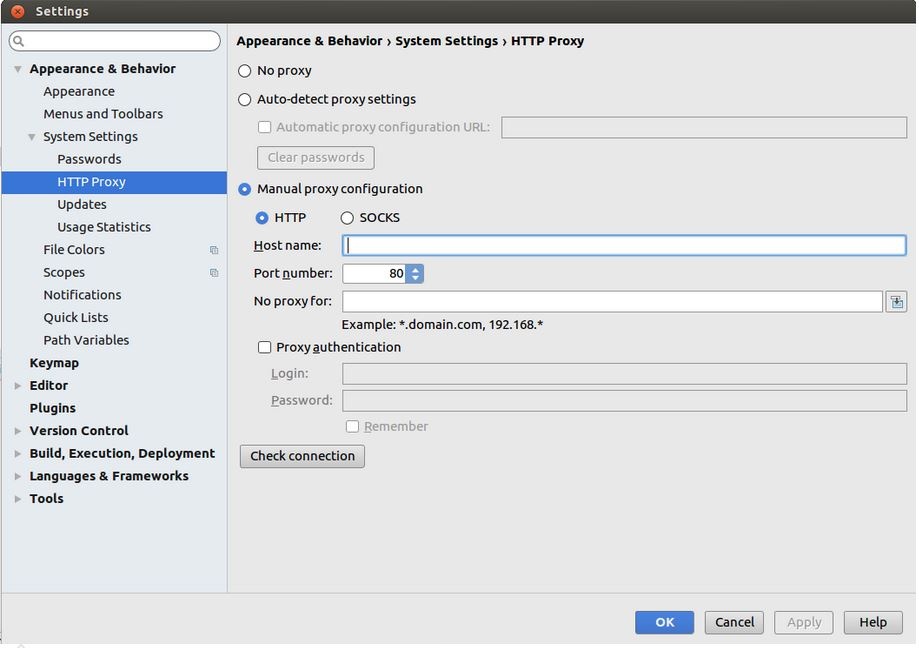
To configure the proxy settings in IntelliJ, click File -> Settings -> Appearance & Behavior -> System Settings -> HTTP Proxy, enter the correct proxy settings and click Apply. In case of Manual proxy configuration, while entering the Host name, there is no need to write http:// in front of the URL. For example, if the proxy value is http://one.proxy.com, you would put one.proxy.com as the Host name.
To configure the proxy settings for Git, play the following command:
git config --global https.proxy https://<proxy username>:<proxy password>@<proxy url>
git config --global http.proxy http://<proxy username>:<proxy password>@<proxy url>
Note: while entering the proxy username, sometimes it may require to add the domain name in front.
Building all ONAP projects
Maven Example settings.xml
Maven settings.xml file is located in ~/.m2/settings.xml
20170512 note addition of the 5th repo which will resolve some libraries in maven central that don't proxy through releases/snapshots repos https://nexus.onap.org/content/repositories/public, we also need the staging repo for some log handling versions.

<?xml version="1.0" encoding="UTF-8"?>
<!-- vi: set et smarttab sw=2 tabstop=2: -->
<settings xmlns="http://maven.apache.org/SETTINGS/1.0.0"
  xmlns:xsi="http://www.w3.org/2001/XMLSchema-instance"
  xsi:schemaLocation="http://maven.apache.org/SETTINGS/1.0.0 http://maven.apache.org/xsd/settings-1.0.0.xsd">

  <profiles>
    <profile>
      <id>openecomp-staging</id>
      <repositories>
        <repository>
          <id>openecomp-staging</id>
          <name>openecomp-staging</name>
          <url>https://nexus.onap.org/content/repositories/staging/</url>
          <releases>
            <enabled>true</enabled>
            <updatePolicy>never</updatePolicy>
          </releases>
          <snapshots>
            <enabled>false</enabled>
          </snapshots>
        </repository>
      </repositories>
      <pluginRepositories>
        <pluginRepository>
          <id>openecomp-staging</id>
          <name>openecomp-staging</name>
          <url>https://nexus.onap.org/content/repositories/staging/</url>
          <releases>
            <enabled>true</enabled>
            <updatePolicy>never</updatePolicy>
          </releases>
          <snapshots>
            <enabled>false</enabled>
          </snapshots>
        </pluginRepository>
      </pluginRepositories>
    </profile>
    <profile>
      <id>openecomp-public</id>
      <repositories>
        <repository>
          <id>openecomp-public</id>
          <name>openecomp-public</name>
          <url>https://nexus.onap.org/content/repositories/public/</url>
          <releases>
            <enabled>true</enabled>
            <updatePolicy>never</updatePolicy>
          </releases>
          <snapshots>
            <enabled>false</enabled>
          </snapshots>
        </repository>
      </repositories>
      <pluginRepositories>
        <pluginRepository>
          <id>openecomp-public</id>
          <name>openecomp-public</name>
          <url>https://nexus.onap.org/content/repositories/public/</url>
          <releases>
            <enabled>true</enabled>
            <updatePolicy>never</updatePolicy>
          </releases>
          <snapshots>
            <enabled>false</enabled>
          </snapshots>
        </pluginRepository>
      </pluginRepositories>
    </profile>
    <profile>
      <id>openecomp-release</id>
      <repositories>
        <repository>
          <id>openecomp-release</id>
          <name>openecomp-release</name>
          <url>https://nexus.onap.org/content/repositories/releases/</url>
          <releases>
            <enabled>true</enabled>
            <updatePolicy>never</updatePolicy>
          </releases>
          <snapshots>
            <enabled>false</enabled>
          </snapshots>
        </repository>
      </repositories>
      <pluginRepositories>
        <pluginRepository>
          <id>openecomp-release</id>
          <name>openecomp-release</name>
          <url>https://nexus.onap.org/content/repositories/releases/</url>
          <releases>
            <enabled>true</enabled>
            <updatePolicy>never</updatePolicy>
          </releases>
          <snapshots>
            <enabled>false</enabled>
          </snapshots>
        </pluginRepository>
      </pluginRepositories>
    </profile>

    <profile>
      <id>openecomp-snapshots</id>
      <repositories>
        <repository>
          <id>openecomp-snapshot</id>
          <name>openecomp-snapshot</name>
          <url>https://nexus.onap.org/content/repositories/snapshots/</url>
          <releases>
            <enabled>false</enabled>
          </releases>
          <snapshots>
            <enabled>true</enabled>
          </snapshots>
        </repository>
      </repositories>
      <pluginRepositories>
        <pluginRepository>
          <id>openecomp-snapshot</id>
          <name>openecomp-snapshot</name>
          <url>https://nexus.onap.org/content/repositories/snapshots/</url>
          <releases>
            <enabled>false</enabled>
          </releases>
          <snapshots>
            <enabled>true</enabled>
          </snapshots>
        </pluginRepository>
      </pluginRepositories>
    </profile>
    <profile>
      <id>opendaylight-release</id>
      <repositories>
        <repository>
          <id>opendaylight-mirror</id>
          <name>opendaylight-mirror</name>
          <url>https://nexus.opendaylight.org/content/repositories/public/</url>
          <releases>
            <enabled>true</enabled>
            <updatePolicy>never</updatePolicy>
          </releases>
          <snapshots>
            <enabled>false</enabled>
          </snapshots>
        </repository>
      </repositories>
      <pluginRepositories>
        <pluginRepository>
          <id>opendaylight-mirror</id>
          <name>opendaylight-mirror</name>
          <url>https://nexus.opendaylight.org/content/repositories/public/</url>
          <releases>
            <enabled>true</enabled>
            <updatePolicy>never</updatePolicy>
          </releases>
          <snapshots>
            <enabled>false</enabled>
          </snapshots>
        </pluginRepository>
      </pluginRepositories>
    </profile>

    <profile>
      <id>opendaylight-snapshots</id>
      <repositories>
        <repository>
          <id>opendaylight-snapshot</id>
          <name>opendaylight-snapshot</name>
          <url>https://nexus.opendaylight.org/content/repositories/opendaylight.snapshot/</url>
          <releases>
            <enabled>false</enabled>
          </releases>
          <snapshots>
            <enabled>true</enabled>
          </snapshots>
        </repository>
      </repositories>
      <pluginRepositories>
        <pluginRepository>
          <id>opendaylight-snapshot</id>
          <name>opendaylight-snapshot</name>
          <url>https://nexus.opendaylight.org/content/repositories/opendaylight.snapshot/</url>
          <releases>
            <enabled>false</enabled>
          </releases>
          <snapshots>
            <enabled>true</enabled>
          </snapshots>
        </pluginRepository>
      </pluginRepositories>
    </profile>
  </profiles>

  <activeProfiles>
    <activeProfile>openecomp-staging</activeProfile>
    <activeProfile>openecomp-public</activeProfile>
    <activeProfile>openecomp-release</activeProfile>
    <activeProfile>openecomp-snapshots</activeProfile>
    <activeProfile>opendaylight-release</activeProfile>
    <activeProfile>opendaylight-snapshots</activeProfile>
  </activeProfiles>
</settings>
If you are behind a proxy you can add a proxy section to your settings.xml
	<proxies>
        <proxy>
            <id>evil-corp-http</id>
            <active>true</active>
            <protocol>http</protocol>
            <host>proxy.evil-corp.com</host>
            <port>599</port>
            <nonProxyHosts>localhost|127.0.0.1|*.evil-corp.com|*.happy.evil-corp.com|fun.evil-corp.com</nonProxyHosts>
        </proxy>
        <proxy>
            <id>evil-corp-https</id>
            <active>true</active>
            <protocol>https</protocol>
            <host>proxy.evil-corp.com</host>
            <port>599</port>
            <nonProxyHosts>localhost|127.0.0.1|*.evil-corp.com|*.happy.evil-corp.com|fun.evil-corp.com</nonProxyHosts>
        </proxy>
	</proxies>