Types of Users and Usage Instructions:
Sr.No | User | Usage Instructions |
1. | Developers who are looking to onboard their mS | · Access the Nifi Web UI url provided to you · Follow steps 2.b to 2.d · You should be able to see your microservices in the Nifi Web UI by clicking and dragging ‘Processor’ on the canvas, and searching for the name of the microservice/component/processor. |
2. | Designers who are building the flows through UI and triggering distribution | · Access the Nifi Web UI url provided to you · Follow steps 3, right upto the end of the document |
3. | Infrastructure/ Admins who want to stand up DCAE Mod and validate it | · Follow start to the end |
1. Deployment of DCAE MOD components via Helm charts
<To be expanded later; deployment of MOD will be via Helm charts>
2. Configuring DCAE mod
The Nifi Registry UI (http://<hostname>/nifi-registry ) should now load if you don’t see errors with the Nifi Registry docker container logs (do docker logs modstandup_nifi-registry_1) and it is now able to find the postgresql database (which is now running as a separate process).

At this point, you can create a new bucket using the wrench tool in the UI and let’s say we name this new-bucket
Now let’s access the Nifi (DCAE designer) UI - http://<hostname>/nifi

a. Get the artifacts to test and onboard.
<Sample artifacts (Spec file/data-format) to be added later>
b. To onboard a data format and a component
Each component has a description that tells what it does.
These requests would be of the type
curl -X POST -u <user>:<password> http://<onboardingapi host>/onboarding/dataformats     -H "Content-Type: application/json" -d @<filepath to request>

curl -X POST -u <user>:<password> http://<onboardingapi host>/onboarding/components     -H "Content-Type: application/json" -d @<filepath to request>
In our case,
curl -X POST -u acumos:integration2019 http://localhost/onboarding/dataformats     -H "Content-Type: application/json" -d @df-request-model-b1-reporting-subscribe.json

curl -X POST -u acumos:integration2019 http://localhost/onboarding/components     -H "Content-Type: application/json" -d @components-request-model-b1-reporting.json
More posting requests for data formats and components
curl -X POST -u acumos:integration2019 http://localhost/onboarding/dataformats     -H "Content-Type: application/json" -d @df-request-model-b1-etl-subscribe.json

curl -X POST -u acumos:integration2019 http://localhost/onboarding/dataformats     -H "Content-Type: application/json" -d @df-request-model-b1-etl-publish.json

curl -X POST -u acumos:integration2019 http://localhost/onboarding/components     -H "Content-Type: application/json" -d @components-request-model-b1-etl.json

curl -X POST -u acumos:integration2019 http://localhost/onboarding/dataformats     -H "Content-Type: application/json" -d @df-request-model-b1-publish.json

curl -X POST -u acumos:integration2019 http://localhost/onboarding/dataformats     -H "Content-Type: application/json" -d @df-request-model-b1-subscribe.json

curl -X POST -u acumos:integration2019 http://localhost/onboarding/components     -H "Content-Type: application/json" -d @components-request-model-b1.json
c. Verify the resources were created using
curl -X GET -u acumos:integration2019 http://localhost/onboarding/dataformats
curl -X GET -u acumos:integration2019 http://localhost/onboarding/components
d. Verify the genprocessor (which polls onboarding periodically to convert component specs to nifi processor), converted the component
Open http://<genprocessor_host>/nifi-jars in a browser.
These jars should now be available for you to use in the nifi UI as processors
3. Design & Distribution Flow
To start creating flows, we need to create a process group first. The name of the process group will be the name of the flow.

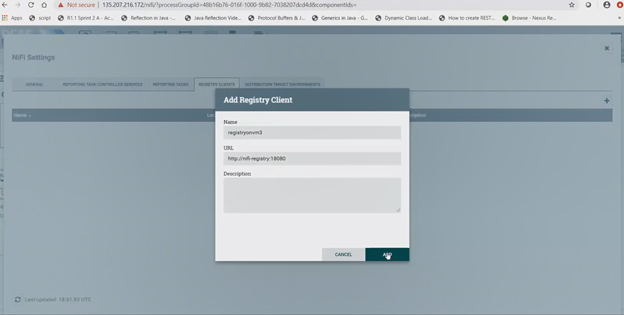
a. Configure Nifi Registry url
Next check Nifi settings by selecting the Hamburger button in the Nifi UI. It should lead you to the Nifi Settings screen

Add a registry client. The Url will be as shown for the current docker compose files. This url is on the internal docker network. This might change when not using docker compose.
Now enter the process group and drag and drop components that we need into the Process group.

If the Nifi registry linking worked, you should see the “Import” button when you try to add a Processor or Process group to the Nifi canvas, like so-
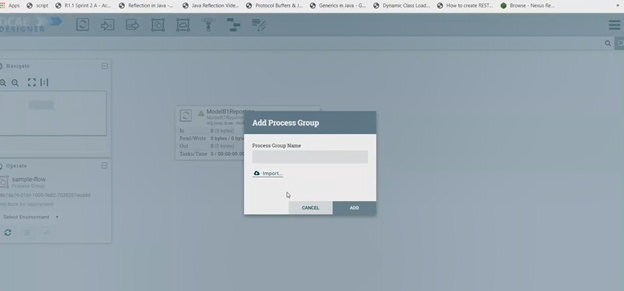
By clicking on the import button, we can import already created saved and version controlled flows from the Nifi registry, if they are present.

We can save created flows by version controlling them like so

Ideally you would name the flow and process group the same, because functionally they are similar.

When the flow is checked in, the bar at the bottom shows a green checkmark

Even if you move around a component, it is recognized as a change, and it will have to recommitted.
b. Adding components and building the flow
You can add additional components in your flow and connect them.
ModelB1Etl connects to ModelB1.

Along the way you need to also provide topic names in the settings section. These can be arbitrary names.

ModelB1 connects to ModelB1Reporting


At this point, in this design, we will drag and drop an Input port and call it ‘ves’ which will be a representation for incoming VES collector data. VES data source connects to ModelB1ETL


To recap, see how ves input port connects to ModelB1Etl connects to ModelB1 which connects to ModelB1Reporting. Look at the connection relationships. Currently there is no way to validate these relationships. Notice how it is required to name the topics by going to Settings.
The complete flow after joining our components looks like so

c) Add distribution target which will be the runtime api url
Once we have the desired flow checked in, we can go ahead and set the distribution target in the controller settings


d. Submit/ Distribute the flow:
Once your flow is complete and saved in the Nifi registry, you can choose to submit it for distribution.

If the flow was submitted successfully to the runtime api, you should get a pop up a success message like so -

At this step, the design was packaged and sent to Runtime api.
The runtime is supposed to generate the blueprint out of the packaged design/flow and push it to the DCAE inventory.
e. Checking the components in the DCAE inventory
curl -X GET -k https://135.207.216.182:32346/dcae-service-types | jq . | less
If you want to view all versions of the components
curl -X GET -k "https://135.207.216.182:32346/dcae-service-types?onlyLatest=false" | jq . | less
You should see the generated artifact/ blueprint in the DCAE inventory. The name for each component will be appended by the flow name followed by underscore followed by the component’s name.

These blueprints can also be seen in the DCAE Inventory dashboard.