Setting Up Your Development Environment
Start by following the page Setting Up Your Development Environment, this covers items such as signing up for a linux foundation account, configuring git, installing gerrit and IDE recommendations.
Downloading the Source Code
Downloading SDN-C Projects
Follow steps in Get git command from ONAP gerrit to get the git clone command and clone each of the following SDNC projects:
| Project Name | Project Description | has code |
|---|---|---|
| sdnc/adaptors | SDN-C adaptors | |
| sdnc/architecture | SDN-C architectural artifacts (e.g. blueprints) | |
| sdnc/core | SDN-C core platform | |
| sdnc/features | SDN-C Karaf features | |
| sdnc/northbound | SDN-C northbound adaptors | |
| sdnc/oam | SDN-C OA&M tools | |
| sdnc/parent | Parent POMS to be used by SDN-C components | |
| sdnc/plugin | SDN-C plugins |
Note: The ONAP SDN-C projects are more like a demo version of ECOMP's SDN-GC.
Downloading CCSDK Projects
Follow steps in Get git command from ONAP gerrit to get the git clone command and clone each of the following CCSDK projects:
| Project Name | Project Description | has code |
|---|---|---|
| ccsdk/dashboard | Opeations Manager Dashboard | |
| ccsdk/distribution | CCSDK distribution packaging (e.g. docker containers) | |
| ccsdk/parent | Parent POMs to be used by CCSDK clients | |
| ccsdk/platform/blueprints | Blueprints. not in Amesterdam release | |
| ccsdk/platform/nbapi | Northbound API | |
| ccsdk/platform/plugins | Platform plugins | |
| ccsdk/sli/adaptors | Common adaptors for use by directed graphs | |
| ccsdk/sli/core | Core Service Logic Interpreter classes | |
| ccsdk/sli/northbound | Common northbound APIS related to service logic interpreter | |
| ccsdk/sli/plugins | Common plugins used by direcged graphs | |
| ccsdk/storage/esaas | Elastic Storage as a Service. not in Amesterdam release | |
| ccsdk/storage/pgaas | PGAAS (PostgreSQL as a Service) | |
| ccsdk/utils | Utilities |
Get git clone Command from ONAP gerrit
The below instructions explain how to clone a repository from gerrit with the commit message hook included and it will be configured to use HTTPS. SSH is still the recommended protocol, these instructions serve as a workaround for users behind restrictive networking rules.
If you have worked on other projects in gerrit and are already familiar with cloning from gerrit you can ignore these instructions!
Check this only once
This should have been done as part of "Setting Up Your Development Environment" and is only needed if you are behind a proxy and plan to use HTTP.
If behind proxy, ensure git config has set http.proxy and https.proxy NVPs,
check with the following command:
git config -l
if no http/https proxies exist add them with the following commands:
git config --add http.proxy <your-proxy-http-url>
git config --add https.proxy <your-proxy-https-url>
here's an example:
git config --add http.proxy http://<user-id>:<password>@11234.proxy.com:8080
git config --add https.proxy https://<user-id>:<password>@11234.proxy.com:8080
Use your linux foundation account to login onto ONAP projects.
Get Project list by entering the project key name in the Filter, for example sdnc, this list of projects under sdnc will be shown as below:
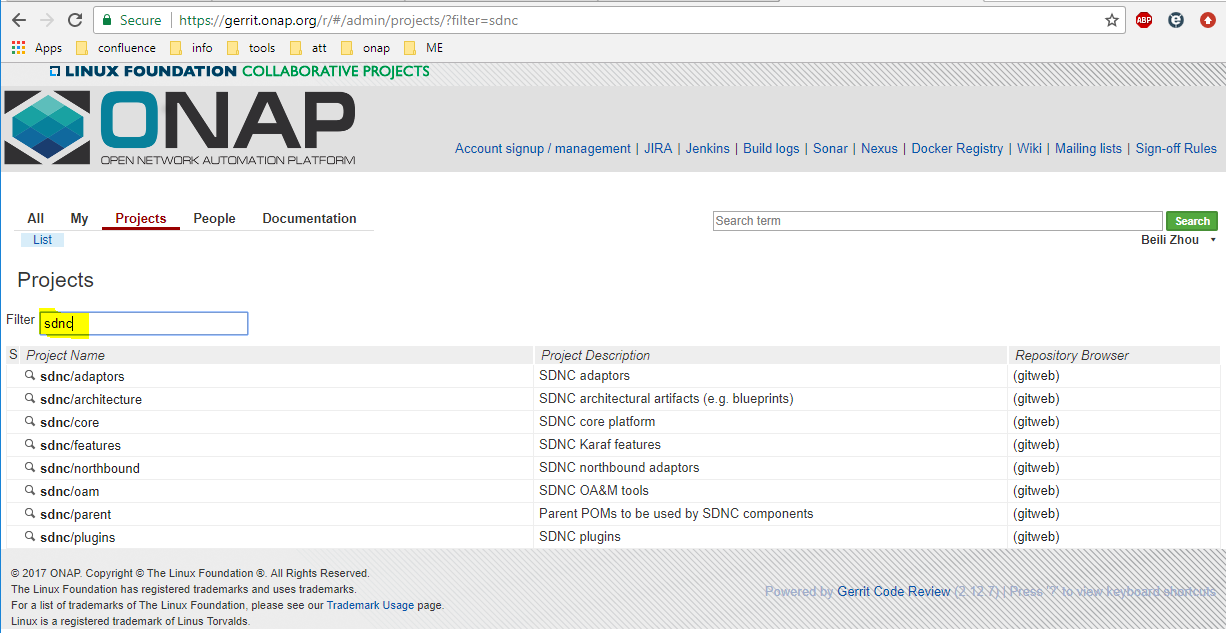
Click on the wanted project from the list, the General page of the selected project will be shown. the following is the General page of sdnc/adaptors:

Now click on Clone with commit-msg hook, then click on http, then click on the notepad icon.

The git clone command for the selected project is now copied into your clipboard. You do paste to use it at where-ever you want to.
View Code on gerrit Website
ONAP code can also be viewed from gerrit web site as below (sdnc/adaptors project is used as the example here):

To view the coce through gerrit client, first follow steps in Get git command from ONAP gerrit to get the Projects list page.
Then, choose either one of the following option to view the code of the desired project.
Option 1: View Through "gitweb" Option in Project List Page
Note: this option will bring you to, and only to, the HEAD branch which is the master branch.
In the project list page, click on the gitweb under the Repository Browser column of your project row.

The master branch's summary page will be shown up. Click on the tree option.

Now, the repo details page will be shown and you can view the code in master branch from there.
Option 2: View from "Branches" Option in Project Page
Note: This option allows you to select a particular branch to view it code.
In the project list page, click the project under the Project Name column. (using sdnc/adaptors project as example here)

It takes you to the project General page, click on the Branches option.

The project page will be switched to Branches page. Check out the Branch Name column, click the gitweb on the same row of the desired branch.

The project Summary page of the selected branch will be shown up. Click on the tree option.

Now, the repo details page will be shown and you can view the code in master branch from there.
Compiling
Maven
Version has to be version greater or equal to 3.3.3
Ensure your maven is installed / set up as per instruction from Maven section of Setting Up Your Development Environment page.
File settings.xml
Get settings.xml file
Following instruction from Maven Example settings.xml section of Setting Up Your Development Environment page to get your settings.xml file.
Just to emphasis
If behind proxy,
Add proxy definition under proxies block, if under proxy
1 |
|
Configure settings file in IntelliJ
If you are going to compile with intelliJ, follow steps in this section to configure settings.xml file in intelliJ.
If you did not make your Maven Project by default shown, do the following:
In intelliJ, Select View -> Tool Windows -> Maven Project
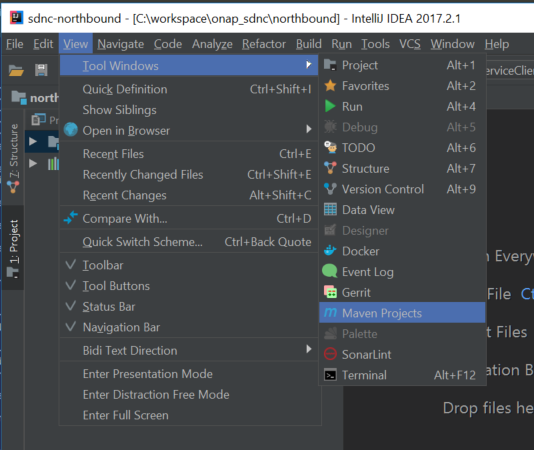
The maven project will shown on the right side of the intelliJ window.

Click the Maven Settings wrench to bring up the Settings window:
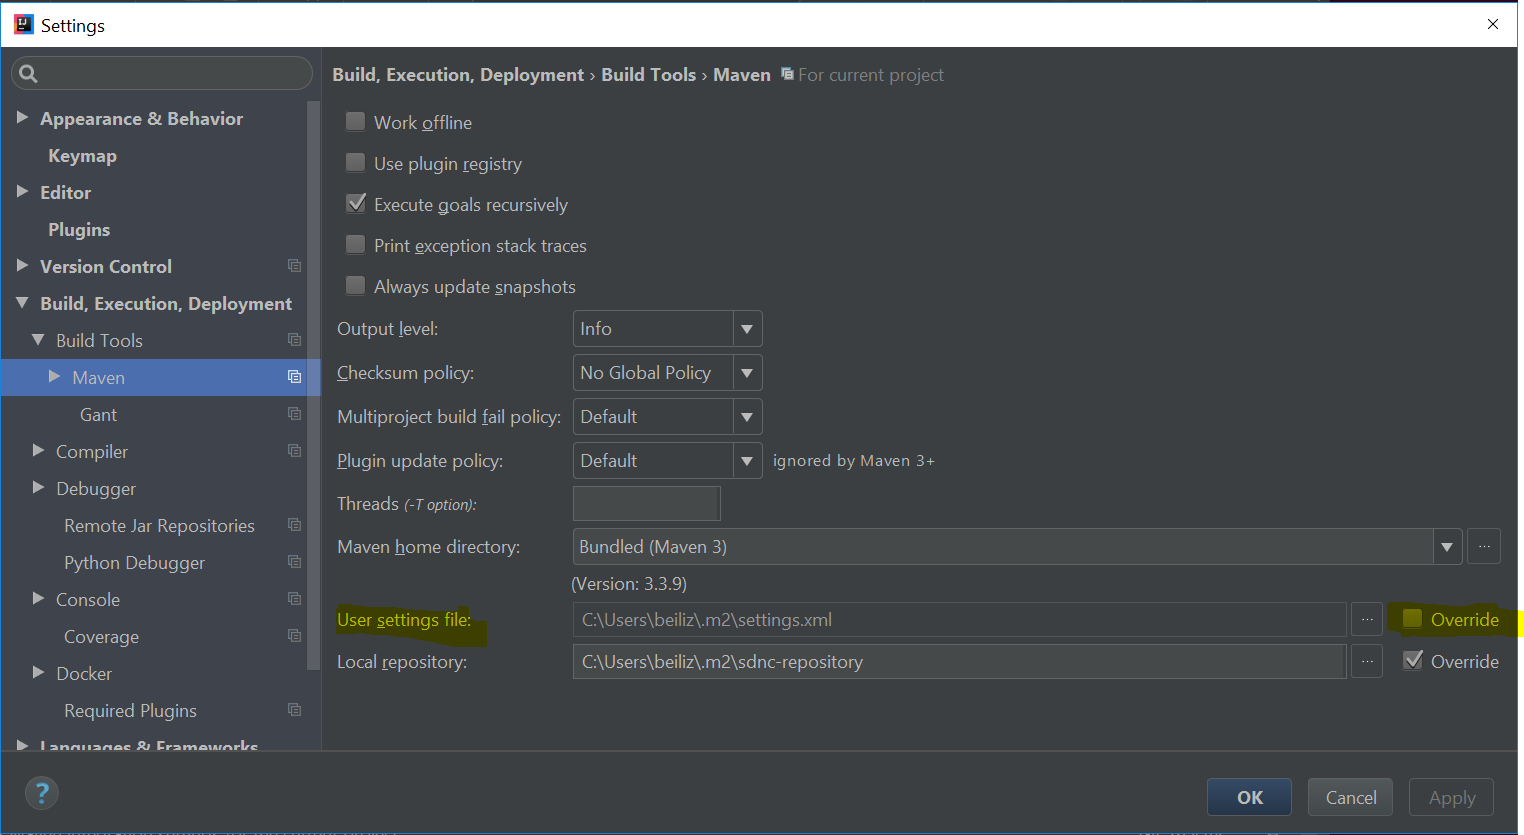
Select the Override of the User settings file, add the settings.xml file full path, the Apply button will be enabled. click on Apply to apply the change.
Build The Code
Projects Build Order
The SDN-C projects repositories should be built in the following order:
- sdnc/core
- sdnc/adaptors
- sdnc/northbound
- sdnc/plugins
- sdnc/oam
Run Maven Build
Build From Command Line
Under the directory where your clone code is, run the following command to build the project
mvn clean install -s <the settings.xml file with full path>
Build Within IntelliJ
From intelliJ Maven Projects window, find the module marked with (root), expand it by clicking on the triangle on the left side or double clicking the text. It will then show two folders : Lifecycle and Plugins. Use the same way to expand the Lifecycle folder, the build options are now shown:

To run the build, double click the Install or select install and then click on the Run Maven Build triangle icon.
To do clean, double click the clean or select clean and then click on the Run Maven Build triangle icon.
Tips
Skip Maven Javadoc Build
In the case, maven javadoc compliation failing which causes build process abort. To continue build the code, we need to skip the maven javadoc compilation.
From command line
add the "maven.javadoc.skip=true" in the command line build command as the following:
mvn clean install -Dmaven.javadoc.skip=true -s <the settings.xml file with full path>
From pom file
add the following property definition:
Unit Testing
Definition of Good Unit Test
Before start writing unit test, it's important that there's a common definition of what a good unit test is.
From the official site of Roy Osherove’s book The Art of Unit Testing:
A unit test is an automated piece of code that invokes a unit of work in the system and then checks a single assumption about the behavior of that unit of work.
In SDN-C project, the unit of work is being defined as Java Method and a "good" Unit Test:
- Is fully automated, integrated with the build process, executes fast, and can be run in any order.
- Executes a specific service flow through a Java method with a known expected result based on the input parameters provides.
- Executes in isolation and doesn't interact with any external methods.
- Executes in memory and does not interact with any external systems, files or databases.
- Consistently return the same result and the result can be trusted. It's Reliable, Repeatable, and Deterministic.
Unit Test Best Practices
- Arrange, Act, and Assert
- Arrange everything you need for the Unit Test.
- Act invokes the method under test and captures the results.
- Assert represents the act of testing, it compares the actual result against the expected result. Assert(s) must be present to have a valid unit test.
- Assert The Results Are Correct
- The Unit Test expects a result based on input and asserts it.
- Simply testing that no exception has been thrown is not enough.
- Avoid the common mistake of testing all of the functionality in one test case.
- Use a Naming Convention for Test Cases
- Follow the shared naming convention when naming test cases.
- Standards increase maintainability, readability and visibility.
- Avoid Test Interdependence
- Each test should handle its own setup and tear down.
- Do not maintain state information between test cases
- Keep Test Short, Sweet, and Visible
- You want the test setup logic to be visible at a glance.
- Unit test code should be concise
- When a unit test fails you want to quickly and easily see what went wrong.
Unit Test Coverage
When determining what to unit test there are several key principles to keep in mind.
- Unit tests should verify business logic.
- Unit tests should be written that verify your code behaves as expected in "normal" scenarios as well as in more "unexpected" scenarios, like boundary conditions or error conditions (null or missing input values)
- Every time a bug is reported unit tests should be created or enhanced for the faulty code
- Do not unit test trivial code like getters and setters.
- Do not unit test external frameworks or application library functions, assume they work.
- Do not unit test database operations, assume they work when the database is available.
Java code coverage can be measured using an external tool such as JaCoCo which ONAP sonar build is using.
JUnit Test
JUnit is the unit test framework used for testing Java. It is recommend to use Junit4 and Mockito to write the junit tests.
JUnit Unit Test Naming Conventions
- The name of the test class should be the name of the class it is testing plus the word Test.
- For example, class MyClass.java has test class MyClassTest.java.
- The name of a test should contain the name of the method being tested, scenario and expected output.
- For example, test createCustomerWithNoNameRaisesException would be a test which is testing the method createCustomer, it tries to do so without providing a name so an exception should be raised.
Create JUnit Test in IntelliJ
This applies to both creating brand new JUnit Test class or navigating to existing test class to add new additions.
Open the class that you are going to write JUnit test for in IntelliJ.
In anywhere of this class editor, do Ctrl+Shift+T or right click to bring up right click menu, then select Go To, then Test in the cascaded menu:

This will bring up the Choose Test for... window as below.
Choose Create New Test... for creating brand new JUnit Test, or just choose the test class to go to the existing tests.

When Create New Test... is selected, the Create Test window will be brought up:
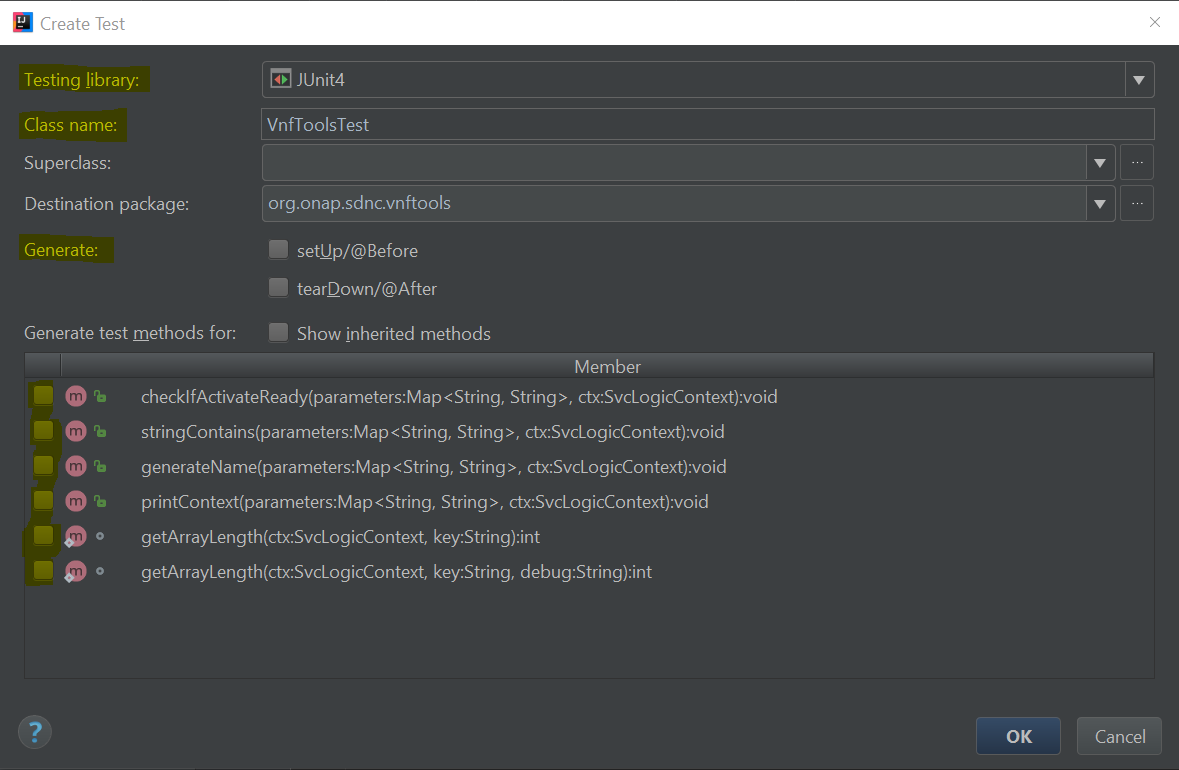
The test Class name is automatically generated and shown in the window. Ensure the Testing library is selected with JUnit4.
Select
- setUp and tearDown for automatically generated setUp and tearDown methods block for each test case set up and tear down.
- the methods under Generate test methods for to automatically generate test method block for that method.
Click OK button, once you completed your selection/set up in the Create Test window.
It will bring you to the edit page of the new test class.
Add Dependency to POM File
If the Junit and mockito dependencies are not in the module and its parent pom file, add them to the module's pom.xml file. A sample snippet is below:
Mock Class Level Attributes
More about how to use Mockito can be found from Mockito Tutorial.
Sometimes you do want to set/get class level attributes to satisfy complex test code and still keep the test coverage in sonar achievable, Whitebox of package org.mockito.internal.util.reflectio could be used to do code reflection.
static Object | getInternalState(Object target, String field) |
static void | setInternalState(Object target, String field, Object value) |
Issue With Using PowerMockito
There are multiple advantages of using PowerMockito to easily write the junit test.
However, we don't recommend to use Powermockito, due to the issue of Jacoco is not compatible with PowerMockito.
Commiting Code
Install git-review
To commit code to ONAP, you must have git-review installed. The steps in this section only need to be done one time, except the Tips ![]() . This should have been done already during Setting Up Your Development Environment.
. This should have been done already during Setting Up Your Development Environment.
On Linux
run the following command to check if git-review is installed as part of your OS image.
git-review
If not the following command to install the git-review.
sudo apt install git-review
here's an example:
On Windows
must have git installed
If you do not have git installed, following Install Git on Windows at atlassian's tutorials for installing git to
- download the Git for Windows installer
- start installer and follow Git Setup wizard screen Next until Finish prompts to complete the installation.
must have python installed
If you do not have python installed, following Python & pip Windows installation to
- download Python window installer
- start installer and select Add Python to PATH option
install git-review using pip
Open a git bash terminal by
- going to the bin directory under your git installed directory (for example, C:\Program Files\Git\bin directory ),
- run bash.exe
In the git bash terminal, run the following command to install git-review
c:/Python27/Scripts/pip2.7 install git_review --proxy <your proxy>
Set Git Remote Gerrit
Check your git remote setting, use the following command
git remote -v
Here's an example of output:
If the gerrit does not exist, you need to set it up with the following command:
git remote add gerrit <the link of the origin>
Note: the remote origin is added automatically after git clone of the repo. The gerrit link is the same as the origin's, hence, we just directly use it.
Set Git Config
Use the following command to check your git config:
git config -l
Ensure that you have the following configuraiton set properly:
| GIT Config Key | Expected Value | Setting Command |
|---|---|---|
| core.eol | lf | git config --global core.eol lf |
core.autocrlf | true | git config --global core.autocrlf true |
| user.name | your name | git config --global user.name <your name> |
| user.email | your email address | git config --global user.email <your email address> |
Creating A Review
Checkout the master branch, work on your changes, once you are ready for submission, do the following to create a review.
- Ensure your workspace is clean and up-to-date
Use the following command to check all the changes in the master branch
git status
Ensure
- your branch is up-to-date with the origin/master
- do a git pull to get the latest master code
- all the changed files are the ones you wanted to submit.
- remove any un-wanted files
- your branch is up-to-date with the origin/master
2. Run the following commands in the listed order to create a review
| Steps | Command | Notes |
|---|---|---|
| 1 | git commit -sam <comment summary> | Commit summary should not exceed 50 char. See ONAP Commit Messages for more details. |
| 2 | git log --shortstat | To ensure change lines are properly done and your commit has the following:
Here's an example: If the Change-Id does not exist, do not proceed. You need to following Fix no change-id to fix it before proceeding further. |
| 3 | git commit --amend | Use this command to do the following:
|
| 4 | git review | This command will create the review at Gerrit. Once this command is completed, your newly created review can be found from Outgoing reviews in Gerrit self dashboard . |
3. Update the Gerrit Review to get ready
From Gerrit self dashboard, click your newly created review, it will bring up the review details.
Click the Add button in the Reviewers section, to add reviewers (who is going to review your code) and committers (who is going to review your code as well as approve and commit your code).

Note:
- The ONAP Jobbuilder will be added automatically within one or two minutes after the review created, and a verfiy build will also be automatically triggered for your review in ONAP jenkins server.
- The committer can be found from Software Defined Newtork Controller secion in Resources and Repositories (Deprecated) page.
By now, you will just wait and check your email for information of
- If the verify jenkins build is passed for your review
- If it is passed, ONAP Jobbuilder will add a +1 to the Verified field in your review.
- If there's any comments in your review
- the comments details can be view from the History section by clicking on the description or Expand All button
- If your review has been merged
- If your review is merged or in process to be merged, you will see in the Code-Review field, you have a +2 from one of the committer you have added in your Reviewers.
Tips
How to Change the Comments in a Review
Oops, I made a mistake in my review comments. It cannot be changed in the gerrit review. ![]()
Go back to your workspace, and do the following to change the comments of your existing review.
| Steps | Command | Notes |
|---|---|---|
| 1 | git commit --amend | update the comment as desired |
| 2 | git log --shortstat | validate your commit now has the updated comments, as well as the Change-Id as the one in the gerrit review |
| 3 | git review | push the changed comment to the review again. Once the command is completed, go to your review, you will see
|

How to Update the Code in a Review
Now, I got comments in my view, and I have made the code adjustment in my workspace and tested.
Follow the steps to push your new code changes to the your existing reiew.
| Steps | command | notes |
|---|---|---|
| 1 | git commit -sam "my updated code" | To create a new commit with your updated code |
| 2 | git log --shortstat | you will see the most 2 recent commits are from
|
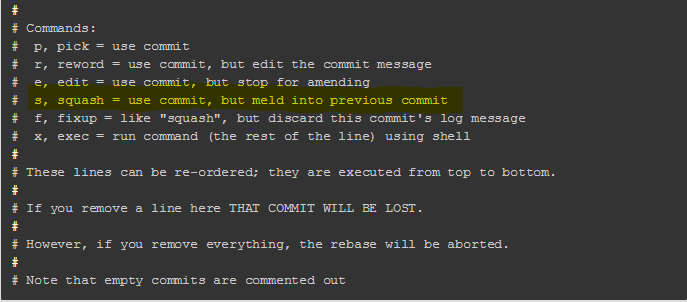
| 3 | git rebase -i HEAD~2 | To run rebase interactively for the most recent 2 commits In the interactive mode, it will bring up the text which contains pick for your last 2 commits along with the following content:
Do the following:
Once this command is completed, 2 commits will be merged into 1 commit. |
| 4 | git log --shortstat | you will see there's only 1 commit which replaces the 2 commit you have seen in step 2. validate your commit has the Change-Id as the one in the gerrit review |
| 5 | git review | push the changed comment to the review again. Once the command is completed, go to your review, you will see
|

How to Fix a Commit which Does Not have a Change-Id
The would only happen when you are creating your very first review in a repo. It mainly because your workspace might have some mis-config which lead your repo clone was not done properly with the Clone with commit-msg hook option.
Follow the steps below to do the correction.
| Steps | Command | Notes |
|---|---|---|
| 1 | git reset HEAD~1 | to undo the commit |
| 2 | from github helper page, download commit-msg, and place it under your <repo>/.git/hooks directory if your O/S adds and extension to the file, remove. It must be named "commit-msg" | set the proper commit-msg hook this will set the Change-Id properly in your commit |
| 3 | Use your previous command to create the commit again | |
| 4 | git log --shortstat | to check the existence of Change-Id |
How to Find All of Your Merged Changes
You can find your recent merged changes from Gerrit self dashboard, however, it only works for Recent changes.
To find all of your changes, you can type in "is:closed(owner:self)" in the Search field at Gerrit self dashboard, then click on the Search button.

Deployment
Deploying a Minimal ONAP SDN-C Environment
This tutorial is based on ONAP-integration project[1] which utilizes Vagrant[2], a deployment tool to build an ONAP environment.
The goal of this section is to guide how to quickly deploy a running ONAP SDN-C envrionment which is going to use the existed image in the ONAP Nexus3 server.
Actually it supports various automate deployment environment including compling code with maven, building docker images as part of the deployment procedure.
ONAP-integration
"Integration framework, automated tools, code and scripts, best practice guidance related to cross-project Continuous System Integration Testing (CSIT), and delivery of ONAP."
Setup
| Tool | Version | Introduction |
|---|---|---|
| Vagrant | 1.9.5 | https://www.vagrantup.com/ |
| Virtualbox | 5.1.20 | https://www.virtualbox.org/ |
Git | 2.14.3 | https://git-scm.com/ |
(1) After installation, make sure that your system is restarted in order to let configuration be activated.
Basic Installations
Windows 10
Download the exe of the following (from the link listed in the above table) and install:
- vagrant
- virtualbox
- git
Ubuntu 16.04
Do the following:
Install virtualbox
Add the following line to your /etc/apt/sources.list:
deb http://download.virtualbox.org/virtualbox/debian xenial contribRun the command below
wget -q https://www.virtualbox.org/download/oracle_vbox_2016.asc -O- | sudo apt-key add -
wget -q https://www.virtualbox.org/download/oracle_vbox.asc -O- | sudo apt-key add -
sudo apt-get update
sudo apt-get install virtualbox-5.1
Create Virtualbox "vboxnet0" Host-only networking
On windows installation this may have been created already.
See "https://www.virtualbox.org/manual/ch06.html#network_hostonly"
VBoxManage hostonlyif create
Install vagrant
wget https://releases.hashicorp.com/vagrant/1.9.5/vagrant_1.9.5_x86_64.deb
sudo dpkg -i vagrant_1.9.5_x86_64.deb
Install git
sudo apt-get install git
Integration Project
Download The Project
Clone the intergration project with the following command:
git clone https://git.onap.org/integration
Hint: More information could be found under integration\bootstrap\vagrant-onap\README.md
Configure Deployment Mode
There is an settings.yaml.development under integration\bootstrap\vagrant-onap\etc (deprecated - /etc directory has been moved to project integration/devtool)used for different deployment scenarios.
The goal is to have a running SDN-C environment, so in the configuration, it turns off clone and build project. Only file name called settings.yaml will be picked-up by the deployment script.
Run the following command to create settings.yaml file from the repo's settings.yaml.development file:
cp settings.yaml.test settings.yaml
vim settings.yaml
Here's the example of the outcoming settings.yaml file:
build_image: "False"
clone_repo: "False"
compile_repo: "False"
enable_oparent: "False"
skip_get_images: "False"
skip_install: "False"
Hint:
- Under integration\bootstrap\vagrant-onap\doc\source\features\configure_execution.rst, it talks about the functionality of these attributes.
- Under integration\bootstrap\vagrant-onap\doc\source\features\example_usage.rst, it talks about the use cases of using this tool.
Modify Vagrantfile
vim integration/bootstrap/vagrant-onap/Vagrantfile
In configuration = {...}, find docker_version and update the corresponding value to 'latest'
If you are using VirtualBox provider and have an issue with the VM vagrant creates not resolving hostnames then enable the natdnshostresolver1
Here is the diff that worked at the time of writting this.
diff --git a/bootstrap/vagrant-onap/Vagrantfile b/bootstrap/vagrant-onap/Vagrantfile
index 0664e5f..667d3bf 100644
--- a/bootstrap/vagrant-onap/Vagrantfile
+++ b/bootstrap/vagrant-onap/Vagrantfile
@@ -13,7 +13,7 @@ configuration = {
   'nexus_password'      => 'docker',
   'dmaap_topic'         => 'AUTO',
   'artifacts_version'   => '1.0.0',
-  'docker_version'      => '1.0-STAGING-latest',
+  'docker_version'      => 'latest',
   # Parameters for DCAE instantiation
   'dcae_zone'           => 'iad4',
   'dcae_state'          => 'vi',
@@ -302,6 +302,11 @@ end

 Vagrant.configure("2") do |config|

+   if provider == :virtualbox && "sdnc".eql?(requested_machine)
+     config.vm.network "forwarded_port", guest: 8282, host: 8282, protocol: "tcp", auto_correct: true
+     config.vm.network "forwarded_port", guest: 8201, host: 8201, protocol: "tcp", auto_correct: true
+   end
+
   # PROXY definitions
     if ENV['http_proxy'] != nil and ENV['https_proxy'] != nil and ENV['no_proxy'] != nil
       if not Vagrant.has_plugin?('vagrant-proxyconf')
@@ -340,6 +345,7 @@ Vagrant.configure("2") do |config|
         # Common Settings:

         nodeconfig.vm.provider "virtualbox" do |vbox|
+          vbox.customize ['modifyvm', :id, '--natdnshostresolver1', 'on']
           vbox.customize ['modifyvm', :id, '--nictype1', 'virtio']
           vbox.customize ['modifyvm', :id, '--audio', 'none']
           vbox.customize ['modifyvm', :id, '--vram', '1']
Also
Modify the SDN-C Deployment Script
The get_sdnc_images function in the "integration/bootstrap/vagrant-onap/lib/sdnc" may need to be synchronized with the images defined in the docker compose file [sdnc/oam.git] / installation / src / main / yaml / docker-compose.yml. If these are not synchroned you will get a
pull access denied for [image name], repository does not exist or may require 'docker login'
In addition to the synchonizing the images the keyword openecomp has changed to onap.
Here is the diff that worked at the time of writting this.
diff --git a/bootstrap/vagrant-onap/lib/sdnc b/bootstrap/vagrant-onap/lib/sdnc
index a69ce18..ff582fe 100755
--- a/bootstrap/vagrant-onap/lib/sdnc
+++ b/bootstrap/vagrant-onap/lib/sdnc
@@ -3,7 +3,7 @@
 source /var/onap/functions
 source /var/onap/ccsdk

-sdnc_src_folder=$git_src_folder/openecomp/sdnc
+sdnc_src_folder=$git_src_folder/onap/sdnc
 sdnc_repos=("sdnc/adaptors" "sdnc/architecture" "sdnc/core" "sdnc/features" \
 "sdnc/northbound" "sdnc/oam" "sdnc/parent" "sdnc/plugins")

@@ -45,9 +45,11 @@ function get_sdnc_images {
     if [[ "$build_image" == "True" ]]; then
         _build_sdnc_images
     else
-        pull_openecomp_image sdnc-image openecomp/sdnc-image:latest
-        pull_openecomp_image admportal-sdnc-image openecomp/admportal-sdnc-image:latest
-        pull_openecomp_image dgbuilder-sdnc-image openecomp/dgbuilder-sdnc-image:latest
+        pull_onap_image sdnc-image onap/sdnc-image:latest
+        pull_onap_image admportal-sdnc-image onap/admportal-sdnc-image:latest
+        pull_onap_image ccsdk-dgbuilder-image onap/ccsdk-dgbuilder-image:latest
+        pull_onap_image sdnc-ueb-listener-image onap/sdnc-ueb-listener-image:latest
+        pull_onap_image sdnc-dmaap-listener-image onap/sdnc-dmaap-listener-image:latest
     fi
     pull_docker_image mysql/mysql-server:5.6
 }
Deployment
Start Deployment
cd integration/bootstrap/vagrant-onap
./tools/run.sh sdnc
This will configure and start the guess VM
configure and start the sdnc docker resources on the guest VM.
and finnaly the SDNC will start
wait
Once the vagrant has completed running it will still take some time for SDNC to come up. Have patience.
Connecting to your deployment
Basic Usage of Vagrant
Vagrant commands are executed on the Base OS.
Get Detail about the vagrant Commands
Print the usage use the '-h' option
vagrant -h
vagrant <command> -h
check running vm instances
From the Base OS use the following command to see the running guest VM id and name.
vagrant global-status
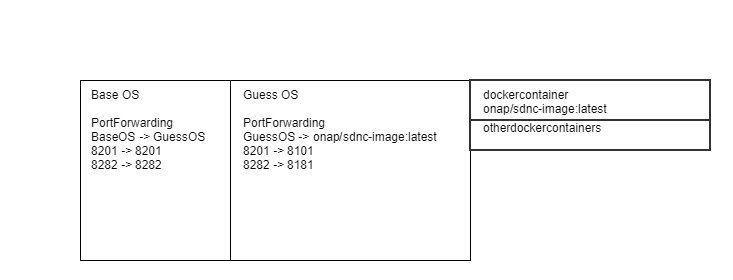
Port Forwarding
The guest VM is running in its own private network and is using the NAT to get the the Base OS network. To see the port forwarding run the following command.
vagrant port sdnc
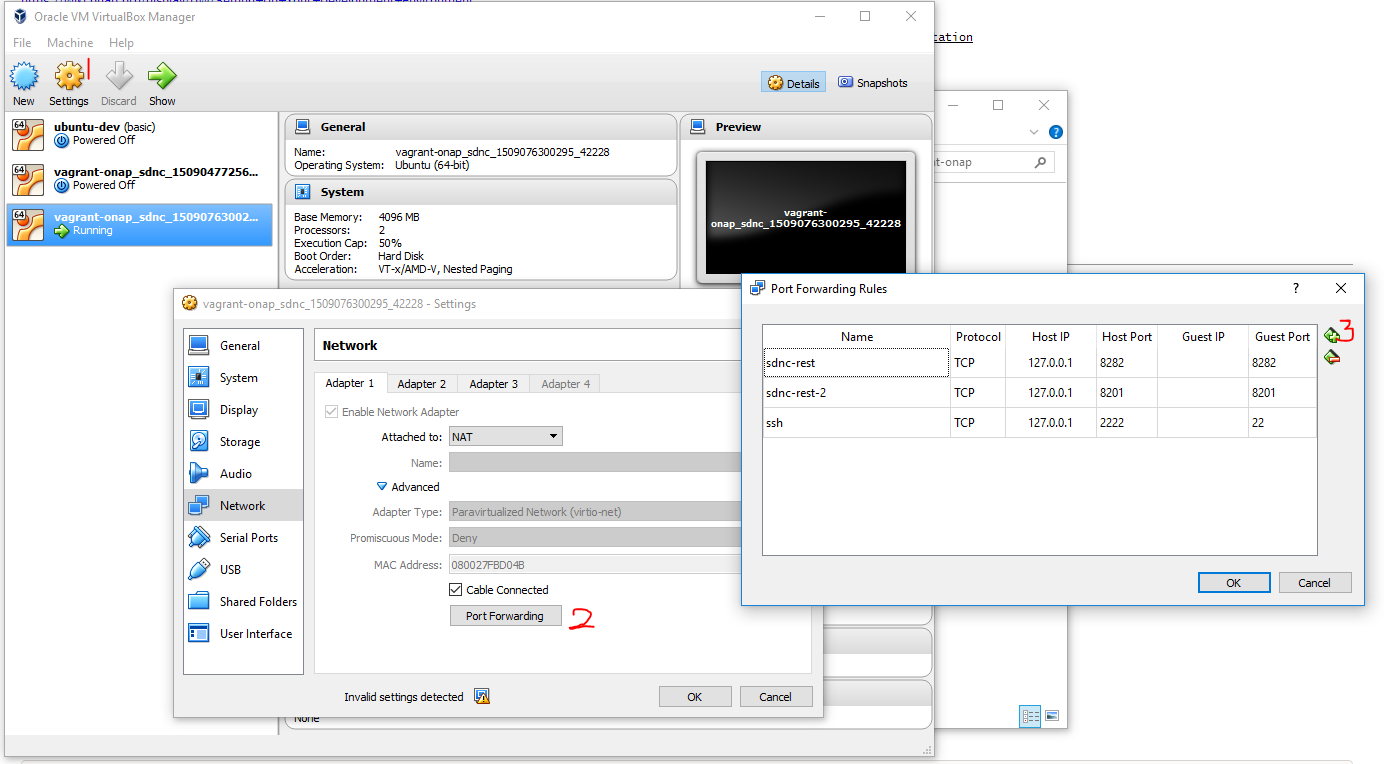
If you don't see any ports Oops. Configuring port-forwarding should have been configured earlier when editing the [integration.git] / bootstrap / vagrant-onap / Vagrantfile. Something must of went wrong. Here is the example of a snippet that can be added to the Vagrant file.
 Vagrant.configure("2") do |config|

   if provider == :virtualbox && "sdnc".eql?(requested_machine)
     config.vm.network "forwarded_port", guest: 8282, host: 8282, protocol: "tcp", auto_correct: true
     config.vm.network "forwarded_port", guest: 8281, host: 8202, protocol: "tcp", auto_correct: true
   end
Port forwarding can also be configured in the Virtual Box Gui. Here is an example
ssh to the Guest OS
The follow command will open a ssh terminal to the running guess vm. The guest vm name or id can be used.
vagrant ssh sdnch
Basic Usage of Docker
docker commands are executed on the guest OS
Get Detail about the dockerCommands
Print the usage use the '-h' option
vagrant -h
vagrant <command> -h
List docker container images
On the Guess VM execute the docker commands
docker images
List the running docker containers
The following command will list the running docker containers. The container's id, name and which ports are forwarded to the Guess OS can be found in this list.
docker ps -a
open a terminal to a docker running docker container
Use the docker container id or name use the following command to open a terminal to that container.
docker exec -i -t sdnc_controller_container bash
OpenDaylight RestConf API Web GUI
To connect to the running sdnc port forwarding must be configured correctly. The port forwarded in the instruction above was 8282.
http://baseoshostip:8282/apidoc/explorer/index.html
The credentials to connect to the SDNC Web GUI are can be found in the file [sdnc/oam.git] / installation / sdnc / src / main / scripts / startODL.sh. Look for the variable ODL_ADMIN_PASSWORD
Here is an example
Credentials: admin/Kp8bJ4SXszM0WXlhak3eHlcse2gAw84vaoGGmJvUy2U
Reference:
[1] ONAP integration: https://git.onap.org/integration/
[2] Vagrant: https://www.vagrantup.com/
[3] ONAP SDC setup: Using Vagrant-Onap for local deployment of SDC project - WIP!!!#OnapforlocaldeploymentofSDCproject-WIP!!!-InitialSetup
[4] Virtualbox Download link: https://www.virtualbox.org/wiki/Linux_Downloads
Deploying New Code (based on the standard ONAP lab setup)
This tutotial talks about one way to deploy new sdnc code into the corresponding docker image which is based on the prevjous chapter "Deploying a Minimal ONAP SDN-C Environment"
Example: Deploy feature.zip File into Docker Image
The example is about adding a new rpc in the generic-resource-api which is a sub-module of northbound project.
Download Project
Download sdnc-northbound project and put it under integration/boostrap/vagrant-onap/opt/openecomp/sdnc
This step is not necssary which is used to align with the folder path where ONAP-integeration clone, complie project.
Add a New RPC
Edit northinboud/generic-resources-api/model/src/main/yang/GENERIC-RESOURCES-API.yang
For example
...
rpc haok-sdnc-test {
    output {
      leaf hello-world {
         type string;
         mandatory true;
      }
    }
}
...

Use Maven to Build Project
build generic-resources-api/model
Write a Simple Implemenation
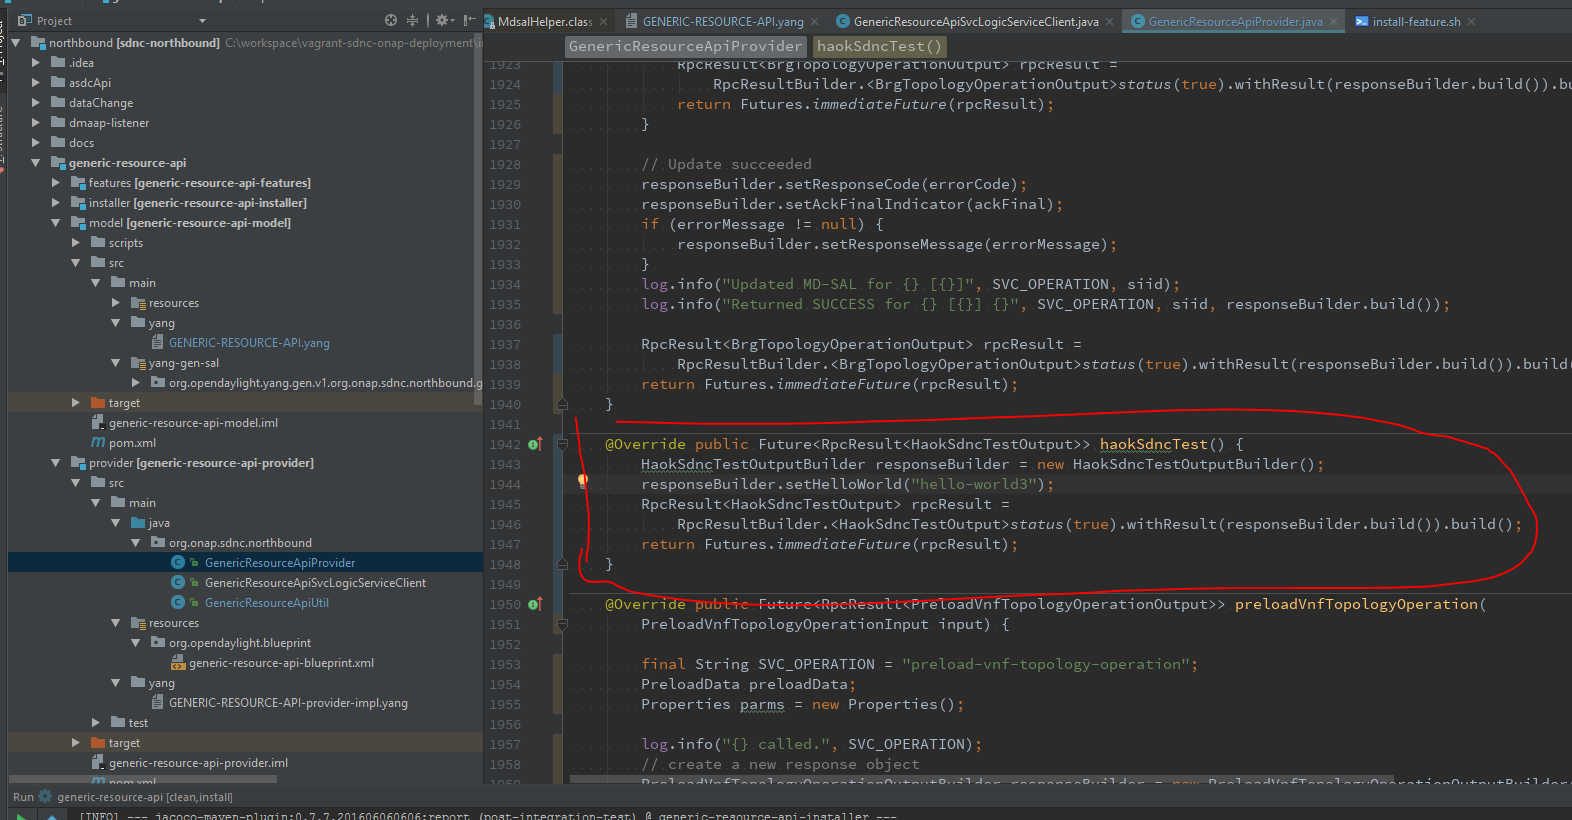
Implement the new rpc generated by YANG model in GenericResourcesApiProvider
For example
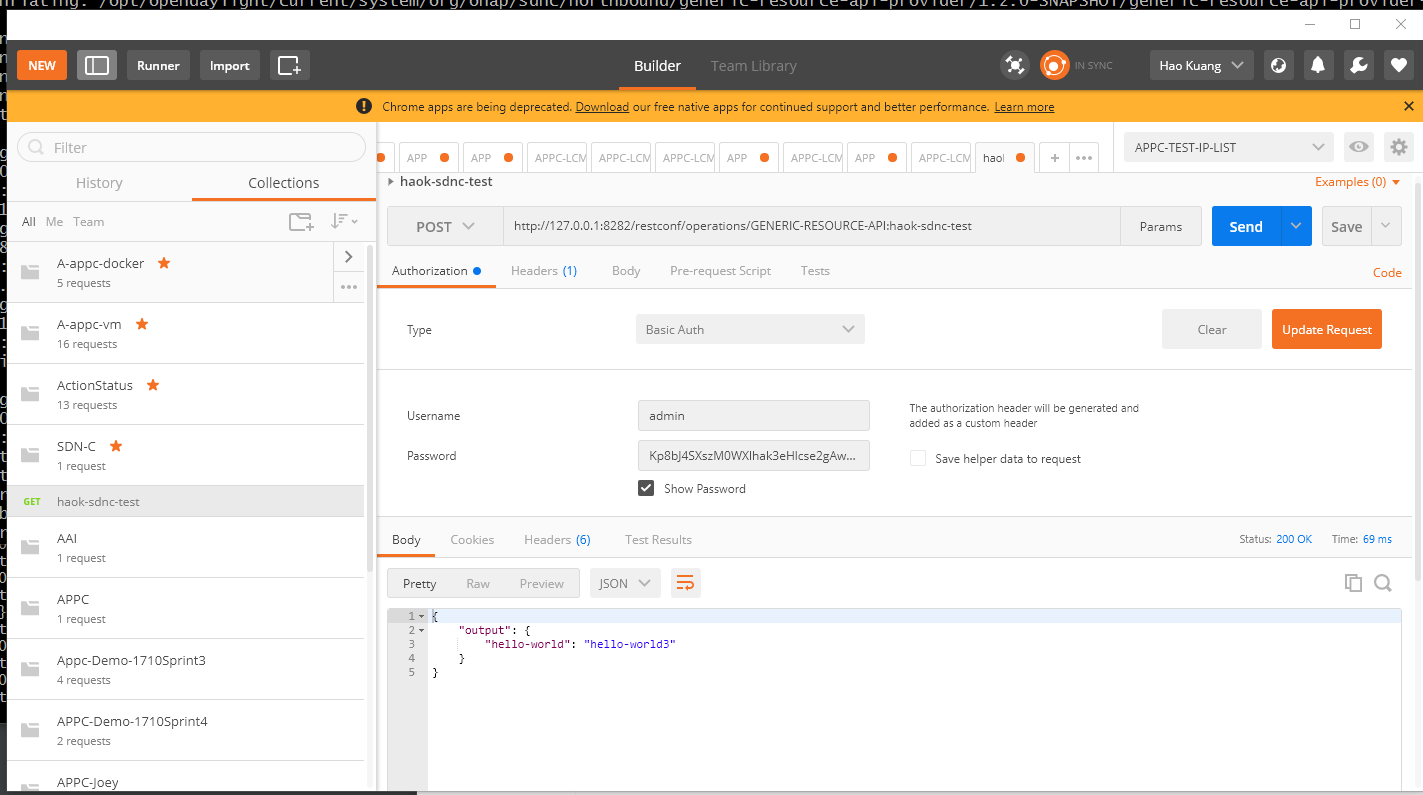
@Override public Future<RpcResult<HaokSdncTestOutput>> haokSdncTest() {
    HaokSdncTestOutputBuilder responseBuilder = new HaokSdncTestOutputBuilder();
    responseBuilder.setHelloWorld("hello-world3");
    RpcResult<HaokSdncTestOutput> rpcResult =
        RpcResultBuilder.<HaokSdncTestOutput>status(true).withResult(responseBuilder.build()).build();
    return Futures.immediateFuture(rpcResult);
}
Copy and unzip feature
vagrant ssh $(vagrant global-status | grep sdnc | awk '{print $1}')docker cp /opt/openecomp/sdnc/northbound/generic-resource-api/installer/target/sdnc-generic-resource-api-1.2.0-SNAPSHOT-installer.zip $(docker ps -a | grep "/sdnc-image" | awk '{print $1}'):/opt/sdnc/featuresdocker exec -it $(docker ps -a | grep "/sdnc-image" | awk '{print $1}') bashcd /opt/sdnc/features
unzip -o sdnc-generic-resource-api-1.2.0-SNAPSHOT-installer.zip
unzip -o -d /opt/opendaylight/current sdnc-generic-resource-api/sdnc-generic-resource-api-1.2.0-SNAPSHOT.zip
rm sdnc-generic-resource-api-1.2.0-SNAPSHOT-installer.zip
rm -rf sdnc-generic-resource-api
Re-install Feature
/opt/opendaylight/current/bin/client -u karaf feature:uninstall sdnc-generic-resource-api
/opt/opendaylight/current/bin/client -u karaf feature:repo-remove mvn:org.onap.sdnc.northbound/generic-resource-api-features/1.2.0-SNAPSHOT/xml/features
/opt/opendaylight/current/bin/client -u karaf feature:repo-add mvn:org.onap.sdnc.northbound/generic-resource-api-features/1.2.0-SNAPSHOT/xml/features
/opt/opendaylight/current/bin/client -u karaf feature:install sdnc-generic-resource-api
docker restart $(docker ps -a | grep "/sdnc-image" | awk '{print $1}')Hint: The version 1.2.0-SNAPSHOT could be updated in the future. Please update the version according to the current project version.
Here is an simple sdnc-docker-auto-deploy script if you would like to use.
Download Link: sdnc-docker-auto-deploy.zip
After download this link, unzip the file under integration//vagrant-onap/opt.
Use Vagrant ssh to connect your running sdnc vm.
and find the script, run ./sdnc-docker-auto-deploy.cfg.
The corresponding configuation is in sdnc-docker-auto-delpoy.cfg.
Verify new rpc
It takes a miniute to restart the karaf platform which really depends on the performance of your host machine.
Remote Debugging
This is the tutorial about how to turn on the remote debug for sdnc docker instance.
SSH to VM
vagrant ssh ${vm-id}Pre-setup
export MTU=$(/sbin/ifconfig | grep MTU | sed 's/.*MTU://' | sed 's/ .*//' |sort -n | head -1)
alias docker-compose=/opt/docker/docker-compose
docker rm ${sdnc-docker-instance-id}//check the java process to make sure it's been killed, if not run "sudo kill -9 ${PID}"
ps aux | grep java
Update docker-compose yaml.file
vim /opt/openecomp/sdnc/oam/installation/src/main/yaml/docker-compose.yaml
Under sdnc service, add "5005:5005" under ports
Under sdnc service, add "KARAF_DEBUG=true" under envrionment.
Below shows the example
...
 sdnc:
    image: onap/sdnc-image:latest
    depends_on :
      - db
    container_name: sdnc_controller_container
    entrypoint: ["/opt/onap/sdnc/bin/startODL.sh"]
    ports:
      - "8282:8181"
      - "8201:8101"
      - "5005:5005"
    links:
      - db:dbhost
      - db:sdnctldb01
      - db:sdnctldb02
    environment:
      - MYSQL_ROOT_PASSWORD=openECOMP1.0
      - SDNC_CONFIG_DIR=/opt/onap/sdnc/data/properties
      - KARAF_DEBUG=true
    dns:
      - ${DNS_IP_ADDR-10.0.100.1}
    logging:
      driver:   "json-file"
      options:
        max-size: "30m"
        max-file: "5"

...
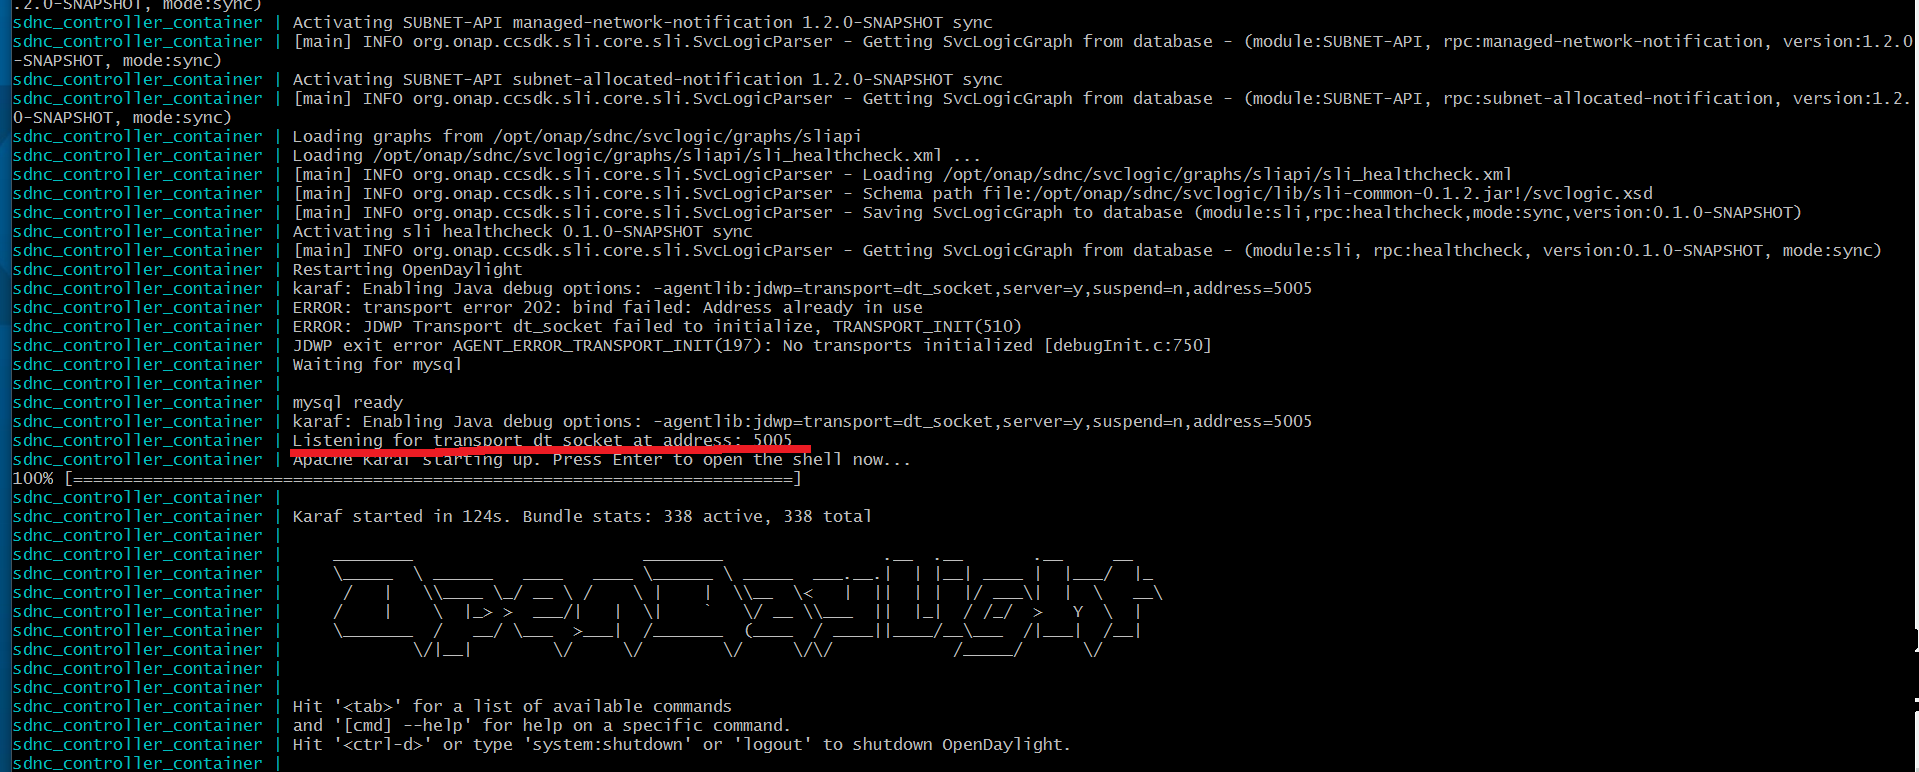
Start SDN-C docker-instance
cd /opt/openecomp/sdnc/oam/installation/src/main/yaml/
docker-compose up -d sdnc
docker-compose logs -f sdnc
After the docker instances fully started, you should see the karaf log information below with 5005 port open.
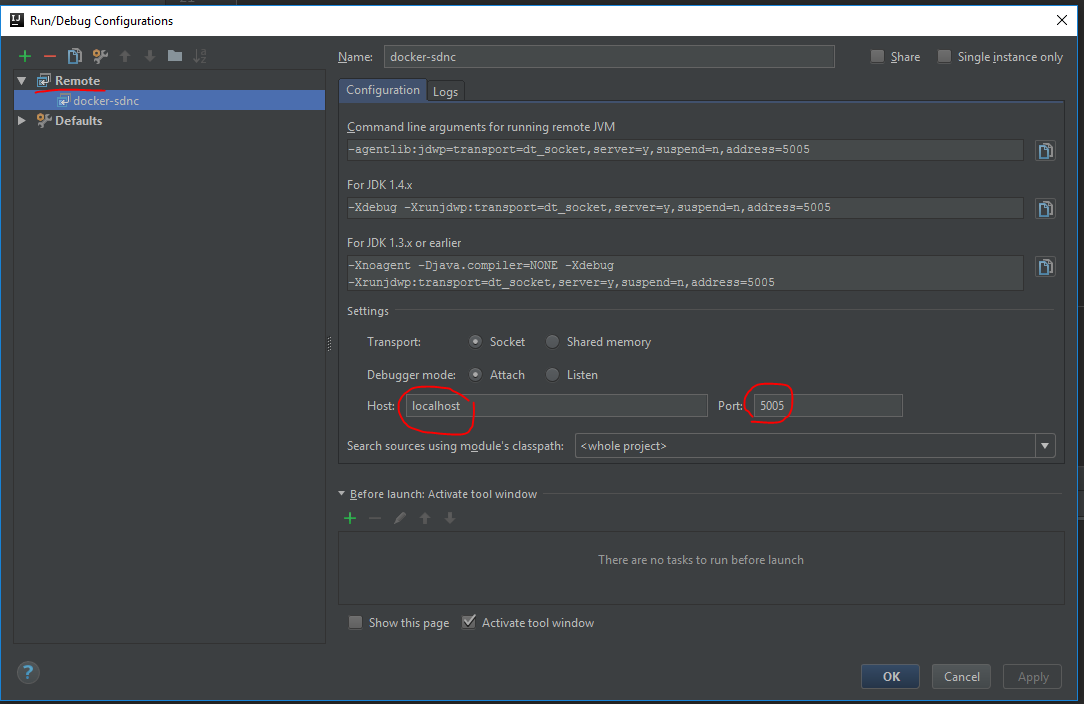
Use Remote debug in IDE
13 Comments
David Minodier
I can't see the snapshots on that page at all: images are not loaded which makes that wiki harder to follow, but still it's possible .
.
I tried multiple browsers (Firefow and Chromium) inluding on my mobile, and I end up with the same issue. Any idea ?
A fix would be nice...
David.
David Minodier
Please fix the image issue.
Beili Zhou
Fixed.
Sorry about the delayed response, just back from vacation.
David Minodier
Thank you
Bryan Guo
how to solve this problem: sdnc docker initially contains 1.4.3 version but i mvn build 1.5.0-snapshot version locally, it show errors when i re-install feature 1.5.0-snapshot reference to above "Re-install Feature" . its in windows10 .
i do not know how to solve it,thanks in advance!
Bryan Guo
hello,is anybody there.
what environment does integration+devtool work in?
i set it with: windows 10+vbox(ubuntu)+docker,it shows error: no such file or directory: line 11 :/var/onap/_commons . as it runs in windows by powershell and there really is no such file /var/onap/_commons.
please guide me which step went wrong.thanks
Bryan Guo
ok, my problem has been resovled.i install sdnc environment via docker-compose without this page guide which is need to been updated really!
look back this installation ,it was full of pitfalls and took a lot of time.negative comment.
Kevin Smokowski
Dan Timoney what is the best way for someone to get started on setting up SDNC/CCSDK in ONAP? Is this page outdated?
Aniello Paolo Malinconico
Is there any reference to build a custom SDNC plugin from scratch?
Kevin Smokowski
I don't think so. I think you should look at an existing plugin like rest api call node https://gerrit.onap.org/r/gitweb?p=ccsdk/sli/plugins.git;a=blob;f=restapi-call-node/provider/src/main/java/org/onap/ccsdk/sli/plugins/restapicall/RestapiCallNode.java;h=b4d7e1ba8950d81929b74ef0a1dc6b5eabb9bba8;hb=refs/heads/master
Your class should implement the interface SvcLogicJavaPlugin and expose itself as an OSGI service. They methods being exposed should have the signature
public void yourMethod(Map<String, String> paramMap, SvcLogicContext ctx) throws SvcLogicException {
doSomething();
}
Aniello Paolo Malinconico
I have created a custom plugin for SDNC by updating an exiting one (i.e. vnfapi). But when I install its fetaure into karaf, karaf console goes into several errors (osgi dependences) and my custom plugin is not installed.
More details are written here: https://lists.onap.org/g/onap-discuss/message/19762
Kevin Smokowski
Without seeing the actual code debugging is not possible. Do you have an open git review?
Aniello Paolo Malinconico
I have not git review. But I have uploaded the plugin code into zip file and the installer at: https://lists.onap.org/g/onap-discuss/message/19788