This page mainly describes the template design steps of option1 for the E2E Network Slicing use case for Guilin release.
Template design for Option1 is as folllows:
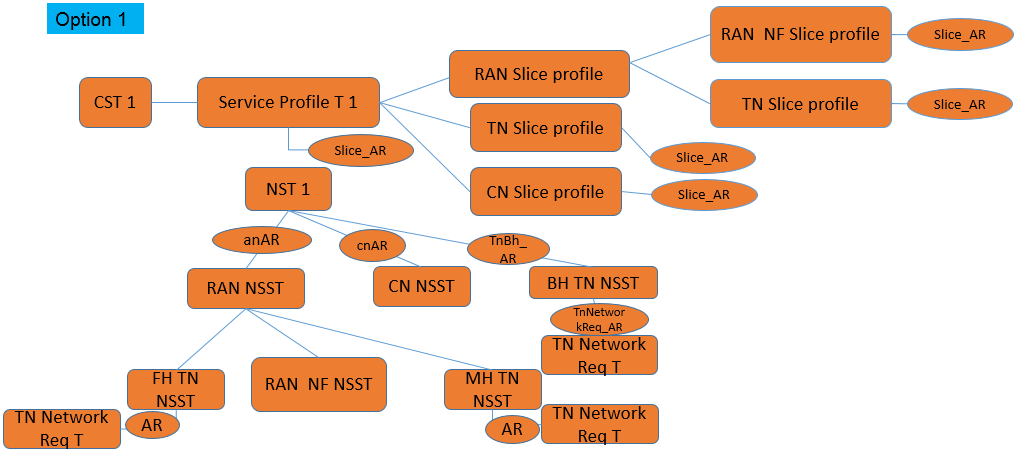
Sample Service Templates for Option 1:

Create Service Category
Login SDC HOME page with Admin Role,create the following categories:
CST,ServiceProfile,AN SliceProfile,AN NF Slice Profile, CN SliceProfile,TN SliceProfile,NST, TN BH NSST, TN MH NSST, TN FH NSST, TN Network Requirement,AN NF NSST,CN NSST, AN NSST.
1.Create CN_NSST
Login SDC HOME page with Designer Role, add new service.
1. In the General section, complete all required fields.
- Suggest 'CN_NSST' as the name to indicate the meaning of the service.
- Select ‘CN NSST’ as Category.
- Provide 'ONAP_internal' as Service Role
2. NSST should be composed of network service(NS). For NS helm artifacts, CBA package and other design time activities, please follow below link:
https://wiki.onap.org/display/DW/5GC+Instantiation+and+Modify+Config+flow+through+CDS
E2E Network Slicing Meeting Notes for Oct 12, 2020 – Design Time Demo (32:00 - 58:00)
3. In Composition section, drag the elements of ‘Fiveg’(NS) from the Elements palette to the service canvas.
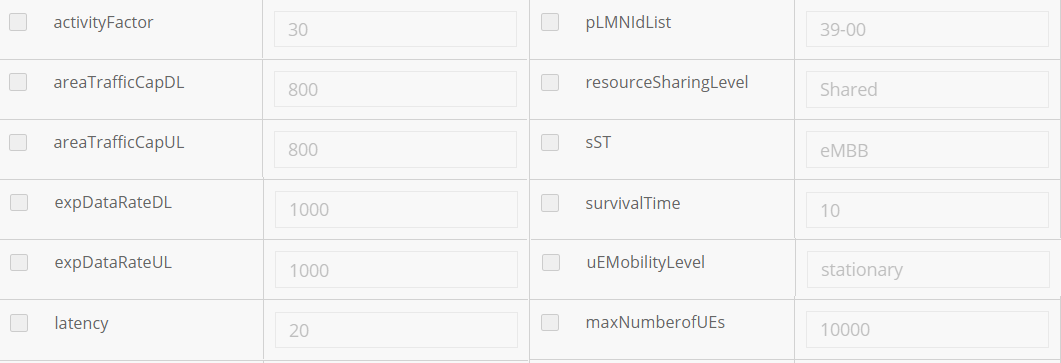
4. In Properties Assignment section,define Service properties.
a. Click 
c. Set property values as shown bellow.
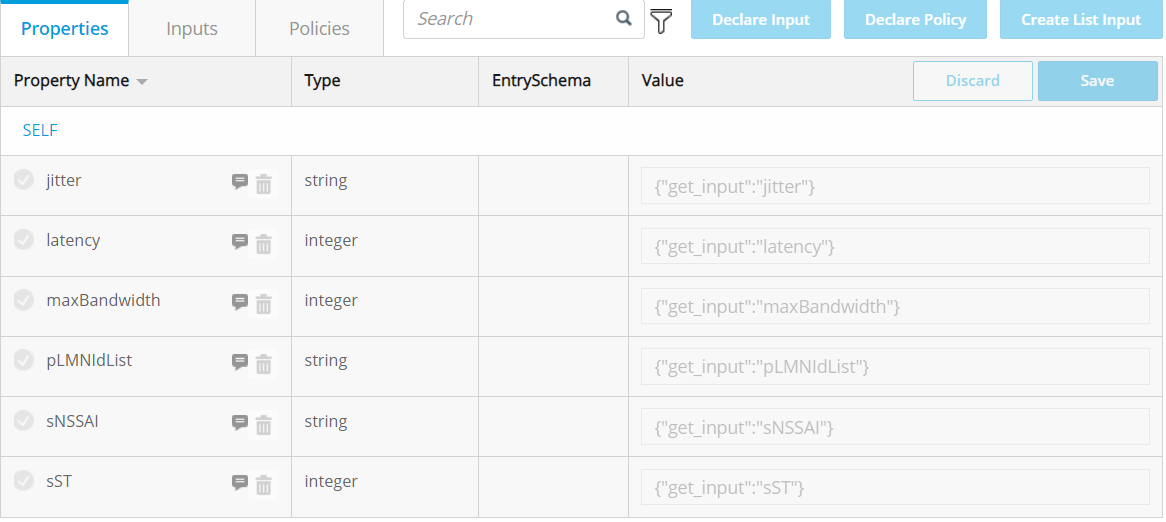
2.Create TN_Network_Req_T
Login SDC HOME page with Designer Role, add new service.
1. In the General section, complete all required fields.
- Suggest 'TN_Network_Req_T' as the name to indicate the meaning of the service.
- Select ‘TN Network Requirement’ as Category.
- Provide 'ONAP_internal' as Service Role
2. In Properties Assignment section, define the following service properties.
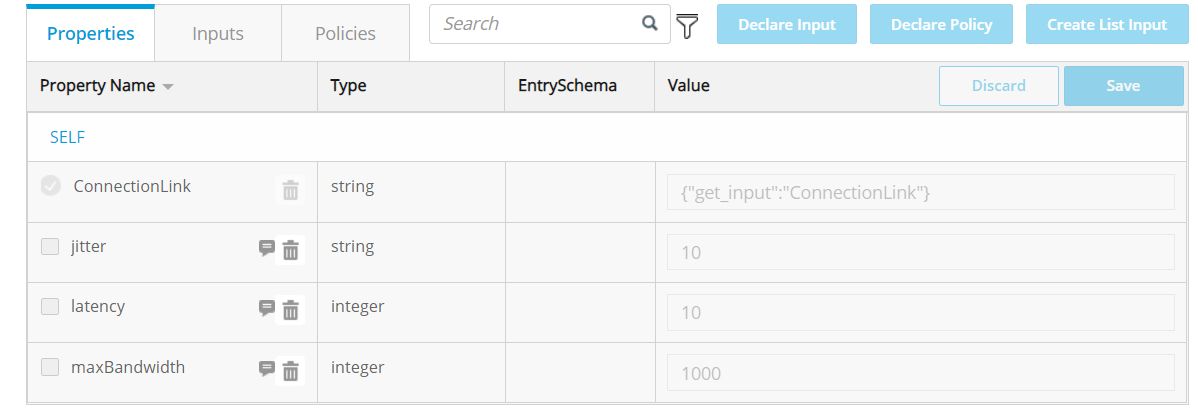
3. Distribute the service model and check the results.
3.Create TN_Network_Req_AR(Allotted Resource)
Login SDC HOME page with Designer Role and add VF.
1. In the General section, complete all required fields.
- Suggest 'TN_Network_Req_AR' as the name to indicate the meaning of the service.
- Select ‘Allotted Resource’ as Category.
- Provide 'ONAP' as Vendor Name.
- Provide '1.0' as Vendor Release.
2. In Composition section,search 'Allotted Resource', drag the element from the Elements palette to the service canvas.
3. In Properties Assignment section, define Service properties.
a. Click 'AllottedResource 0' in the right pane
b. Use the value of TN_Network_Req_T to set 'providing_service_invariant_uuid' and 'providing_service_uuid' and 'providing_service_name'.

4.Create TN_BH_NSST
Login SDC HOME page with Designer Role, add new service.
1. In the General section, complete all required fields.
- Suggest 'TN_BH_NSST' as the name to indicate the meaning of the service.
- Select ‘TN BH NSST’ as Category.
- Provide 'ONAP_internal' as Service Role
2. In Composition section,search 'TN_Network_Req_AR', drag the element from the Elements palette to the service canvas.
3.In Properties Assignment section, define the following service properties.

4. Distribute the service model and check the results.
5.Create TN_FH_AR(Allotted Resource)
Login SDC HOME page with Designer Role and add VF.
1. In the General section, complete all required fields.
- Suggest 'TN_FH_AR' as the name to indicate the meaning of the service.
- Select ‘Allotted Resource’ as Category.
- Provide 'ONAP' as Vendor Name.
- Provide '1.0' as Vendor Release.
2. In Composition section,search 'Allotted Resource', drag the element from the Elements palette to the service canvas.
3. In Properties Assignment section, define Service properties.
a. Click 'AllottedResource 0' in the right pane
b. Use the value of TN_Network_Req_T to set 'providing_service_invariant_uuid' and 'providing_service_uuid' and 'providing_service_name'.
6.Create TN_MH_AR(Allotted Resource)
Login SDC HOME page with Designer Role and add VF.
1. In the General section, complete all required fields.
- Suggest 'TN_MH_AR' as the name to indicate the meaning of the service.
- Select ‘Allotted Resource’ as Category.
- Provide 'ONAP' as Vendor Name.
- Provide '1.0' as Vendor Release.
2. In Composition section,search 'Allotted Resource', drag the element from the Elements palette to the service canvas.
3. In Properties Assignment section, define Service properties.
a. Click 'AllottedResource 0' in the right pane
b. Use the value of TN_Network_Req_T to set 'providing_service_invariant_uuid' and 'providing_service_uuid' and 'providing_service_name'.
7.Create TN_MH_NSST
Login SDC HOME page with Designer Role, add new service.
1. In the General section, complete all required fields.
- Suggest 'TN_MH_NSST' as the name to indicate the meaning of the service.
- Select ‘TN MH NSST’ as Category.
- Provide 'TRANSPORT' as Service Type.
- Provide 'TN_MH' as Service Role.
2. In Composition section,search 'TN_MH_AR', drag the element from the Elements palette to the service canvas.
8.Create TN_FH_NSST
Login SDC HOME page with Designer Role, add new service.
1. In the General section, complete all required fields.
- Suggest 'TN_FH_NSST' as the name to indicate the meaning of the service.
- Select ‘TN FH NSST’ as Category.
- Provide 'TRANSPORT' as Service Type.
- Provide 'TN_FH' as Service Role.
2. In Composition section,search 'TN_FH_AR', drag the element from the Elements palette to the service canvas.
9.Create NrtRIC_resource
Login SDC HOME page with Designer Role, add new VF.
In the General section, complete all required fields.
- Suggest 'NrtRIC_resource' as the name to indicate the meaning of the service.
- Select ‘Network Elements’ as Category.
- Provide '5G RAN' as Vendor Name.
- Provide '1' as Vendor Release.
2. In Composition section,search 'ExtCP2' from Generic Category, drag the element from the Elements palette to the service canvas.
- Rename ExtCP2 as 'EP_E2'.
10.Create CUCP_Resource
Login SDC HOME page with Designer Role, add new VF.
In the General section, complete all required fields.
- Suggest 'CUCP_Resource' as the name to indicate the meaning of the service.
- Select ‘Network Elements’ as Category.
- Provide '5G RAN' as Vendor Name
- Provide '1' as Vendor Release
2. In Composition section,search 'ExtCP2' from Generic Category, drag the element from the Elements palette to the service canvas.
- Rename ExtCP2 as 'EP_NG_c'.
- drag another 'ExtCP2' element from Generic Category and rename ExtCP2 as 'EP_E1'.
- drag another 'ExtCP2' element from Generic Category and rename ExtCP2 as 'EP_E2'.
- drag another 'ExtCP2' element from Generic Category and rename ExtCP2 as 'EP_F1C'.
11.Create CUUP_Resource
Login SDC HOME page with Designer Role, add new VF.
In the General section, complete all required fields.
- Suggest 'CUUP_Resource' as the name to indicate the meaning of the service.
- Select ‘Network Elements’ as Category.
- Provide '5G RAN' as Vendor Name
- Provide '1' as Vendor Release
2. In Composition section,search 'ExtCP2' from Generic Category, drag the element from the Elements palette to the service canvas.
- Rename ExtCP2 as 'EP_NG_u'.
- drag another 'ExtCP2' element from Generic Category and rename ExtCP2 as 'EP_E1'.
- drag another 'ExtCP2' element from Generic Category and rename ExtCP2 as 'EP_E2'.
- drag another 'ExtCP2' element from Generic Category and rename ExtCP2 as 'EP_F1U'.
12.Create DU_Resource
Login SDC HOME page with Designer Role, add new VF.
In the General section, complete all required fields.
- Suggest 'DU_Resource' as the name to indicate the meaning of the service.
- Select ‘Network Elements’ as Category.
- Provide '5G RAN' as Vendor Name
- Provide '1' as Vendor Release
2. In Composition section,search 'ExtCP2' from Generic Category, drag the element from the Elements palette to the service canvas.
- Rename ExtCP2 as 'EP_E2'.
- drag another 'ExtCP2' element from Generic Category and rename ExtCP2 as 'EP_FH'.
- drag another 'ExtCP2' element from Generic Category and rename ExtCP2 as 'EP_F1C'.
- drag another 'ExtCP2' element from Generic Category and rename ExtCP2 as 'EP_F1U'.
13.Create RAN_NF Service Template
Login SDC HOME page with Designer Role, add new service.
1. In the General section, complete all required fields.
- Suggest 'RAN_NF_NSST' as the name to indicate the meaning of the service.
- Select ‘AN NF NSST’ as Category.
- Provide 'RAN' as Service Type.
- Provide 'AN_NF' as Service Role.
2. In Composition section,drag the elements of ‘NrtRIC_resource’,‘CUCP_Resource’,‘CUUP_Resource’, 'DU_Resource' from the Elements palette to the service canvas.
3. In Properties Assignment section,define Service properties.
a. Click

14.Create TESTRANTOPNSST(TOP RAN Service Template)
Login SDC HOME page with Designer Role, add new service.
1. In the General section, complete all required fields.
- Suggest 'TESTRANTOPNSST' as the name to indicate the meaning of the service.
- Select ‘AN NSST’ as Category.
- Provide 'RAN' as Service Type.
- Provide 'ONAP_internal' as Service Role.
2. In Composition section,drag the elements of ‘RAN_NF_NSST’,‘TN_MH_NSST’,‘TN_FH_NSST’ from the Elements palette to the service canvas.
3.In Properties Assignment section,define Service properties.
a. Click
15.Create CN_AR(Allotted Resource)
Login SDC HOME page with Designer Role and add VF.
1. In the General section, complete all required fields.
- Select ‘Allotted Resource’ as Category.
- Provide 'ONAP' as Vendor Name.
- Provide '1.0' as Vendor Release.
2. In Composition section,search 'Allotted Resource', drag the element from the Elements palette to the service canvas.
3. In Properties Assignment section, define Service properties.
a. Click 'AllottedResource 0' in the right pane
b. Use the value of CN_NSST to set 'providing_service_invariant_uuid' and 'providing_service_uuid' and 'providing_service_name'.
16.Create Tn_BH_AR(Allotted Resource)
Login SDC HOME page with Designer Role and add VF.
1. In the General section, complete all required fields.
- Select ‘Allotted Resource’ as Category.
- Provide 'ONAP' as Vendor Name.
- Provide '1.0' as Vendor Release.
2. In Composition section,search 'Allotted Resource', drag the element from the Elements palette to the service canvas.
3. In Properties Assignment section, define Service properties.
a. Click 'AllottedResource 0' in the right pane
b. Use the value of TN_BH_NSST to set 'providing_service_invariant_uuid' and 'providing_service_uuid' and 'providing_service_name'.
17.Create AN_AR(Allotted Resource)
Login SDC HOME page with Designer Role and add VF.
1. In the General section, complete all required fields.
- Select ‘Allotted Resource’ as Category.
- Provide 'ONAP' as Vendor Name.
- Provide '1.0' as Vendor Release.
2. In Composition section,search 'Allotted Resource', drag the element from the Elements palette to the service canvas.
3. In Properties Assignment section, define Service properties.
a. Click 'AllottedResource 0' in the right pane
b. Use the value of TESTRANTOPNSST to set 'providing_service_invariant_uuid' and 'providing_service_uuid' and 'providing_service_name'.
18.Create NSTO1 Service Template
Login SDC HOME page with Designer Role, add new service.
1. In the General section, complete all required fields.
- Suggest 'NSTO1' as the name to indicate the meaning of the service.
- Select ‘NST’ as Category.
- Suggest 'ONAP_internal' as Service Role
2. In Composition section,drag the elements of ‘AN_AR’,‘Tn_BH_AR’,‘CN_AR’ from the Elements palette to the service canvas.
3. In Properties Assignment section, define Service properties.
a. Click
Set property values as shown bellow.
19.Create Slice_AR(Allotted Resource)
Login SDC HOME page with Designer Role and add VF.
1. In the General section, complete all required fields.
- Suggest 'Slice_AR' as the name to indicate the meaning of the service.
- Select ‘Allotted Resource’ as Category.
2. In Composition section,search 'Allotted Resource', drag the element from the Elements palette to the service canvas.
3. In Properties Assignment section, define Service properties.
a. Click 'AllottedResource 0' in the right pane
b. Select 'providing_service_invariant_uuid' and 'providing_service_uuid' and click Declare Input.

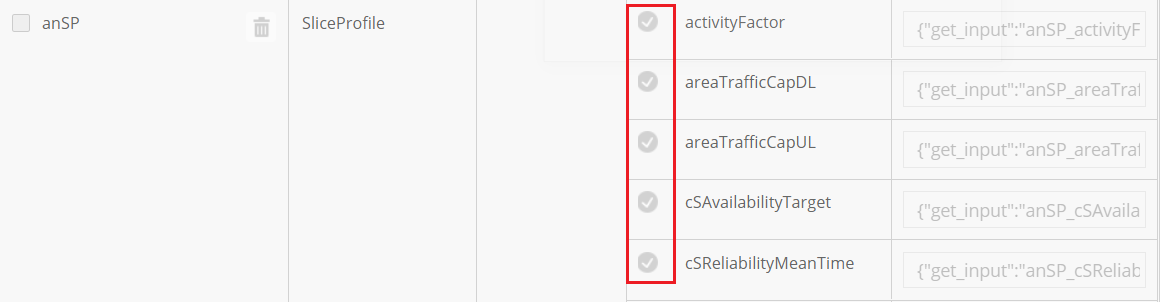
20.Create TN_SliceProfile Service Template
Login SDC HOME page with Designer Role, add new service.
1. In the General section, complete all required fields.
- Suggest 'TN_SliceProfile' as the name to indicate the meaning of the service.
- Select ‘TN SliceProfile’ as Category.
2. In Composition section,search 'Slice_AR', drag the element from the Elements palette to the service canvas.
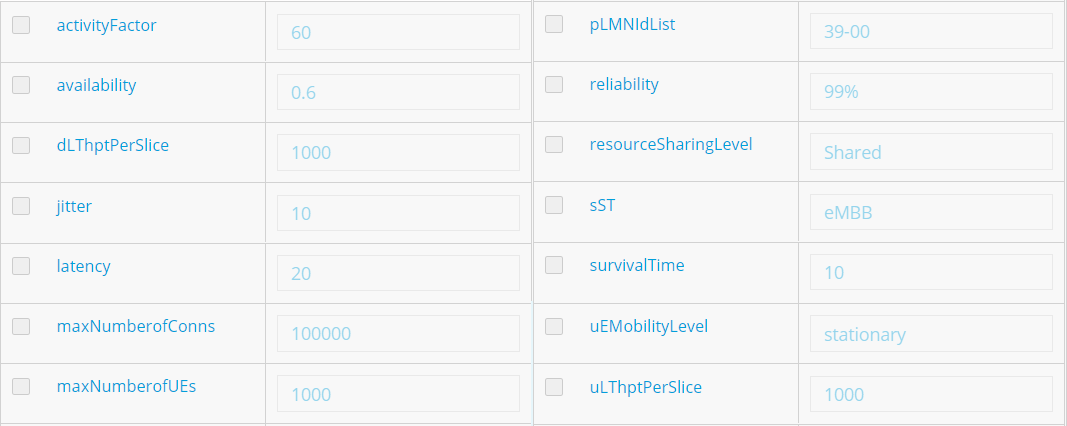
3. In Properties Assignment section,define Service properties.
a. Add some properties as the picture shown bellow.
b. Select all properties and click Declare Input.
c. Click 'Slice_AR 0'in the right pane
d. Select 'allottedresource0_providing_service_invariant_uuid' and 'allottedresource0_providing_service_uuid' and click Declare Input.
4. Distribute the service model and check the results.
21.Create CN_SliceProfile Service Template
Login SDC HOME page with Designer Role, add new service.
1. In the General section, complete all required fields.
- Suggest 'CN_SliceProfile' as the name to indicate the meaning of the service.
- Select ‘CN SliceProfile’ as Category.
2. In Composition section,search 'Slice_AR', drag the element from the Elements palette to the service canvas.
3. Properties Assignment section, define Service properties.
a. Click

e. Click 'Slice_AR 0'in the right pane
f. Select 'allottedresource0_providing_service_invariant_uuid' and 'allottedresource0_providing_service_uuid' and click Declare Input.
22.Create SliceProfile_AN_NF_O1 Service Template
Login SDC HOME page with Designer Role, add new service.
1. In the General section, complete all required fields.
- Suggest 'SliceProfile_AN_NF_O1' as the name to indicate the meaning of the service.
- Select ‘AN NF SliceProfile’ as Category.
2. In Composition section,search 'Slice_AR', drag the element from the Elements palette to the service canvas.
3. In Properties Assignment section,define Service properties.
a. Click

e. Click 'Slice_AR 0'in the right pane
f. Select 'allottedresource0_providing_service_invariant_uuid' and 'allottedresource0_providing_service_uuid' and click Declare Input.

4. Distribute the service model and check the results.
23.Create SliceProfile_AN_O1 Service Template
Login SDC HOME page with Designer Role, add new service.
1. In the General section, complete all required fields.
- Suggest 'SliceProfile_AN_O1' as the name to indicate the meaning of the service.
- Select ‘AN SliceProfile’ as Category.
2. In Composition section,drag the elements of ‘SliceProfile_AN_NF_O1’,‘TN_SliceProfile’ from the Elements palette to the service canvas.
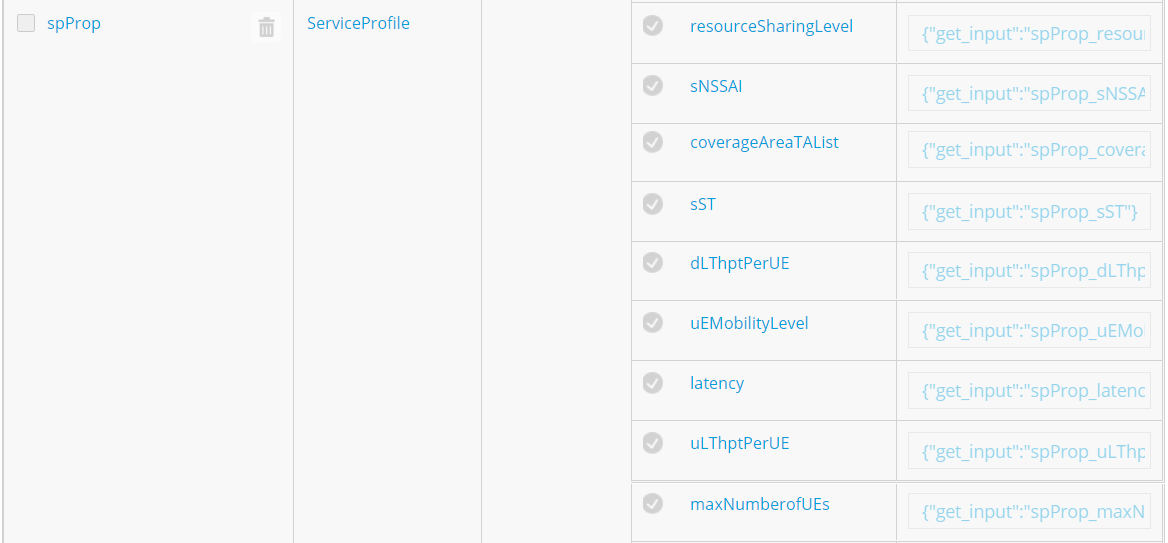
24.Create ServiceProfile_O1 Service Template
Login SDC HOME page with Designer Role, add new service.
1. In the General section, complete all required fields.
- Suggest 'ServiceProfile_O1' as the name to indicate the meaning of the service.
- Select ‘ServiceProfile’ as Category.
2. In Composition section,search 'Slice_AR', ’SliceProfile_CN‘,‘SliceProfile_AN_O1’,‘SliceProfile_TN’,drag the element from the Elements palette to the service canvas.
3. In Properties Assignment section,define Service properties.
a. Click
25.Create CST_O1 Service Template
Login SDC HOME page with Designer Role, add new service.
1. In the General section, complete all required fields.
- Suggest 'CST_O1' as the name to indicate the meaning of the service.
- Select ‘CST’ as Category.
- Fill in the "Service Type" field with the value "embb"
2. In Composition section,search 'ServiceProfile_O1', drag the element from the Elements palette to the service canvas.
3. In Properties Assignment section,define Service properties.
a. Click

A&AI Configuration:
If the service distribution to A&AI failed, like the picture shows bellow:

Add 'ServiceProfile' and 'NSTAR' model to A&AI through postman.(ServiceProfile/NSTAR Model Id and Invariant Id can be find on SDC page.)
- model-invariant-id is SERVICE_INVARIANT_ID
- model-version-id is SERVICE_MODEL_UUID
- model-type is SERVICE_TYPE
- model-name is SERVICE_NAME
curl --user AAI:AAI -X PUT -H "X-FromAppId:AAI" -H "X-TransactionId:get_aai_subscr" -H "Accept:application/json" -H "Content-Type:application/json" -k "https://{worker-vm-ip}:30233/aai/v21/service-design-and-creation/models/model/bfd35bbf-4469-44d2-aa13-eb531b2d4e7a" -d '{
"model-invariant-id": "bfd35bbf-4469-44d2-aa13-eb531b2d4e7a",
"model-type": "Service",
"model-vers": {
"model-ver": [
{
"model-version-id": "fd4ca61e-2147-4693-ad2c-2786889b51a5",
"model-name": "NSTO1",
"model-version": "1.0"
}
]
}
}'
NOTE: If any service template composed of Allotted Resource(AR) fails to distribute in AAI, then add created Allotted Resource Configuration to AAI as given above.
12 Comments
Ganesh Mane
Hello LIN MENG Deepika S Aniello Paolo Malinconico
Thank you for your efforts to create such helpful document.
After distribute following services, we are getting 'DISTRIBUTION_COMPLETE_ERROR'
due to 'ONAP-SO'.
1. CST_01
2. ServiceProfile_01
3. TESTRANTOPNSST
4. fiveg
By going through 'SO-SDC-Controller' logs, we found some 'Tosca CSAR' warnings
and 'Column 'SOURCE_SERVICE_MODEL_UUID' cannot be null' error for
CST_01, ServiceProfile_01 and TESTRANTOPNSST service.
Could you please guide us, is there any need to do some manual configuration in ONAP_SO to fix ‘Column 'SOURCE_SERVICE_MODEL_UUID' cannot be null’ error or is there any steps missing in “option 1” design template wiki page which causes “DISTRIBUTION_COMPLETE_ERROR” error.
Could you please help us to get out off this problem?
Aniello Paolo Malinconico
Hi Ganesh Mane , Which version of ONAP are you using? Guilin?
Ganesh Mane
Hello Aniello Paolo Malinconico
Thank you for the response.
We are using ONAP Honolulu Version.
Documents of Honolulu release points to this wiki page. so we are referring it.
Aniello Paolo Malinconico
Ganesh Mane mmm I have never had this kind of issue ... Can you describe bettere what you have done? What are the services distributed succesfully?
I had one issue on the distribution and it was into AAI (Slice-AR, described above) ...
Thanks,
Aniello
Ganesh Mane
Hello Aniello Paolo Malinconico
Can you describe better what you have done?
=> We created VFs/services using above steps(1-25).
What are the services distributed successfully?
=> Except below services, all other services(between steps 1-25) distributed successfully.
1. CST_01(Distribution Id: 20252952-df6f-429f-a816-00884964a448)
2. ServiceProfile_01(Distribution Id: e942fed6-3fed-4d54-a015-2c2cf14310a9)
3. TESTRANTOPNSST(Distribution Id : 3ab3977e-03a6-4d98-82ae-406f8731055c)
Please find the attached logs of 'SO-SDC-Controller'.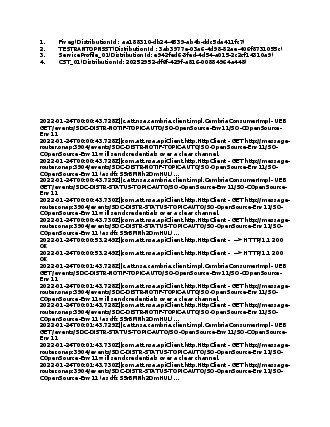

Ganesh Mane
Hello Aniello Paolo Malinconico
=> Now we are using "Istanbul" version due to some AAI certificate issue of Honolulu version.
=> In "Istanbul" also, following SDC services(between 1-25) distribution get failed in ONAP-SO.
CST_01
ServiceProfile_01
TESTRANTOPNSST
TN_Network_Req_T
fiveg
=> If we distribute following services(this is not mentioned in this wiki) then TESTRANTOPNSST service distributed successfully.
7.Create TN_MH_NSST
8.Create TN_FH_NSST
=> If we distribute following service(this is not mentioned in this wiki) then CST_01 and ServiceProfile_01 services distributed successfully.
23. Create SliceProfile_AN_O1
In summary, distribution steps are missing in step 7, 8 and 23.
Could you please verify above? Is it right or we did it wrong way?
=> We are still getting distribution error in ONAP-SO of following services.
TN_Network_Req_T
fiveg
Could you please help/give some ideas to solve this issue? We are not getting what is the exact error from logs files.
Aniello Paolo Malinconico
Hi Ganesh Mane , you need to distribute all resources of SERVICE type, so , please, do it for each service resource and check if the distribution was executed successfully.
If you dont make the distribution, you cannot use that service resource .
For fiveg service, what is the error?
Thanks,
Aniello
Ganesh Mane
Hello Aniello Paolo Malinconico
Thank you very much for the reply.
Please find the error summary of 'fiveg' and 'TN_Network_Req_T' service error.
1. fiveg(Distribution ID : 09dac85a-8c64-4394-8bf5-1e26b1a0080e)
We can see following kind of errors in 'so-sdc-controller' log file.
stributionClientImpl - try to send status {
"distributionID": "09dac85a-8c64-4394-8bf5-1e26b1a0080e",
"consumerID": "SO-COpenSource-Env11",
"timestamp": 1643884992488,
"artifactURL": "/sdc/v1/catalog/services/Fiveg/1.0/resourceInstances/fiveg0/artifacts/upf_cloudtech_k8s_charts.env",
"status": "DEPLOY_ERROR",
"errorReason": "The artifact has not been used by the modules defined in the resource"
}
2022-02-03T10:47:16.190Z|dcaa91ce-383c-448b-a759-6920b5ed5f89|org.onap.sdc.impl.StatusConsumer - recieved notification from broker: {
"distributionID": "09dac85a-8c64-4394-8bf5-1e26b1a0080e",
"consumerID": "SO-COpenSource-Env11",
"timestamp": 1643885147613,
"artifactURL": "",
"status": "DISTRIBUTION_COMPLETE_ERROR"
}
May be it's related to files errors in our 'fiveg.zip' file.
Could you please share file? so we can try this.
2. TN_Network_Req_T(Distribution ID : 35263e2c-7390-494b-b4a1-c2477246955d)
We are not getting exact error from logs file for this service.
We can see only the following kind of error.
2022-02-03T08:51:19.669Z|35263e2c-7390-494b-b4a1-c2477246955d|o.o.so.asdc.tenantIsolation.WatchdogDistribution - SO has not be updated in the the WatchDog Component DB yet, so ending the loop
2022-02-03T08:52:19.672Z|35263e2c-7390-494b-b4a1-c2477246955d|org.onap.so.asdc.client.ASDCController - Timeout of 300000 seconds was reached before all components reported status
Could you please guide us to solve this error?
Please find log file and screen shot of the errors in the attachment.
Regards
Ganesh Mane
Aniello Paolo Malinconico
I think your fiveg.zip files are wrong ... Give a look at 5G_CoreSimulator_Helm_package.zip
Ganesh Mane
Hello Aniello Paolo Malinconico
Thank you for sharing zip file.
I tried with your zip file and 'fiveg' service is distributed successfully. Thanks once again.
Now, there is only 'TN_Network_Req_T' Service distribution error left.
Could you please guide us to solve this error?
is 'TN_Network_Req_T' distribution error will create issue while creating
slice in UUI?
Aniello Paolo Malinconico
I dont know how to fix this issue...
It seems to be related with CatalogDB:
Error updating CatalogDBStatus
java.lang.NullPointerException: null
at org.onap.so.asdc.tenantIsolation.WatchdogDistribution.updateCatalogDBStatus(WatchdogDistribution.java:206)
at org.onap.so.asdc.client.ASDCController.treatNotification(ASDCController.java:690)
Can you re-distribute the service again? Same error?
However, I suggest you to open a discuss here: https://lists.onap.org/g/onap-discuss/topics
or on so channel of SLACK .
Thanks,
Aniello
Ganesh Mane
Hello Aniello Paolo Malinconico
Thank you for the response
Can you re-distribute the service again? Same error?
Yes, after re-distribute service, we are getting same error.
Yes, We will create topic on following.
https://lists.onap.org/g/onap-discuss/topics
Regards
Ganesh