Preparation
Install ONAP
Make sure that you've installed ONAP R2 release. For installation instructions, please refer ONAP Installation in Vanilla OpenStack.
Make sure that all components pass health check when you do the following:
- ssh to the robot vm, run '/opt/ete.sh health'
You will need to update your /etc/hosts so that you can access the ONAP Portal in your browser. You may also want to add IP addresses of so, sdnc, aai, etc so that you can easily ssh to those VMs. Below is a sample just for your reference:
10.12.5.159 aai-inst2
10.12.5.162 portal
10.12.5.162 portal.api.simpledemo.onap.org
10.12.5.173 dns-server
10.12.5.178 aai
10.12.5.178 aai.api.simpledemo.onap.org

10.12.5.178 aai1
10.12.5.183 dcaecdap00
10.12.5.184 multi-service
10.12.5.189 sdc
10.12.5.189 sdc.api.simpledemo.onap.org
10.12.5.194 robot
10.12.5.2 so
10.12.5.204 dmaap
10.12.5.207 appc
10.12.5.208 dcae-bootstrap
10.12.5.211 dcaeorcl00
10.12.5.214 sdnc
10.12.5.219 dcaecdap02
10.12.5.224 dcaecnsl02
10.12.5.225 dcaecnsl00
10.12.5.227 dcaedokp00
10.12.5.229 dcaecnsl01
10.12.5.238 dcaepgvm00
10.12.5.239 dcaedoks00
10.12.5.241 dcaecdap03
10.12.5.247 dcaecdap04
10.12.5.248 dcaecdap05
10.12.5.249 dcaecdap06
10.12.5.38 policy
10.12.5.38 policy.api.simpledemo.onap.org
10.12.5.48 vid
10.12.5.48 vid.api.simpledemo.onap.org
10.12.5.51 clamp
10.12.5.62 dcaecdap01
You can try to login to the portal at http://portal.api.simpledemo.onap.org:8989/ONAPPORTAL/login.htm using as one of the following roles. The password is demo123456! for all the users.
| User | Role |
|---|---|
| demo | Operator |
| cs0008 | DESIGNER |
| jm0007 | TESTER |
| op0001 | OPS |
| gv0001 | GOVERNOR |
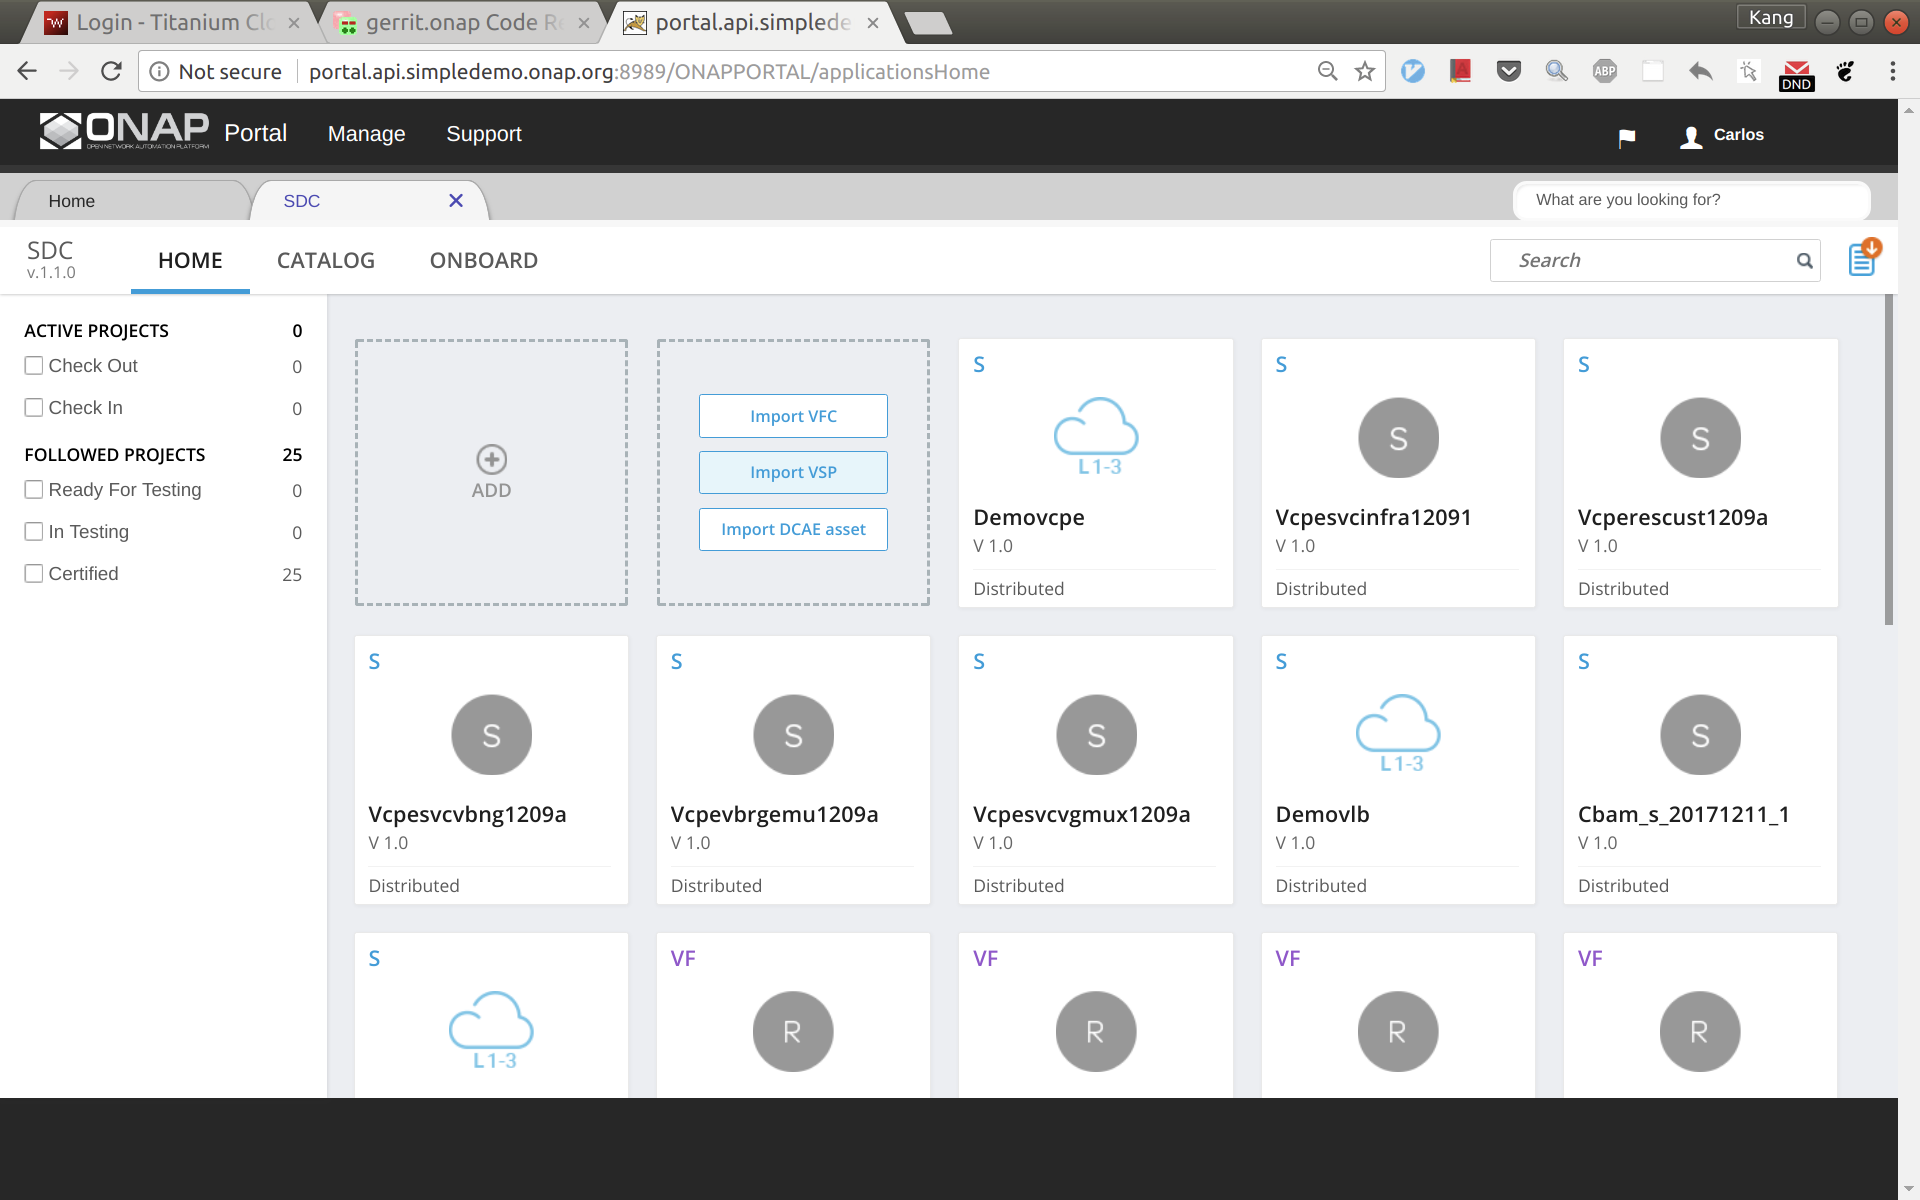
Create images for vBRG, vBNG, vGMUX, and vG
Follow the following instructions to build an image for each VNF and save them in your Openstack: ONAP vCPE VPP-based VNF Installation and Usage Information
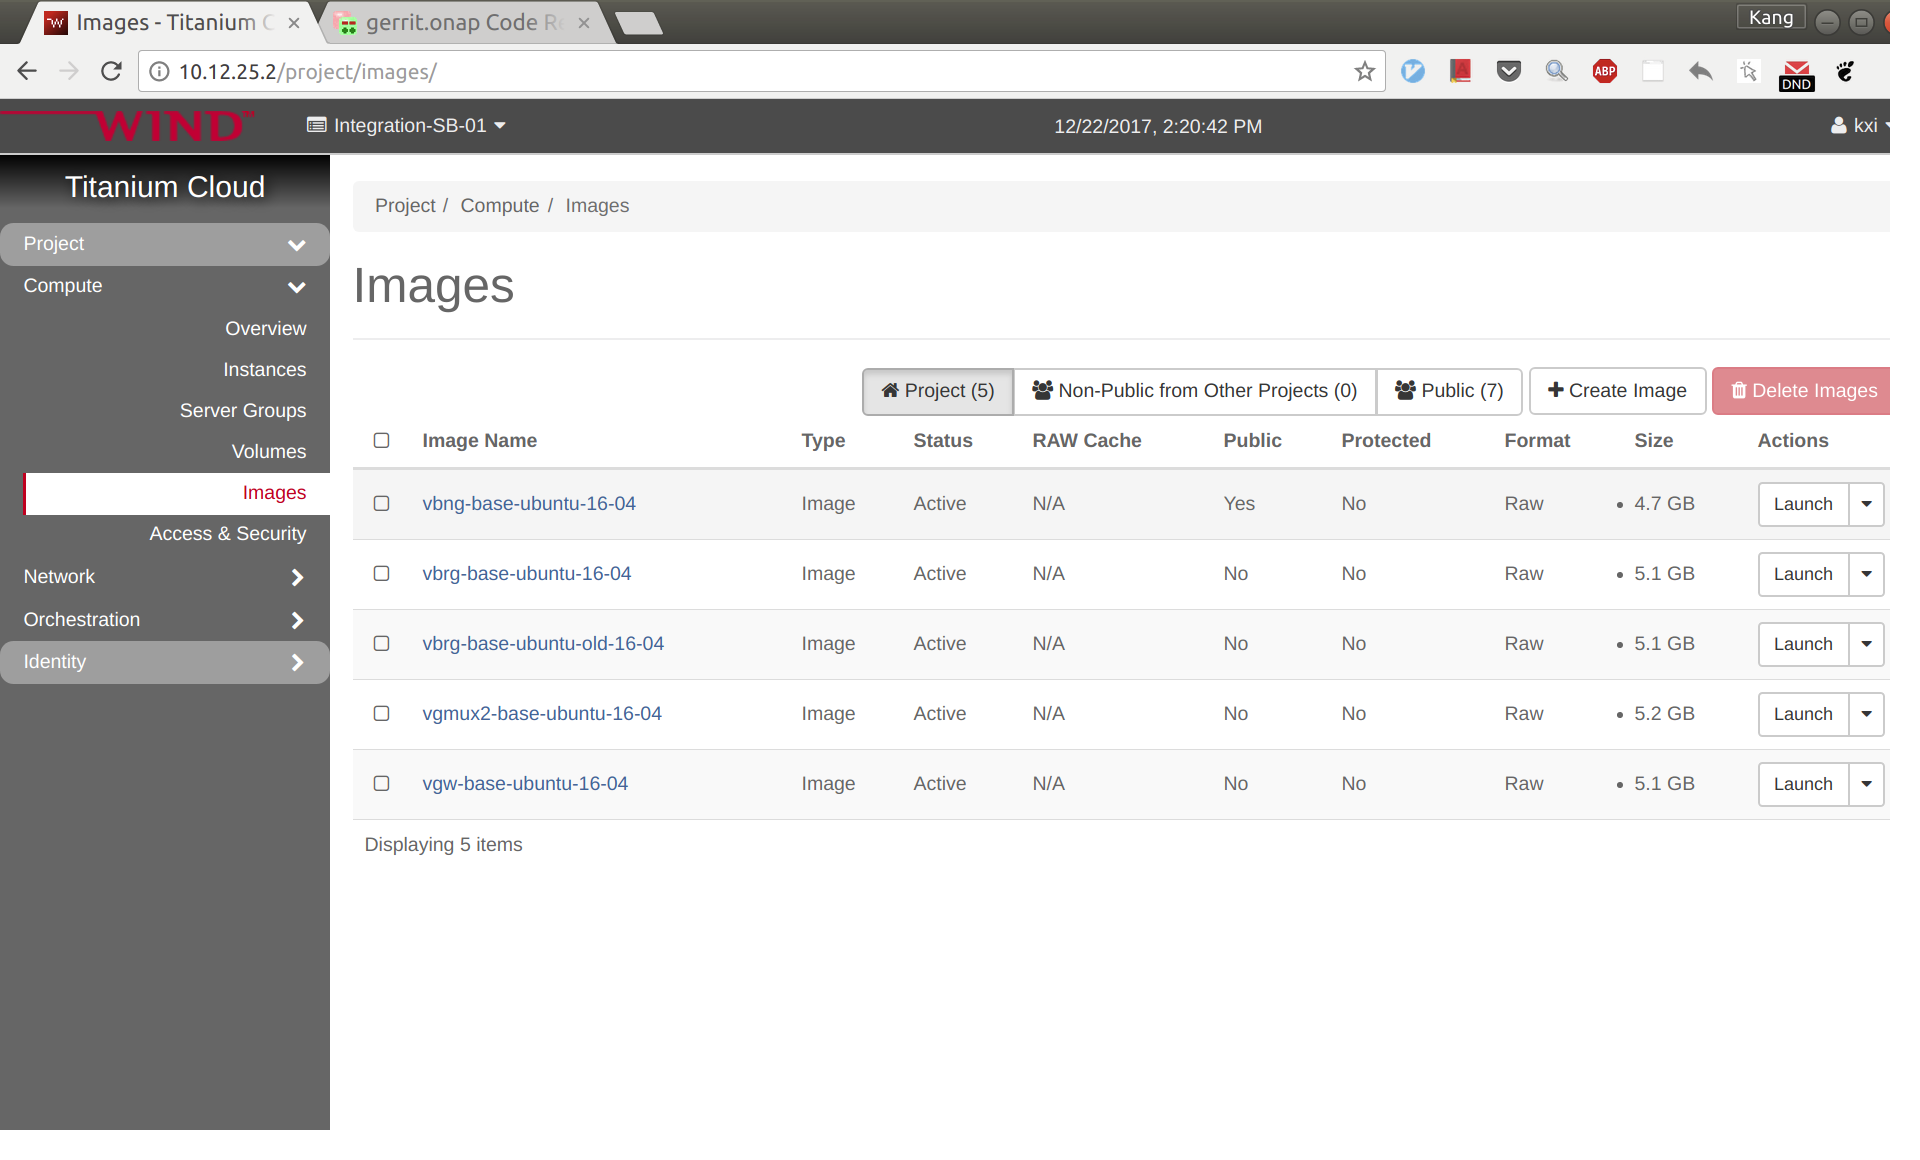
To avoid unexpected mistakes, you may want to give each image a meaningful name and also be careful when mixing upper case and lower case characters. After this you should see images like below. The casablanca image names have 'casa' in them like "vbng-casa-base-ubuntu-16-04" .
VNF Onboarding
Create license model in SDC
Log in to SDC portal as designer. Create a license that will be used by the subsequent steps. The detailed steps are here: Creating a Licensing Model
Prepare HEAT templates
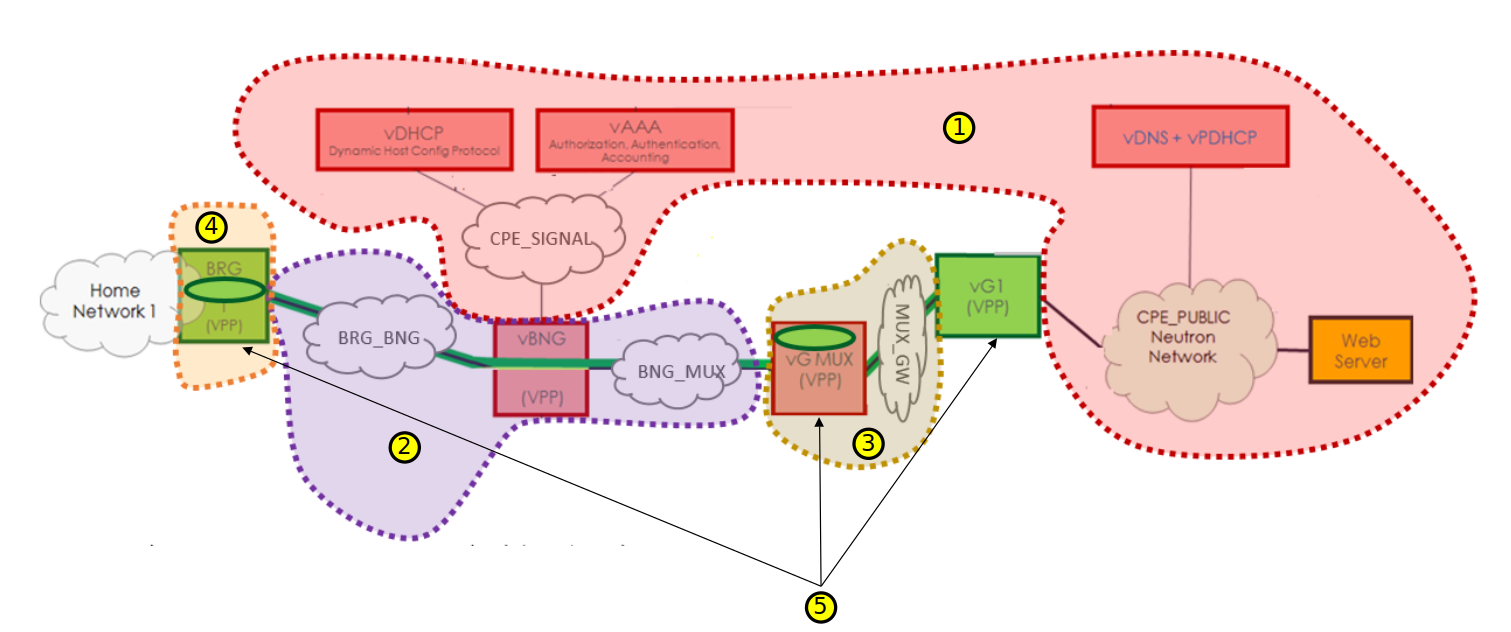
vCPE uses five VNFs: Infra, vBRG, vBNG, vGMUX, and vG, which are described using five HEAT templates. For each HEAT template, you will need to fill the env file with appropriate parameters. The HEAT templates can be obtained from gerrit: [demo.git] / heat / vCPE /
Note that for each VNF, the env file name and yaml file name are associated together by file MANIFEST.json. If for any reason you change the env anf yaml file names, please remember to change MANIFEST.json accordingly.
For each VNF, compress the three env, yaml, and json files into a zip package, which will be used for onboarding. If you want to get the zip packages I used for reference, download them here: infra-sb02.zip, vbng-sb02.zip, vbrg-sb02.zip, vgmux-sb02.zip, vgw-sb02.zip.
VNF onboarding in SDC
Onboard the VNFs in SDC one by one. The process is the same for all VNFs. The suggested names for the VNFs are given below (all lower case). The suffix can be a date plus a sequence letter, e.g., 1222a.
- vcpevsp_infra_[suffix]
- vcpevsp_vbrg_[suffix]
- vcpevsp_vbng_[suffix]
- vcpevsp_vgmux_[suffix]
- vcpevsp_vgw_[suffix]
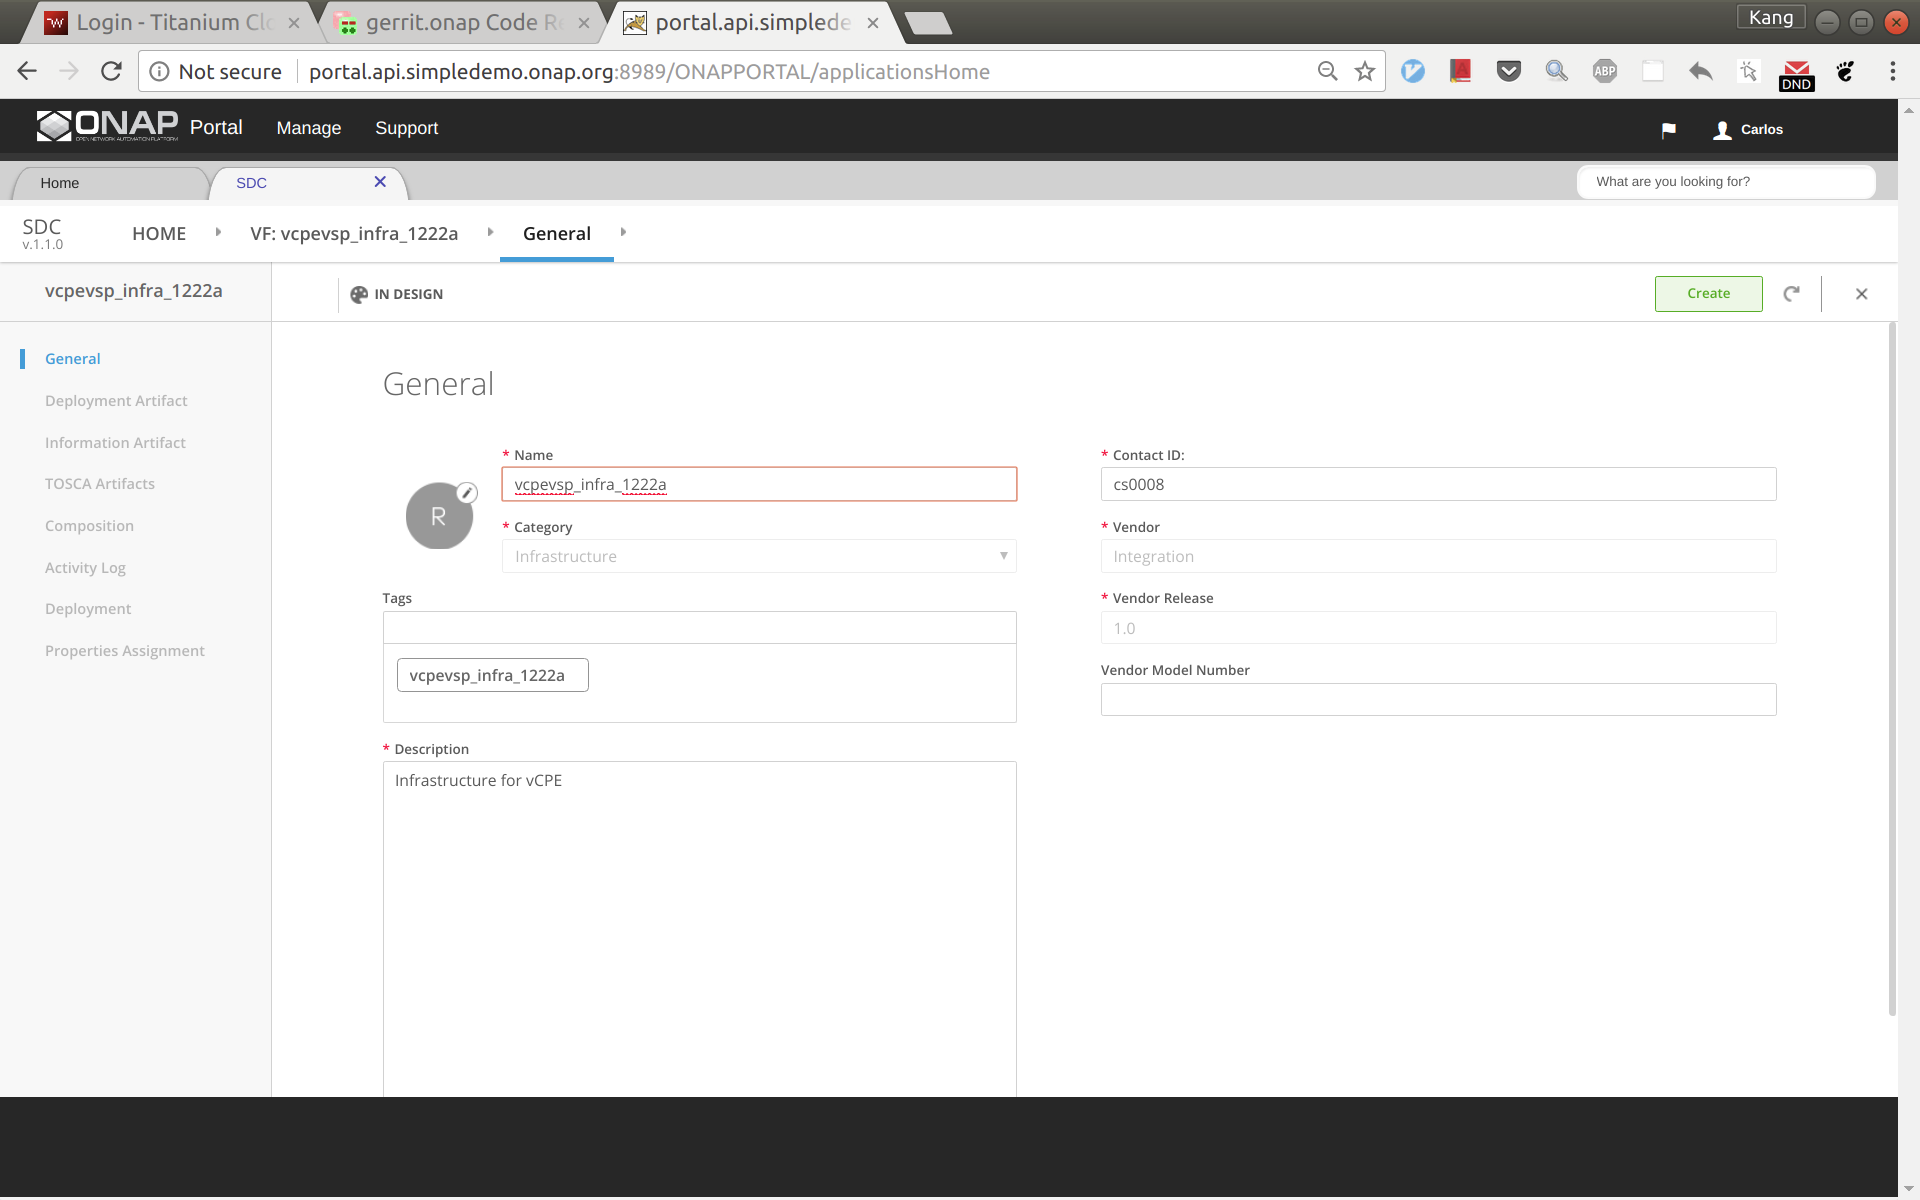
Below is an example for onboarding infra.
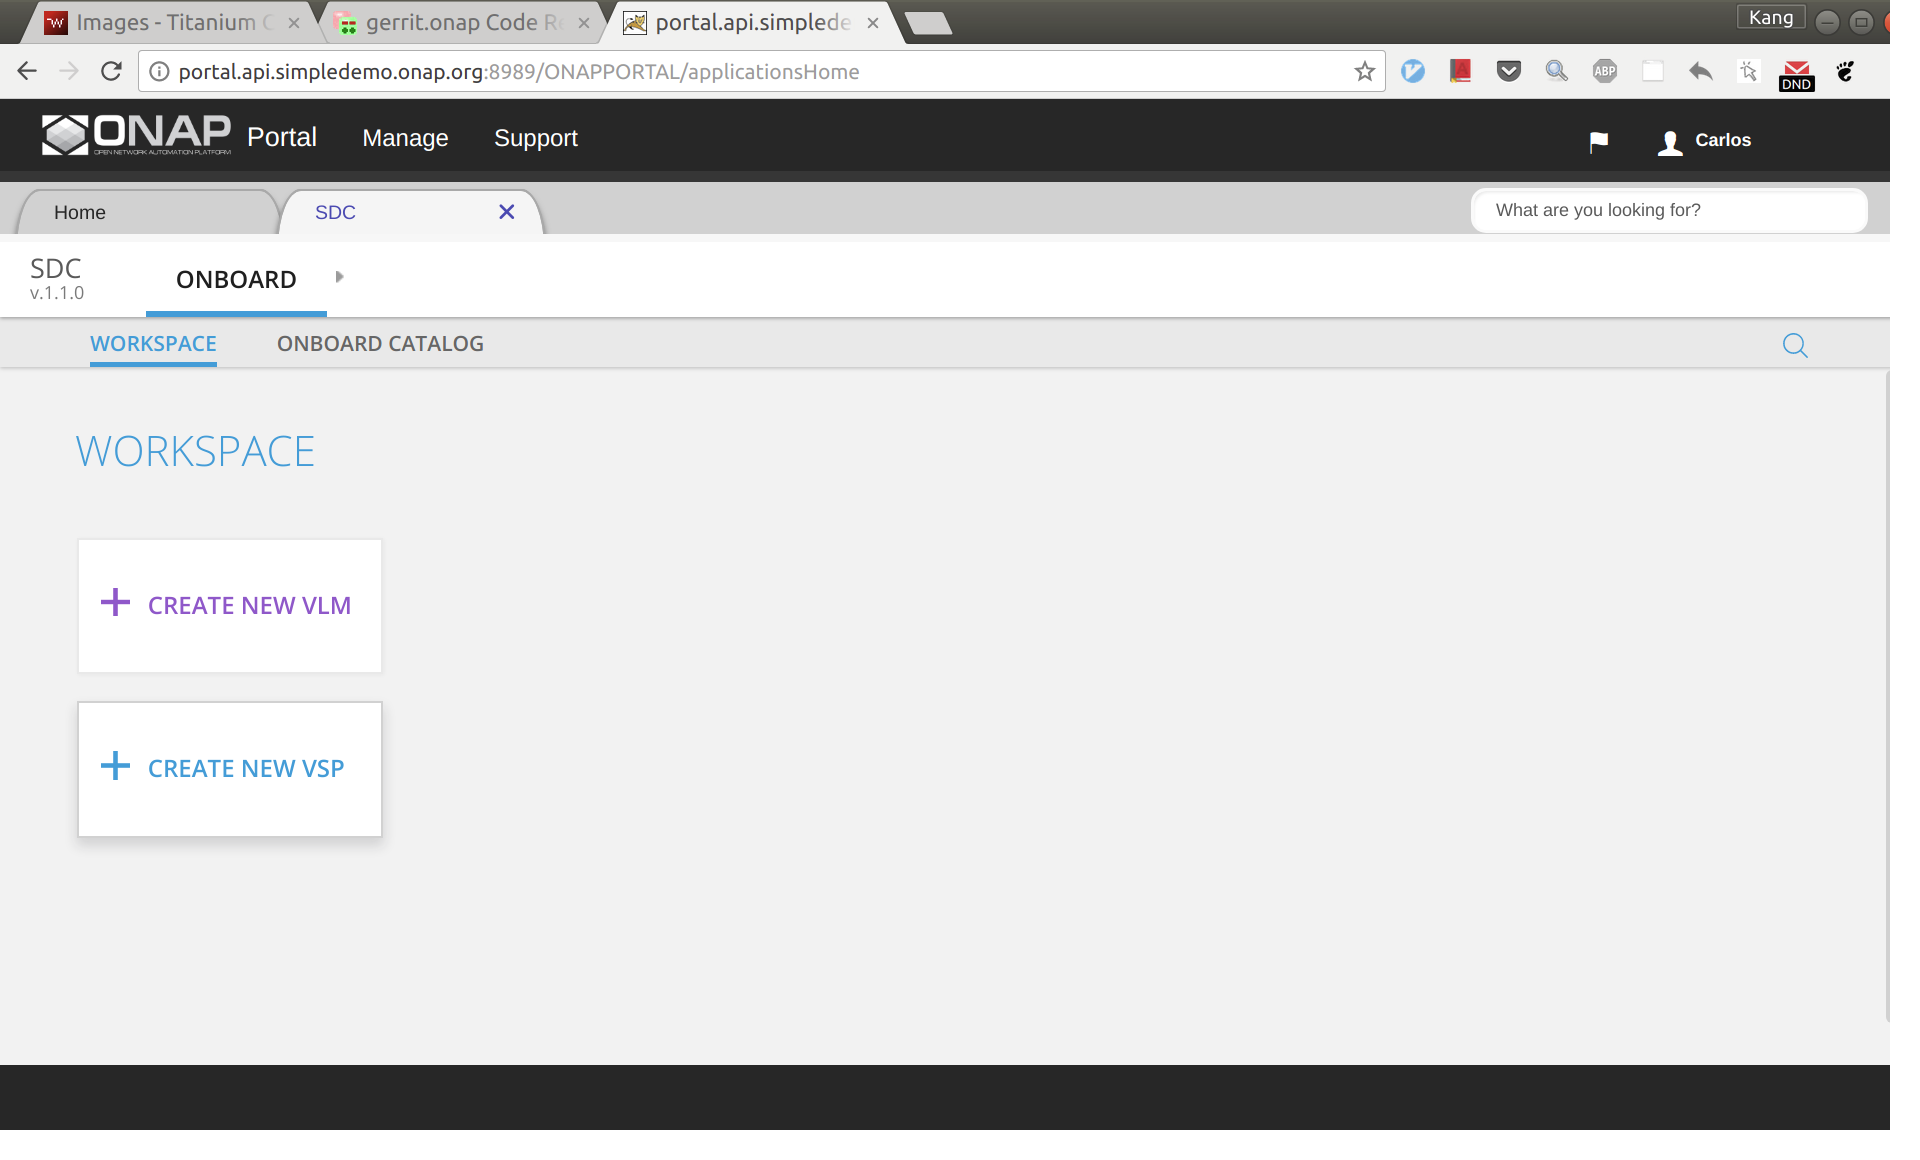
Sign into SDC as cs0008, choose ONBOARD and then click 'CREATE NEW VSP'.
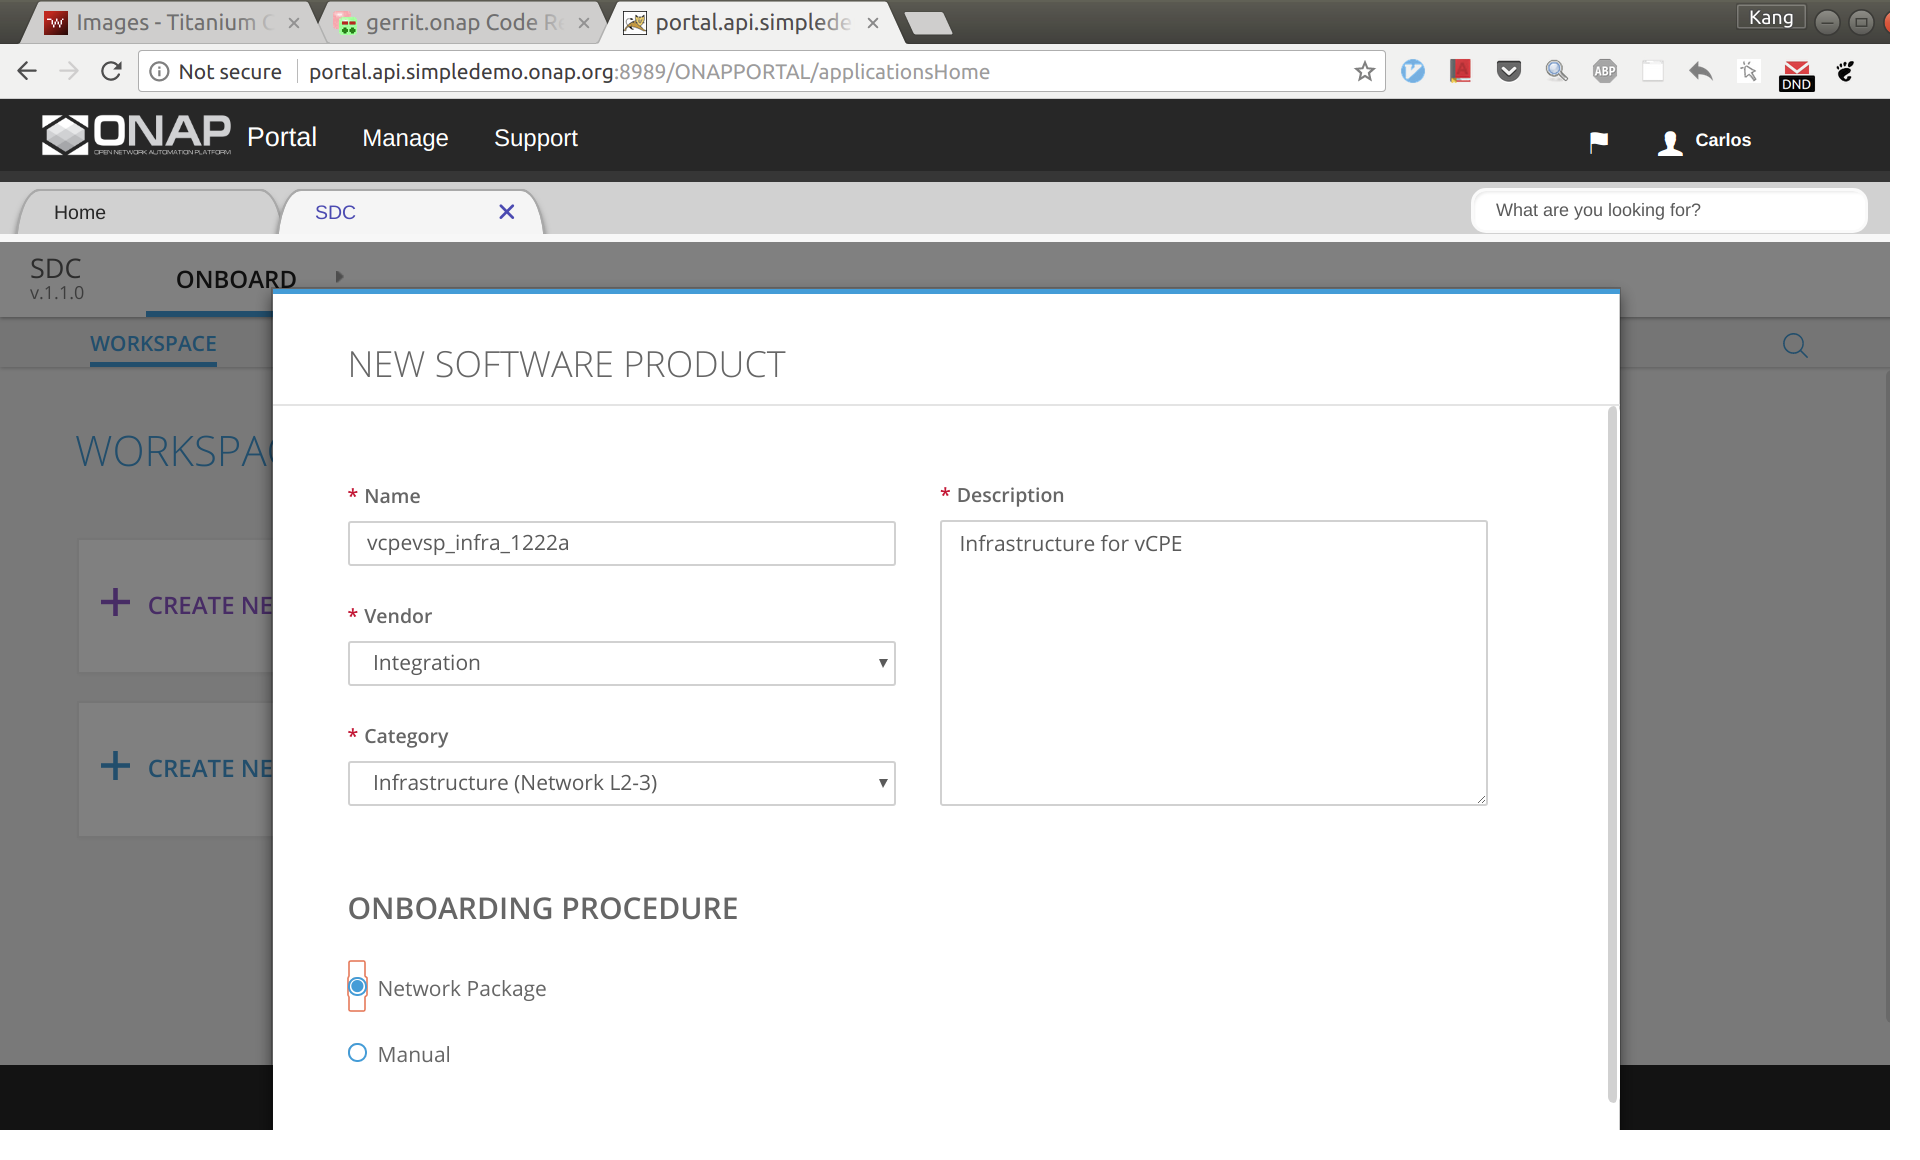
Now enter the name of the vsp. For naming, I'd suggest all lower case with format vcpevsp_[vnf]_[suffix], see example below.
After clicking 'Create', click 'missing' and then select to use the license model created previously.
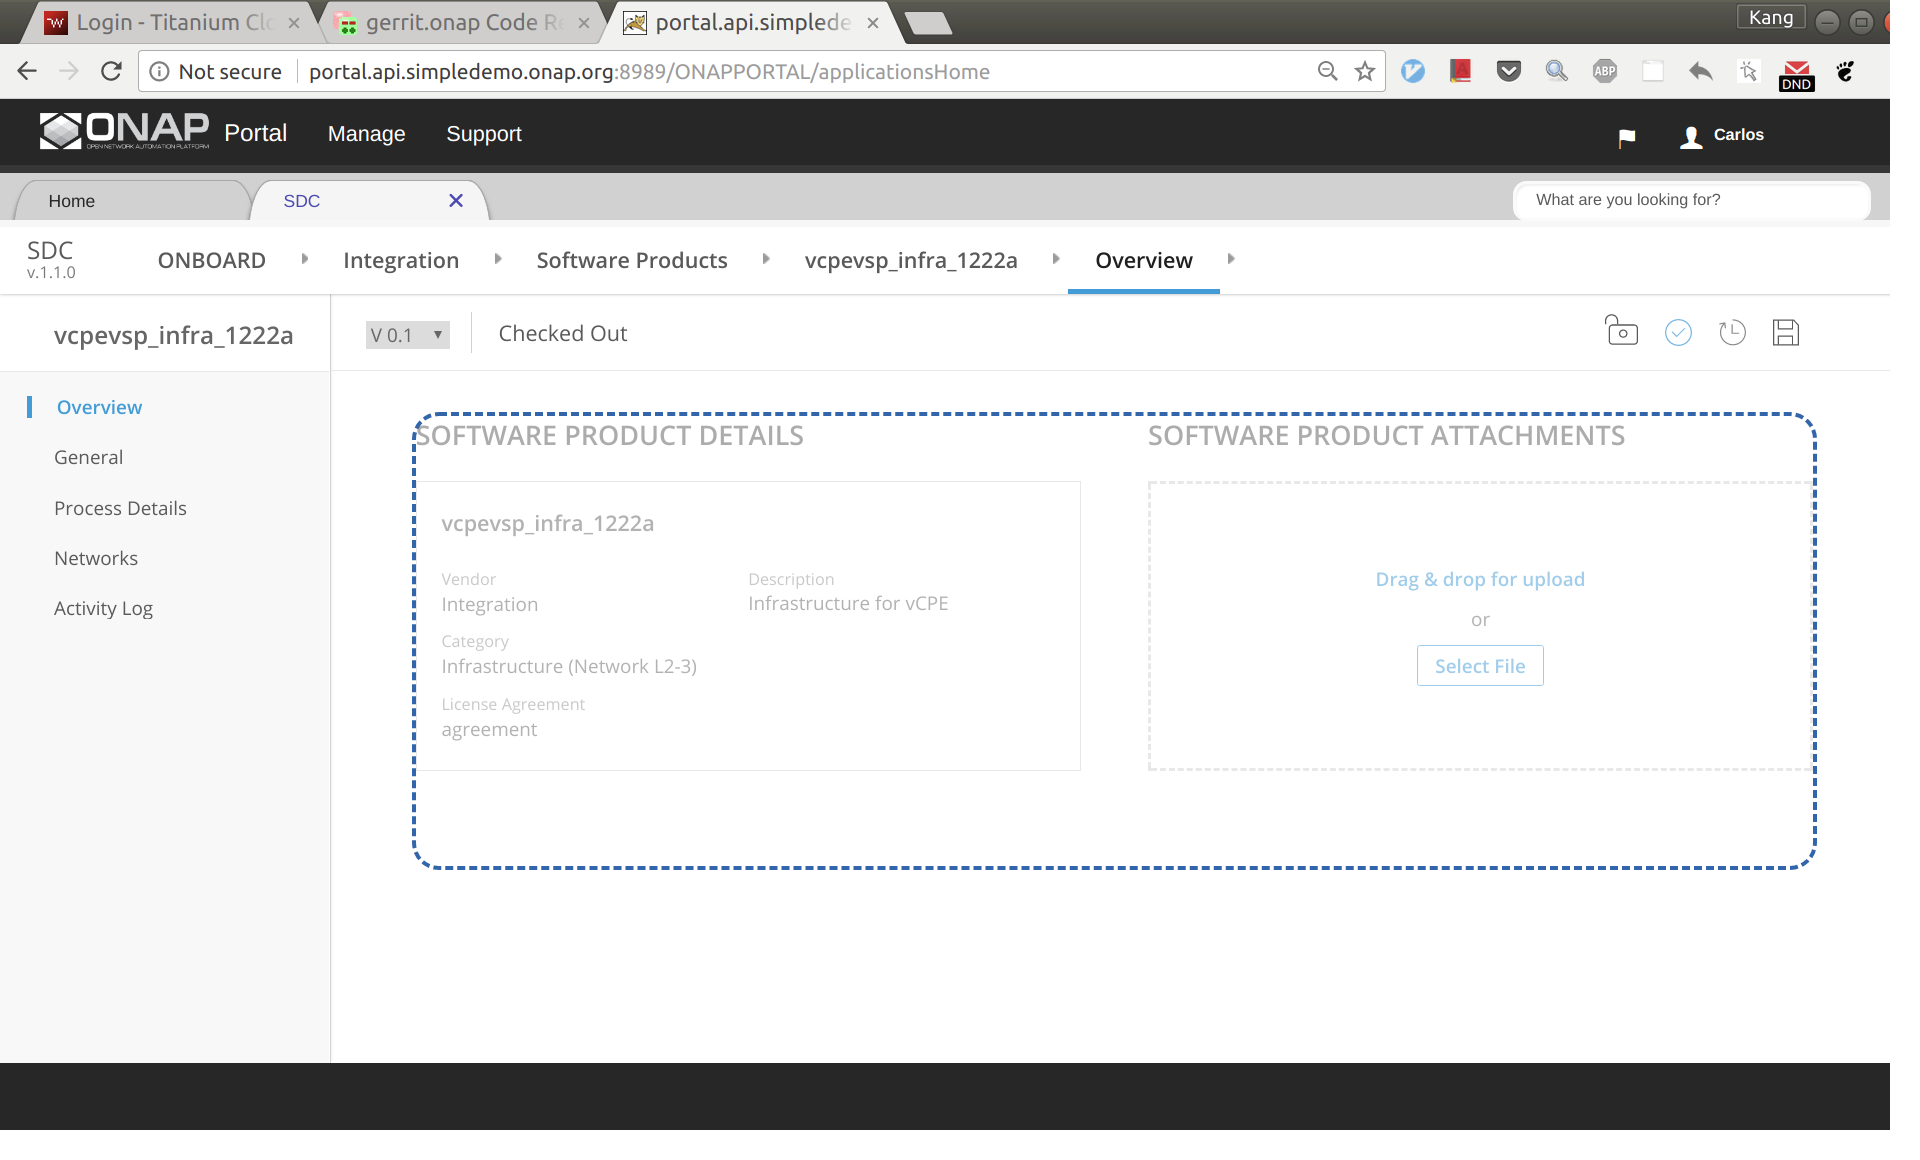
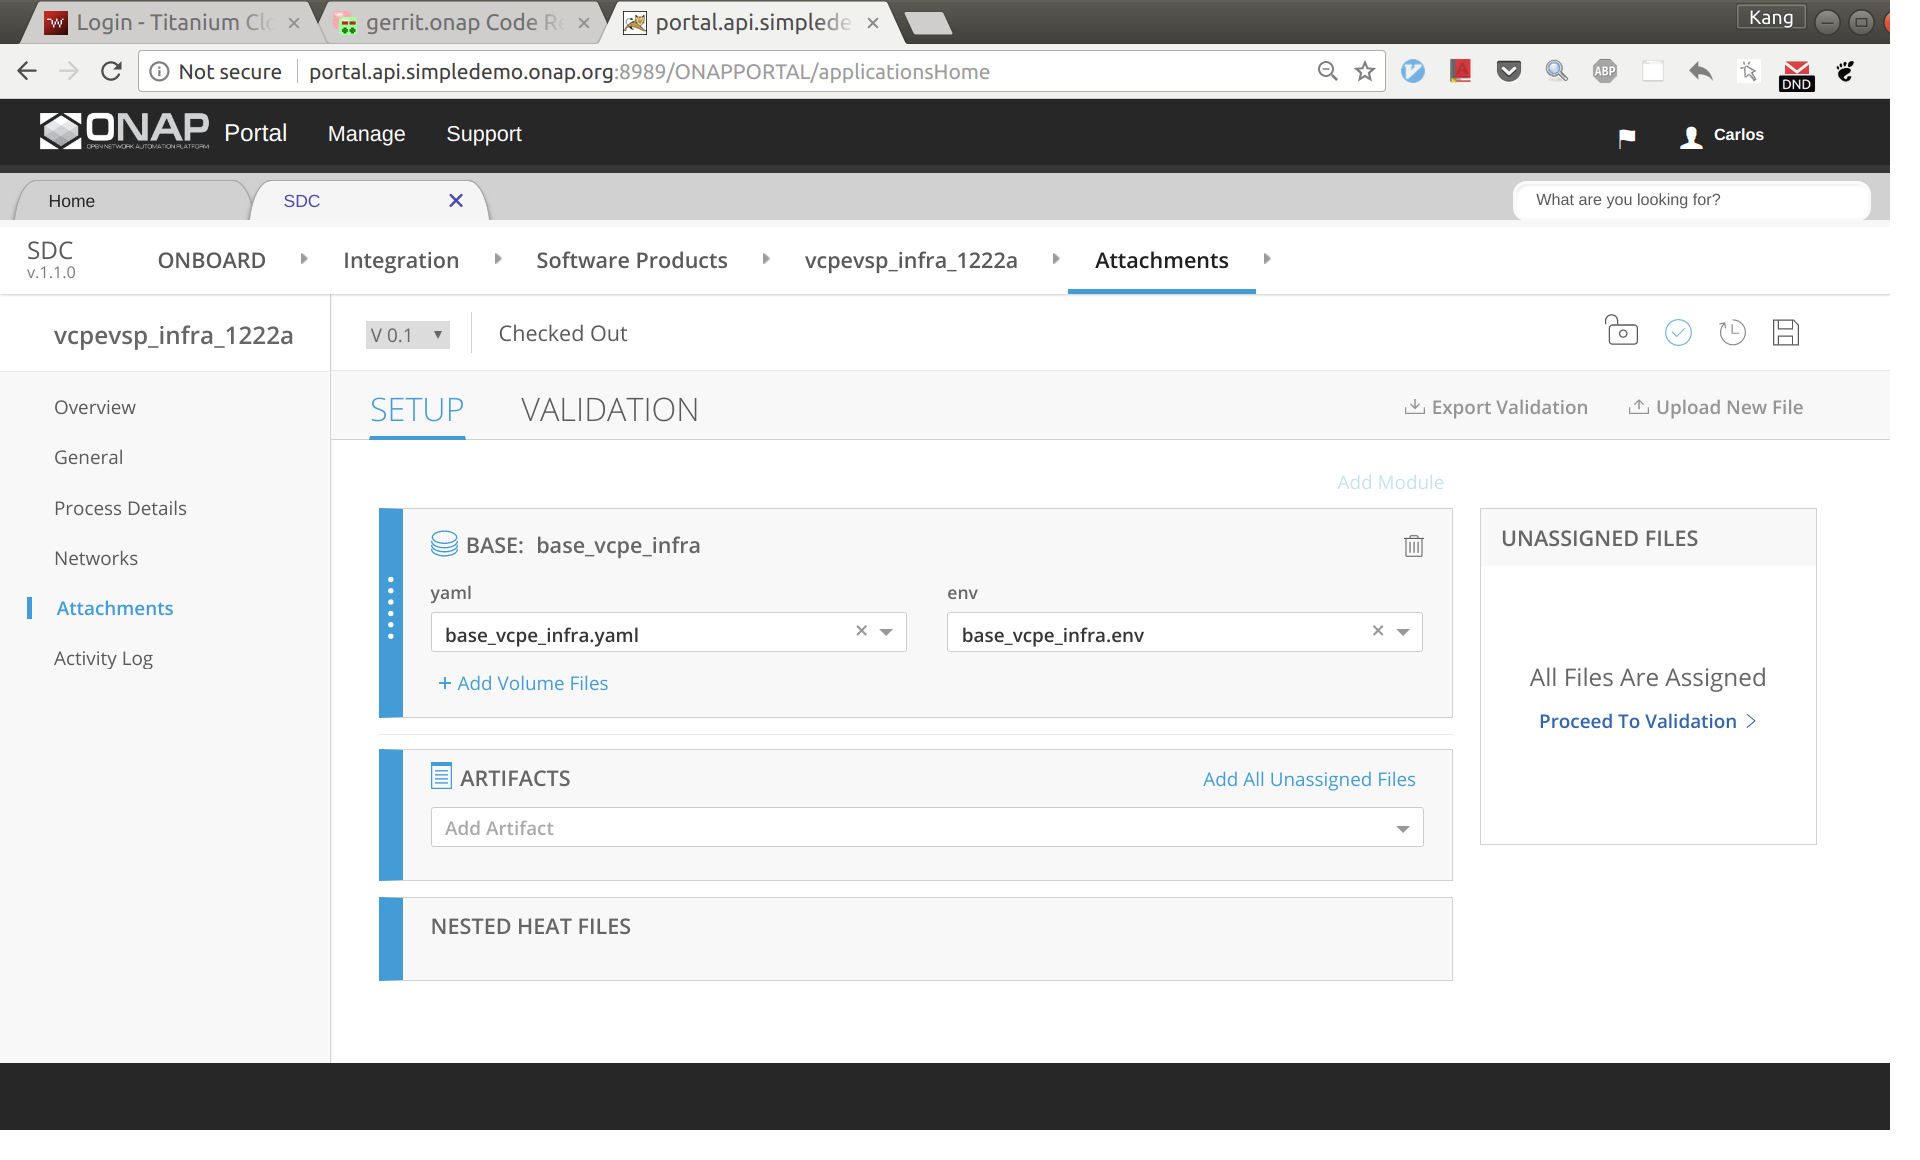
Click 'Overview' on the left size panel, then drag and drop infra.zip to the webpage to upload the HEAT.
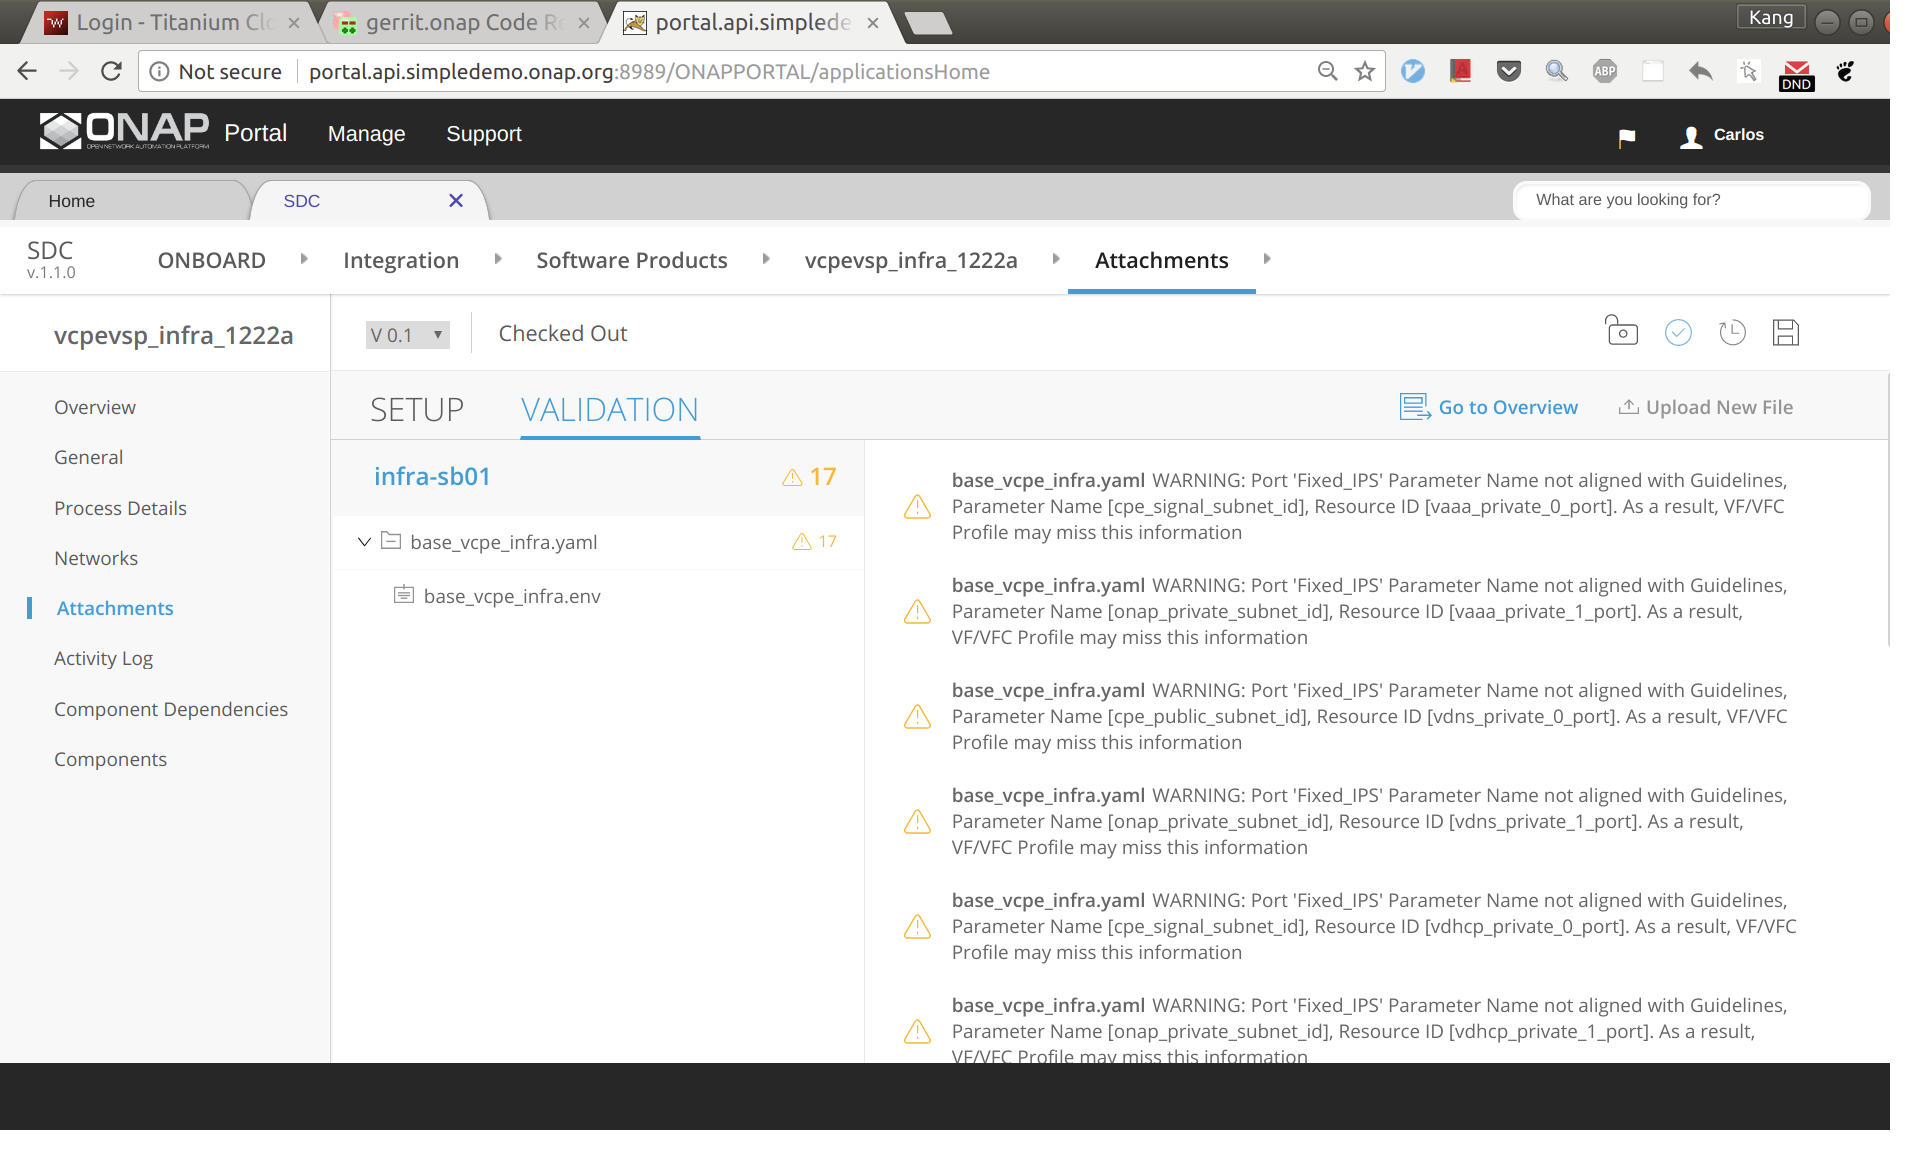
Now click 'Proceed To Validation' to validate the HEAT template.
You may see a lot of warnings. In most cases, you can ignore those warnings.
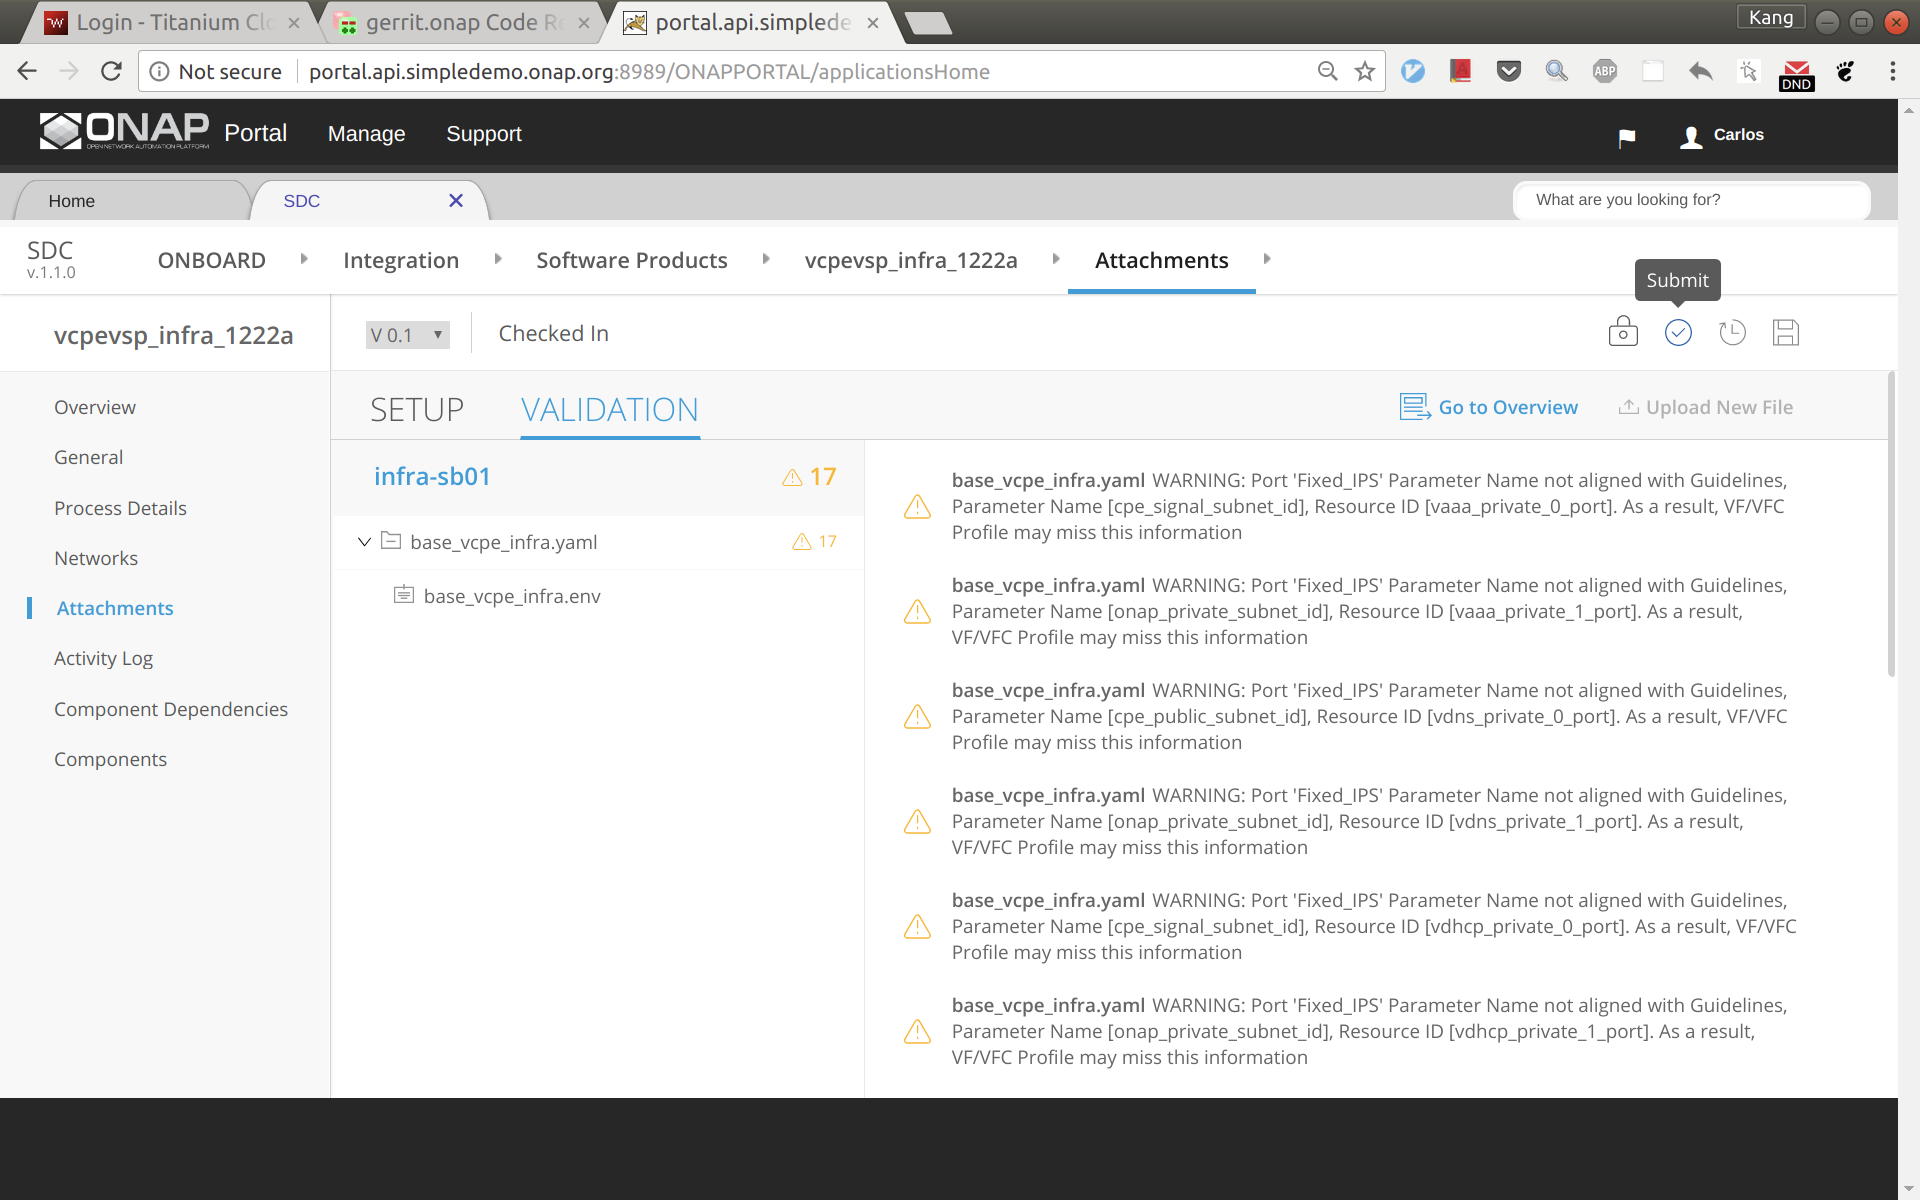
Click 'Check in', and then 'Submit'
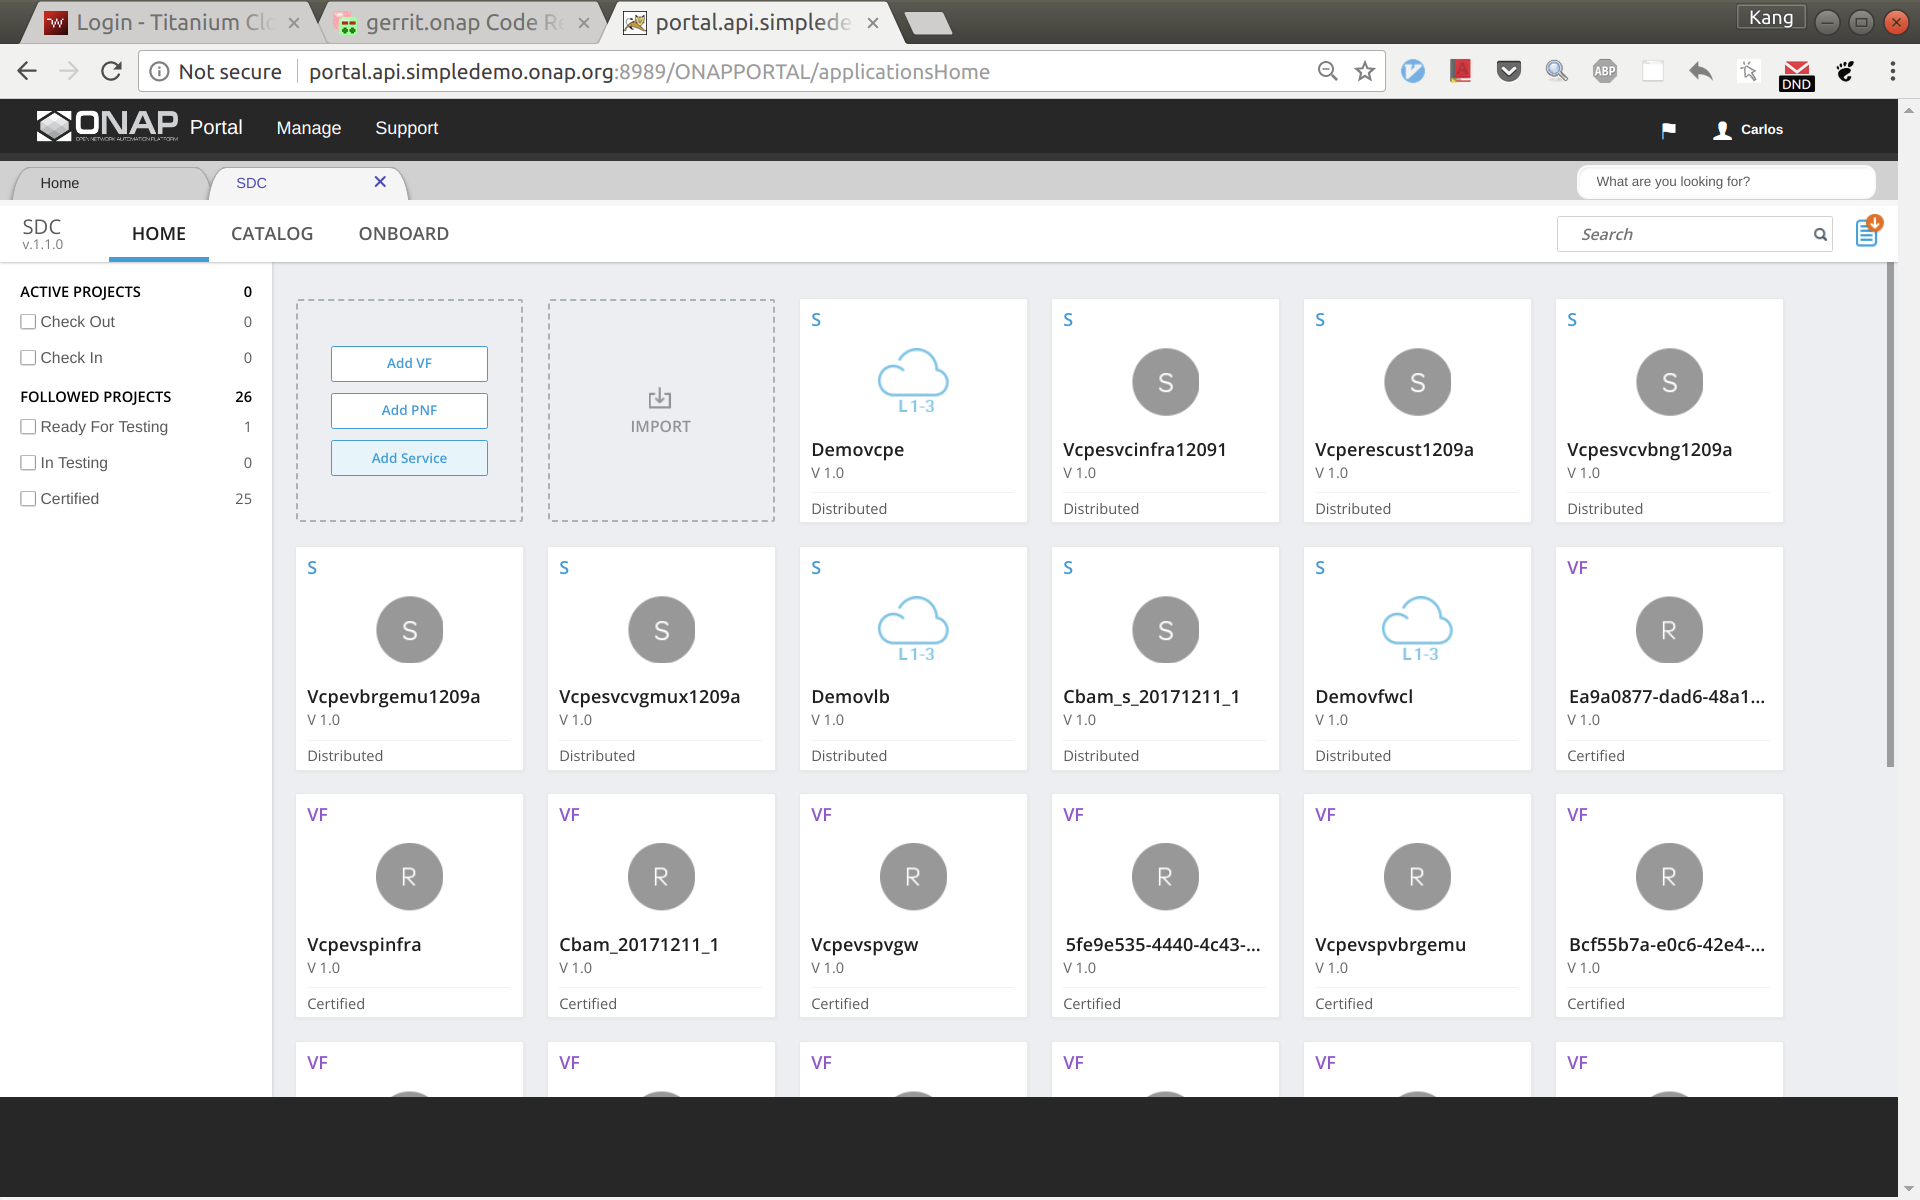
Go to SDC home, and then click 'Import VSP'.
In the search box, type in suffix of the vsp you onboarded a moment ago to easily locate the vsp. Then click 'Import VSP'.

Click 'Create' without changing anything.
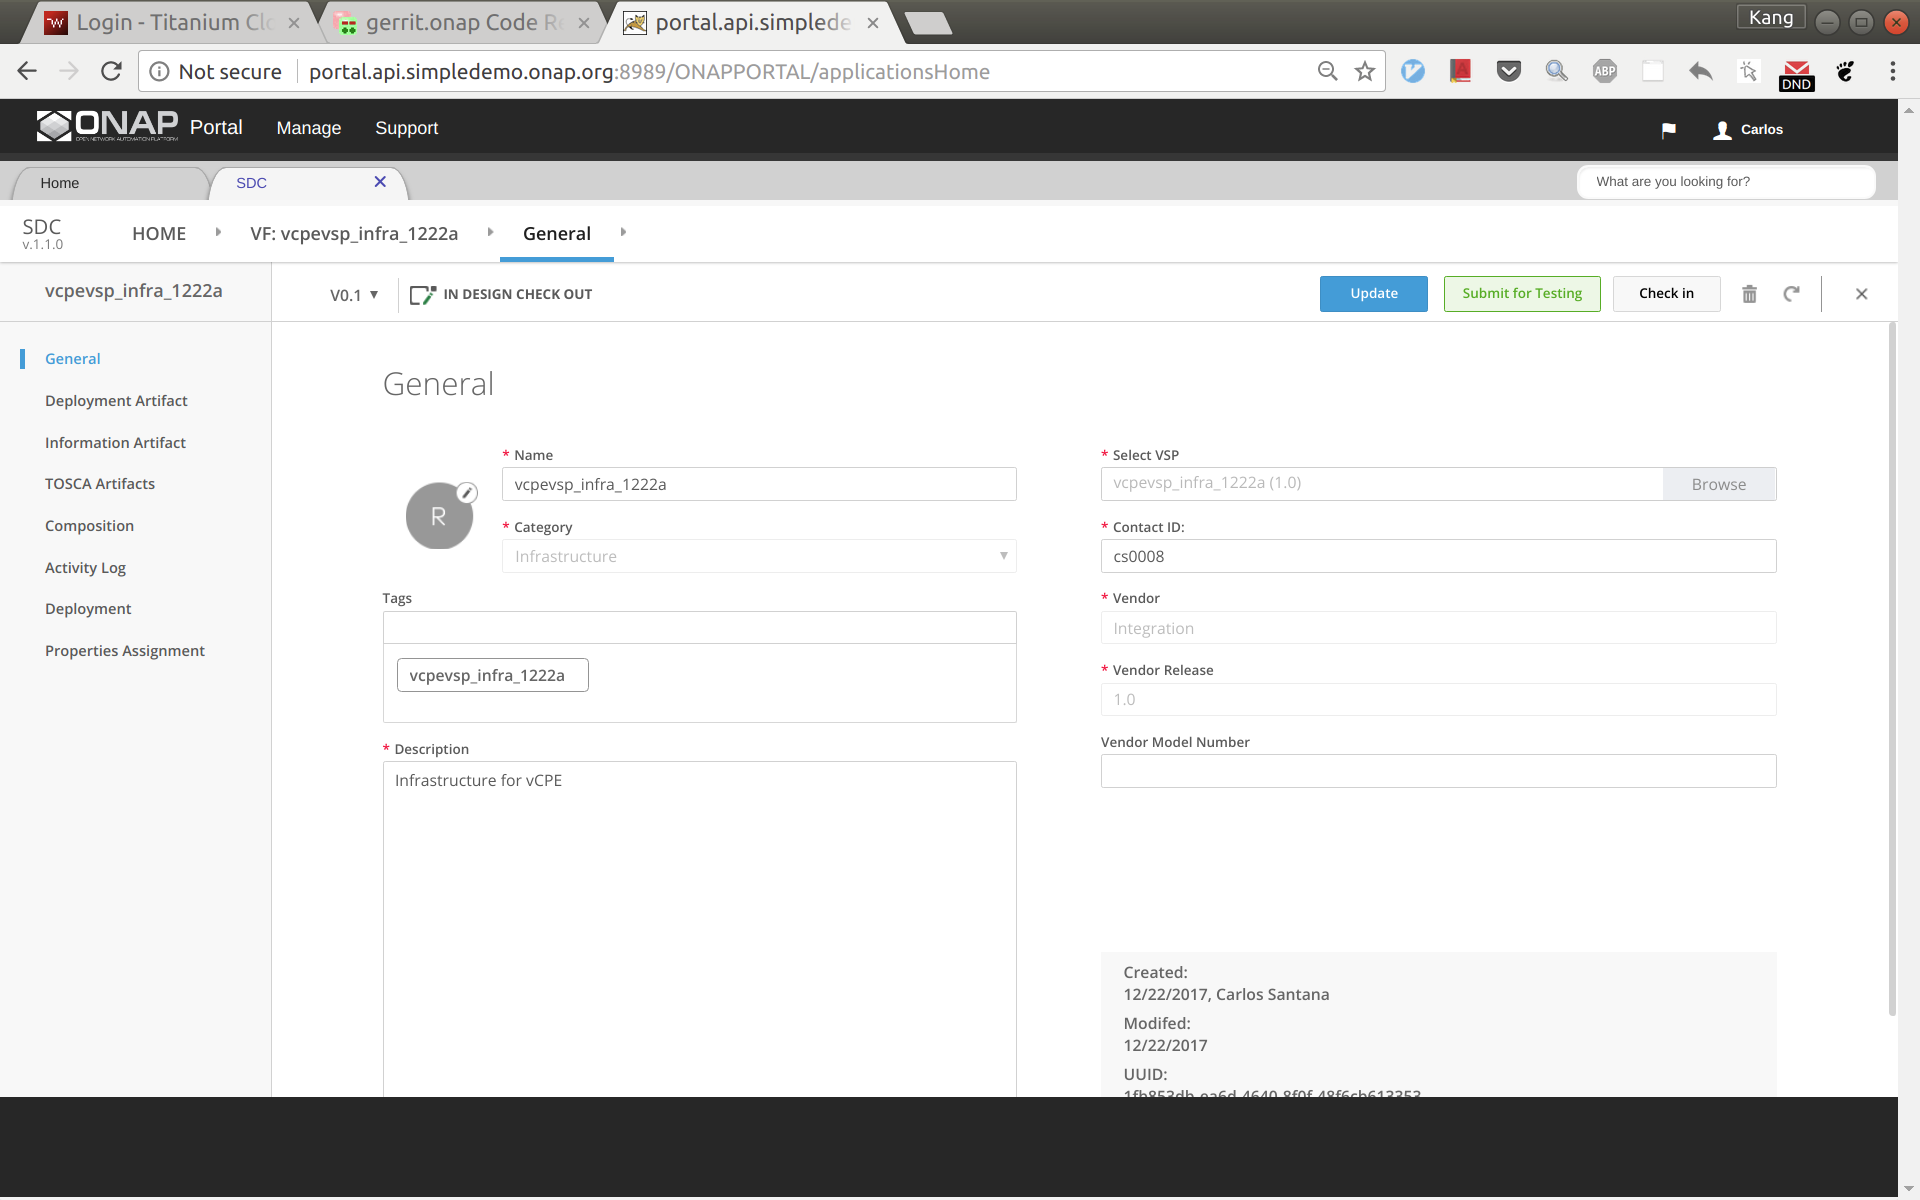
Now a VF based on the HEAT is created successfully. Click 'Submit for Testing'.
Sign out and sign back in as tester: jm0007, select the VF you created a moment ago, test and accept it.
Note: in Casablanca you can simply Certify the VSP and continue on with Service Design and Creation (see image below)

Service Design and Creation
The entire vCPE use case is divided into five services as show below. Each service is described below with suggested names.
- vcpesvc_infra_[suffix]: includes two generic neutron networks named cpe_signal and cpe_public (all names are lower case) and a VNF infra.
- vcpesvc_vbng_[suffix]: includes two generic neutron networks named brg_bng and bng_mux and a VNF vBNG.
- vcpesvc_vgmux_[suffix]: includes a generic neutron network named mux_gw and a VNF vGMUX
- vcpesvc_vbrg_[suffix]: includes a VNF vBRG.
- vcpesvc_rescust_[suffix]: includes a VNF vGW and two allotted resources that will be explained shortly.
Service design and distribution for infra, vBNG, vGMUX, and vBRG
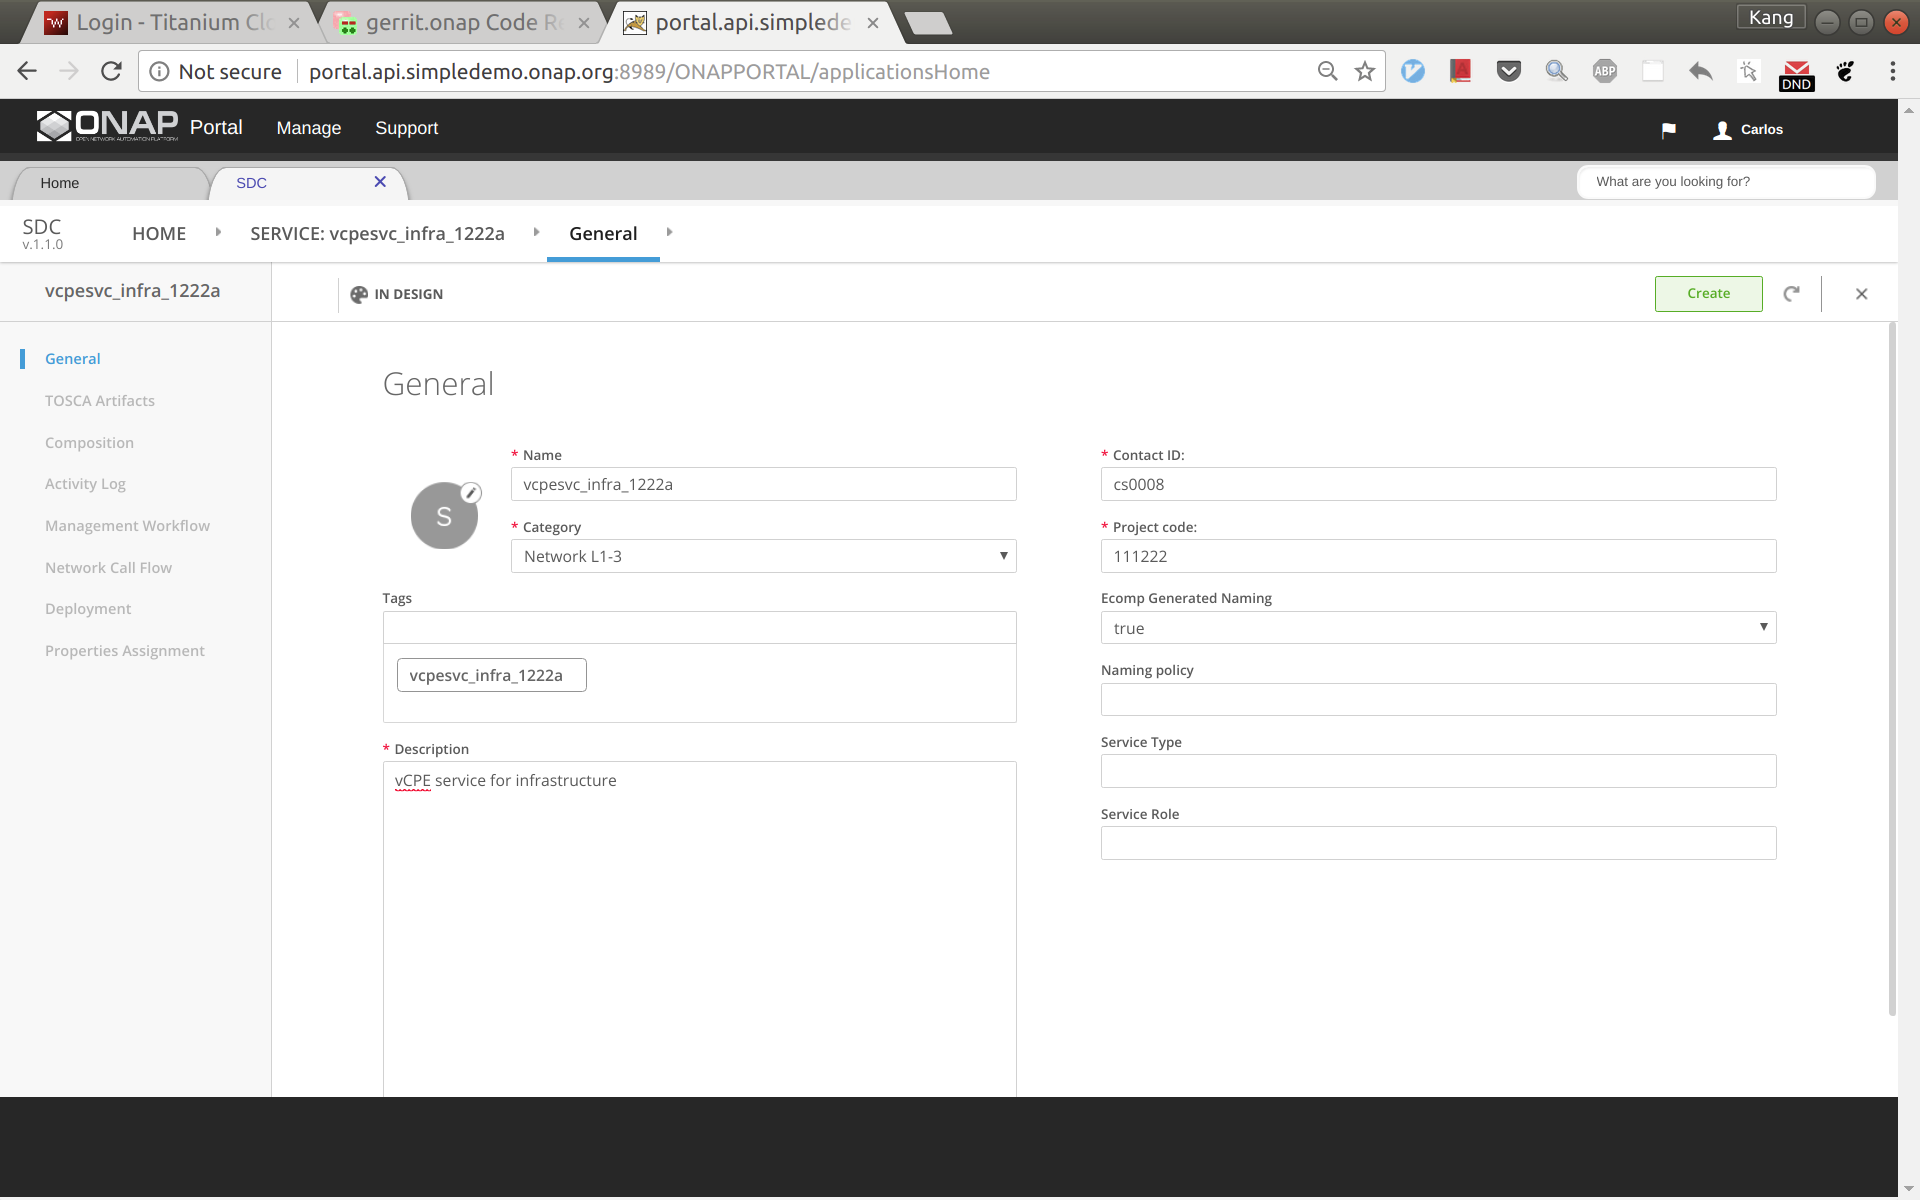
The process for creating these four services are the same, however make sure to use the vnfs & networks as described above. Below are the steps to create vcpesvc_infra_1222a. Follow the same process to create the other three services, changing networks and VNFs according to above. Log back in as Designer username: cs0008
In SDC, click 'Add Service' to create a new service
Enter name, category, description, product code, and click 'Create'.
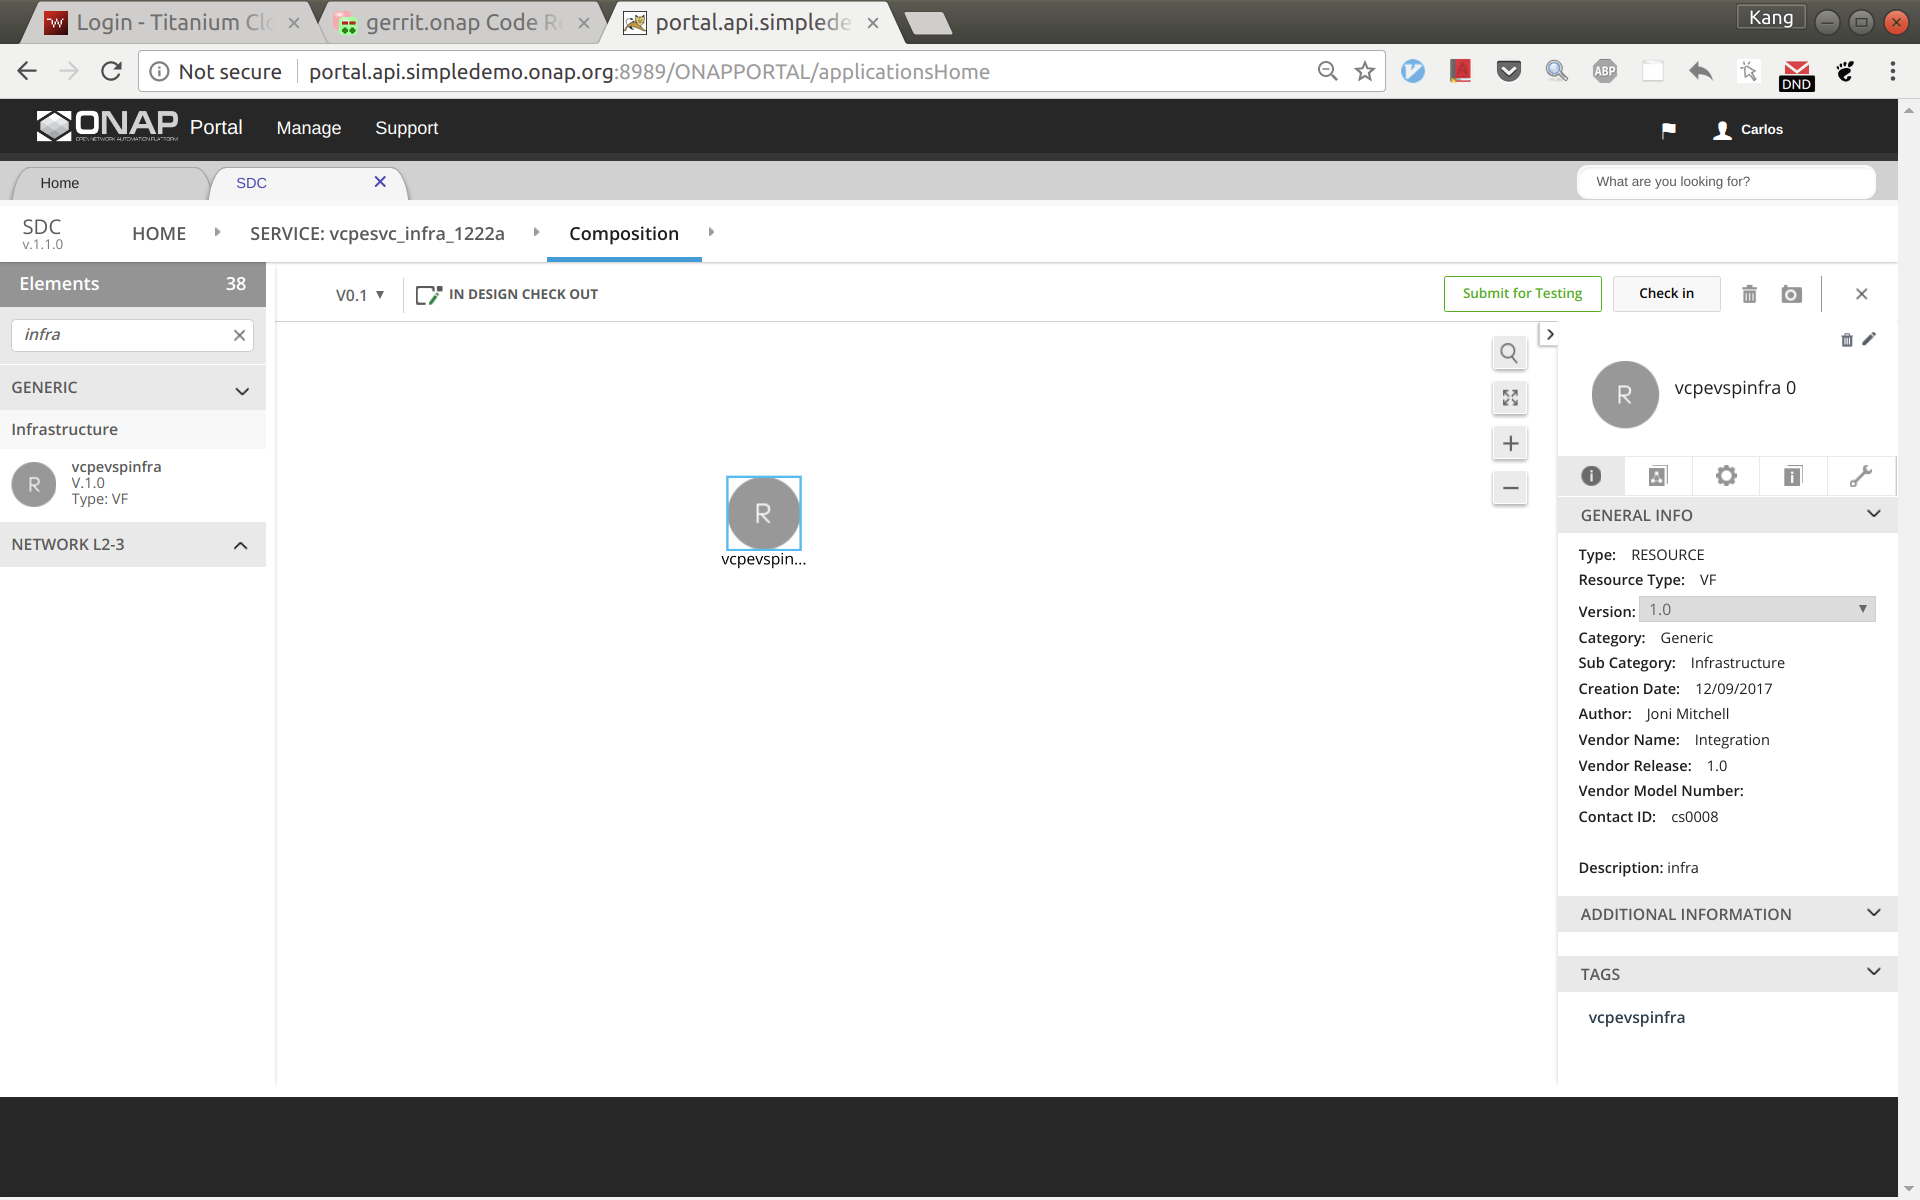
Click 'Composition' from left side panel. Drag and drop VF vcpevsp_infra_1222a to the design.
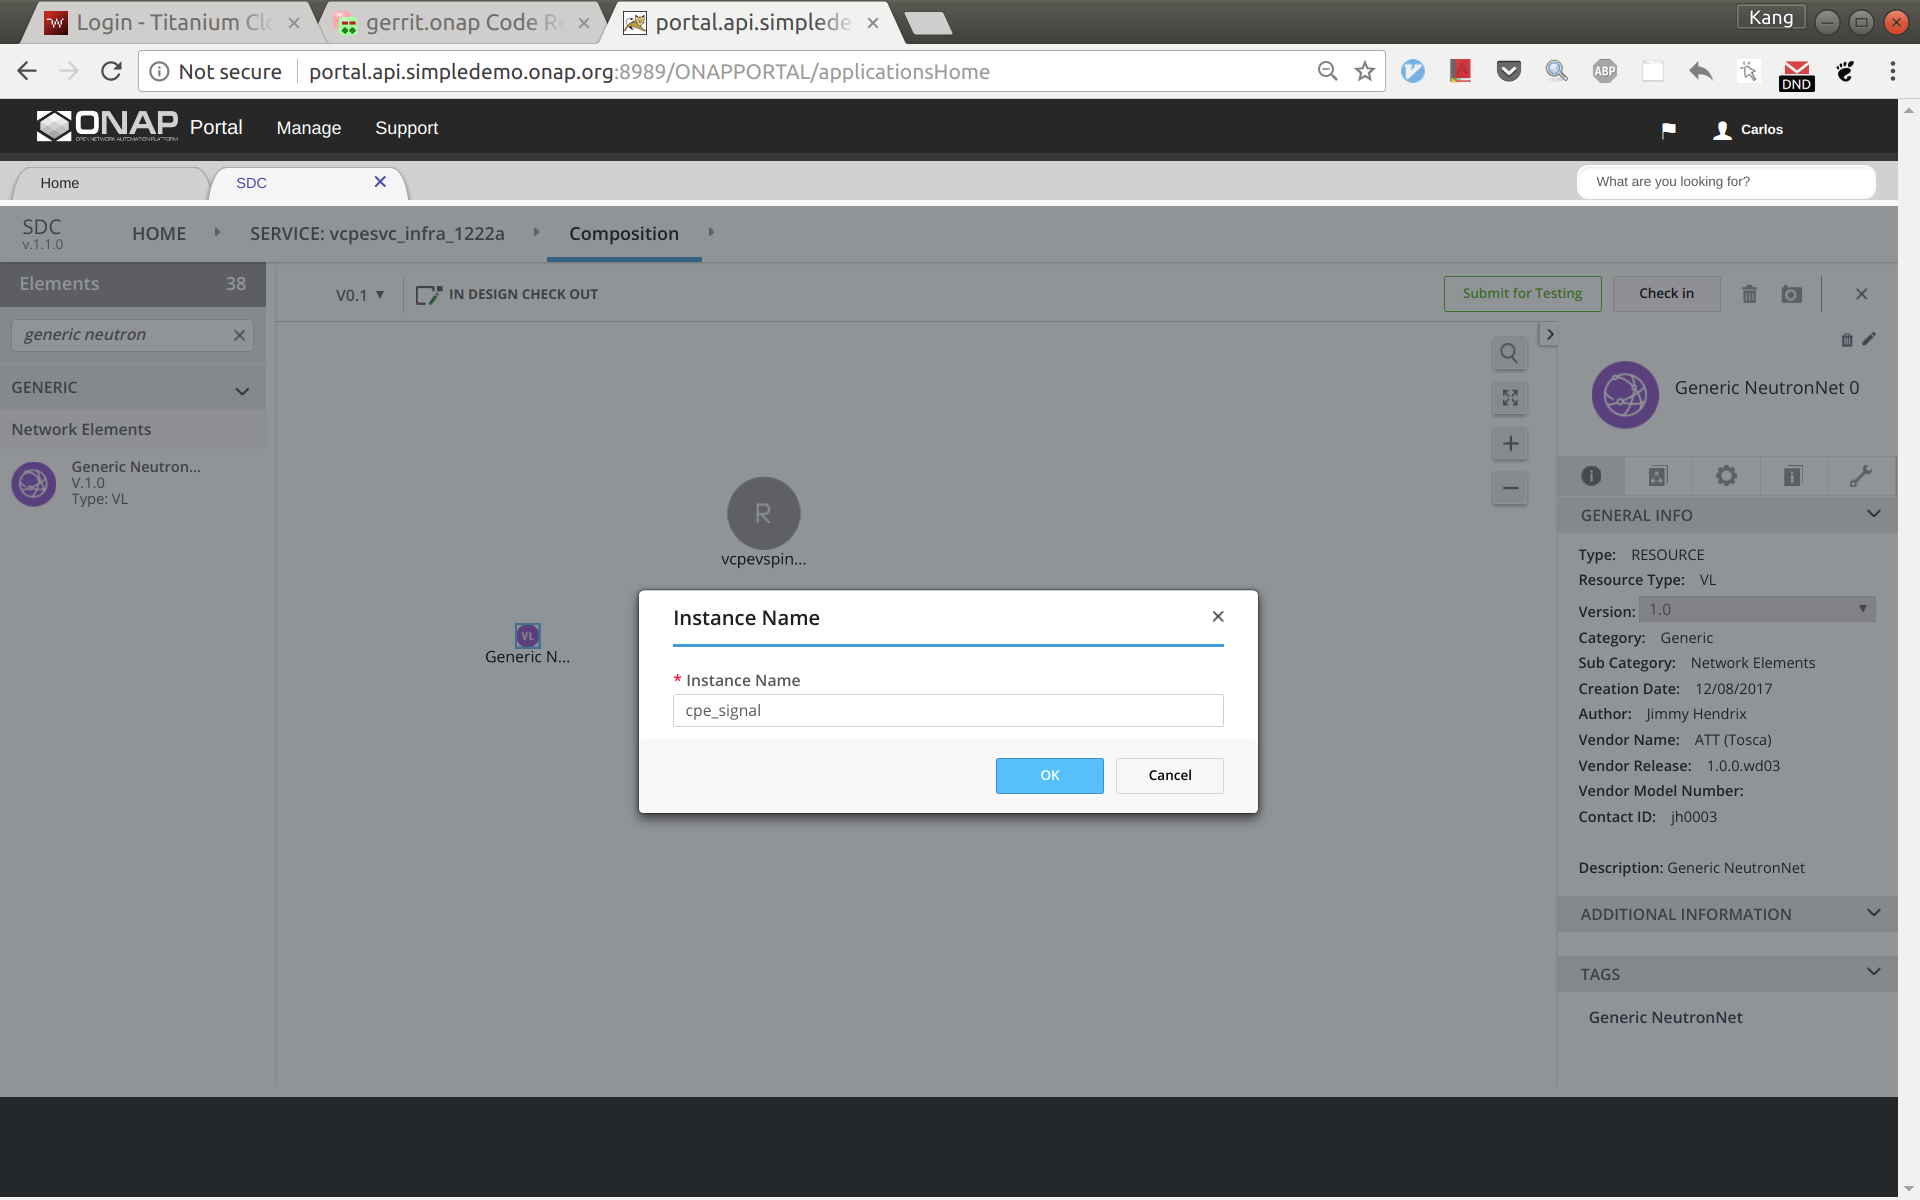
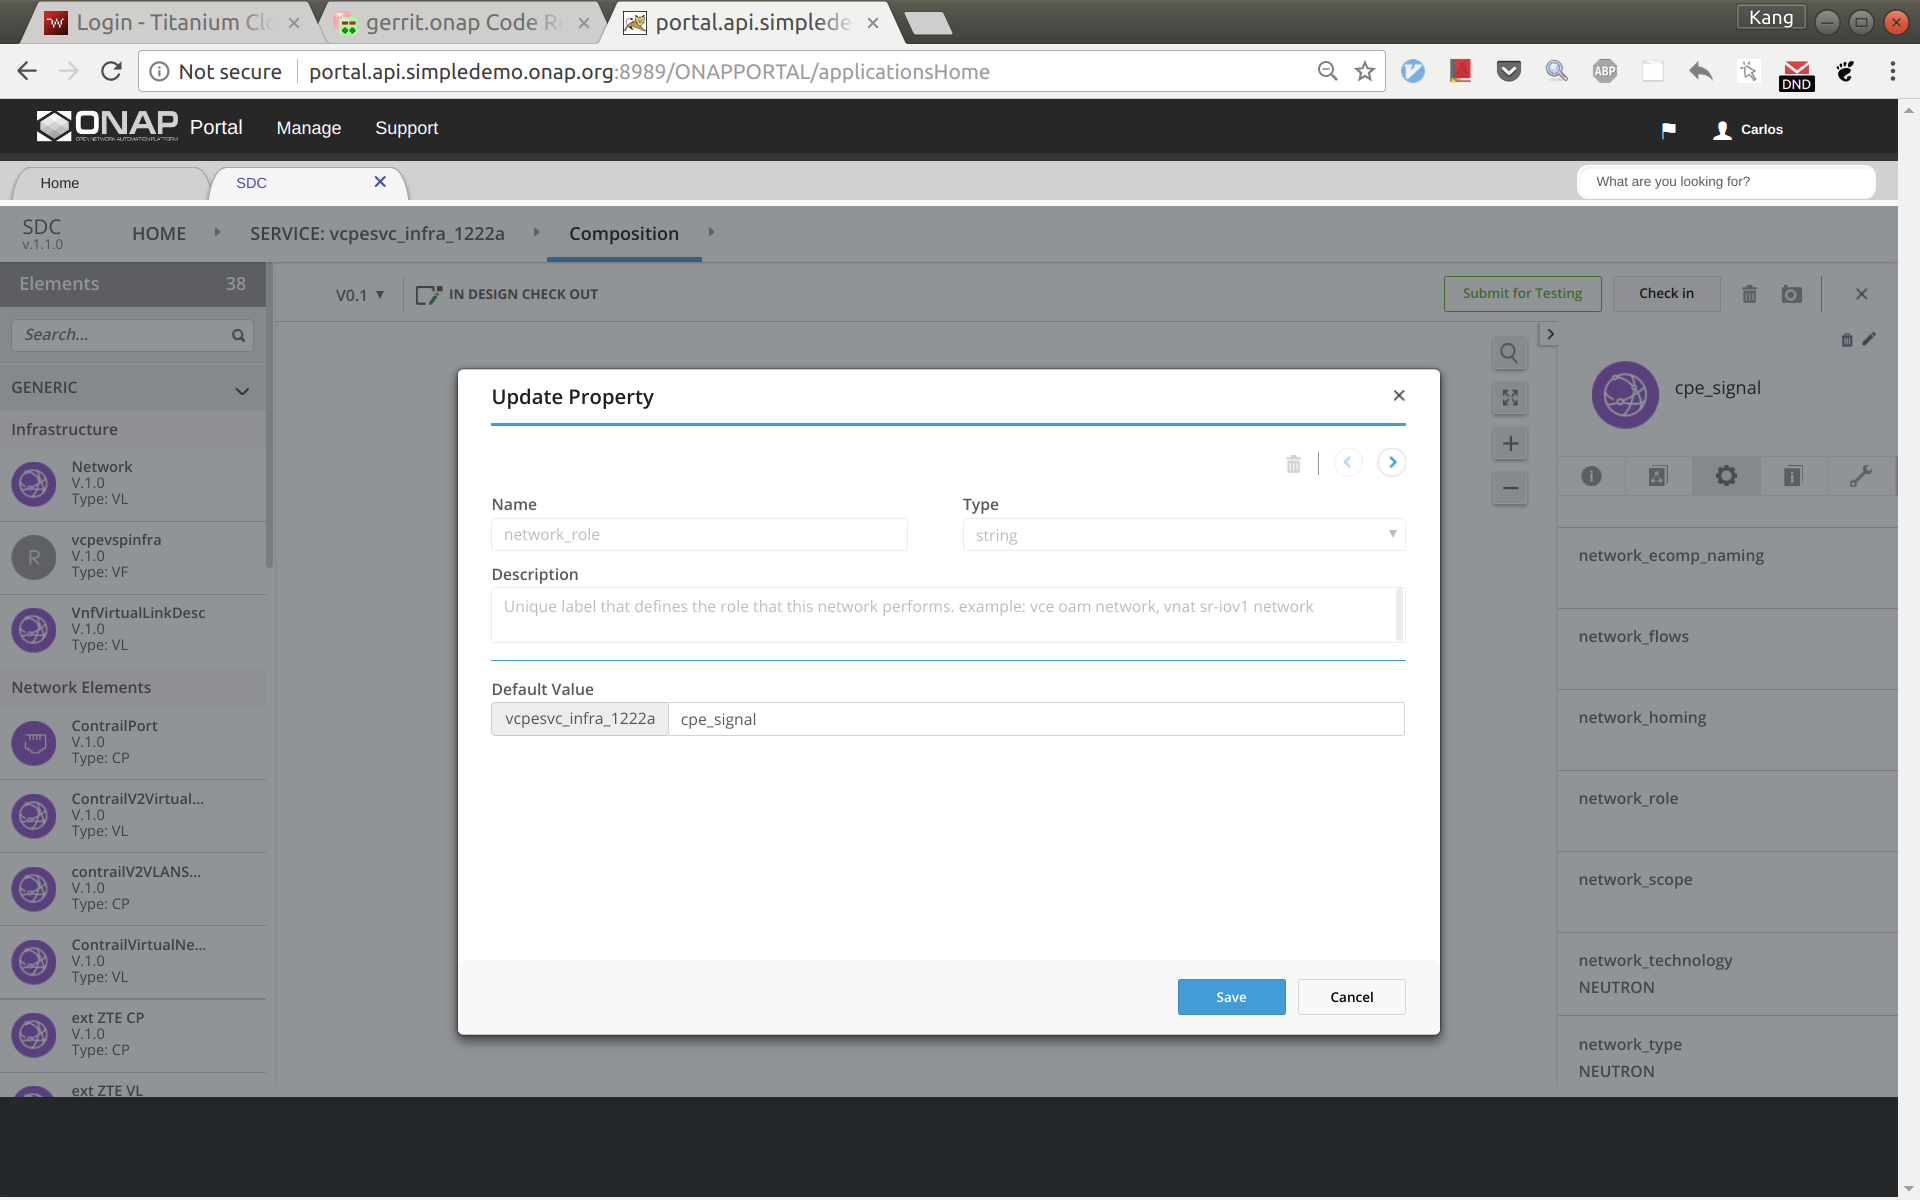
Drag and drop a generic neutron network to the design, click to select the icon in the design, then click the pen in the upper right corner (next to the trash bin icon), a window will pop up as shown below. Now change the instance name to 'cpe_signal'.
Click and select the network icon in the design again. From the right side panel, click the ![]() icon and then select 'network_role'. In the pop up window, enter 'cpe_signal' as shown below.
icon and then select 'network_role'. In the pop up window, enter 'cpe_signal' as shown below.
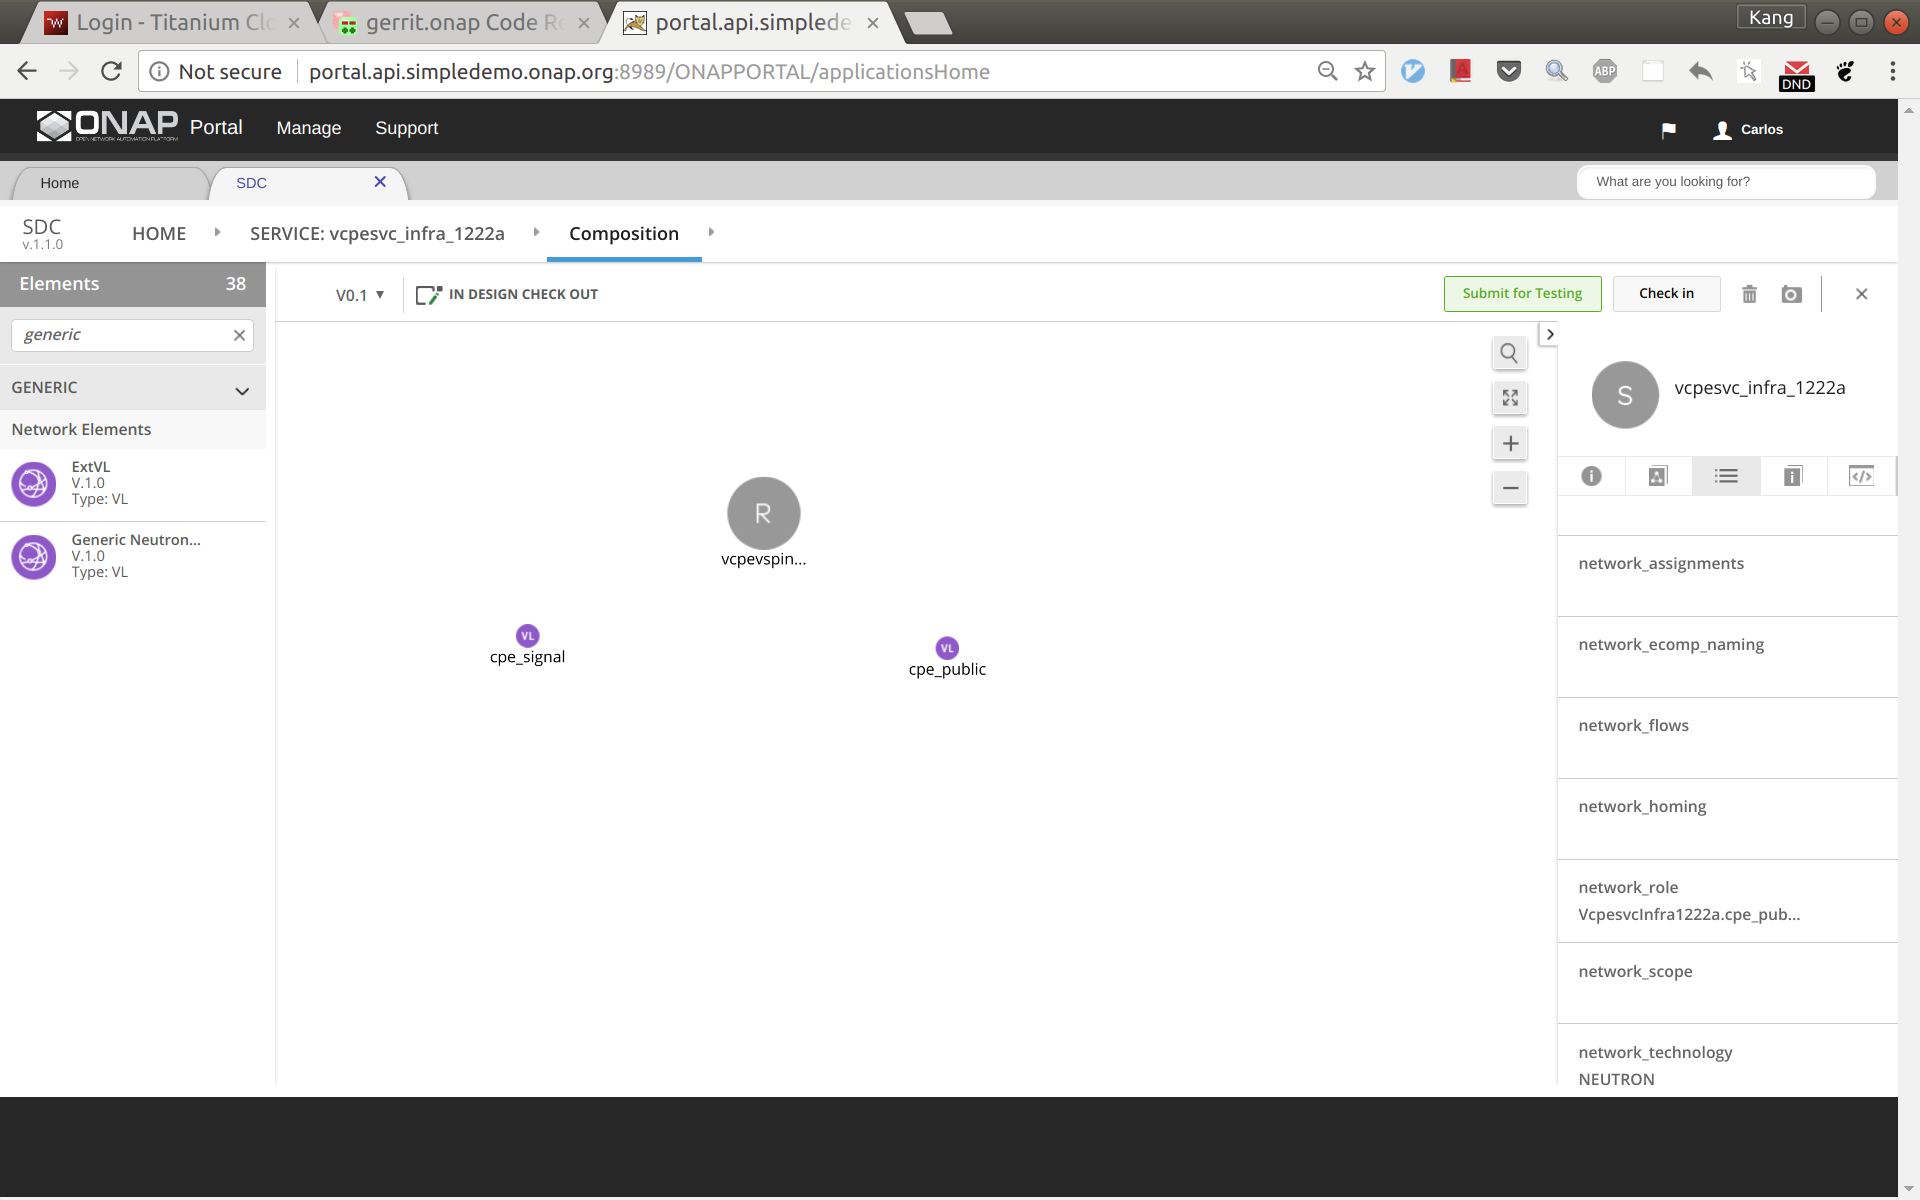
Add another generic neutron network the sam way. This time change the instance name and network role to 'cpe_public'. Now the service design is completed. Click 'Submit for Testing'.
Sign out and sign back in as tester 'jm0007'. Test and approve this service.
Sign out and sign back in as governer 'gv0001'. Approve this service.
Sign out and sign back in as operator 'op0001'. Distribute this service. Click monitor to see the results. After some time (could take 30 seconds or more), you should see the service being distributed to AAI, SO, SDNC.
Service design and distribution for customer service
First of all, make sure that all the previous four services have been created and distributed successfully.
The customer service includes a VNF vGW and two allotted resources: tunnelxconn and brg. We will need to create the two allotted resources first and then use them together with vG (which was already onboarded and imported as a VF previously) to compose the service.
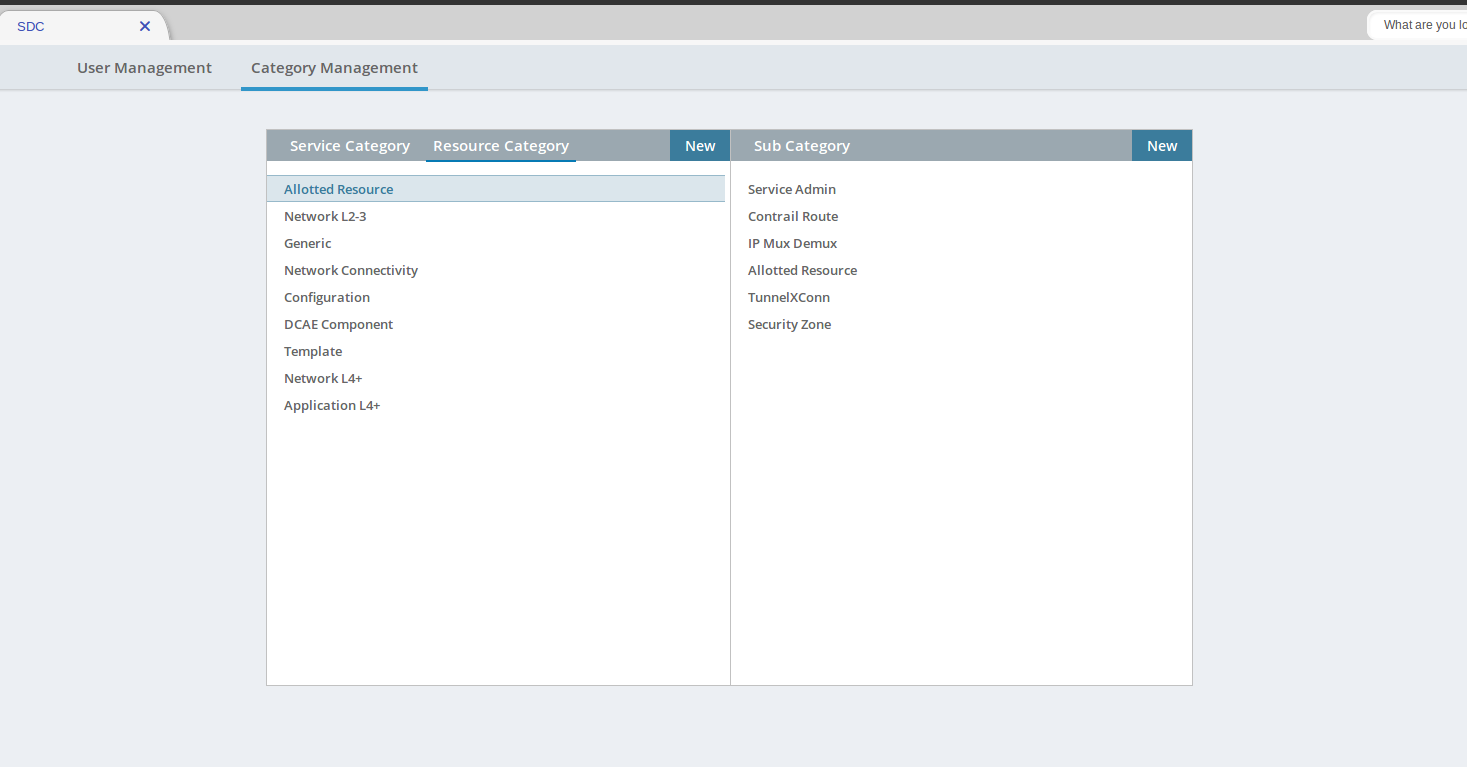
Check Sub Category Tag in SDC
You may need to add an Allotted Resource Category Tag to SDC for the BRG.
Log as the "demo" account and go to SDC.
Select "Category Management"
Select "Allotted Resource"
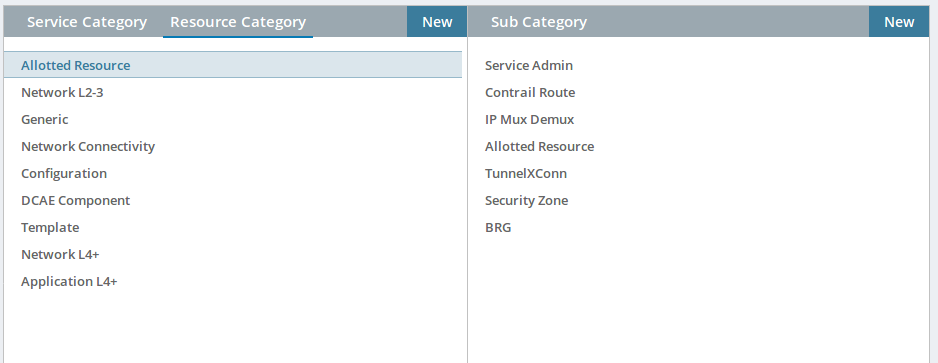
You should have "Tunnel XConn" and "BRG".
If you do not and are missing the "BRG" Sub Category Like the screen shot below. Click on New and add the "BRG" Subcategory.
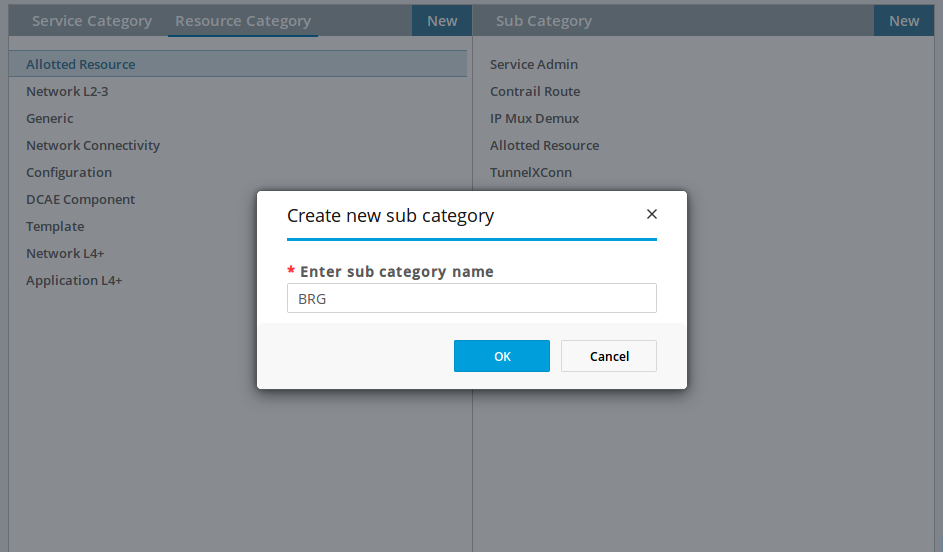
If Chrome browser fails to add BRG, try Firefox browser.
Create allotted resource tunnelxconn
This allotted resource depends on the previous created service vcpesvc_vgmux_1222a. The dependency is described by filling the allotted resource with the UUID, invariant UUID, and service name of vcpesvc_vgmux_1222a. So for preparation, we first download the csar file of vcpesvc_vgmux_1222a from SDC.
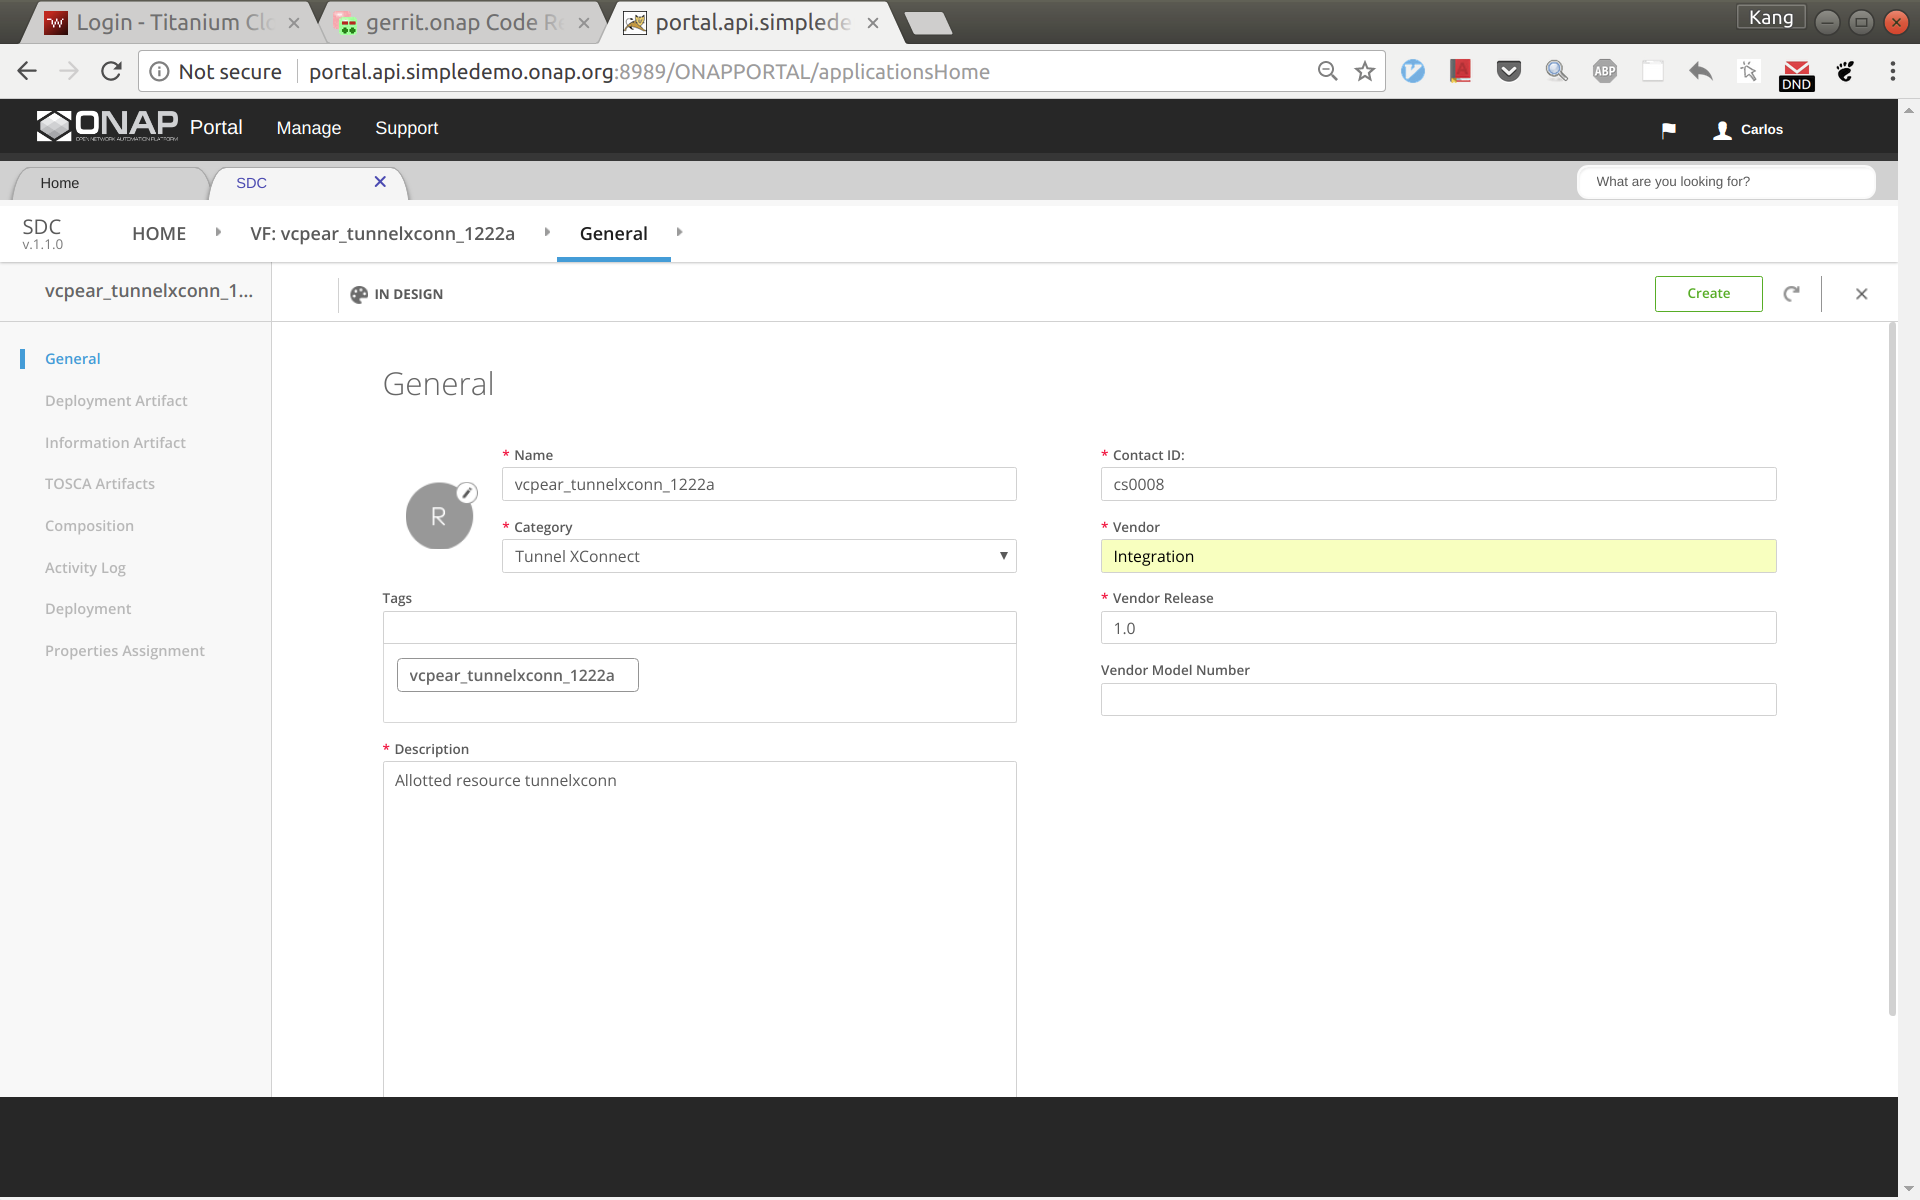
Sign into SDC as designer cs0008, click create a new VF, select 'Tunnel XConnect' as category and enter other information as needed. See below for an example. I'm using vcpear_tunnelxconn_1222a as the name of this allotted resource.
Click create. And then click 'Composition', drag an 'AllottedResource' from the left side panel to the design.

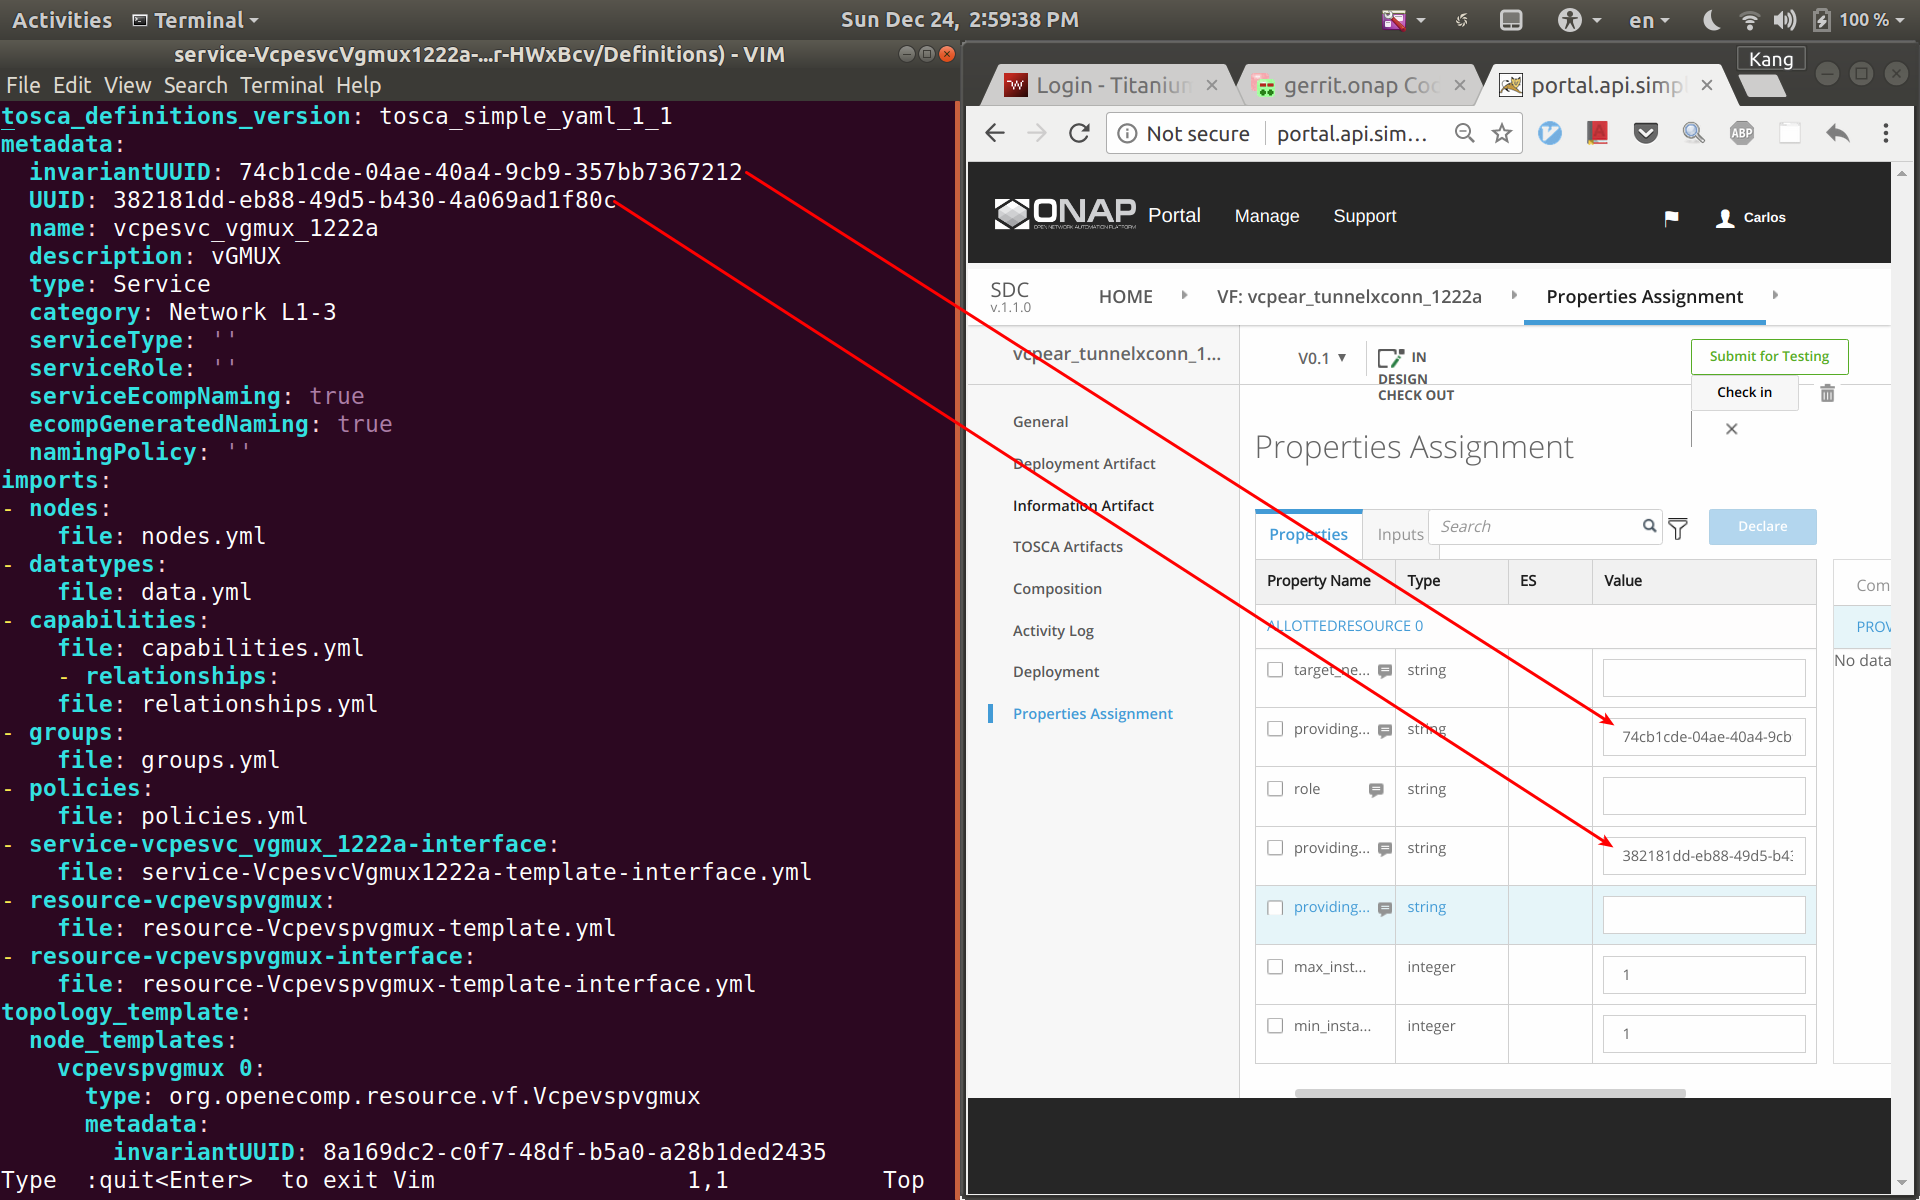
Click on VF name link in between HOME link and Composition on the top menu. From here click on Properties Assignment on the left hand menu. Now open the csar file for vcpesvc_vgmux_1222a, under 'Definitions' open file 'service-VcpesvcVgmux1222a-template.yml'. (Note that the actual file name depends on what you name the service at the first place.) Now put the yml file and the SDC window side by side. Now copy&paste the invariantUUID, UUID, and node name to the corresponding fields in SDC. See the two screenshots below. Save and then submit for testing.

Create allotted resource brg
This allotted resource depends on the previous created service vcpesvc_vbrg_1222a. The dependency is described by filling the allotted resource with the UUID, invariant UUID, and service name of vcpesvc_vbrg_1222a. So for preparation, we first download the csar file of vcpesvc_vbrg_1222a from SDC.
We name this allotted resource vcpear_brg_1222a. The process to create it is the same as that for the above vcpear_vgmux_1222a, Use catagory: BRG. The only differences are the UUID, invariant UUID, and service name parameters being used. Therefore, I will not repeat the steps and screenshots here.
Sign out and sign back in as tester 'jm0007'. Test and approve both Allotted Resources.
Create customer service
Log back in as Designer username: cs0008
We name the service vcpesvc_rescust_1222a and follow the steps below to create it.
Sign into SDC as designer, add a new service and fill in parameters as below. Then click 'Create'.

Click 'Composition' from the left side panel. Drag and drop the following three components to the design.
- vcpevsp_vgw_1222a
- vcpear_tunnelxconn_1222a
- vcpear_brg_1222a
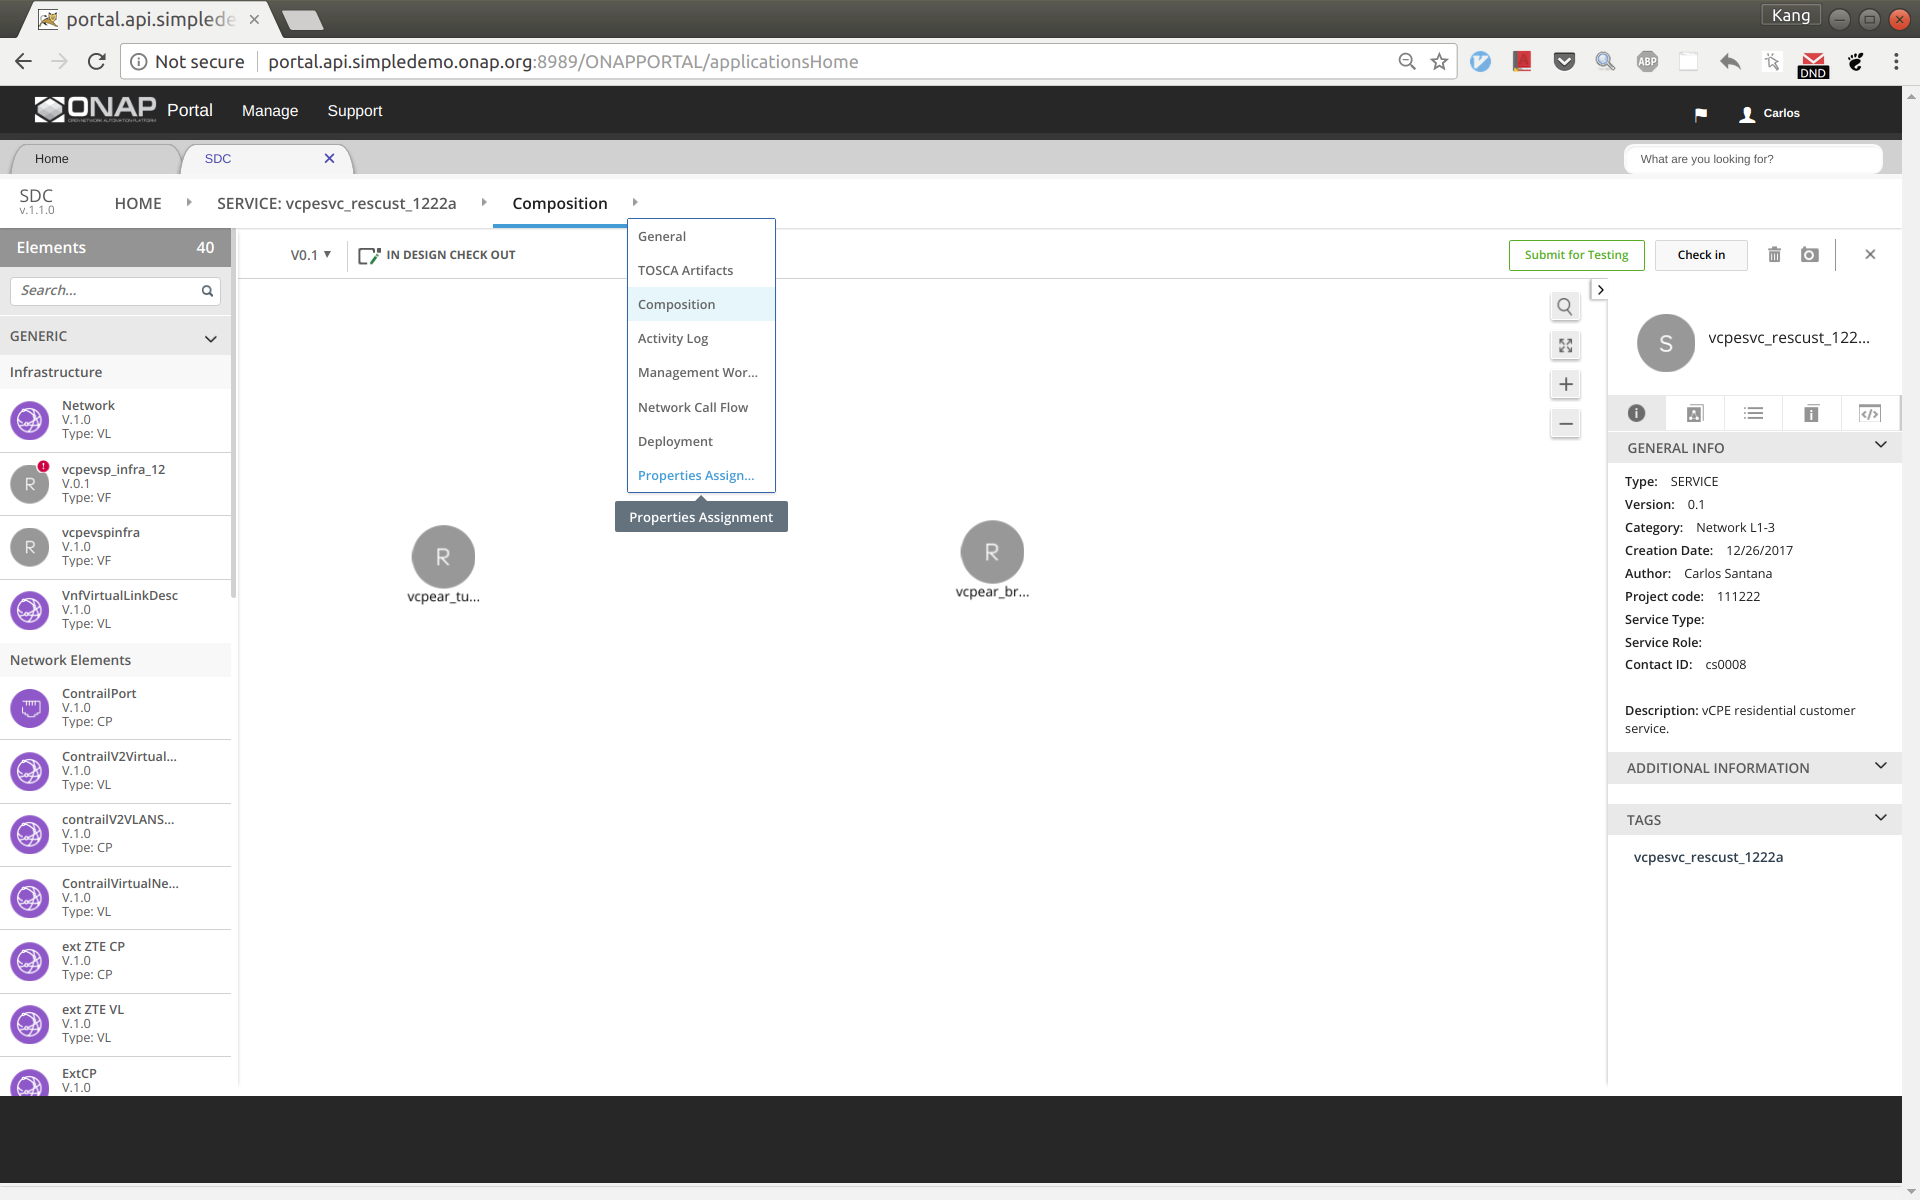
Point your mouse to the arrow next to 'Composition' and then click 'Properties Assignment' (see below).
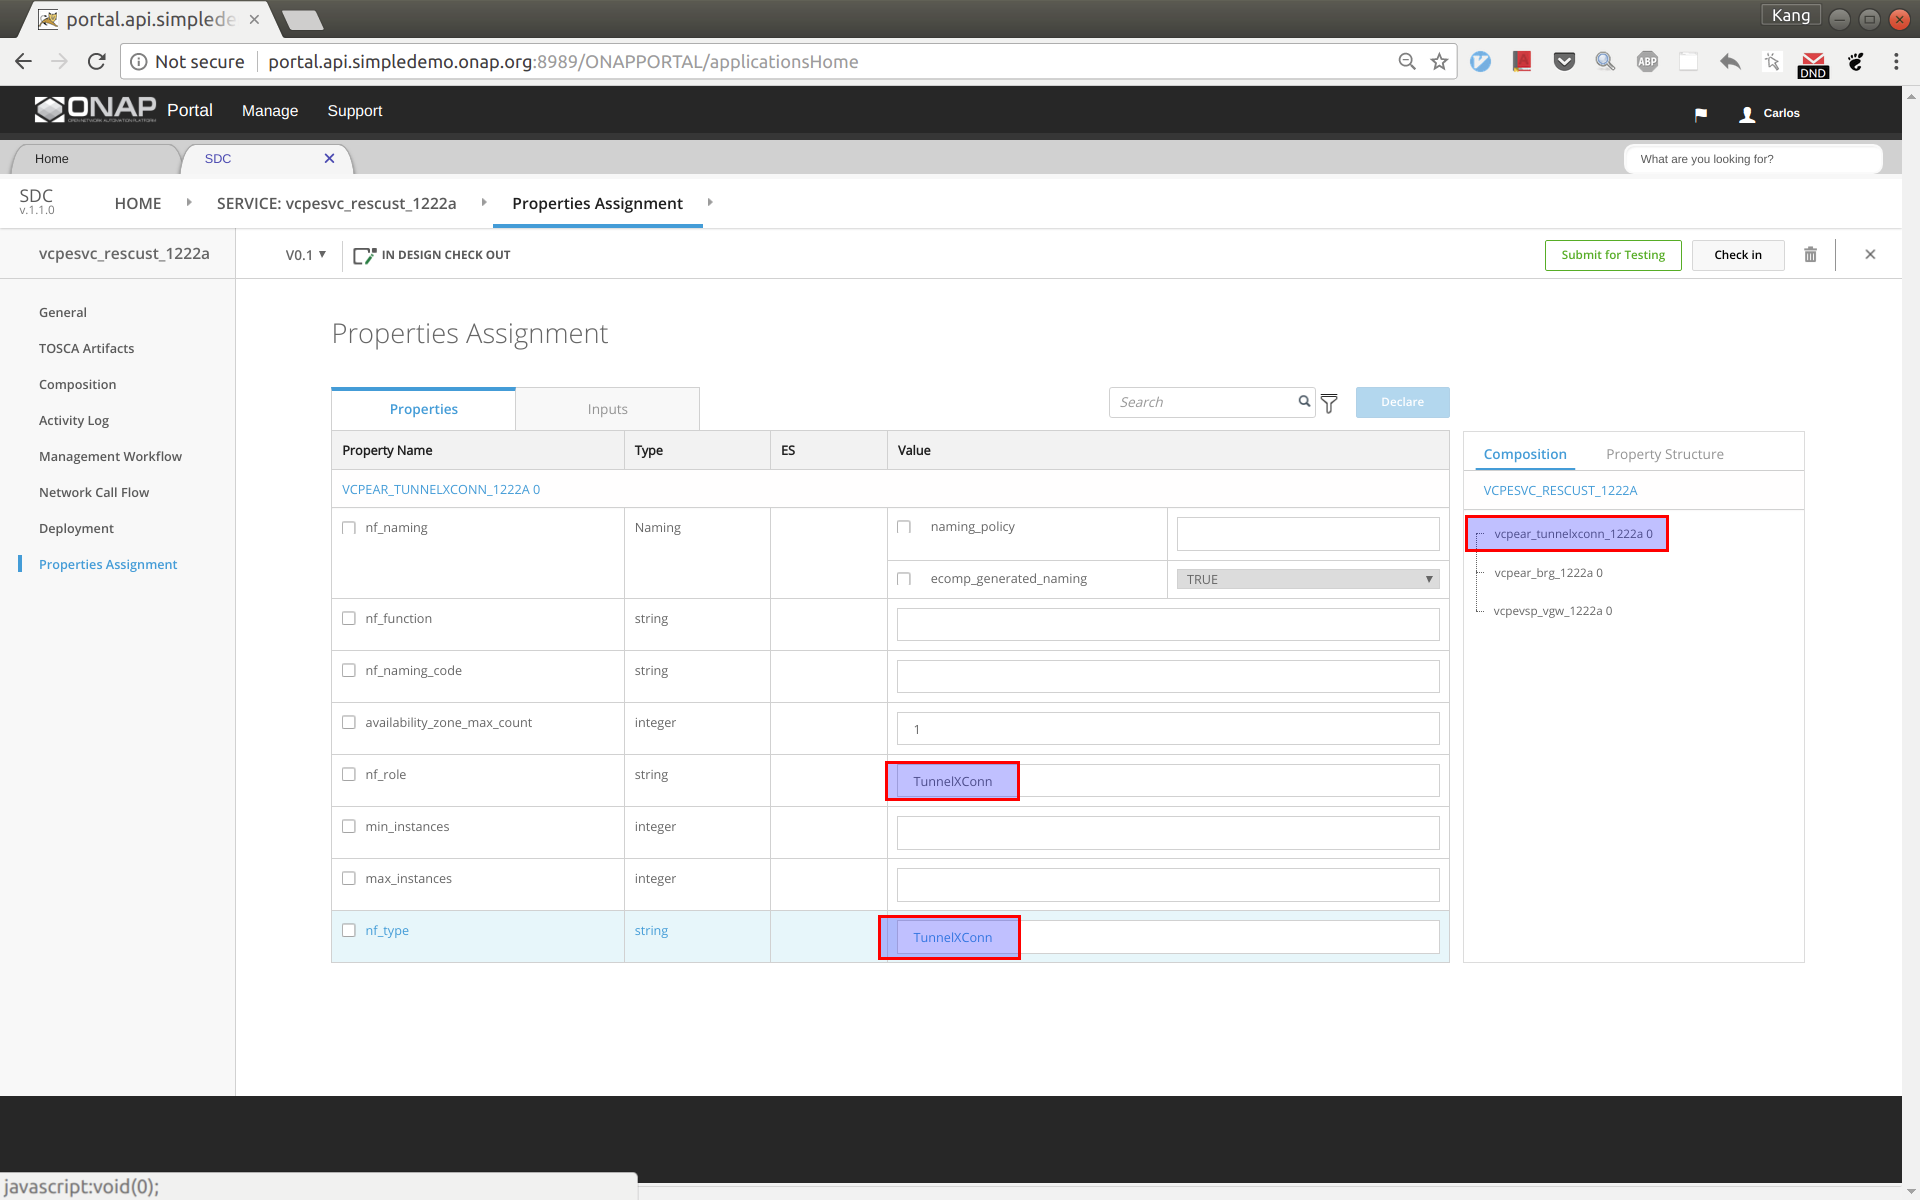
First select tunnelxconn from the right side panel, then fill nf_role and nf_type with value 'TunnelXConn'.
Next select brg from the right side panel, then fill nf_role and nf_type with value 'BRG'.
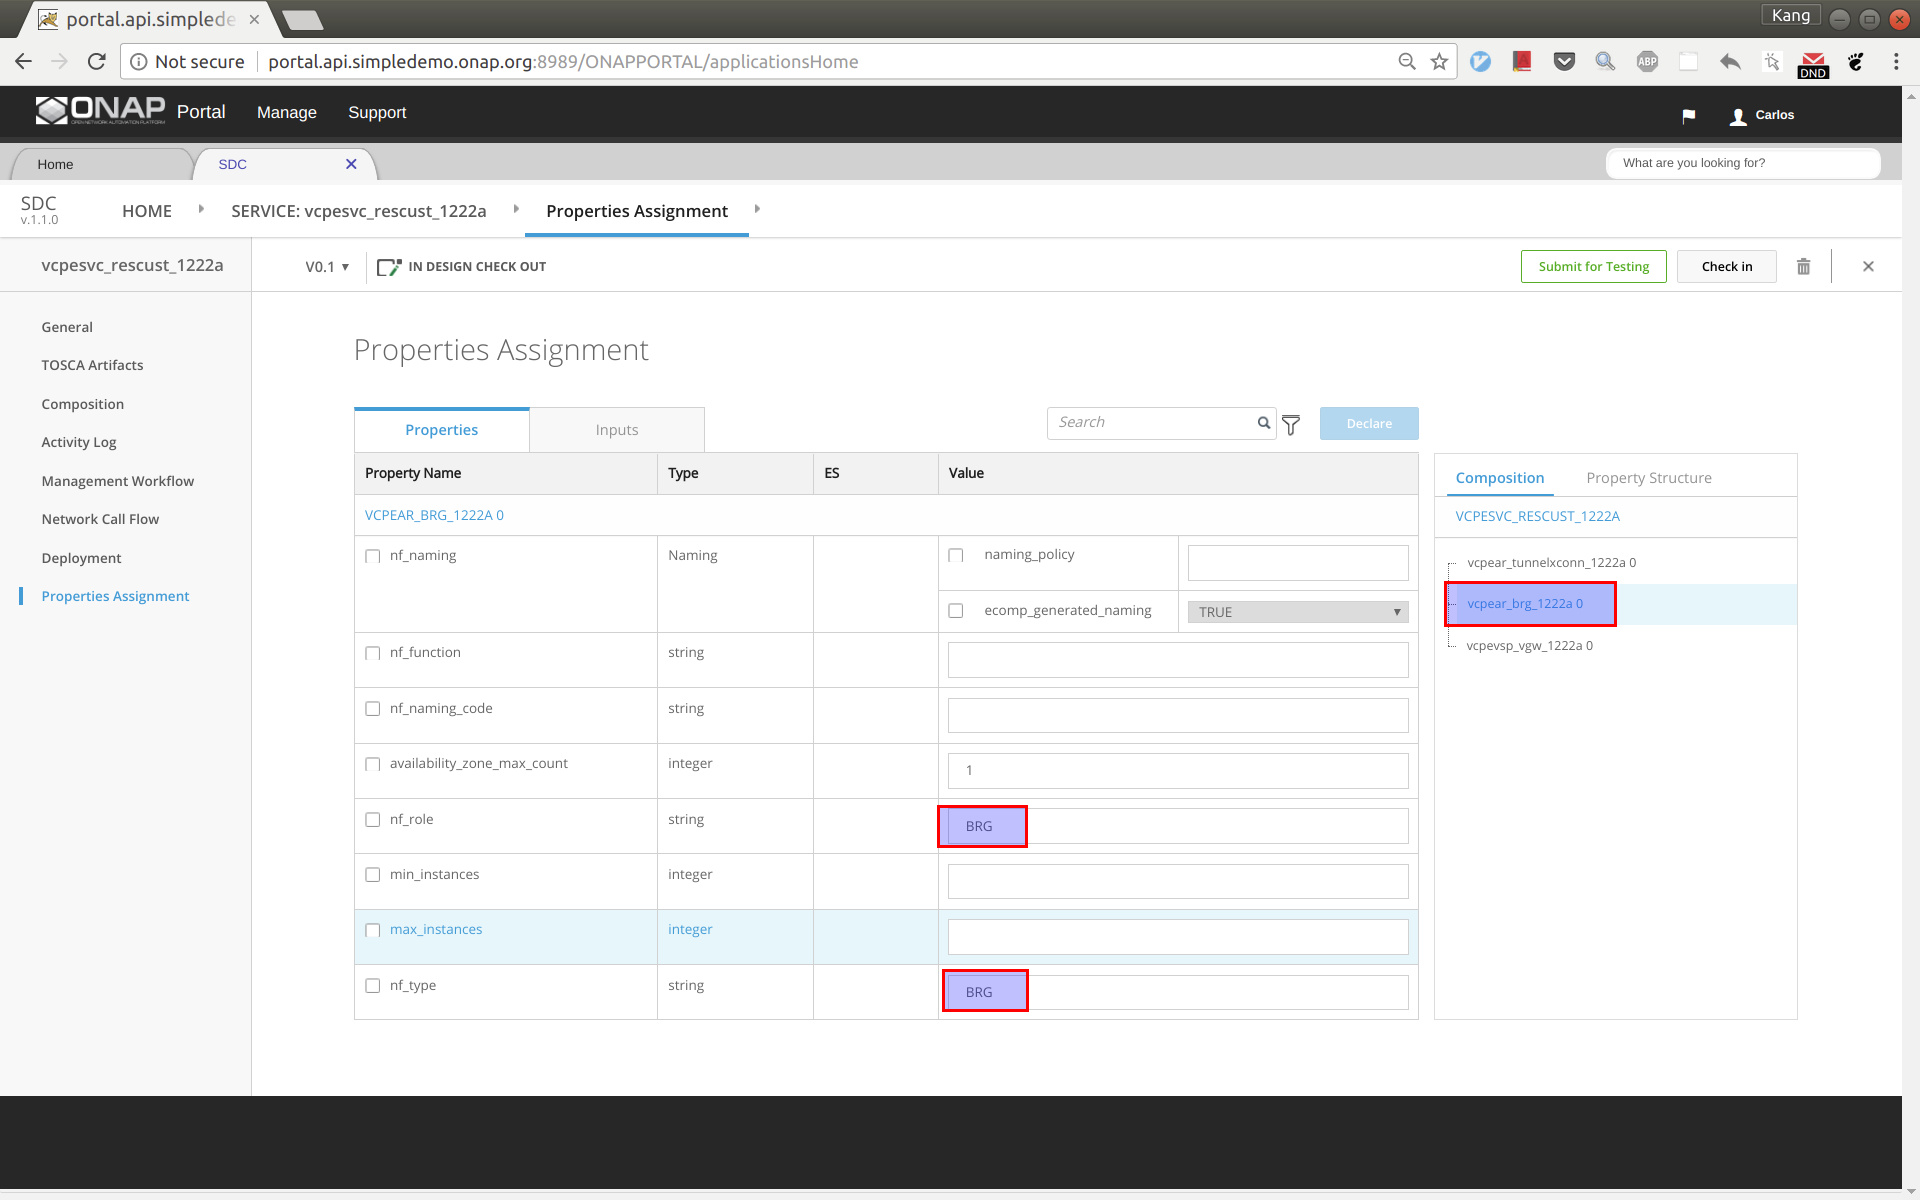
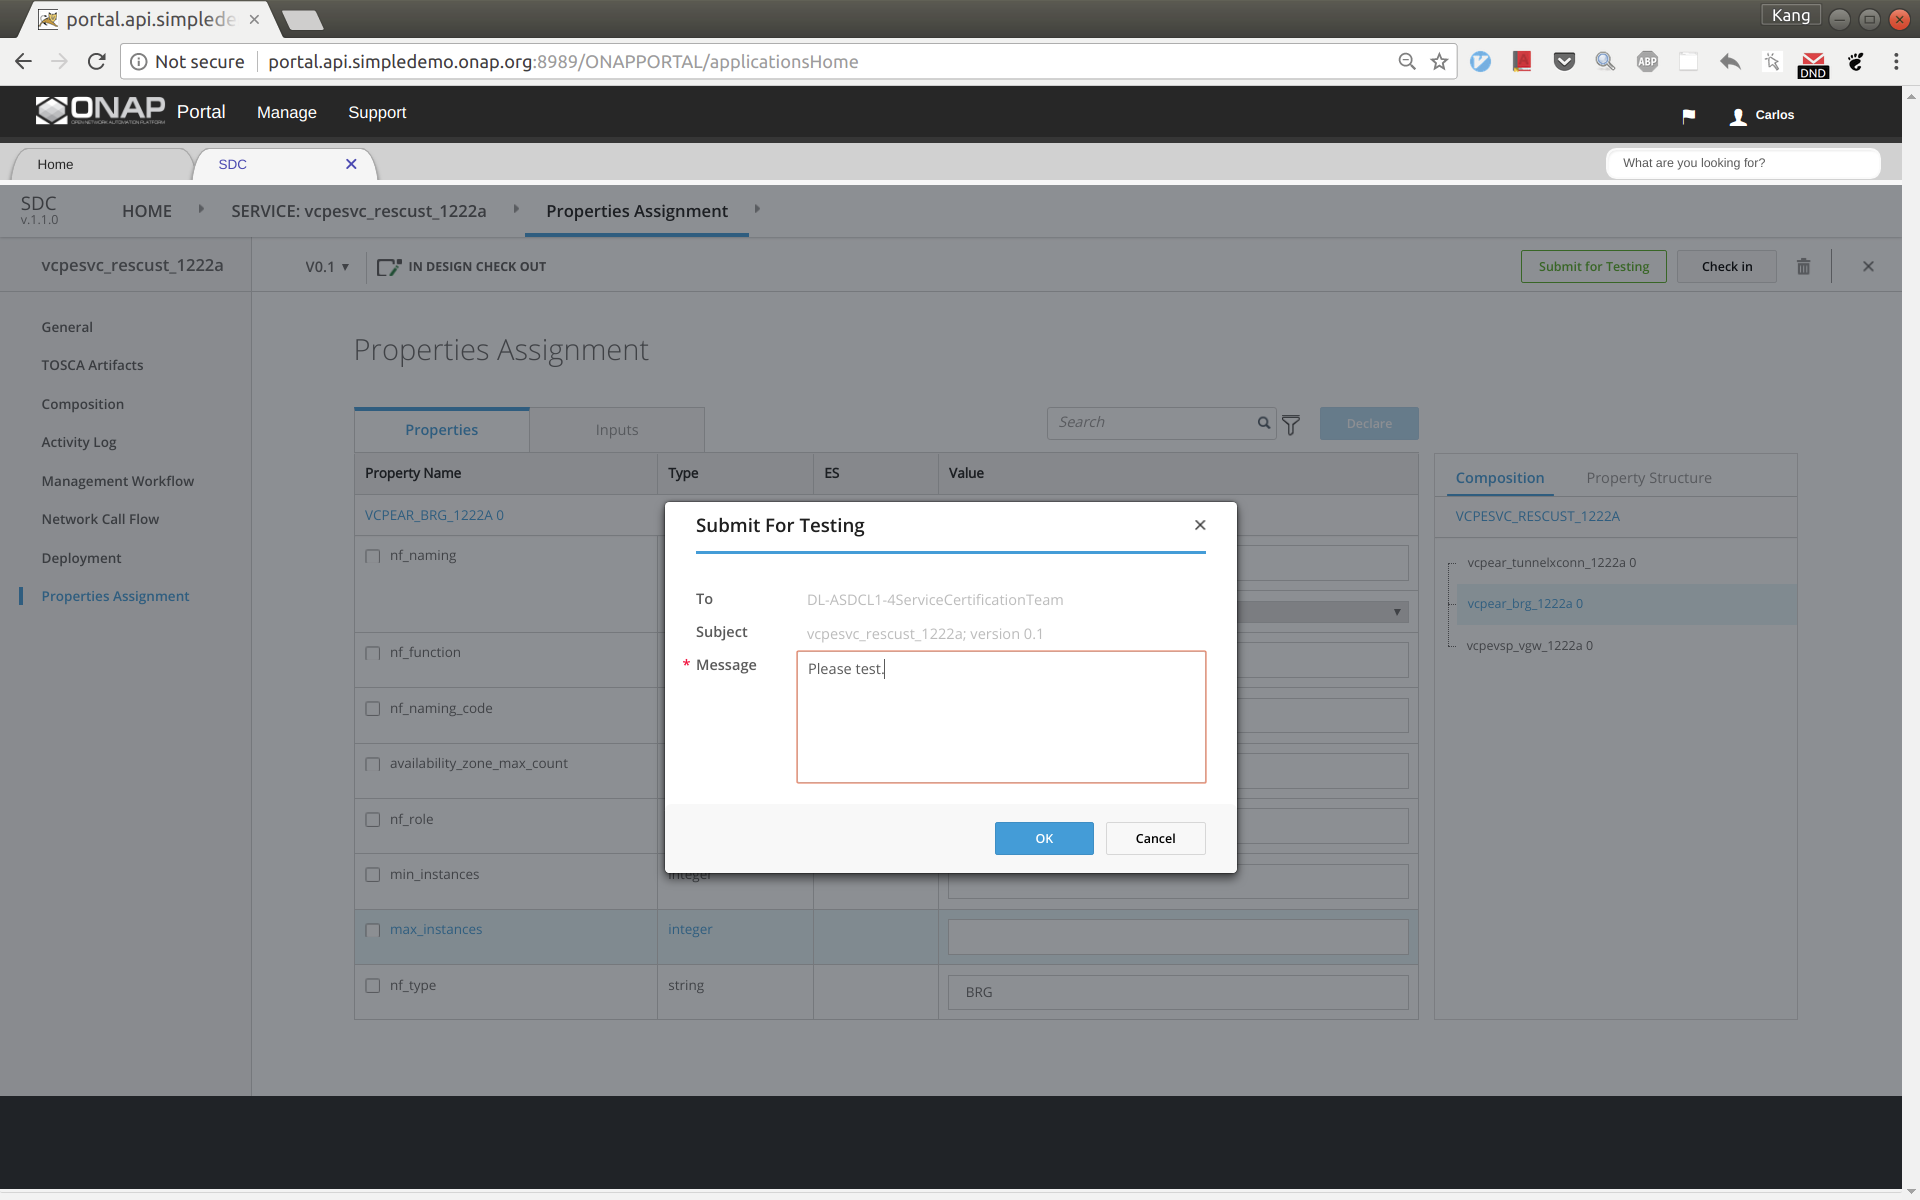
Click 'Submit for Testing'.
Now sign out and sign back in as tester 'jm0007' to complete test of vcpesvc_rescust_1222a.
Sign out and sign back in as governer 'gv0001'. Approve this service.
Distribute the customer service to AAI, SO, and SDNC
Before distributing the customer service, make sure that the other four services for infra, vBNG, vGMUX, and vBRG all have been successfully distributed.
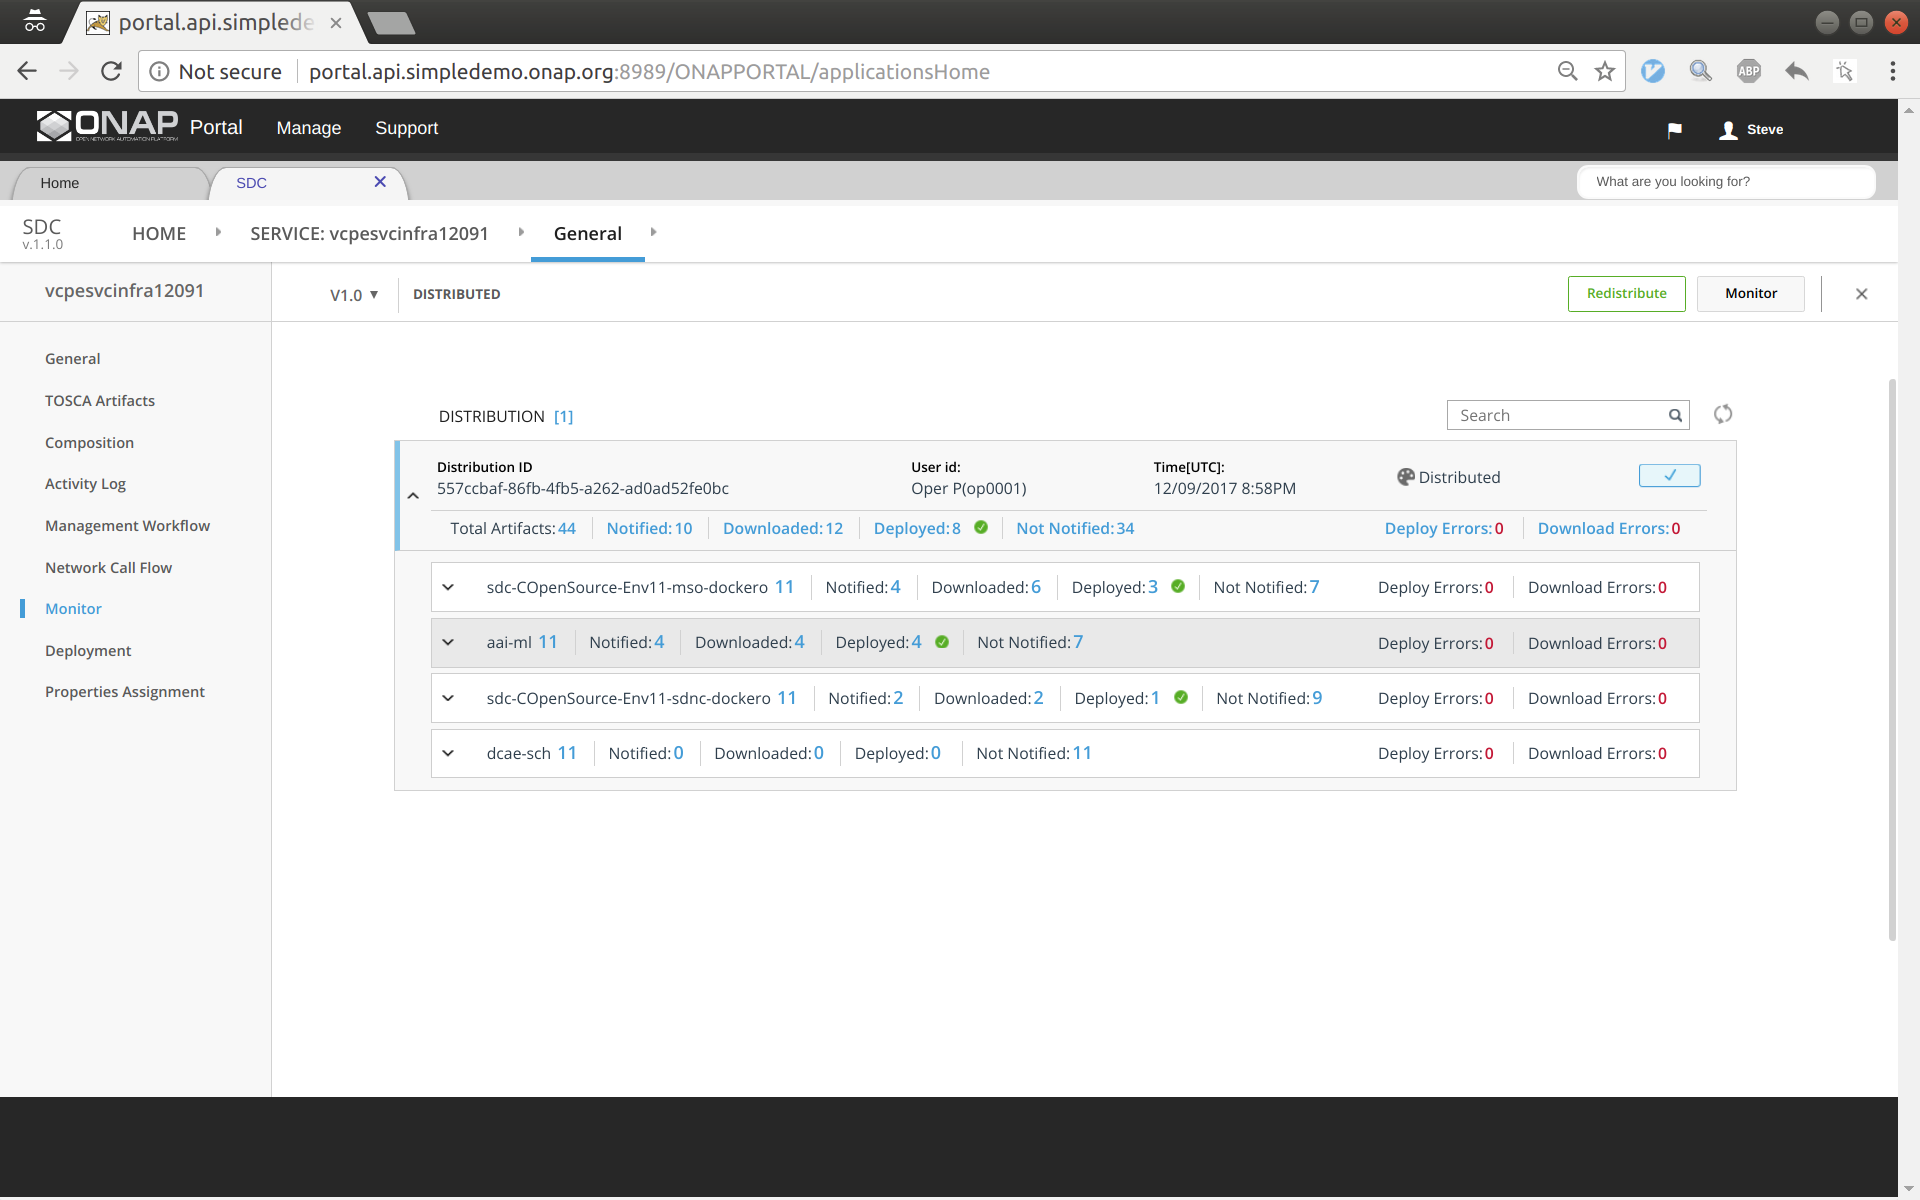
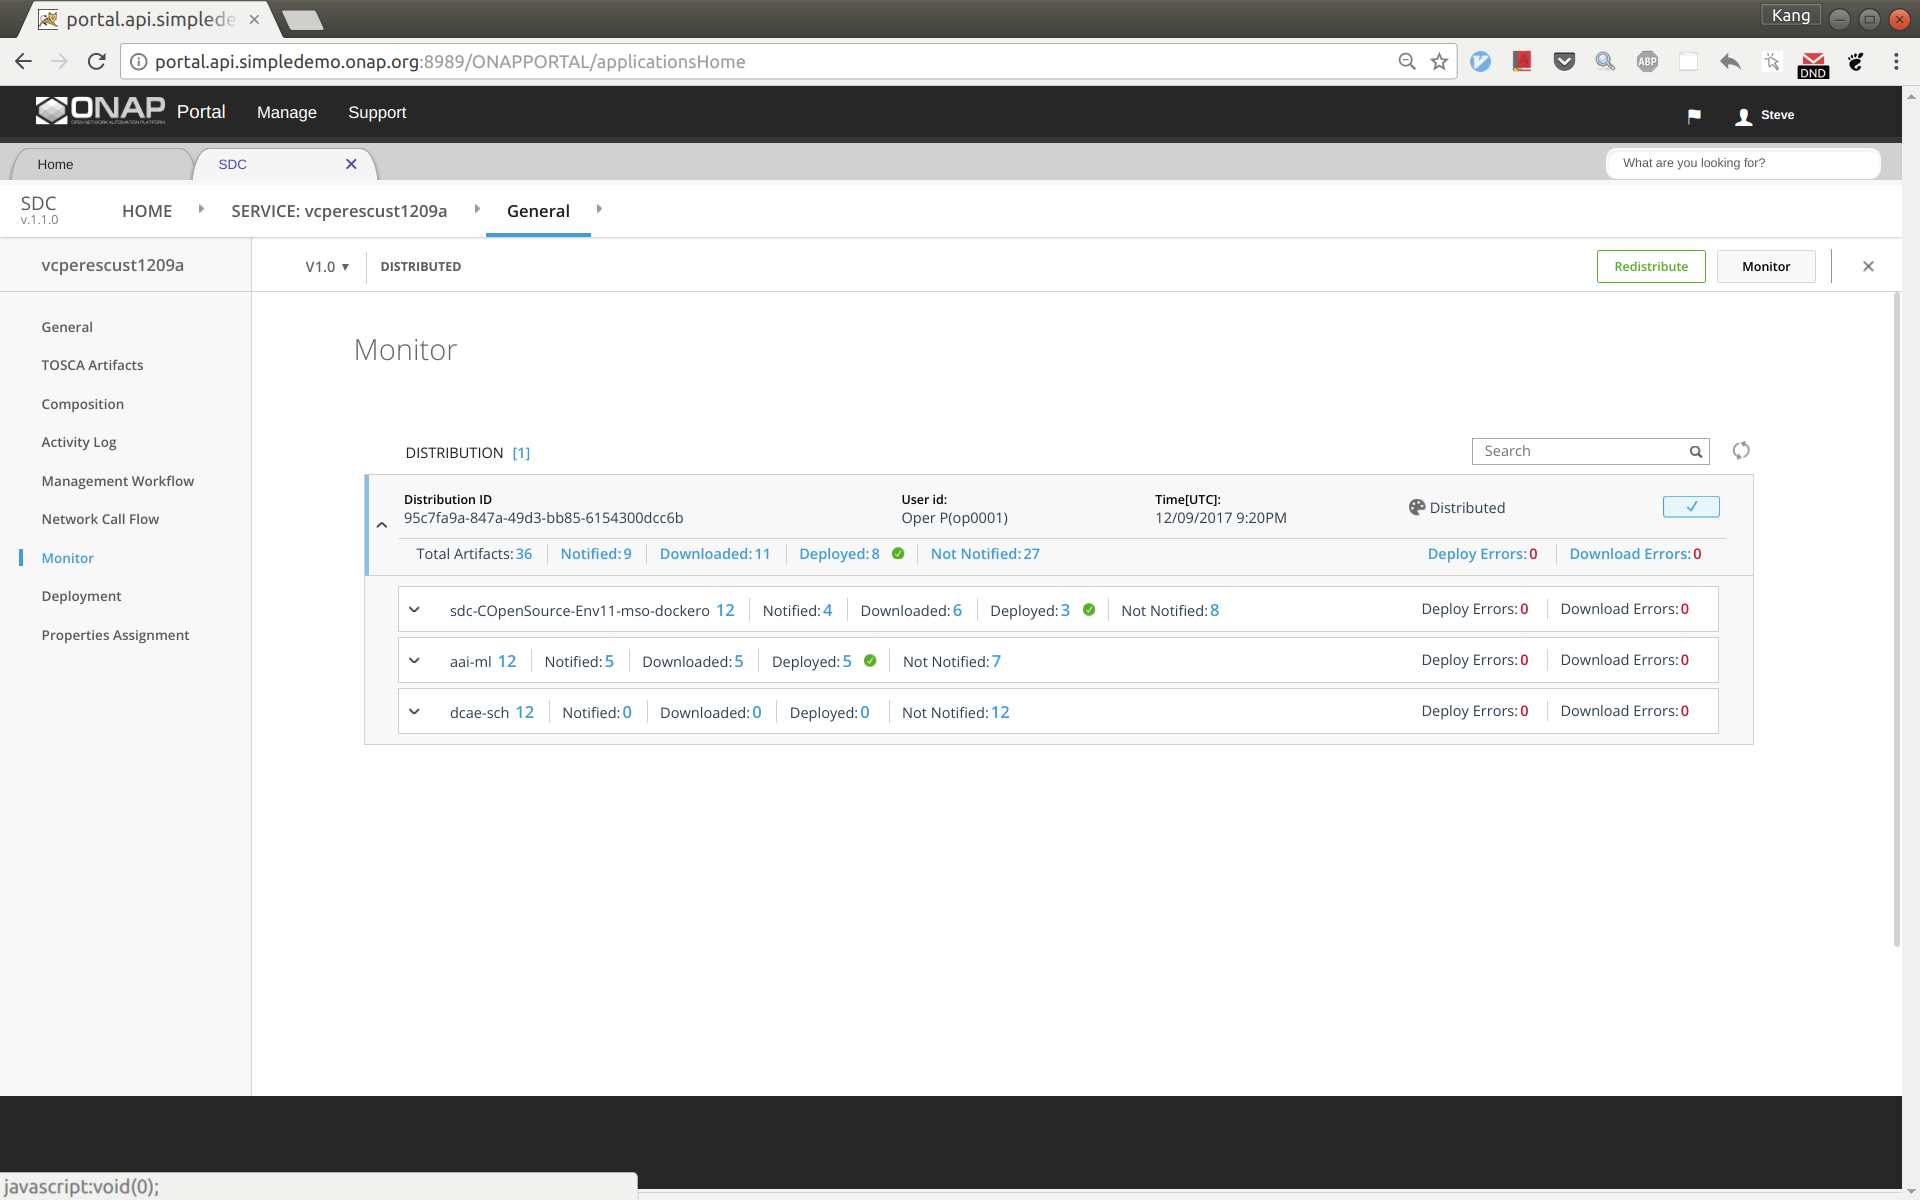
Now distribute the customer service, sign out and sign back in as operator 'op0001'. Distribute this service and check the status to ensure the distribution succeeds. It may take tens of seconds to complete. The results should look like below.
Initial Configuration of ONAP to Deploy vCPE
ssh to the robot VM, execute:
- /opt/demo.sh init_robot
- /opt/demo.sh init
Add an availability zone to AAI by executing the following:
curl -k -X PUT \
  https://aai:8443/aai/v11/cloud-infrastructure/cloud-regions/cloud-region/CloudOwner/RegionOne/availability-zones/availability-zone/nova \
  -H 'accept: application/json' \
  -u 'AAI:AAI'\
  -H 'X-TransactionId:9999' \
  -H 'X-FromAppId:postman' \
  -H 'content-type: application/json' \
  -d '{
		"availability-zone-name": "nova",
		"hypervisor-type": "KVM",
		"operational-status": "Active"
	}'
Add operation user ID to AAI. Note that you will need to replace the tenant ID 087050388b204c73a3e418dd2c1fe30b in 2 places and tenant name with the values you use.
curl -k -X PUT \
  'https://aai1:8443/aai/v11/business/customers/customer/SDN-ETHERNET-INTERNET' \
  -H 'accept: application/json' \
  -H 'cache-control: no-cache' \
  -H 'content-type: application/json' \
  -H 'X-TransactionId:9999' \
  -H 'X-FromAppId:postman' \
  -u 'AAI:AAI'\
  -d '{
    "global-customer-id": "SDN-ETHERNET-INTERNET",
    "subscriber-name": "SDN-ETHERNET-INTERNET",
    "subscriber-type": "INFRA",
    "service-subscriptions": {
        "service-subscription": [
            {
                "service-type": "vCPE",
                "relationship-list": {
                    "relationship": [
                        {
                            "related-to": "tenant",
                            "related-link": "/aai/v11/cloud-infrastructure/cloud-regions/cloud-region/CloudOwner/RegionOne/tenants/tenant/087050388b204c73a3e418dd2c1fe30b",
                            "relationship-data": [
                                {
                                    "relationship-key": "cloud-region.cloud-owner",
                                    "relationship-value": "CloudOwner"
                                },
                                {
                                    "relationship-key": "cloud-region.cloud-region-id",
                                    "relationship-value": "RegionOne"
                                },
                                {
                                    "relationship-key": "tenant.tenant-id",
                                    "relationship-value": "087050388b204c73a3e418dd2c1fe30b"
                                }
                            ],
                            "related-to-property": [
                                {
                                    "property-key": "tenant.tenant-name",
                                    "property-value": "Integration-SB-01"
                                }
                            ]
                        }
                    ]
                }
            }
        ]
    }
}'
ssh to the SDNC VM in HEAT or the host node for pod sdnc-sdnc-0 in OOM, and do the following: (this step is to make sure SDNC can reach out BRG later for configuration)
- Add a route in HEAT: ip route add 10.3.0.0/24 via 10.0.101.10 dev eth0
- Add a route in OOM: ip route add 10.3.0.0/24 via 10.0.101.10 dev ens3
- Enter the sdnc controller docker
- HEAT: "docker exec -it sdnc_controller_container bash"
OOM: "kubectl -n onap exec -it dev-sdnc-sdnc-0 bash"
In the container, run the following to create IP address pool: /opt/sdnc/bin/addIpAddresses.sh VGW 10.5.0 22 250
- Can also remotely run addIpAddresses.sh: kubectl -n onap exec -it dev-sdnc-sdnc-0 -- /opt/sdnc/bin/addIpAddresses.sh VGW 10.5.0 22 250
- For healthcheck-k8s.py also install curl inside the sdnc container
Deploy Infrastructure
Download and modify automation code
A python program had been developed to automate the deployment. You can download ONAP integration repo by git clone https://gerrit.onap.org/r/integration, and the script is under integration/test/vcpe.
Now go to the vcpe directory and modify vcpecommon.py. You will need to enter your cloud and network information into the following two dictionaries.
cloud = {
    '--os-auth-url': 'http://10.12.25.2:5000',
    '--os-username': 'kxi',
    '--os-user-domain-id': 'default',
    '--os-project-domain-id': 'default',
    '--os-tenant-id': '087050388b204c73a3e418dd2c1fe30b',
    '--os-region-name': 'RegionOne',
    '--os-password': 'yourpassword',
    '--os-project-domain-name': 'Integration-SB-01',
    '--os-identity-api-version': '3'
}

common_preload_config = {
    'oam_onap_net': 'oam_onap_oTA1',
    'oam_onap_subnet': 'oam_onap_oTA1',
    'public_net': 'external',
    'public_net_id': '971040b2-7059-49dc-b220-4fab50cb2ad4'
}
Preparation
Create subdirectory csar/ and __var/, and download service csar from SDC and put under csar directory
install python-pip and other python modules (see the comment section)
apt install python-pip
pip install ipaddress
pip install pyyaml
pip install mysql-connector-python
pip install progressbar2
pip install python-novaclient
pip install python-openstackclient
pip install kubernetes
Run automation program to deploy services
Sign into SDC as designer and download five csar files for infra, vbng, vgmux, vbrg, and rescust. Copy all the csar files to directory csar.
If robot has done the model onboardin for you the CSARs may also be inside the robot container in the /tmp/csar directory.
Now you can simply run 'vcpe.py' to see the instructions.
To get ready for service deployment. First run 'vcpe.py init'. This will modify SO and SDNC database to add service-related information.
Once it is done. Run 'vcpe.py infra'. This will deploy the following services. It may take 7-10 minutes to complete depending on the cloud infrastructure.
- Infra
- vBNG
- vGMUX
- vBRG
If the deployment succeeds, you will see a summary of the deployment from the program.

Validate deployed VNFs
By now you will be able to see 7 VMs in Horizon. However, this does not mean all the VNFs are functioning properly. In many cases we found that a VNF may need to be restarted multiple times to make it function properly. We perform validation as follows:
- Run healthcheck.py. It checks for three things:
- vGMUX honeycomb server is running
- vBRG honeycomb server is running
- vBRG has obtained an IP address and its MAC/IP data has been captured by SDNC
If this healthcheck passes, then skip the following and start to deploy customer service. Otherwise do the following and redo healthcheck.
- If vGMUX check does not pass, restart vGMUX, make sure it can be connected using ssh.
- If vBRG check does not pass, restart vBRG, make sure it can be connected using ssh.
(Please note that the four VPP-based VNFs (vBRG, vBNG, vGMUX, and vGW) were developed by the ONAP community in a tight schedule. We are aware that vBRG may not be stable and sometimes need to be restarted multiple times to get it work. The team is investigating the problem and hope to make it better in the near future. Your patience is appreciated.)
Deploy Customer Service and Test Data Plane
After passing healthcheck, we can deploy customer service by running 'vcpe.py customer'. This will take around 3 minutes depending on the cloud infrastructure. Once finished, the program will print the next few steps to test data plane connection from the vBRG to the web server. If you check Horizon you should be able to see a stack for vgw created a moment ago.
Tips for trouble shooting:
- There could be situations that the vGW does not fully functioning and cannot be connected to using ssh. Try to restart the VM to solve this problem.
- isc-dhcp-server is supposed to be installed on vGW after it is instantiated. But it could happen that the server is not properly installed. If this happens, you can simply ssh to the vGW VM and manually install it with 'apt install isc-dhcp-server'.
Closed Loop Test
Step 1. Copy libevel.so to vGMUX VM, and follow steps given by Eric on the comment section of vCPE - Test Status.
Step 2. Push closed loop policy from pap
root@oom-rancher:~# kubectl -n onap get pod |grep pap
dev-policy-pap-b74f6775-bvng5                               2/2       Running             0          6d
root@oom-rancher:~# kubectl exec -it  dev-policy-pap-b74f6775-bvng5  -c pap -n onap -- bash -c "export PRELOAD_POLICIES=true; /tmp/policy-install/config/push-policies.sh"
Step 3. Run heatbridge.
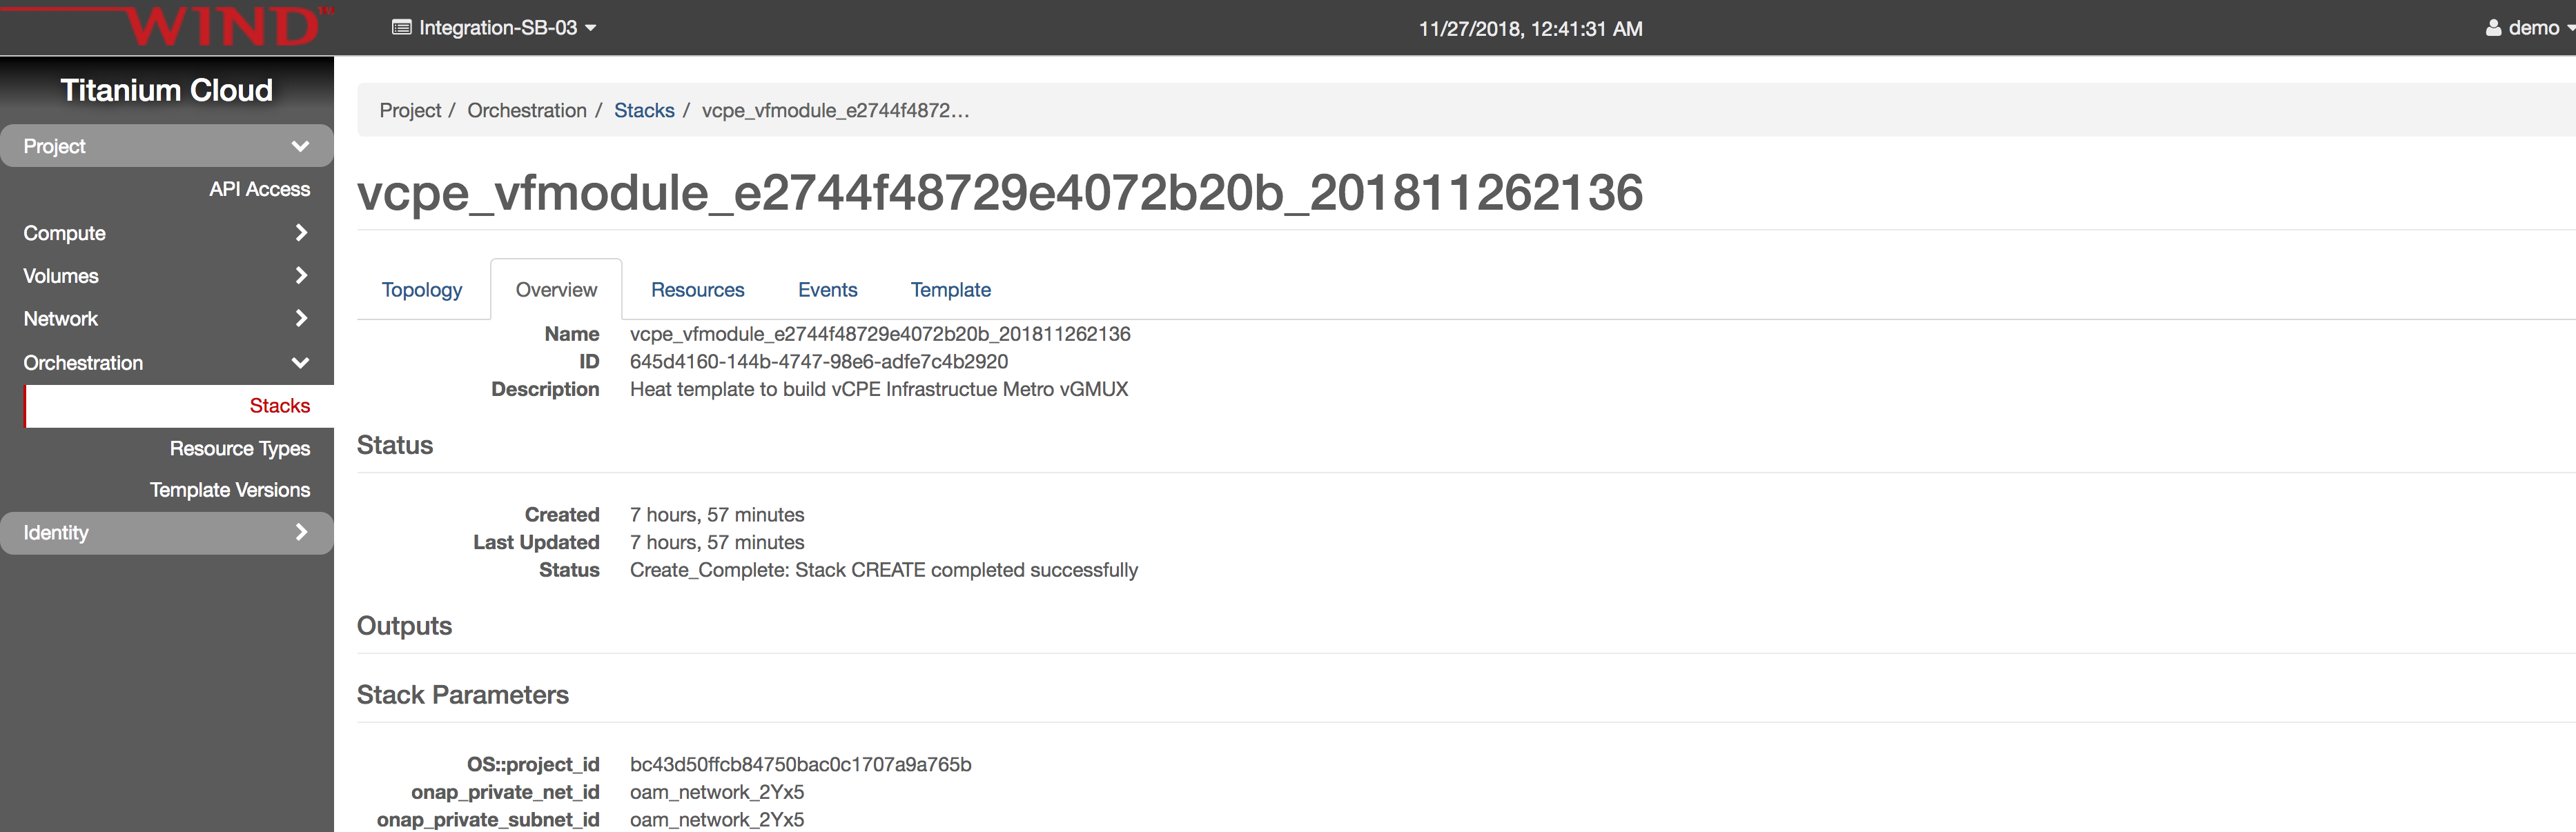
stack_name: from Openstack Horizon→Orchestration→Stack page
service: vCPEvGMUX
oam_ip_address: vGMUX VM oam network ip, you can get from Horizon
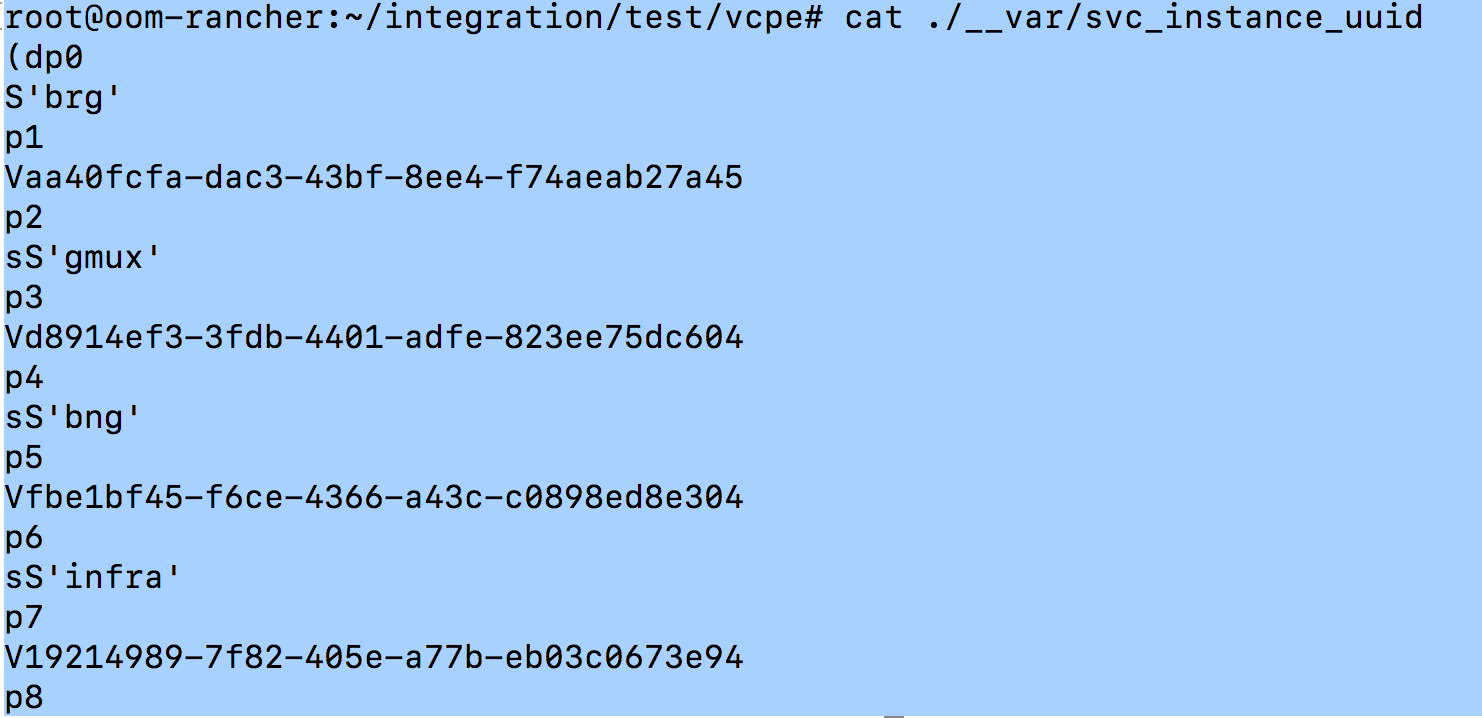
service_instance_id: Take from __var/svc_instance_uuid file. Copy the value for gmux without letter 'V'.
#demo-k8s.sh <namespace> heatbridge <stack_name> <service_instance_id> <service> <oam-ip-address>
root@oom-rancher:~/integration/test/vcpe# ~/oom/kubernetes/robot/demo-k8s.sh onap heatbridge vcpe_vfmodule_e2744f48729e4072b20b_201811262136 d8914ef3-3fdb-4401-adfe-823ee75dc604 vCPEvGMUX 10.0.101.21
Step 4. Make sure APPC VNF_DB_MAPPING table has Restart with Generic_Restart as DG_NAME and 3.0.0 as DG_VERSION
MariaDB [sdnctl]> select * from TRANSACTIONS;
Empty set (0.00 sec)
MariaDB [sdnctl]> SELECT * FROM VNF_DG_MAPPING;
+-------------------+-------------------+-------------+----------+-------------+-----------------+------------+-----------+
| VNF_DG_MAPPING_ID | ACTION | API_VERSION | VNF_TYPE | VNF_VERSION | DG_NAME | DG_VERSION | DG_MODULE |
+-------------------+-------------------+-------------+----------+-------------+-----------------+------------+-----------+
| 580 | Restart | 2.00 | | | Generic_Restart | 3.0.0 | APPC |
| 583 | Configure | NULL | NULL | NULL | DGOrchestrator | 4.0.0 | APPC |
| 586 | ConfigModify | NULL | NULL | NULL | DGOrchestrator | 4.0.0 | APPC |
| 589 | Rebuild | NULL | NULL | NULL | DGOrchestrator | 4.0.0 | APPC |
| 592 | Restart | NULL | NULL | NULL | DGOrchestrator | 4.0.0 | APPC |
| 595 | HealthCheck | NULL | NULL | NULL | DGOrchestrator | 4.0.0 | APPC |
| 598 | StartApplication | NULL | NULL | NULL | DGOrchestrator | 4.0.0 | APPC |
| 601 | StopApplication | NULL | NULL | NULL | DGOrchestrator | 4.0.0 | APPC |
| 604 | Migrate | NULL | NULL | NULL | DGOrchestrator | 4.0.0 | APPC |
| 607 | Snapshot | NULL | NULL | NULL | DGOrchestrator | 4.0.0 | APPC |
| 610 | ConfigRestore | NULL | NULL | NULL | DGOrchestrator | 4.0.0 | APPC |
| 613 | ConfigBackup | NULL | NULL | NULL | DGOrchestrator | 4.0.0 | APPC |
| 616 | Evacuate | NULL | NULL | NULL | DGOrchestrator | 4.0.0 | APPC |
| 619 | Stop | NULL | NULL | NULL | DGOrchestrator | 4.0.0 | APPC |
| 622 | Start | NULL | NULL | NULL | DGOrchestrator | 4.0.0 | APPC |
| 625 | ConfigScaleOut | NULL | NULL | NULL | DGOrchestrator | 4.0.0 | APPC |
| 628 | DistributeTraffic | NULL | NULL | NULL | DGOrchestrator | 4.0.0 | APPC |
+-------------------+-------------------+-------------+----------+-------------+-----------------+------------+-----------+
17 rows in set (0.00 sec)
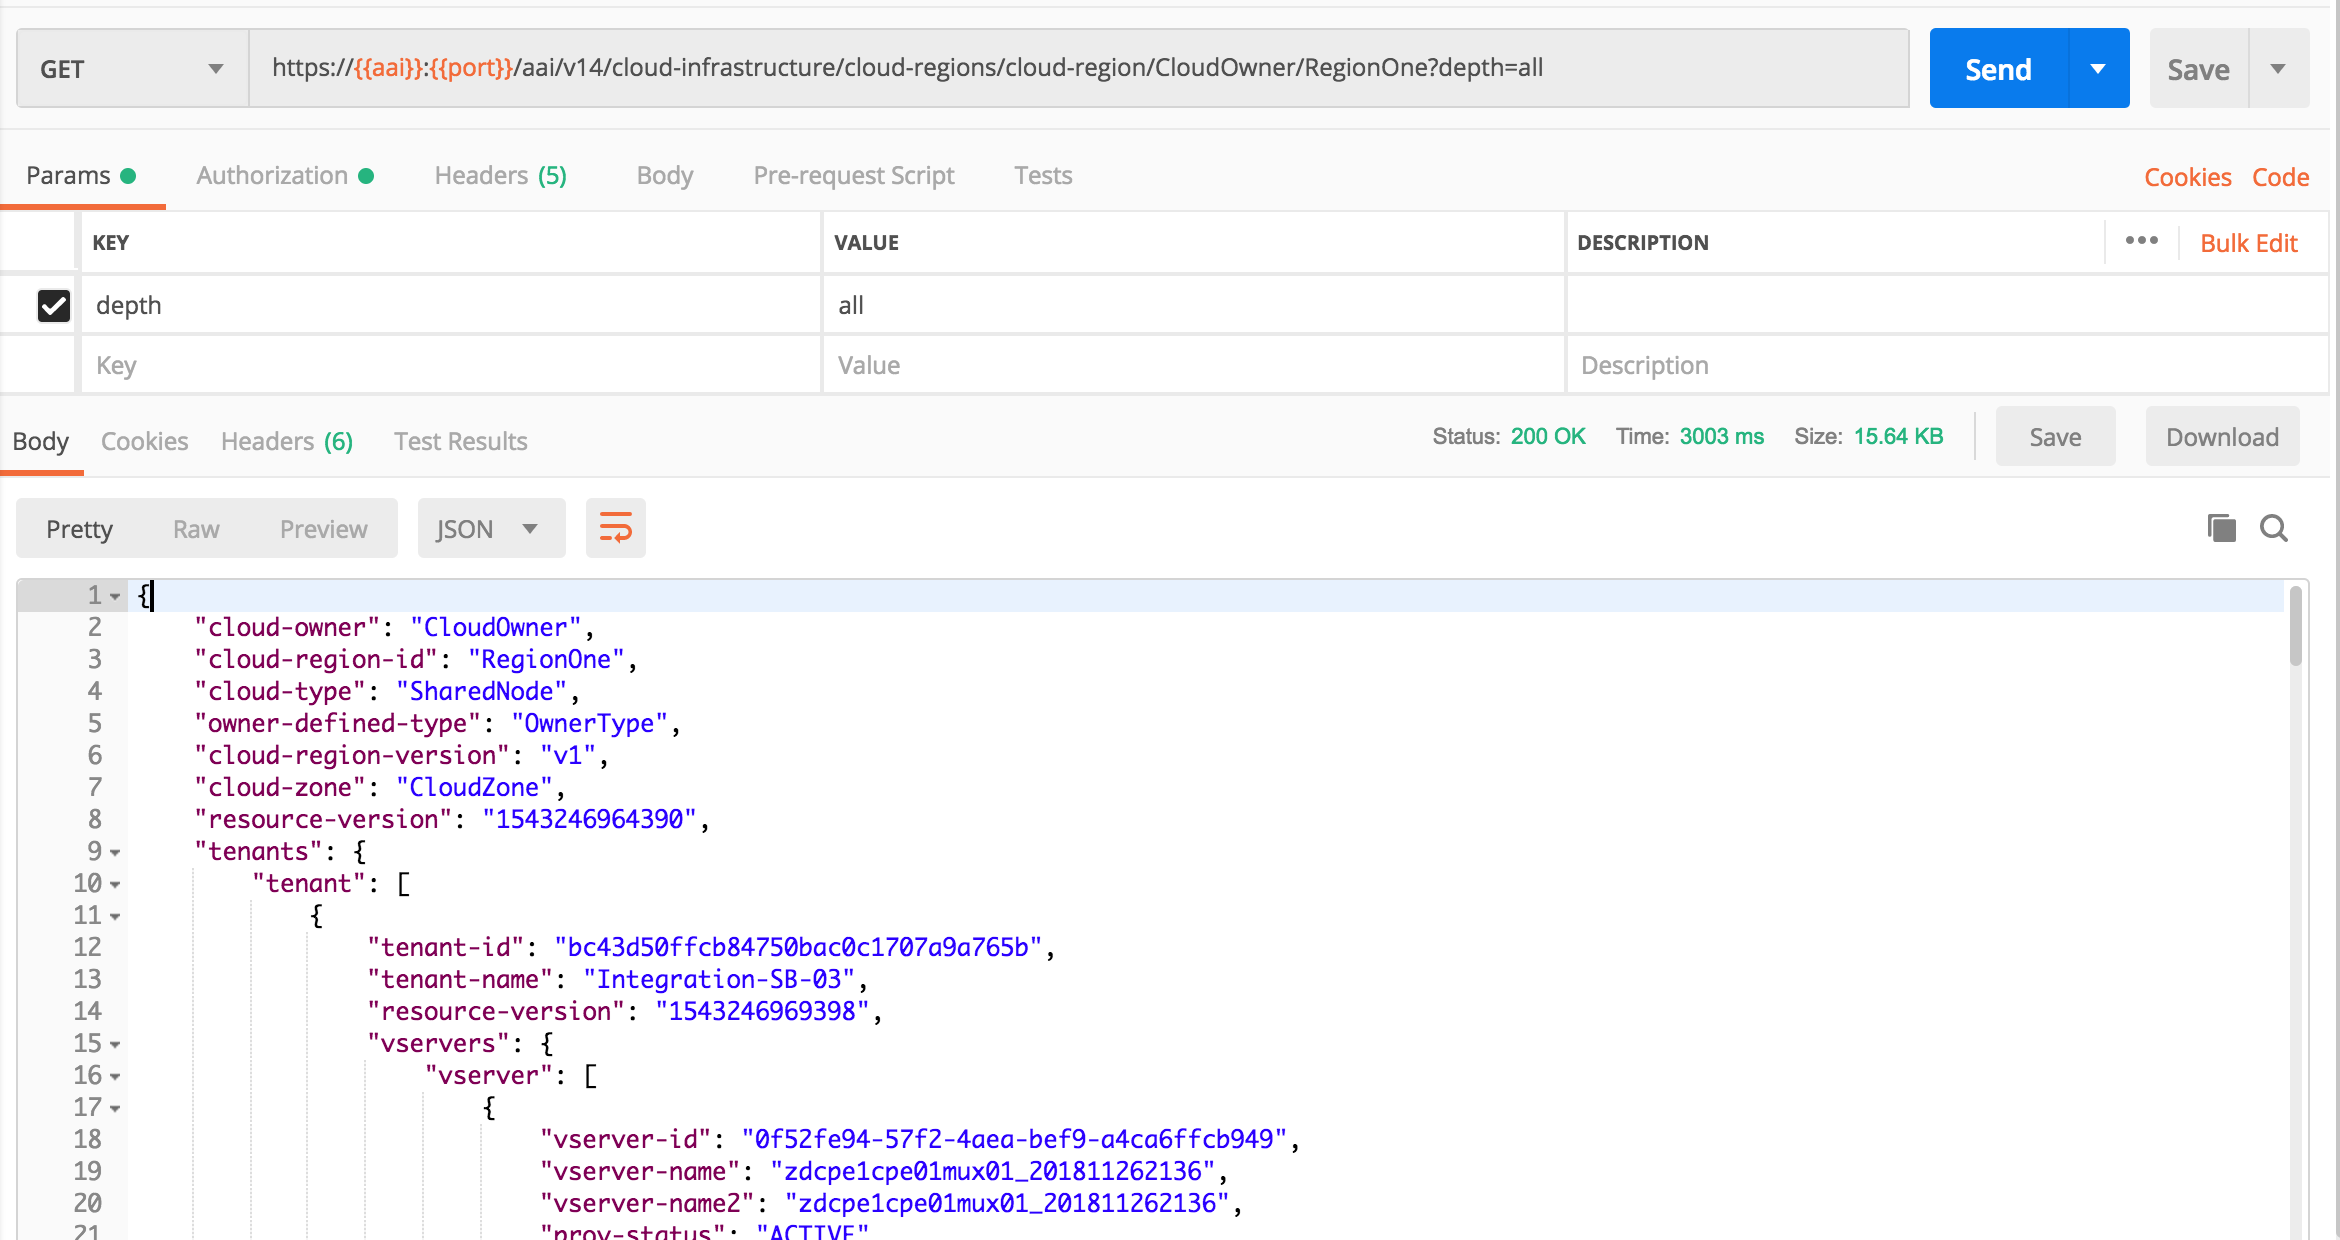
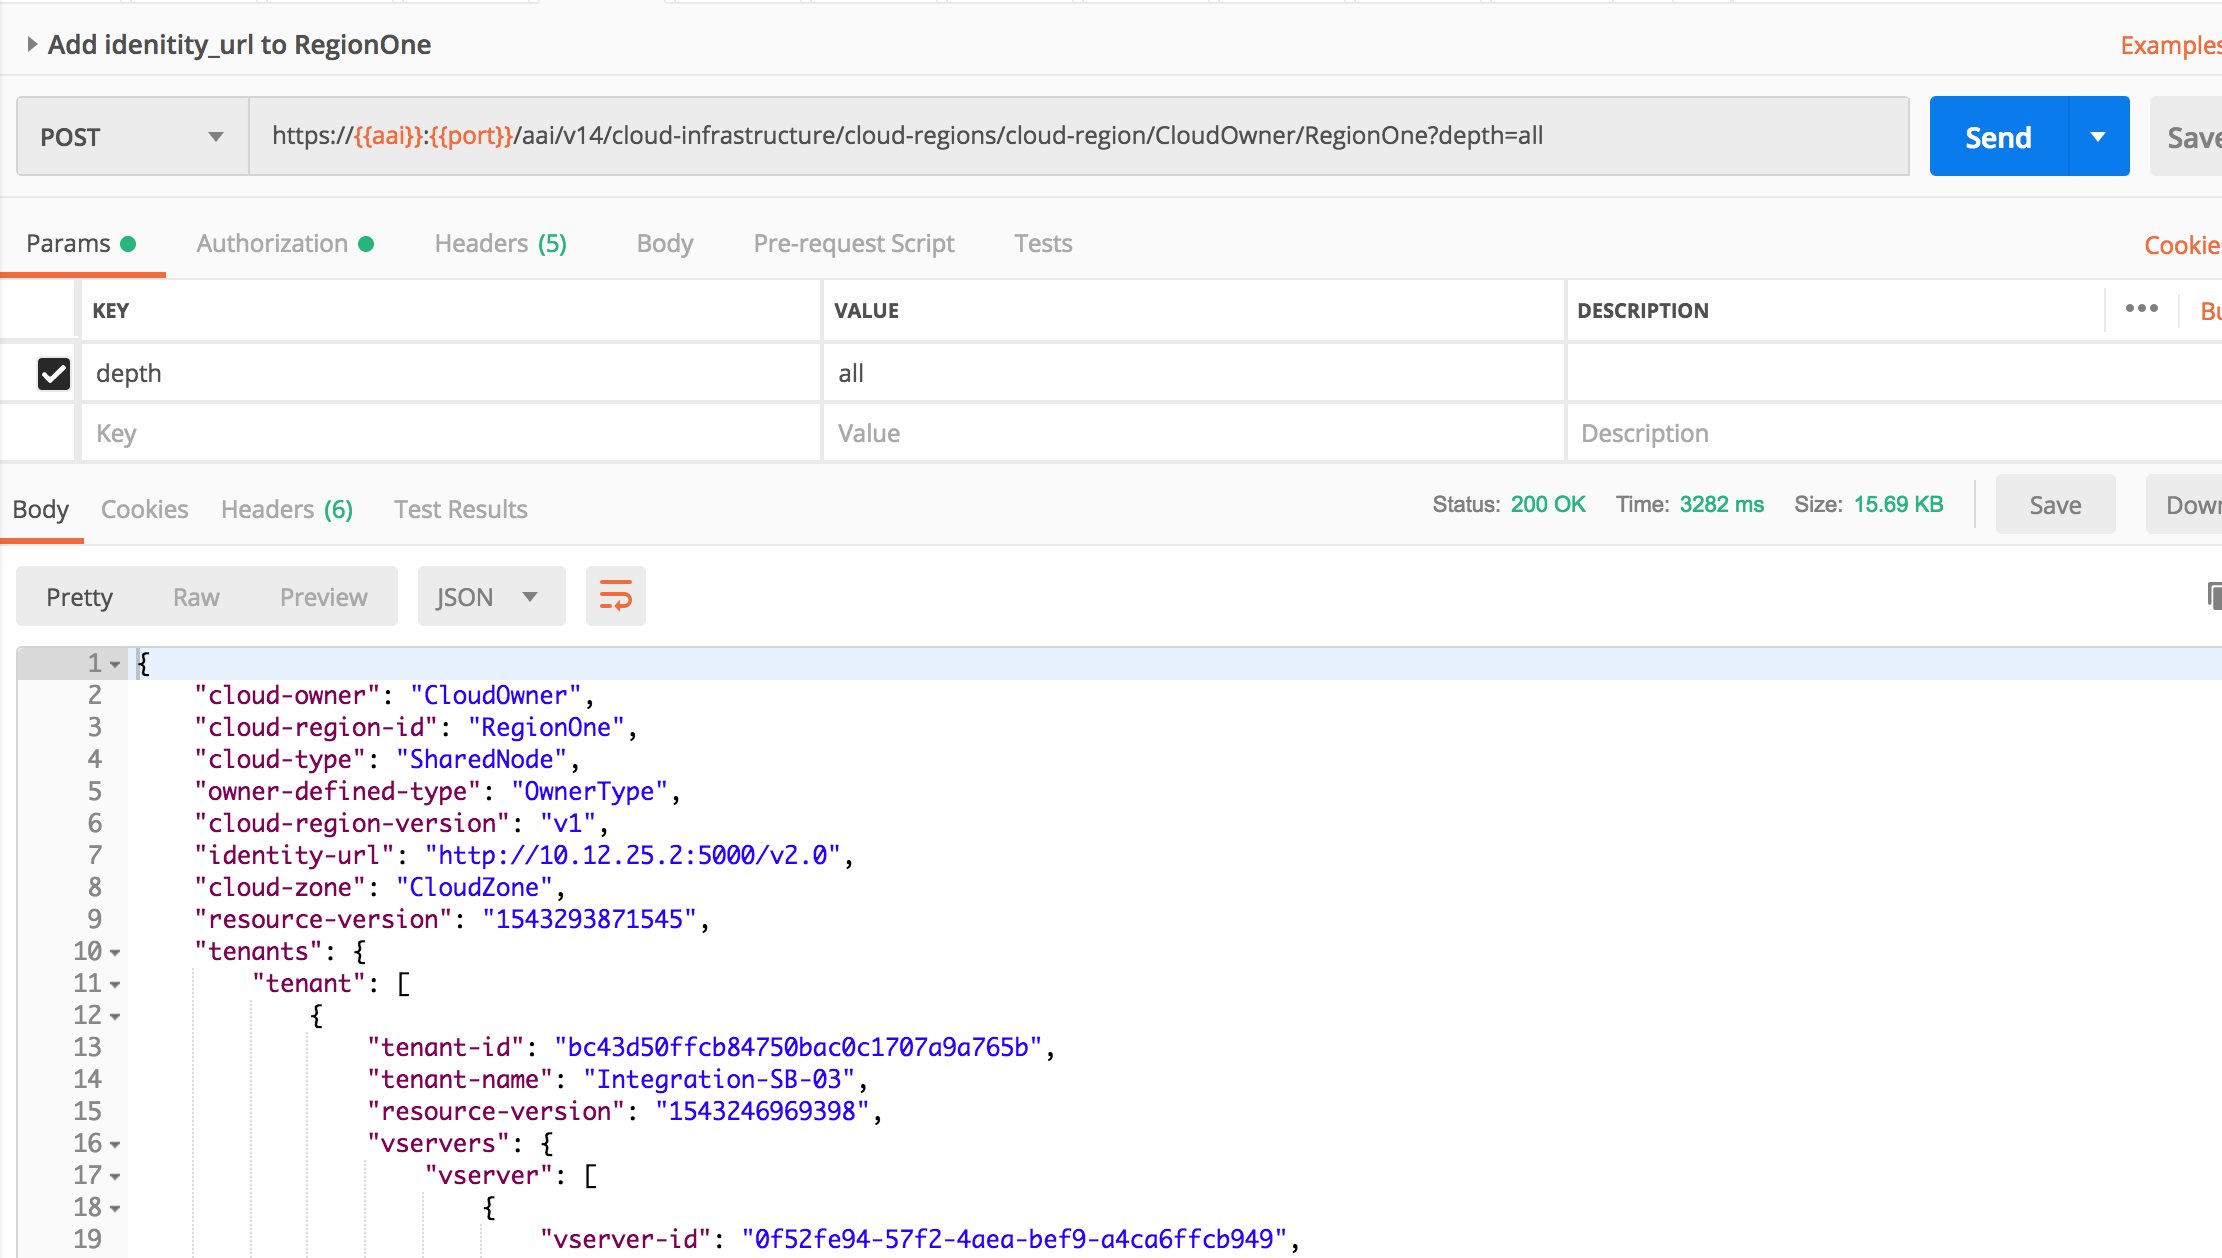
Step 5. Update RegionOne with identity-url. First query RegionOne from Postman and add idenity-url, then Post updated content back to AAI
Get RegionOne data
Add only identity-url with Openstack keystone endpoint, and PUT back to AAI
Step 6. run vcpe.py loop. You don't need to stop/start policy (which is suggested by vcpe script and will be changed)
Checklist for Casablanca Release
Assuming you run vcpe script from rancher node, here we put the above steps in summary, you need to see details of each step in the above tutorial.
0. Enable dev-sdnc-sdnc-0 docker karaf log by editing StatefulSet/dev-sdnc-sdnc (remove log mount), then deleting pod dev-sdnc-sdnc-0 to restart it. Note the pod may move to a different cluster node after restart, write down the cluster node IP.
1. model distribution by `demo-k8s.sh onap init`. this will onboard VNFs and 4 services, i.e. infrastructure, brg, bng and gmux.
2. Login in Portal as Demo user, then go to SDC portal to add BRG subcategory to AllottedResource. SDC FE API not working yet:
POST http://sdc.api.fe.simpledemo.onap.org:30206/sdc1/feProxy/rest/v1/category/resources/resourceNewCategory.allotted%20resource/subCategory
Body: {"name":"BRG"}
3. (No need anymore for Casablanca MR) Update SO catalogdb tables temp_network_heat_template_lookup and network_resource tables by setting aic_version_max=3.0 (SO-1184)
4. Update SO catalogdb table heat_template to set Generic NeutronNet entry BODY field with the correct yaml format
5. Manually create and distribute customer service according to the steps in tutorial
Note: in Casablanca maintenance, this step is automated in Robot by running >ete-k8s.sh onap distributevCPEResCust
5.1 Create csar directory under vcpe, and copy the following 5 csar files from robot docker /tmp/csar/
6. Create availability zone in A&AI
7. Add customer SDN-ETHERNET-INTERNET
7.1 Add route on sdnc cluster node `ip route add 10.3.0.0/24 via 10.0.101.10 dev ens3`. You can find sdnc cluster node name by using kubectl describe sdnc pod
If you have onap_dev key in local, you can run the following commands; otherwise you can find the cluster node ip from Openstack Horizon and login with key.
7.2 Run from Rancher node `kubectl -n onap exec -it dev-sdnc-sdnc-0 -- /opt/sdnc/bin/addIpAddresses.sh VGW 10.5.0 22 250`
8. Install python-pip and other python libraries. See tutorial comments section
9. Change the following env and service related parameters in vcpecommon.py
9.1 Run `vcpe.py init`. You may see some sql command failure, it's ok to ignore.
10. Run `vcpe.py infra`
11. Make sure sniro configuration is run as part of the above step.
12. Install curl command inside sdnc-sdnc-0 container
13. Run `healthcheck-k8s.py onap` to check connectivity from sdnc to brg and gmux. If healthcheck-k8s.sh fails, check /opt/config/sdnc_ip.txt to see it has the SDNC host ip correctly. If you need to change SDNC host ip, you need to clean up and rerun `vcpe.py infra`.
.
If you have changed the SDNC_IP after instantiation of the vBNG and vBRGEMU:
- you need to also update the /opt/sdnc_ip in the vBNG and run v_bng_install.sh to get the vBNG route tables updated.
- you need to change sdnc_ip.txt and ip.txt on the vBRGEMU
14. Run `vcpe.py customer`
15. Verify tunnelxconn and brg vxlan tunnels are set up correctly
16. Set up vgw and brg dhcp and route, and ping from brg to vgw. Note vgw public ip on Openstack Horizon may be wrong. Use vgw OAM ip to login.
17. Add identity-url property in RegionOne with Postman
18. Add new DG in APPC for closed loop. See APPC release note for steps. CCSDK-741
19. Update gmux libevel.so. See Eric comments on vcpe test status wiki
20. Run heatbridge Robot script
21. Push closed loop policy on Pap.
22. Run `vcpe.py loop` and verify vgmux is restarted
23. To repeat create infra step, you can delete infra vf-module stacks first and the network stacks from Openstack Horizon Orchestration->Stack page, then clean up the record in sdnc DHCP_MAC table before rerun `vcpe.py infra`
24. To repeat create customer step, you can delete customer stack, then clear up tunnles by running `cleanGMUX.py gmux_public_ip` and `cleanGMUX.py brg_public_ip`. After that you can rerun create customer command
25. If SDNC needs to be redeployed, you need again to distribute service model from SDC UI, create ip pool, install curl, and set SDNC VM cluster node routing table. Then you should reinstantiate infra VNFs, otherwise you would need to change sdnc ip address in VNFs for snat config.
Checklist for Dublin and El Alto Releases
- Model distribution by `demo-k8s.sh onap init`. this will onboard VNFs and 4 services, i.e. infrastructure, brg, bng and gmux
- Run Robot `ete-k8s.sh onap distributevCPEResCust`. This step assumes step 1 successfully distributed the 4 models
- Add customer SDN-ETHERNET-INTERNET (need to put into vcpe init)
- Add identity-url to RegionOne
- Add route on sdnc cluster node `ip route add 10.3.0.0/24 via 10.0.101.10 dev ens3`
- Initialize SDNC ip pool by running from Rancher node `kubectl -n onap exec -it dev-sdnc-sdnc-0 -- /opt/sdnc/bin/addIpAddresses.sh VGW 10.5.0 22 250`
- Install python and other python libraries
- In El Alto this can be done via ~integration/test/vcpe/bin/setup.sh
- Change the openstack env parameters and the customer service related parameter in vcpecommon.py
- Make sure to Change vgw_VfModuleModelInvariantUuid in vcpecommon.py based on the CSAR - it changes for every CSAR
- Run `vcpe.py init`
- Insert the custom service workflow entry in SO catalogdb
10. Run `vcpe.py infra`
11. Install curl command inside sdnc-sdnc-0 container
12. From Rancher node run `healthcheck-k8s.py onap` to check connectivity from sdnc to brg and gmux
13. Update libevel.so in vGMUX
14. Run heatbridge
15. Push new Policy. Follow Jorge's steps in INT-1089 - Getting issue details... STATUS
16. Start closeloop by `./vcpe.py loop` to trigger packet drop VES event. You may need to run the command twice if the first run fails
[Note you may need to comment out the set_closed_loop in vcpe.py line 165 if INT-1323 - Getting issue details... STATUS is not closed.
#vcpecommon.set_closed_loop_policy(policy_template_file)
17. Stop cloed loop for testing with ./vcpe.py noloss
Frankfurt vCPE.py Log for creating networks:
Typical Errors and Solutions
SDNC DG error
If you run vcpe.py customer and see an error similar to the following:
"requestId": "c772d346-ae34-4e88-b419-0af510c4526a",
"requestScope": "service",
"requestStatus": {
"finishTime": "Wed, 22 Aug 2018 18:46:09 GMT",
"percentProgress": 100,
"requestState": "FAILED",
"statusMessage": "Received error from SDN-C: Not Found"
It is most likely due to an error in vnf-topology-assign DG. This happends in R2 and should have been fixed in R3 (refer SDNC-351 - Getting issue details... STATUS ). The solution:
Enter the SDNC docker
1. make a copy of GENERIC-RESOURCE-API_vnf-topology-operation-assign.xml in the sdnc_controller_container under /opt/sdnc/svclogic/graphs/generic-resource-api
2. edit GENERIC-RESOURCE-API_vnf-topology-operation-assign.xml to replace "<break> </break>" with "<break/>" or "<break></break>"
a. optionally you can change the version to something like 1.3.3-SNAPSHOT-FIX and update graph.versions to match but that is not needed if the xml failed to load .
3. run /opt/sdnc/svclogic/bin/install.sh
this will install the edited DG and make it active as long as the version in the xml and the version in graph.versions match
4. re-run /opt/sdnc/svclogic/bin/showActiveGraphs.sh and you should see the active DG
DHCP server doesn't work
- ssh to the dhcp server
- systemctl status kea-dhcp4-server.service
- If the service is not installed, do 'apt install kea-dhcp4-server.service'
- If the service is installed, most likely /usr/local/lib/kea-sdnc-notify.so is missing. Download this file from the following link and put it in /usr/local/lib. Link: kea-sdnc-notify.so
- systemctl restart kea-dhcp4-server.service
vBRG not responding to configuration from SDNC
Symptom: Run healthcheck.py and the test fails to connect to connect to vBRG. (Note you need to edit the healthcheck.py to use the correct IP address for vBRG. The default is 10.3.0.2).
This is caused by vpp not working properly inside vBRG. There is no deterministic fix for this problem until we have a stable vBRG image. Temporarily, you may try to either restart the vBRG VM or ssh to vBRG and 'systemctl restart vpp' and then retry healthcheck.py. Note that 'systemctl restart vpp' may work better that rebooting the VM but there is no guarantee.
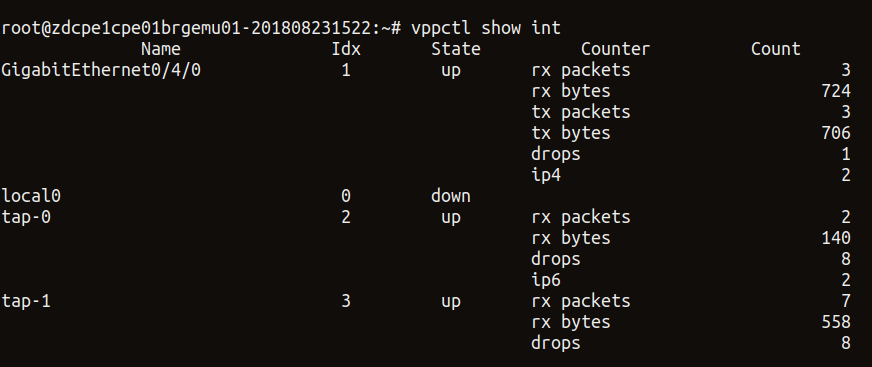
Inside vBRG you can also check the status with 'vppctl show int'. If vpp works properly, you should be able to see that both tap-0 and tap-1 in 'up' state. An example is below.
Unable to change subnet name
When running "vcpe.py infra" command, if you see error message about subnet can't be found. It may be because your python-openstackclient is not the latest version and don't support "openstack subnet set --name" command option. Upgrade the module with "pip install --upgrade python-openstackclient".
Unable to generate VM name error from SDNC
Received error from SDN-C: Unable to generate VM name: naming-policy-generate-name: input.policy-instance-name is not set and input.policy is ASSIGN.
To resolve this: Check the vgw_VfModuleModelInvariantUuid parameter in the vcpecommon.py script is updated with your ResCust_svc VF_ModuleModelInvariantUuid or not. For every new customer don't forget to update this.
Add this to CheckList:
# CHANGEME: vgw_VfModuleModelInvariantUuid is in rescust service csar, look in service-VcpesvcRescust1118-template.yml for groups vgw module metadata. TODO: read this value automcatically
self.vgw_VfModuleModelInvariantUuid = '26d6a718-17b2-4ba8-8691-c44343b2ecd2'
48 Comments
Brian Freeman
Some packages might need to be installed to use the script
pip install ipaddress
pip install pyyaml
pip install mysql-connector-python
pip install progressbar2
pip install python-novaclient
pip install python-openstackclient
Kang Xi
Thanks for adding this.
Brian Freeman
progressbar2 is required not progressbar
Marcus Williams
python-openstackclient also seems to be needed to create network.
Be sure to use the lastest python-openstackclient as older versions do not support some of the commands in vpe scripts.
Arun Arora
When executing the automation script on a fresh ubuntu VM (I did it on ubuntu 16.04), following commands need to be executed before the above mentioned commands from Brian:
apt-get update
apt-get install python
apt-get install python-pip
Also, install the relevant certificate for the cloud which has HTTPS based Auth URL. Do the following for it:
And, export the following as python don't use the installed certificates directly:
Arun Arora
Also, for them who have HTTPS AUTH URL, the relevant cloud certificate need to be installed on the following containers:
Brian Freeman
Do you need to submit the VF's created (TunnelXconn) for testing before doing the composition with them on the vGW service ?
Kang Xi
Yes. By doing that the ARs will show up in the catalog and then you will be able to create the service by drag-n-drop the ARs.
Brian Freeman
Is the BRG tunnel also a Tunnel Xconn type ?
Kang Xi
Yes it is.
Brian Freeman
Need to add FromAppId header to curl commands to AAI in OOM environments . This is probably because of HAProxy
-H 'X-FromAppId: robot-ete' \
Brian Freeman
If you plan to run this from the VNC console machine use the "-k" option on curl to turn off SSL checks
Brian Freeman
In updating the SO docker container on OOM , dont stop the container. It shouldn't be needed (SO error log indicates the mso.bpmn file was changed so it probably doesnt need a restart) and if you do your changes may be lost. You should update the file on the docker-nfs.
Marcus Williams
Kang Xi and Brian Freeman, is it required to run 'demo.sh init' before adding 'nova' availability zone to AAI? Adding the availability zone to AAI wouldn't work for me until I did.
Brian Freeman
Yes. demo.sh init populates the Demonstration customer and cloud regions that the availability zones are attached to. We probably should add the vailability zone to the demo.sh init
Marcus Williams
Kang Xi in the section "Download and modify automation code", your python scripts are now in integration repo at integration/test/vcpe correct?
Which is the most recent set?
Srinivasa Addepalli
@Marcus Williams, @ Kang Xi, @Eric Multanen,
Normally Service design should happen only once irrespective of number of customers.
Do steps under
Service design and distribution for customer service
are expected to be done only once even if there are multiple customers? Or above steps expected to happen as many times as number of customers? I guess former is true. Can you please confirm?
If former is true, I guess "vcpe.py customer" needs to be run for each customer. Is there any customer specific tuning? If so, which file in vcpe.zip need to be changed? For example, I might want to give descriptive name every time service is instantiated for a given customer or it could be that I may want to provide specific network/subnet configuration for each customer network.
Srini
Kang Xi
Yes, design only once for multiple customers. That said, right now we haven't got a chance to work out the support for multiple customers.
Srinivasa Addepalli
Can it be tested at least for 2 customers to check whether there are any issues?
Is running vCPE for multiple (at least 2) subscribers in the scope of Beijing release?
Kang Xi
Not now.
Srinivasa Addepalli
Okay
Marcus Williams
Srinivasa Addepalli RE: vcpe.py script - It is a testing script, correct me if I'm wrong Kang Xi, but it currently uses date + time as addition to each instantiated service to differentiate. If we wanted to expand it to operator/user facing script there would be additional work (for enhanced naming etc.). However I believe the expectation would be that operators/users of ONAP use portal/vid and other ONAP tools, or custom tools to instantiate.
Kang Xi
Marcus Williams, you are right. It is technically feasible to do so. Just no enough resources to make necessary updates to support it given the current workload.
Srinivasa Addepalli
@Marcus Williams What was the intention of developing vcpe.py if portal/vid can be used to instantiate the service. It would be good if vCPE testing is done using portal/vid just like the way SDC is used to onboard/create the services. Or is it that there are some missing features in Portal/VID?
Brian Freeman
vcpe.py was built for test automation. Generally, VID is for infrastructure and the expectation is that customer driven orders for things like the vGateway would be from a BSS/OSS front end out side of ONAP rather than a technician going to the VID GUI to instantiate a vGW. The BSS/OSS ordering systems would handle the service provider customer experience, ordering, fulfillment of the BRG and billing setup and one of the steps would be the call to an ONAP based system to instantiate the vGW.
Srinivasa Addepalli
Thanks Brian Freeman. I understand that the OSS/BSS systems are the consumers of the API and VID will not be used for service instantiation in real deployments. Based on Marcus reply, I understand we have some way to instantiate the services via VID (Could have been done for simplifying testing, demoing etc...). If so, it is good to utilize GUI in integration testing. In my view there are two advantages. One is that VID is also tested as part this end-to-end use case testing and second is intuitiveness
Srinivasa Addepalli
Marcus Williams and Brian Freeman,
In vCPE use case, I thought there would be only two services - Infrastructure service and customer service. But, there are 4 infrastructure services - infra (to instantiate AAA, DHCP, DNS and test web server etc...), BNG, VGMUX and BRG. What was the reasoning for dividing infrastructure service into 4 of them. By putting them in 4 different services, somebody else (like OSS/BSS system or user) need to worry about making these 4 services run atomically. If they had put in one service, that complexity could have been avoided. Any reasons on why it was divided into multiple services?
Brian Freeman
They are separate deployable units. If you think about edge data centers there will be multiple locations with vGMUX, vBNG. In fact the vBNG could be down in the metro area connecting to 1 or more vGMUX sites. The centralized components like AAA, DHC, DNS could/would be centralized not regionalized and the BRG is really per customer and we put it in as a virtual device for testing only. So on a national service level these items would be deployed in different groups with different life cycles.
Srinivasa Addepalli
Brian Freeman
Just brainstorming/discussing here. Now that we have OOF and in future TOSCA based orchestration, I think we can have one service using TOSCA with various VNFDs - One for centralized components such as AAA, DHCP, DNS etc.., 2nd one for VGMUX and 3rd for BNG and others for testing etc.. OOF, with its policy constraints, can select the site (on per VNF basis) during instantiation time. Does that sound okay? Or do you still see the need for having various services in Casablanca?
Arun Arora
Hi Kang,
I am getting the following error when executing vpe.py infra
"statusMessage": "Received error from SDN-C: Error writing to l3-netework - An error occurred while saving tenant and clould-region relationship for l3-network in AnAI where network-id = 49d71ea9-527e-4532-a686-0041d1c03384"
I can see in the VID portal that the Service (Generic VNF) is created, however the above error comes when network cpe_public is being created.
Can you suggest the probable cause and the fix for the issue..
Thanks,
Arun
PS: The CLI logs of vcpe.py infra are attached. FYI, I also put some extra logs and enabled some in the code.
Kang Xi
Please check your cloud region and tenant config in both AAI and the script.
Kamel Idir
Hi Kang,
followed your suggestion, I checked cloud_region (in my case regionOne) and tenant (onap) in both AAI and in the vcpecommon.py and it is the same. Any other hint on how to fix this Error writing to l3-network issue?
Thanks
Kamel Idir
Hi Arun,
I'm getting the same error you got long time back.
"requestState": "FAILED",
"statusMessage": "Received error from SDN-C: Error writing to l3-netework - An error occurred while saving tenant and clould-region relationship for l3-network in AnAI where network-id = d9d33f1e-f8e0-4cef-a1ea-5313d29f43c6".
How did you solve the problem?
Thanks
liu Chenglong
hi kang:
when I running vcpe.py infra, there are some error like this on Create Service Instance:
"statusMessage": "<requestError><serviceException><messageId>SVC3001</messageId><text>Resource not found for %1 using id %2 (msg=%3) (ec=%4)</text><variables><variable>PUT</variable><variable>business/customers/customer/SDN-ETHERNET-INTERNET/service-subscriptions/service-subscription/vCPE/service-instances/service-instance/f48c6247-c912-4333-8877-0a4777f9e8cd</variable><variable>Node Not Found:object located at service-design-and-creation/models/model/61c83e86-82e9-4744-b931-eba579b24186/model-vers/model-ver/19d3edca-6636-482a-83c8-351647e6c030#model-version not found</variable><variable>ERR.5.4.6114</variable></variables></serviceException></requestError>\n"
but I can find UUID:19d3edca-6636-482a-83c8-351647e6c030 model that named vcpesvc_infra in SDC Portal. And the request data is :
Creating service instance: vcpe_svc_vcpesvc_infra_201806060659.
{
"requestDetails": {
"modelInfo": {
"modelInvariantId": "61c83e86-82e9-4744-b931-eba579b24186",
"modelName": "vcpesvc_infra",
"modelType": "service",
"modelVersion": "1.0",
"modelVersionId": "19d3edca-6636-482a-83c8-351647e6c030"
},
"owningEntity": {
"owningEntityId": "520cc603-a3c4-4ec2-9ef4-ca70facd79c0",
"owningEntityName": "OE-Demonstration"
},
"project": {
"projectName": "Project-Demonstration"
},
"requestInfo": {
"instanceName": "vcpe_svc_vcpesvc_infra_201806060659",
"requestorId": "vCPE-Robot",
"source": "VID",
"suppressRollback": "true"
},
"requestParameters": {
"aLaCarte": "true",
"subscriptionServiceType": "vCPE",
"userParams": []
},
"subscriberInfo": {
"globalSubscriberId": "SDN-ETHERNET-INTERNET"
}
}
}
Can you suggest the probable cause and the fix for the issue..
Thanks.
Chenglong
PS: curl Add an availability zone to AAI , Add operation user ID to AAI both success.
Kang Xi
This is caused by distribution error.
liu Chenglong
hi Kang:
when i run healthcheck.py, there are some error.
root@onap-robot:~/vcpe# ./healthcheck.py
Initializing configuration
Checking vGMUX REST API from SDNC
cmd: curl -u admin:admin -X GET http://10.0.101.21:8183/restconf/config/ietf-interfaces:interfaces
{"interfaces":{"interface":[{"name":"GigabitEthernet0/6/0","enabled":true,"type":"iana-if-type:ethernetCsmacd","v3po:ethernet":{"mtu":9216},"ietf-ip:ipv4":{"address":[{"ip":"10.5.0.21","prefix-length":24}]}},{"name":"local0","enabled":false,"type":"iana-if-type:ethernetCsmacd"},{"name":"GigabitEthernet0/4/0","enabled":true,"type":"iana-if-type:ethernetCsmacd","v3po:ethernet":{"mtu":9216},"ietf-ip:ipv4":{"address":[{"ip":"10.1.0.21","prefix-length":24}]}}]}}
Checking vBRG REST API from SDNC
0 0 0 0 0 0 0 0 --:--:-- --:--:-- --:--:-- 0{"interfaces":{"interface":[{"name":"tap-0","enabled":true,"type":"v3po:tap","v3po:ethernet":{"mtu":9216},"v3po:tap":{"mac":"02:fe:72:3a:ea:07","tap-name":"lstack"},"v3po:l2":{"bridged-virtual-interface":false,"bridge-domain":"bridge-domain-10"}},{"name":"tap-1","enabled":false,"type":"v3po:tap","v3po:ethernet":{"mtu":9216},"v3po:tap":{"mac":"02:fe:54:04:6c:81","tap-name":"tap0"}},{"name":"local0","enabled":false,"type":"iana-if-type:ethernetCsmacd"},{"name":"GigabitEthernet0/4/0","enabled":true,"type":"iana-if-type:ethernetCsmacd","v3po:ethernet":{"m100 570 0 570 0 0 60748 0 --:--:-- --:--:-- --:--:-- 63333
Checking SDNC DB for vBRG MAC address
mac_recent: None
Traceback (most recent call last):
File "./healthcheck.py", line 31, in <module>
mac = common.get_brg_mac_from_sdnc()
File "/home/ubuntu/vcpe/vcpecommon.py", line 193, in get_brg_mac_from_sdnc
assert mac_recent
AssertionError
The mac_recent value is None, and I login into sdnc_db_container(mysql) database sdnctl, use sql "select * from DHCP_MAP;" and there no result.
Can you suggest the probable cause and the fix for the issue..
Thanks.
Chenglong
Brian Freeman
If you get an error like:
it means that you put a Service instead of a VSP into the composition of the service and need to recreate that service model
Brian Freeman
TARGET_NETWORK_ROLE is not making it from SO into the SDC allotted_resource_customization table.
Need to add a description of adding the categories for BRG and selecting "TunnelXConn" as the category for the tunnelxconn allotted resource
Steve Smokowski
I thought Rob had submitted a fix for that, if not please open an issue, if its in the CSAR it can be mapped.
Brian Freeman
He did good work around - my comment was more for down the road. TARGET_NETWORK_ROLE is null in the table so we are mapping nf_role to TARGET_NETWORK_ROLE in the code since it was less work than adding changes to the data ingest. Our documentation wasnt setting it in SDC but it doesnt get into the table either. Seems like its a 1/2 deprecated feature.
Brian Freeman
For vCPEResCust distribution if AAI model-loader is giving a DEPLOY_ERROR on the csar with a message about model-vers doesnt exist , check that the gmux and brg distributions succeeded. The UUID's in the refereces create edges at model onboard for the AllottedResources in the TunnelXConn and BRG VFs
Brian Freeman
A way to confirm is to grep for the parameters in vcpe_allotted_resource_data.json in the /tmp directory to confirm they match the csar data of the BRG and GMUX
root@dev-robot-robot-744bfc4bcf-jntt7:/tmp# cat vcp*
{
"tunnelxconn": {
"invariantUUID": "82759408-fd8b-48bf-bbed-0c3232a6428f",
"UUID": "48b3ad80-beb8-4830-9c4e-baa753aaf7e9",
"node_type": "org.openecomp.service.Demovcpevgmux"
},
"brg": {
"invariantUUID": "2b1b3941-e38a-4ea4-9d7b-2967e47911ce",
"UUID": "601f463e-8740-47ed-aa16-4ae5b73ab785",
"node_type": "org.openecomp.service.Demovcpevbrgemu"
}
}
root@dev-robot-robot-744bfc4bcf-jntt7:/tmp# grep -R 82759408-fd8b-48bf-bbed-0c3232a6428f *
csar/gmux/Definitions/service-Demovcpevgmux-template.yml: invariantUUID: 82759408-fd8b-48bf-bbed-0c3232a6428f
vcpe_allotted_resource_data.json: "invariantUUID": "82759408-fd8b-48bf-bbed-0c3232a6428f",
root@dev-robot-robot-744bfc4bcf-jntt7:/tmp# grep -R 48b3ad80-beb8-4830-9c4e-baa753aaf7e9 *
csar/gmux/Definitions/service-Demovcpevgmux-template.yml: UUID: 48b3ad80-beb8-4830-9c4e-baa753aaf7e9
vcpe_allotted_resource_data.json: "UUID": "48b3ad80-beb8-4830-9c4e-baa753aaf7e9",
root@dev-robot-robot-744bfc4bcf-jntt7:/tmp# grep -R 2b1b3941-e38a-4ea4-9d7b-2967e47911ce *
csar/brg/Definitions/service-Demovcpevbrgemu-template.yml: invariantUUID: 2b1b3941-e38a-4ea4-9d7b-2967e47911ce
vcpe_allotted_resource_data.json: "invariantUUID": "2b1b3941-e38a-4ea4-9d7b-2967e47911ce",
root@dev-robot-robot-744bfc4bcf-jntt7:/tmp# grep -R 601f463e-8740-47ed-aa16-4ae5b73ab785 *
csar/brg/Definitions/service-Demovcpevbrgemu-template.yml: UUID: 601f463e-8740-47ed-aa16-4ae5b73ab785
vcpe_allotted_resource_data.json: "UUID": "601f463e-8740-47ed-aa16-4ae5b73ab785",
root@dev-robot-robot-744bfc4bcf-jntt7:/tmp# grep -R org.openecomp.service.Demovcpevgmux *
csar/gmux/Definitions/service-Demovcpevgmux-template.yml: node_type: org.openecomp.service.Demovcpevgmux
csar/gmux/Definitions/service-Demovcpevgmux-template-interface.yml: org.openecomp.service.Demovcpevgmux:
vcpe_allotted_resource_data.json: "node_type": "org.openecomp.service.Demovcpevgmux"
root@dev-robot-robot-744bfc4bcf-jntt7:/tmp# grep -R org.openecomp.service.Demovcpevbrgemu *
csar/brg/Definitions/service-Demovcpevbrgemu-template.yml: node_type: org.openecomp.service.Demovcpevbrgemu
csar/brg/Definitions/service-Demovcpevbrgemu-template-interface.yml: org.openecomp.service.Demovcpevbrgemu:
vcpe_allotted_resource_data.json: "node_type": "org.openecomp.service.Demovcpevbrgemu"
PRAVEEN VELUGUBANTLA
While deploying the customer service we encountered an error from SDNC
Received error from SDN-C: Unable to generate VM name: naming-policy-generate-name: input.policy-instance-name is not set and input.policy is ASSIGN.
To resolve this: Check the vgw_VfModuleModelInvariantUuid parameter in the vcpecommon.py script is updated with your ResCust_svc VF_ModuleModelInvariantUuid or not. For every new customer don't forget to update this.
Add this to CheckList:
# CHANGEME: vgw_VfModuleModelInvariantUuid is in rescust service csar, look in service-VcpesvcRescust1118-template.yml for groups vgw module metadata. TODO: read this value automcatically
self.vgw_VfModuleModelInvariantUuid = '26d6a718-17b2-4ba8-8691-c44343b2ecd2'
Yang Xu
thanks, will do.
Brian Freeman
If during:
./ete-k8s.sh onap distributevCPEResCust
you get :
post response: { "requestError": { "serviceException": { "messageId": "SVC4054", "text": "Error: Invalid Content. Invalid %1 category.", "variables": [ "Resource" ] } } }
then you want to make sure you have run .vcpe.py init to setup the BRG category in SDC
Brian Freeman
El Alto:
healthcheck-k8s.py --namespace onap
Checking vGMUX REST API from SDNC
{
"interfaces": {
"interface": [
{
"type": "iana-if-type:ethernetCsmacd",
"v3po:ethernet": {
"mtu": 9216
},
"enabled": true,
"name": "GigabitEthernet0/6/0",
"ietf-ip:ipv4": {
"address": [
{
"ip": "10.5.0.21",
"prefix-length": 24
}
]
}
},
{
"type": "iana-if-type:ethernetCsmacd",
"enabled": false,
"name": "local0"
},
{
"type": "iana-if-type:ethernetCsmacd",
"v3po:ethernet": {
"mtu": 9216
},
"enabled": true,
"name": "GigabitEthernet0/4/0",
"ietf-ip:ipv4": {
"address": [
{
"ip": "10.1.0.21",
"prefix-length": 24
}
]
}
}
]
}
}
Checking vBRG REST API from SDNC
{
"interfaces": {
"interface": [
{
"name": "tap-0",
"v3po:l2": {
"bridge-domain": "bridge-domain-10",
"bridged-virtual-interface": false
},
"enabled": true,
"v3po:ethernet": {
"mtu": 9216
},
"v3po:tap": {
"tap-name": "lstack",
"mac": "02:fe:82:0a:0a:8a"
},
"type": "v3po:tap"
},
{
"name": "tap-1",
"enabled": true,
"v3po:ethernet": {
"mtu": 9216
},
"v3po:tap": {
"tap-name": "tap0",
"mac": "02:fe:03:10:64:3c"
},
"type": "v3po:tap",
"ietf-ip:ipv4": {
"address": [
{
"ip": "20.0.0.40",
"prefix-length": 24
}
]
}
},
{
"type": "iana-if-type:ethernetCsmacd",
"enabled": false,
"name": "local0"
},
{
"type": "iana-if-type:ethernetCsmacd",
"v3po:ethernet": {
"mtu": 9216
},
"enabled": true,
"name": "GigabitEthernet0/4/0",
"ietf-ip:ipv4": {
"address": [
{
"ip": "10.3.0.2",
"prefix-length": 24
}
]
}
}
]
}
}
Checking SDNC DB for vBRG MAC address
mac_addr ip_addr
fa:16:3e:30:7b:f4 10.3.0.2
Brian Freeman
if print_instructions:
print('----------------------------------------------------------------------------')
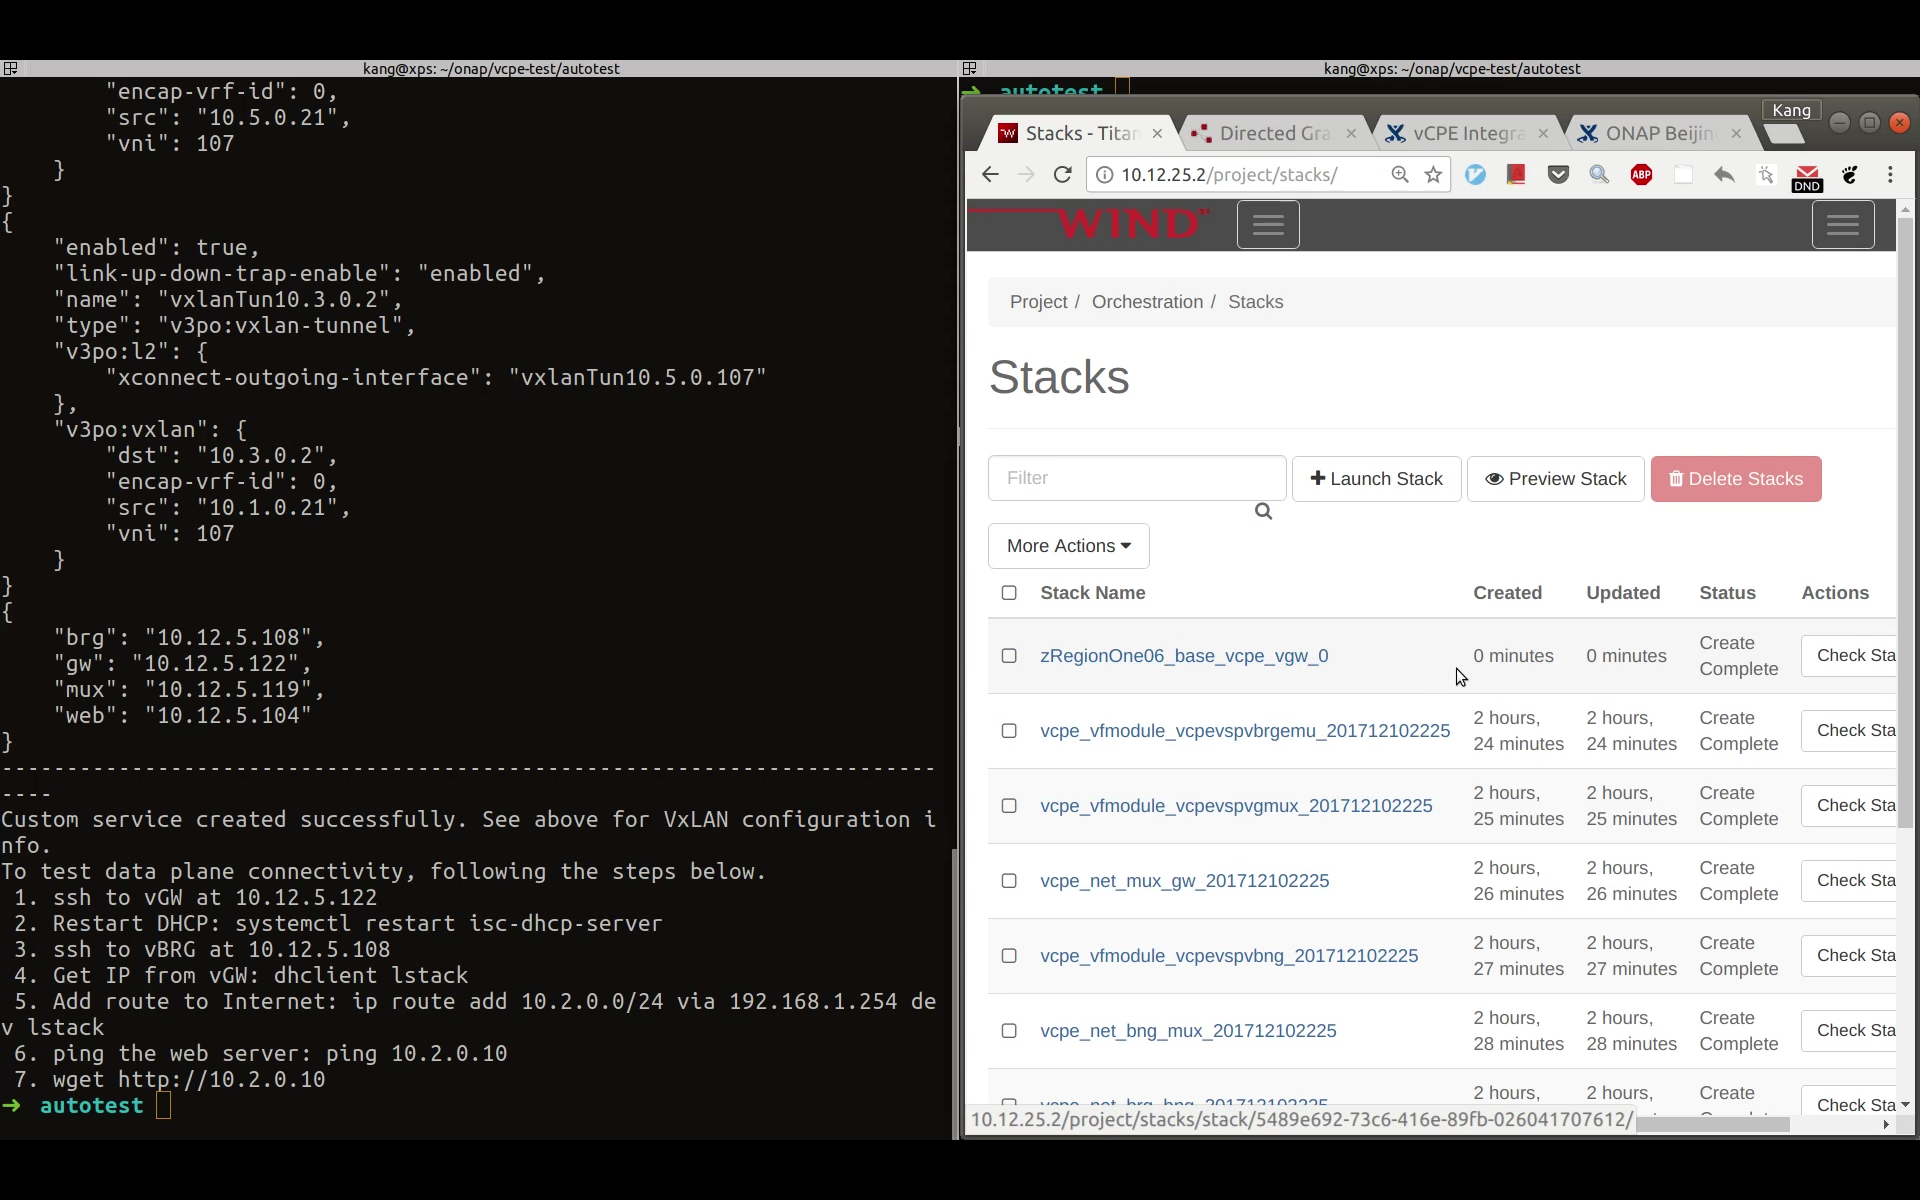
print('Custom service created successfully. See above for VxLAN configuration info.')
print('To test data plane connectivity, following the steps below.')
print(' 1. ssh to vGW at {0}'.format(ip_dict['gw']))
print(' 2. Restart DHCP: systemctl restart isc-dhcp-server')
print(' 3. ssh to vBRG at {0}'.format(ip_dict['brg']))
print(' 4. Get IP from vGW: dhclient lstack')
print(' 5. Add route to Internet: ip route add 10.2.0.0/24 via 192.168.1.254 dev lstack')
print(' 6. ping the web server: ping {0}'.format('10.2.0.10'))
print(' 7. wget http://{0}'.format('10.2.0.10'))
Brian Freeman
Example network preload from ./vcpe.py inra against Frankfurt:
self.sdnc_preload_network_gra_url = 'https://' + self.hosts['sdnc'] + \
':' + self.sdnc_preloading_port + '/restconf/operations/GENERIC-RESOURCE-API:preload-network-topology-operation'
2020-06-25 16:51:33,061 DEBUG preload.preload(): tempalte_file:/root/integration/test/vcpe/preload_templates/template.networkgra.json
2020-06-25 16:51:33,062 DEBUG preload.preload(): {
"input": {
"preload-network-topology-information": {
"is-external-network": "FALSE",
"is-provider-network": "FALSE",
"is-shared-network": "FALSE",
"network-policy": [],
"network-topology-identifier-structure": {
"network-name": "vcpe_net_cpe_signal_202006251651",
"network-role": "cpe_signal",
"network-technology": "neutron",
"network-type": "Generic NeutronNet"
},
"physical-network-name": "Not Aplicable",
"route-table-reference": [],
"subnets": [
{
"cidr-mask": "24",
"dhcp-enabled": "N",
"gateway-address": "10.4.0.1",
"ip-version": "4",
"start-address": "10.4.0.2",
"subnet-name": "vcpe_net_cpe_signal_202006251651"
}
],
"vpn-bindings": []
},
"sdnc-request-header": {
"svc-action": "reserve",
"svc-request-id": "robotgra-1234"
}
}
}