DCAE MOD ( Microservices Onboarding and Design ) is being redesigned with angular based UI to have a great user experience, self managed catalog with APIs to ease access and manage life cycle of different version of microservices.
It also provides extensibility to include pluggable modules for generating deployment artifacts and communication with other systems such as Policy Engine and DCAE dashboard.
Details of the target architecture and initial implementation can be found in below ppt slides and initial API Specifications
DCAE MOD Catalog and UI redesign draft - DCAE_MOD_redesign_v3.pptx
API Specification draft - swagger json (draft)
Below picture depicts the target architecture of redesigned MOD

It is composed of UI and Backend with Catalog service and Authentication Service.
UI
UI is developed using angular framework and enables users including designers and developers to onboard microservices. It currently provides a user-friendly menu options to onboard microservices and its instances per release, associate a component specification and generate deployment artifact that can be deployed using DCAE dashboard.
It will be enhanced to onboard policy models and data format to support policy-based control and composite microservice models.
Backend
The backend for MOD composed of a catalog service and authentication service. Catalog Service will manage microservices, its instances and generated deployment artifacts. Authentication service will provide access control for designers and developers to perform different operations.
Catalog Service
Catalog service is composed of APIs to manage base microservice, microservice instances, component specifications associated with microservices and to generate deployment artifacts.
Authentication Service
Authentication service provides APIs to manage users, currently used by UI.
Below ER diagram represents the entities present in Mongo Database

User Guide
Deployment
POC version of MOD can be deployed using docker-compose with below docker-compose,yml file on any Ubuntu VMs
Run below command to download the latest built version and deploy on docker container.
docker-compose -f docker-compose.yml up &
After deployment is successful, you can list using docker ps -a command and it will show the below deployments.
Note: For Guilin POC, the above deployment procedure would be followed to install MOD components. For future releases, it will be enhanced to use helm chart.

UI will be available in below URL where hostname would be the hostname or IP address of the deployed VM
https:// <hostname>:30997
Initial user/password would be set to admin/admin@mod.
Below is the snapshot of initial landing page of MOD UI

Steps to onboard a microservice and generate deployment artifact
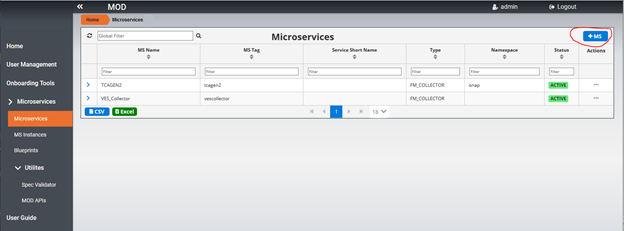
- Click on Microservices... option on the page, following sample page will be displayed. Currently this page contains 2 onboarded microservices in the list. For initial deployment, the list will be empty.

2. Click on +MS button on the page below shown in red to add a Microservice that needs to be onboarded.
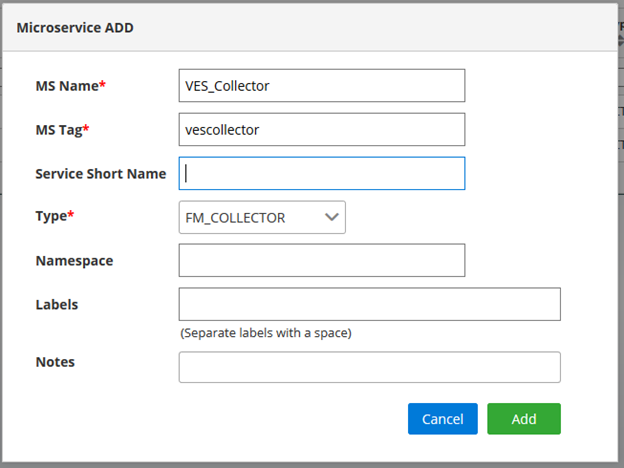
3. Below Popup page will be displayed and enter details of Microservice and press Add to add the Microservce in the list.
4. To add an instance for a release click on … on the right as circled below in the list of Microservice by selecting s specific Microservice

5. Below popup page will be displayed. Select a release and developer details. Then click on Add button to add a Microservice instance.

6. To add a component spec for Microservice instance, Select MS Instances on the left menu, it will bring up the list of Microservice instances and choose … on the right side for the specific Microservice instance as below. Click on Add Component spec option.

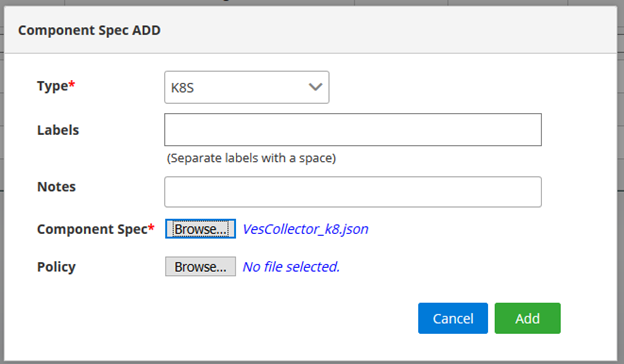
7. Below popup page will be displayed for adding component spec json file. Select the type and browse to choose component spec json file. Choose Add to add the component spec for the specific Microservice instance.
8. To generate deployment artifact, choose … on the right side for the specific Microservice instance as below. Then choose Generate Blueprint option to generate the deployment Artifact.

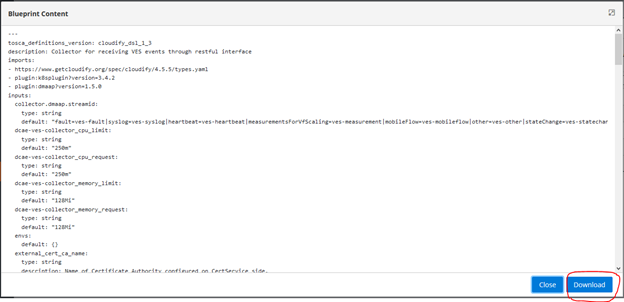
9. Choose Blueprints on left side menu to get a list of blueprints that are generated. Choose … option menu for specific blueprint and choose “View BP Content”

10. The Blueprint content can be downloaded by choosing download option show below.
Currently after the deployment artifact is downloaded, you have to go manually to DCAE dashboard to deploy.
For future releases, the plan is to automate through a menu option from the UI.
Note: Update in progress...